2 Enable the Web GUI for Access

You must enable access to the Web GUI from the Web server before you can log on and the steps vary depending on whether you want to enable a new Oracle® Enterprise Session Border Controller (ESBC) or an existing one. To provide secure access, you can enable HTTPS.

Access the Web GUI with HTTPS

To provide secure access to the Web GUI from the Web server, you can enable HTTPS by creating a Transport Layer Security (TLS) profile. The Oracle® Enterprise Session Border Controller (ESBC) does not require either the hardware Security Service Module (SSM) or the software TLS license when configuring certificate record, tls-profile, and tls-global for an HTTPS connection to the Web GUI from the Web server.

Note that the ESBC requires the TLS license when you configure SIP for TLS.

Note:

Virtual machines require the software TLS license.

Enable the Web GUI for a New Installation

To enable the Web GUI on a new Oracle® Enterprise Session Border Controller (ESBC) installation, use the run setup command from the ACLI command line. After you save and activate the configuration, you can sign on to the Web GUI.

Prerequisites
  • Install the hardware and connect to the ESBC. See "Getting Started" in the ACLI Configuration Guide"
For new installations, use the following procedure to run the Installation Wizard to configure the primary ESBC and enable the Web GUI. To set up another ESBC as the secondary peer in a High Availability pair, see Set Up High Availability.

Note:

For existing installations, see Enable the Web GUI for an Existing Installation.
  1. In Superuser mode, type run setup, and press Enter.
    The system displays the following:
    -----------------------------------------------------------
    Thank you for purchasing the Oracle Enterprise Session Border Controller. 
    The following short wizard will guide you through the initial setup.
    A restart will be required to save changes.
    -----------------------------------------------------------
    '?' = Help; '.' = Clear; 'q' = Exit
    CONFIGURATION
    WARNING: Proceeding with wizard will result in existing configuration being erased.  
    Erase config and proceed (yes/no) [no] : yes
    Configuration will be backed up as bkup_setup_wizard_<timestamp>.gz
    '-' = Previous; '?' = Help; '.' = Clear; 'q' = Exit
  2. For "Erase config and proceed", type yes, and press Enter.
    The system displays the following:
    GUI ACCESS
    If you want to the allow GUI to access this SBC, enable this setting.  
    Enable Web GUI with HTTP Connection (yes/no) [yes] : 
  3. For "Enable Web GUI with HTTP Connection", type yes, and press Enter.
    The system displays the following:
    HIGH AVAILABILITY
    This SBC may be a standalone or part of a highly available redundant pair.  
    SBC mode     
    1 - standalone     2 - high availability    
    Enter choice [<choice>] : 
    
  4. For "SBC mode", type 1 for a standalone installation or type 2 for a High Availability installation.
    The system displays the following:
    SBC SETTINGS  
    Unique target name of this SBC :   
    IP address on management interface :   
    Subnet mask :   
    Management interface VLAN (0 - 4095) [0] :   
    Gateway IP address : 
  5. Set the values for the ESBC parameters according to your deployment, and press Enter.
    The system displays the following:
    OC SDM ACCESS SETTINGS
    Configure the SBC to allow the OC Session Delivery Manager to access it  
    OC SDM access (yes/no) [yes] : no
  6. Set access permission to either allow (yes) or prohibit (no) the Oracle Communications Session Delivery Manager to access the SBC, and press Enter.
  7. Save and activate the configuration.

Enable the Web GUI for an Existing Installation

To enable the Web GUI on an existing Oracle® Enterprise Session Border Controller (ESBC) installation, use the ACLI command line to set the name of the HTTP server. After you save and activate the configuration, you can sign on to the Web GUI.

The following procedure requires Administrator credentials.

Note:

For new installations, see Enable the Web GUI for a New Installation.
  1. Go to configure terminal, system, http-server.
    # conf t
    # system
    # http-server
  2. In http-server configuration, in the name parameter, type the name of your HTTP server.
  3. Save and activate the configuration.

Set Up High Availability

To minimize downtime and service interruptions, you can pair Oracle® Enterprise Session Border Controllers (ESBCs) for redundancy to provide High Availability (HA).

Before you begin, configure a primary ESBC.
Use the following procedure to configure a secondary ESBC to form an HA pair with a primary ESBC.
  1. In Superuser mode, type run setup, and press Enter.
    The system displays the following:
    -----------------------------------------------------------
    Thank you for purchasing the Oracle Enterprise Session Border Controller. 
    The following short wizard will guide you through the initial set-up.
    A restart will be required to save changes.
    -----------------------------------------------------------
    '?' = Help; '.' = Clear; 'q' = Exit
    CONFIGURATION
    WARNING: Proceeding with wizard will result in existing configuration being erased.  
    Erase config and proceed (yes/no) [no] : 
     yes
    Configuration will be backed up as bkup_setup_wizard_<timestamp>.gz
    '-' = Previous; '?' = Help; '.' = Clear; 'q' = Exit
  2. For "Erase config and proceed", type yes, and press Enter.
    The system displays the following:
    GUI ACCESS
    If you want to the allow GUI to access this SBC, enable this setting.  
    Enable Web GUI with HTTP Connection (yes/no) [yes] : 
  3. For "Enable Web GUI with HTTP Connection", type yes, and press Enter.
    The system displays the following:
    HIGH AVAILABILITY
    This SBC may be a standalone or part of a highly available redundant pair.  
    SBC mode     
    1 - standalone     2 - high availability    
    Enter choice [<choice>] : 
    If this SBC is the primary, enter the configuration.
    If this SBC is the secondary, you can import settings from the primary.  
    SBC role     1 - primary     2 - secondary    
    Enter choice [<choice>] : 
    Specify the IP address to set on interface connected for redundancy  
    Redundancy interface address [<YourRedundancyInterfaceAddress>] :   
    Redundancy subnet mask [<YourSubnetMask>] :
        
  4. For "SBC mode", type 2 for a High Availability installation, and press Enter.
    The system displays the following:
    SBC SETTINGS  
    Unique target name of this SBC [<YourSbcName>] :   
    IP address on management interface [<YourSbcManagementInterfaceIpAddress>] :   
    Subnet mask [<YourSubnetMask>] :   
    Management interface VLAN (0 - 4095) [0] :   
    Gateway IP address [<YourGatewayIpAddress>] : 
  5. Type the necessary ESBC settings, and press Enter.
    The system displays the following:
    PEER CONFIGURATION  
    Peer IP address [<PeerIpAddress>] :   
    Peer target name [<PeerTargetName>] :
          
  6. Type the IP address and target name of the peer and, press Enter.
    The system displays the following:
    OC SDM ACCESS SETTINGS
    Configure the SBC to allow the OC Session Delivery Manager to access it.  
    OC SDM access (yes/no) [yes] : no
  7. Set access permission to either allow (yes) or prohibit (no) the Oracle Communications Session Delivery Manager to access the SBC, and press Enter.
  8. Save and activate the configuration.

Set the Log On Banner Message

When you want to get messaging to your Oracle® Enterprise Session Border Controller (ESBC) users, you can put your message into the optional log on banner. The log on banner is a text box that displays before the system asks users for their log on credentials.

To get your message into the log on banner, enter the text you want into the Set Login Banner field. There is no character limit. The the banner field adjusts to the quantity of text.
  1. Access the Systems tab, System Operations, Set Login Banner.
  2. Enter the text you want into the Set login banner field.
  3. Click Complete.

Simultaneous Logons

The Web GUI allows the User and Administrator to log on simultaneously. Session availability to the User and Admin depends on which type of user is logged on to the session. The following illustrations depict and explain the system behavior when a User and an Administrator log on to a Web GUI session.
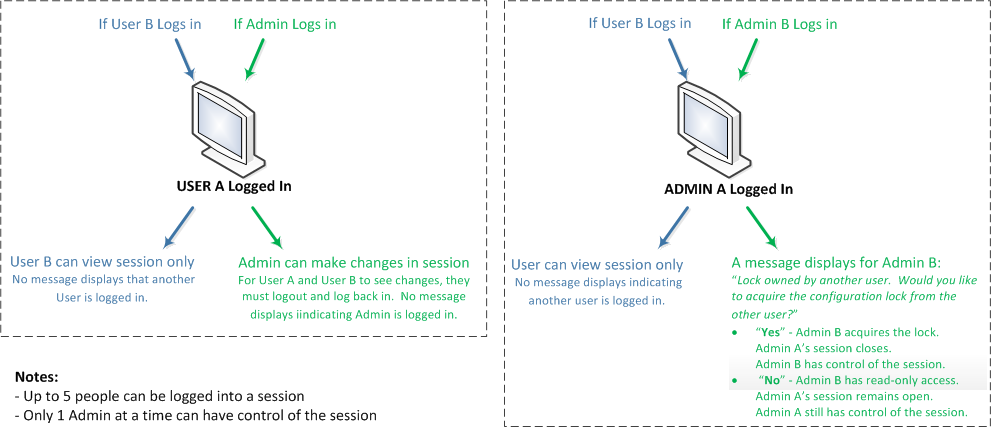
This illustration and text explain system behavior when either user a or admin a is logged on and either user B or admin B also log on.

Note:

In the illustration where Admin A logged in first, the behavior is as described. If Admin B logs in first, then the system shows the lock message to Admin A. The first Admin to log in acquires the lock.

Up to five users can log onto the same session at the same IP address at the same time. Only one Administrator at a time can have full control of a simultaneous session.

Log On to the Web GUI

You can log on to the Oracle® Enterprise Session Border Controller (ESBC) as a User or an as Administrator, depending on your permissions.

You need your User name, Password, and optionally your Passcode to log on. The system requires your passcode when two factor authentication is enabled. If your system Administrator configured the optional log on page message, the system displays the message after you enter your log on credentials. After reading the message, click Close, and the system displays the GUI. The first time you log on, the GUI displays the Configuration Assistant.

  1. On a PC, open a supported Internet browser. See "Browser Support" in your software version's Release Notes for the list of supported browsers.
  2. Start the GUI with either the HTTP or HTTPS log on.
    http://<YourEcbManagementInterfaceIpAddress> previously configured.
    https://<YourEcbManagementInterfaceIpAddress> previously configured.

    Note:

    Whether you log on using HTTP or HTTPS depends on the settings for your deployment.
  3. In the Sign In dialog, enter your ESBC credentials.
    This screen capture shows the Web GUI log on dialog
  4. If your ESBC requires two-factor authentication, do the following:
    1. In the log on dialog, enter your passcode.
    2. In the Confirm dialog, acknowledge the Last Log on information. Yes—allows you to login. No—ends the session.
  5. Click log on.

    Note:

    If you want to open another Web GUI tab on the same ESBC in a new tab in the same browser, you can do so without logging on again.

Change the Sign In Password

Use the Oracle® Enterprise Session Border Controller ACLI to change a User or Administrator sign in password.

Use the secret command from the ACLI to change the sign in password for a User and the config password command for an Administrator. For more information about setting passwords, see the Oracle Enterprise Session Border Controller ACLI Configuration Guide.

Log Off from the Web GUI

To log off from the Web GUI, open the User menu, and click Log Out.
  1. On the User menu located in the upper right corner of the Web GUI, click Log Out.
    This screen capture shows the user menu with Logout highlighted.
    The Web GUI displays a confirmation message that depends on whether or not unsaved changes exist.
  2. In the Confirm dialog, take the appropriate action.

    Click Yes when no unsaved changes exist.This screen capture shows the confirmation dialog that the system displays after you click Log Out when no unsaved changes exist.

    Click the action you want when unsaved changes exist.

    This screen capture shows the confirmation dialog that the system displays after you click Log Out and unsaved changes exist.