3 Software Installation
This chapter explains the different procedures to install FTRA software on Windows and LINUX platforms.
Overview
You can install and upgrade the FTRA either locally or remotely through LAN. Since FTRA is a Java™ based application, you need to install Java™ Runtime Environment on your machine. In case if the Java™ Runtime Environment is already available on your machine, then the installation and upgrade of FTRA can complete in 5-10 minutes. In case if the Java™ Runtime Environment is unavailable on your machine, and you are downloading the Java™ Runtime Environment software from Oracle’s website, the installation and upgrade of FTRA can take 30-90 minutes( depending upon the download speed of your internet connection). The FTRA will not provide service during this time. If you are upgrading the FTRA, it will not be necessary to recreate directories or environment variables that already exist.
- For Release 4.4 and earlier, an FTRA CD may be provided
- For Release 4.5 and later, the FTRA software may be distributed through a downloaded zip file obtained from https://edelivery.oracle.com
If you are installing the FTRA software for the first time, perform one of the following procedures:
- FTRA Software Installation on WindowsFTRA Software Installation on Windows
- FTRA Software Installation on LinuxFTRA Software Installation on Linux
To upgrade FTRA software, see, Windows FTRA release 4.x or later upgrade.
FTRA Software Installation on Windows
- If you are installing FTRA using an FTRA CD, place the FTRA CD in
the CD-ROM drive.
- To see the contents of the FTRA CD, double click the My Computer icon on the Desktop of your computer that opens Windows Explorer
- Click on theFolders tab at the top of the Windows Explorer menu to display the drives in your system.
- Select the CD Drive by clicking on it to display the
contents of the CD as shown in Figure 1.
Figure 3-1 Exploring the FTRA 4.X CD Using Windows Explorer

- If you are installing FTRA from the downloaded zip file, perform
the following steps:
- Create a new folder to copy and unzip the FTRA zip file
into it :
- Select the C: drive.
- Right click and select New -> Folder as shown in Figure 2, and rename it ftra_zip.
- Copy the downloaded FTRA zip file to the ftra_zip folder and unzip the file to the same directory.
Figure 3-2 Exploring the FTRA 4.X Zip File Using Windows Explorer

- Create a new folder to copy and unzip the FTRA zip file
into it :
- Install the Java™ 2 Runtime Environment, Standard Edition from
the CD or ftra_zip directory.
You may not need to install the Java™ 2 Runtime Environment, Standard Edition Version 1.8 if it is already installed on your machine.
To check the programs installed on your machine, go to Start->Settings->Control Panel ->Add or Remove Programs.That action will display all the programs that are installed on your machine.- If the Java™ 2 Runtime Environment, Standard Edition Version 1.8 is already installed on your machine (as shown in Figure 3), go to Step 5.
- If the Java™ 2 Runtime Environment Standard Edition Version 1.8 software is not installed on your machine, go to Step 4.
Figure 3-3 Adding or Removing Program Window

- To install the Java™ 2 Runtime Environment software on your
machine, perform the following steps:
- Select the CD Drive on your machine or select the ftra_zip directory.
- Select the Windows folder by double clicking it. The executable files required for the FTRA installation are displayed.
- Double-click on the Java™ 2 Runtime Environment, Standard Edition installable icon in the Windows folder. The InstallShield Wizard opens. For JRE 1.8, click on jre-7u45-windows-i586.exe.
- Follow the InstallShield Wizard instructions. Click the Yesor Next buttons in the InstallShield Wizard to proceed with the installation procedure.
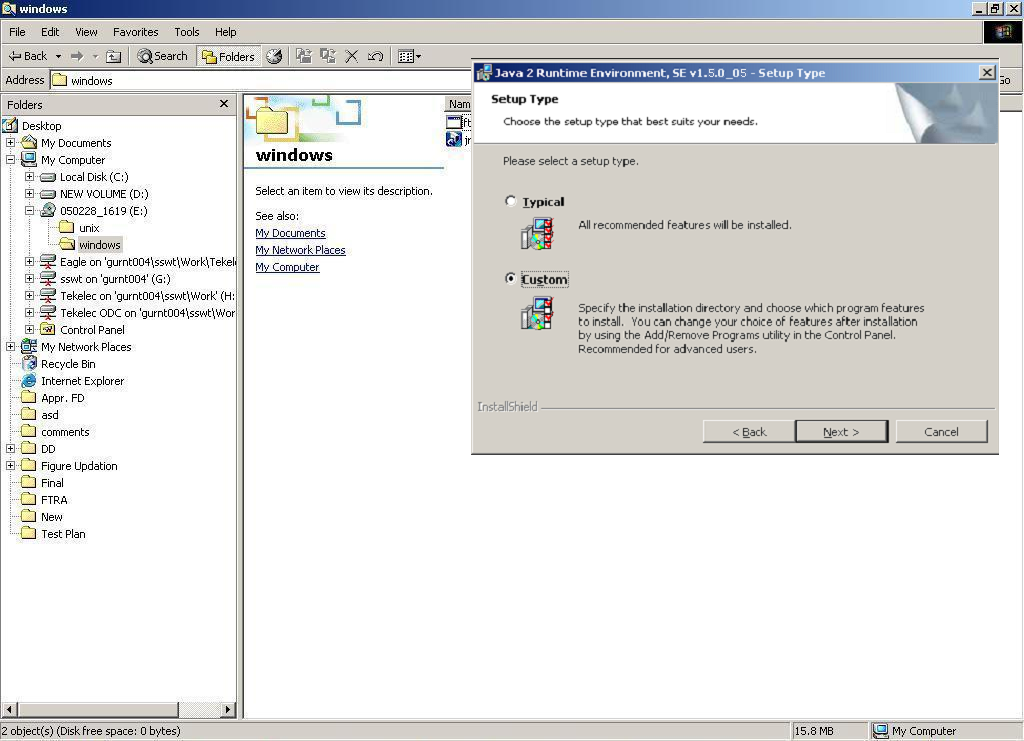
- The InstallShield wizard asks to choose the destination
location for the installation of the Java™ 2 Runtime Environment,
Standard Edition only when custom installation is selected. Change it by
clicking the Change button, or use the default path given by the wizard.
Make a note of this path for further use in Step 8.
Figure 3-4 Selecting a Custom Installation
- Create a folder on your computer for installing the FTRA
package (the <base_directory>), for example, C:/ftra.
The new folder can be created on any drive on your computer. Perform these steps to create the folder. For this example, a new folder named ftra is created on the C:Drive.
- Select the C:Drive from Windows Explorer.
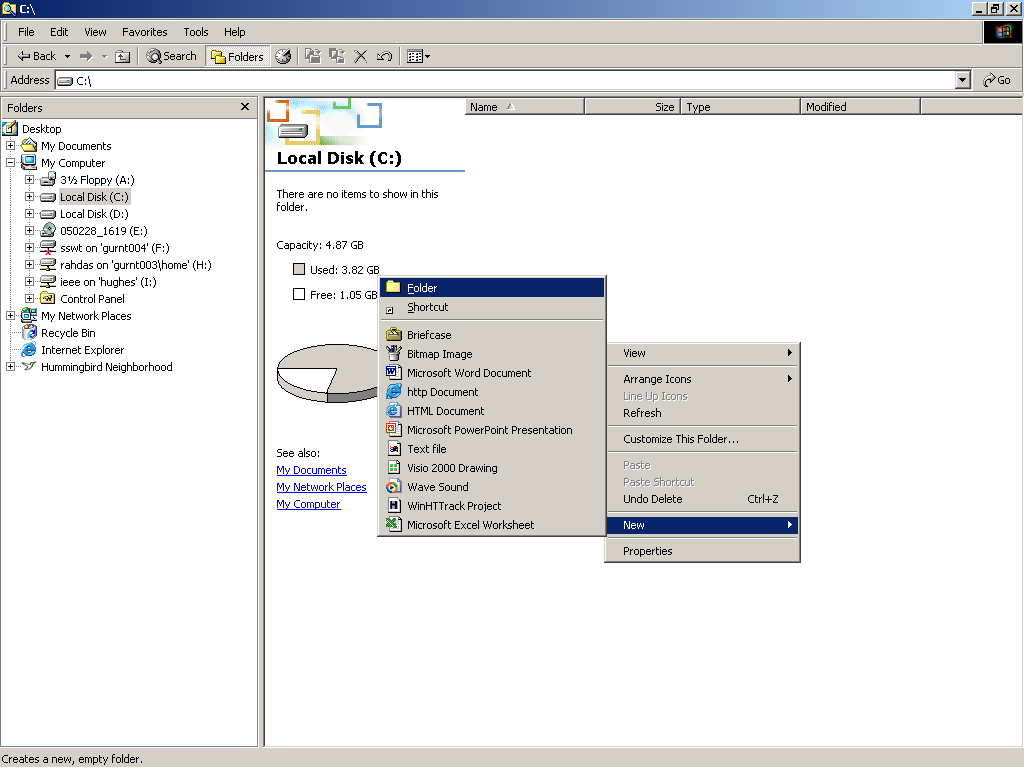
- Right click and select New, Folderas
shown in following figure. This will create a folder with the name
New Folder.
Figure 3-5 Creating New Folder for FTRA Installation
- Rename this folder to ftra as shown in
following figure.
Figure 3-6 Renaming New Folder to ftra

Note:
If you are upgrading FTRA and a previous installation of the software exists inside theftrafolder, choose a different name for your <base_directory> or else choose to remove or rename your previous FTRA installation.
- To copy
ftra_install.exefile from the FTRA CD or the ftra_zip directory to the <base_directory>, perform the following steps:- In Windows Explorer, select the CD Drive or the ftra_zip folder on your machine and go to the Windows folder.
- Copy
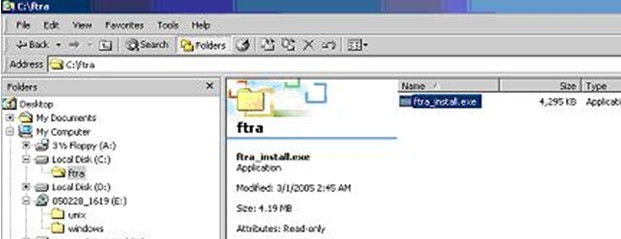
ftra_install.exefile from the Windows folder to the <base_directory> directory as shown in following figure.
Figure 3-7 Copying the ftra_install.exe File
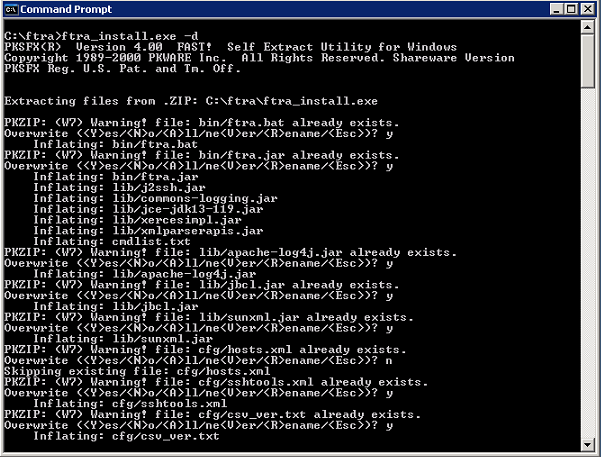
- Extract the FTRA files using Command Prompt only. Do not use
Windows Explorer window to extract the FTRA program files.
- Open the Windows command prompt.
- Change directory to the FTRA <base_directory>.
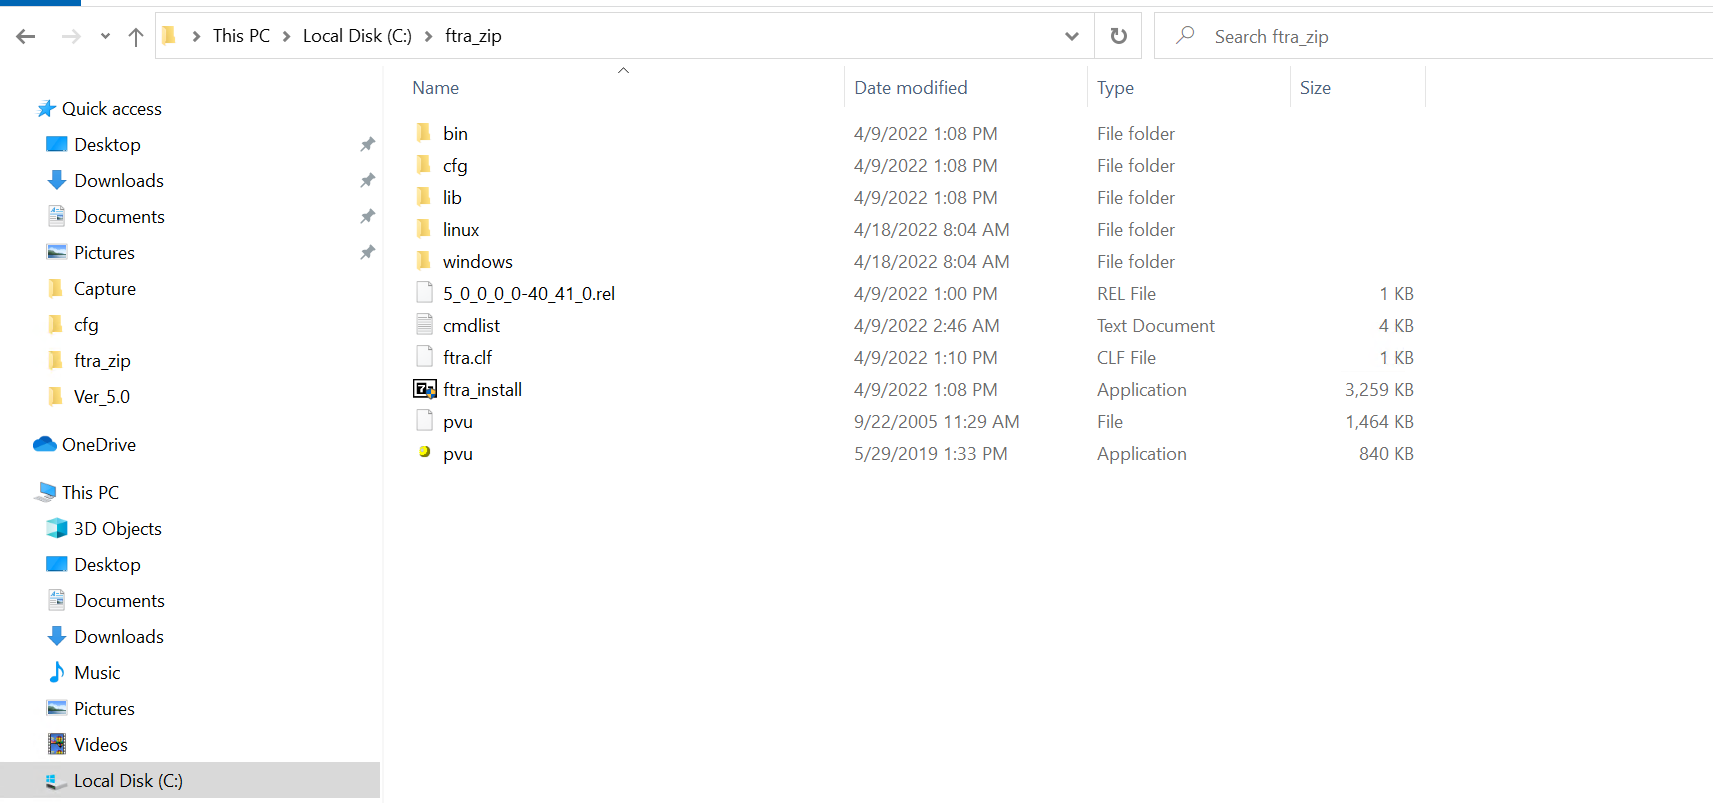
- Extract the FTRA program files in
<base_directory> as shown in Figure 8.
-
If your FTRA installation is version 4_5_0_0_0-40_34_0 or later, enter the following command:
ftra_install.exe
-
If your FTRA installation is version 4_5_0_0_0-40_33_0 or earlier, enter the following command:
ftra_install.exe –d
-
Figure 3-8 Extracting the FTRA Program Files Using the Command Prompt
- Set the system or user environment variables FTRA_HOME &
JRE_HOME.
- Right-click the My Computer icon on the desktop and select Properties.
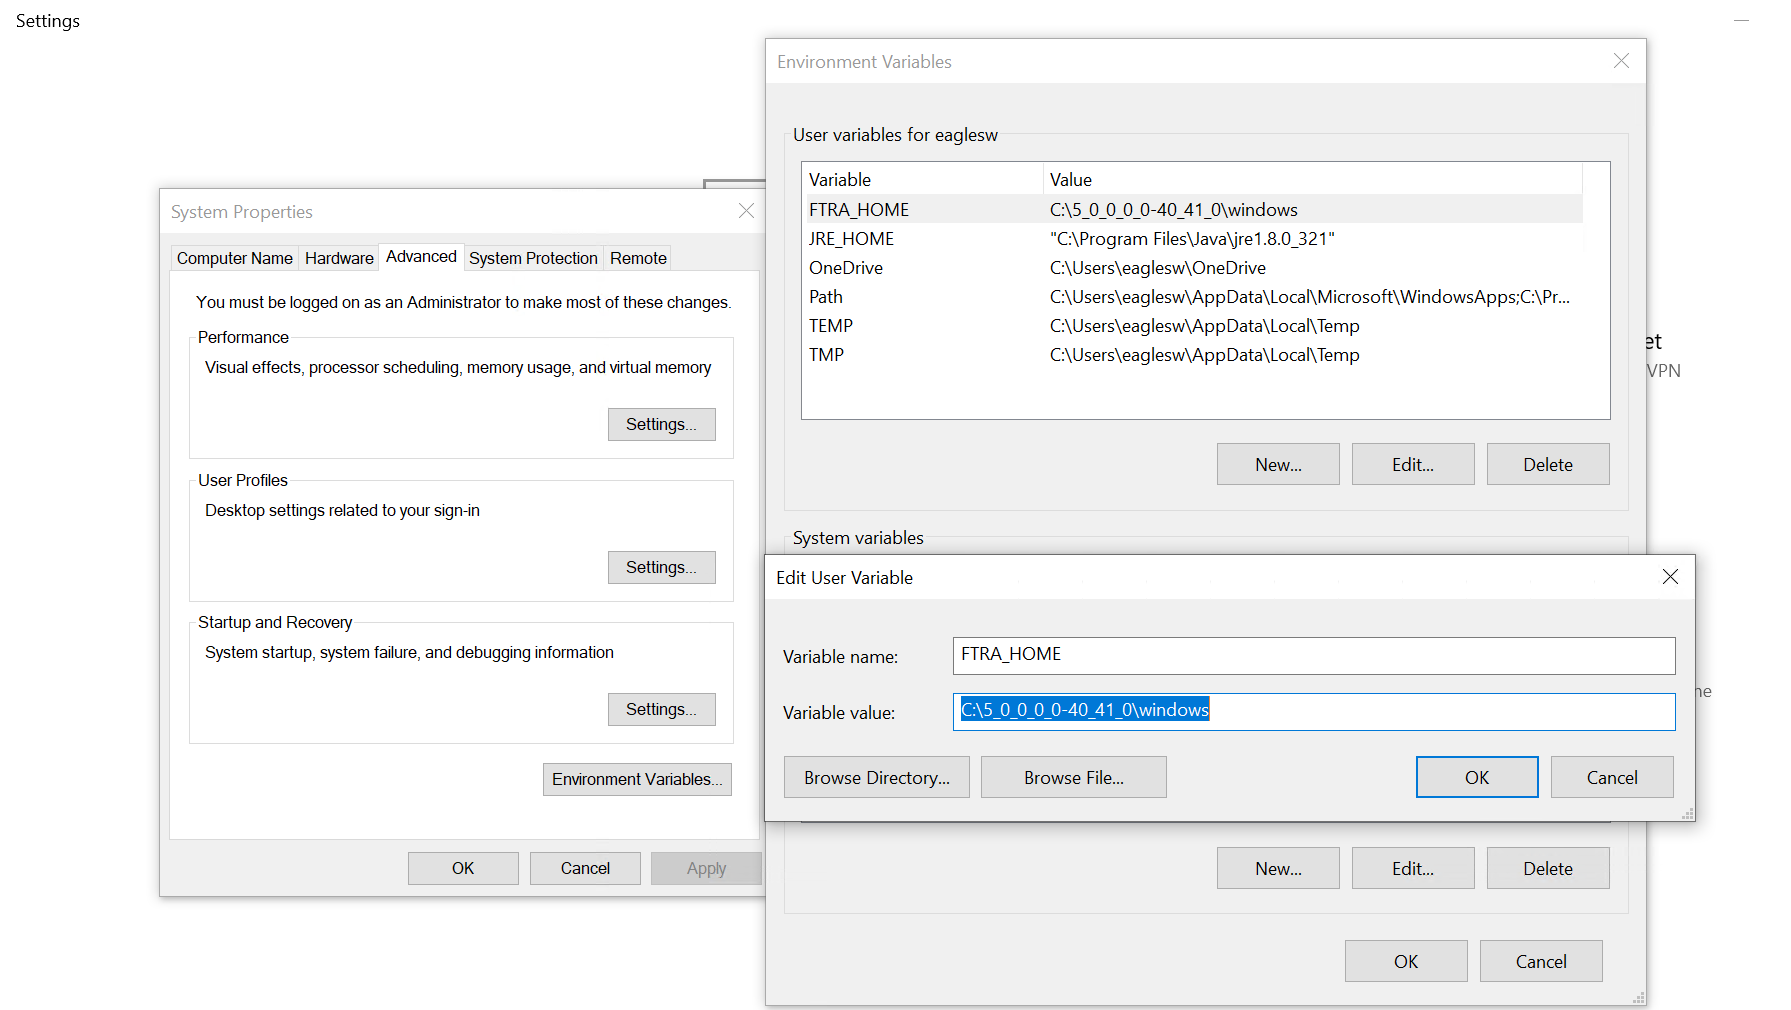
- In the Advanced tab, click Environment Variables and then click New as shown in Figure 9.
- Under User variables, enter the following variable
names and their values.
FTRA_HOME = C:\<base_directory created for FTRA> (typically C:\ftra)
JRE_HOME = C:\Program Files\Java\<jre path> (typically, the folder where Java is installed, and the Java path information recorded in Step 3).
Figure 3-9 Setting the Environment Variables
Note:
If the directory name has spaces or is over eight characters long, the DOS short name may be required to define the environment variable. For example, using the JRE_HOME environment variable above, you can define the variable as “C:\Progra~1\Java\<jre path>” (without the quotes) with maximum of eight characters for the directory name. - Create an FTRA shortcut on your desktop:
- Using Windows Explorer, open the <base_directory>/bin folder.
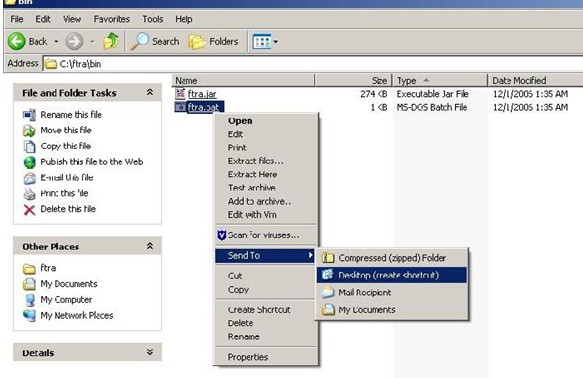
- Right click on the ftra.bat file and then select Send To->Desktop (Create Shortcut) as shown in Figure 10. This will create the shortcut to FTRA on the desktop.
Note:
For a new installation of FTRA Release 4.x, the bin folder will contain the ftra.jar and ftra.bat files only as shown in following figure.Note:
Place the shortcut either in the Default User or in All Users desktop folder on the multi-user systems in order to make it available to all users.Figure 3-10 Creating a Shortcut to FTRA
FTRA Software Installation on Linux
- Place the FTRA CD in the CD-ROM drive if the software needs to be installed from a CD; or if the FTRA software is downloaded as a zip file, create a temporary directory and copy the downloaded FTRA zip file to it. Unzip the contents into that temporary directory. Place the FTRA CD in the CD-ROM drive if the software needs to be installed from a CD. Create a temporary directory if the FTRA software needs to be downloaded as a zip file. Copy the downloaded FTRA zip file and unzip the contents into that temporary directory.
-
Check whether Java is already installed in your computer. Check the version of the Java 2 Runtime Environment installed by using the command java -version.
If the Java 2 Runtime Environment Standard Edition Version 1.8 is already installed in your computer, go to Step 4.
- Java Runtime Environment Installation
- To install the Java 2 Runtime Environment, Standard Edition from the CD, open FileManager and go to the CDROM drive. Follow the instructions in the Java Runtime Environment Installation procedure to install the Java 2 Runtime Environment Standard Edition Version 1.8.
- To install the Java Runtime Environment from the web, go to http://java.sun.com/products/archive and follow the instructions provided there.
- Create an <install_directory> to install the FTRA software into.
The preferred location to install the FTRA software is <HOME_DIRECTORY>/ftra,
but you can place it wherever you would prefer. Open FileManager and go to
the preferred location. From FileManager, select File > New Folder
and rename it ftra. Copy the file ftra_install.tar from the FTRA CD or the
temporary zip location to the new <install_directory> (for example,
<HOME_DIRECTORY>/ftra).
Note: You can identify the HOME_DIRECTORY with the command “echo $HOME”.
- Extract the files using command tar -xvwf ftra_install.tar
- To display the environment settings, use the following commands:
echo $FTRA_HOME
echo $JRE_HOME
An example of the output is:
echo $FTRA_HOME:
<ftra_install_directory> (for example, <HOME_DIRECTORY>/ftra)
echo $JRE_HOME:
<jre_install_directory> (for example, /usr/java)
If FTRA_HOME is already set to <HOME_DIRECTORY>/ftra and JRE_HOME is set to <jre_install_directory>, go to step 8.
- Set the required environment variables by using export command from the shell
prompt:
export FTRA_HOME=<ftra_install_directory> (for example, <HOME_DIRECTORY>/ftra)
export JRE_HOME=<jre_install_directory>
- Change to the FTRA bin directory to run FTRA. (for example,
<cd/ftra/bin>)
Run FTRA by entering the following command:
./ftra
Java Runtime Environment Installation
To install the Java Runtime Environment, see section Java Runtime Environment Installation.
Windows FTRA release 4.x or later upgrade
- Place the FTRA CD in the CD-ROM drive; or if the FTRA software is being delivered through the downloaded zip file, create a temporary directory to copy the downloaded FTRA zip file. Unzip the contents into that temporary directory.
- From Windows Explorer, copy the ftra_install.exe file from the FTRA_CD or from the temporary zip location to the existing <base_directory> directory (see step 4 of the FTRA Software Installation on Windows, procedure for details about the <base_directory>).
- Extract the FTRA file(s) to the existing <base_directory>,
using Command Prompt only. Do not use a Windows Explorer window for the
extraction.
From Windows command line, enter the ftra_install.exe -d command. This will create the sub-directories and extract the program files into the existing <base_directory>.
Follow the below recommendations when asked about overwriting hosts.xml -Note:
Answer “yes”, when asked to overwrite an existing file.- For FTRA release 4.x till 4.4 - If some host entries were previously provisioned in hosts.xml file that need to be retained, answer “no” when asked to overwrite the hosts.xml file. Figure 11 shows the selection of “no” option for hosts.xml file.
- For FTRA release 4.5 or later – It is mandatory to answer “yes” when asked to overwrite hosts.xml file.
FTRA Release 4.x or later has been installed.
- Start the FTRA software. See the “FTRA Initialization” section in the FTP-Based Table Retrieve Application (FTRA) User Guide for more information on starting the FTRA software. The existing FTRA STP Connection Configuration data will automatically be converted during the FTRA system initialization.
Figure 3-11 Upgrading to FTRA Release 5.0 from FTRA Release 4.x
