4.6.1 Procedure 29: Assess MPS Server Readiness
Table 4-10 Procedure 29: Assess MPS Server Readiness
| STEP # | This procedure includes the steps required to assess the readiness of a system to be DIU upgraded. Check off (✓)each step as it is completed. Boxes have been provided for this purpose under each step number. IF THIS PROCEDURE FAILS, CONTACT MY ORACLE SUPPORT AND ASK FOR DIU UPGRADE ASSISTANCE. | |
|---|---|---|
|
1. ☐ |
MPS A: Log in as the user “elapdev” user. |
If not already logged-in, then log in.
|
|
2. ☐ |
MPS A: Verify High Availability status. |
Run the following command to display the high availability status of the ELAP pair.
Note: HA status could be Active or Standby. If HA status is not Active/Standby, contact the My Oracle Support by following the instructions on the front page or the instructions in the Appendix E. |
|
3. ☐ |
MPS A: Verify DRBD status. Check the CS value as ‘Connected’. Note: If CS value is other than ‘Connected’, periodically run drbd status until both ELAPs get synced. |
Run the following command to display the DRBD status.
If any status is not as expected then contact My Oracle Support by following the instructions on the front page or the instructions in the Appendix E. |
|
4. ☐ |
MPS A: For logging purposes cat the hosts file. Note: The hostname in this file will be as per the configuration. |
#
|
|
5. ☐ |
MPS A: Check the static routes. |
Run the following command to display the static routes. |
|
6. ☐ |
MPS A: Delete unwanted ISO images. |
Run the following command to display the presence of ELAP software ISO images. Below is an example of the output of the ‘ls -la’ command:
Remove any ISO images that are not the target software ISO image using the following command: |
|
7. ☐ |
MPS A: Determine when last reboot occurred. For any server up longer than 180 days would be a candidate for reboot during a maintenance window. |
|
|
8. ☐ |
MPS A: Following self test on the disk. |
Run the following command:
Note: Please wait for 5 minutes for the test to complete. |
|
9. ☐ |
MPS A: Examine the results of self test on the disk. In case of any error/failure, contact the My Oracle Suppor tby following the instructions on the front page or the instructions in the Appendix E. |
Run the following command:
|
|
10. ☐ |
MPS A: Disk Integrity step |
Run the following command: The output would be like: If any output shows “Completed: read failure” or “Error: UNC xxx sectors”, contact the My Oracle Support by following the instructions on the front page or the instructions in the Appendix E. |
|
11. ☐ |
MPS A: Disk Integrity Test. |
Repeat steps 8 to 10, for the ‘/dev/sdb’ disk drive on the APPD card. |
|
12. ☐ |
MPS A:Inspect the banner for any messages. |
Run the following command to display the banner messages. There are currently no BannerInfo messages for this side in the database. If unexpected output is returned, then contact My Oracle Support by following the instructions on the front page or the instructions in the Appendix E. |
|
13. ☐ |
MPS B: Repeat checks on Server B. |
|
|
14. ☐ ☐ ☐ ☐ |
Active MPS: Verify RTDB status Login to ELAP GUI using VIP. Expand the “RTDB” Folder. Select the “View RTDB Status”. Ensure that the DB Status is Coherent. |
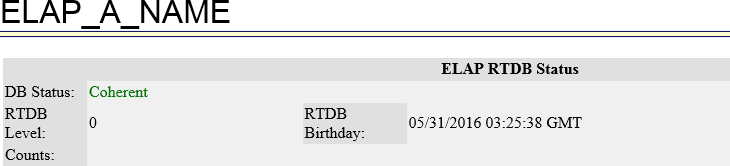 If the RTDB status is other than Coherent, contact My Oracle Support by following the instructions on the front page or the instructions in the Appendix E. |
|
15. ☐ |
Procedure Complete. |
This procedure is complete. |