3.2.2 Procedure 2 CAPTURING E5-APP-B CURRENT CONFIGURATIONS
Table 3-6 Procedure 2 CAPTURING E5-APP-B CURRENT CONFIGURATIONS
| STEP # | This procedure captures the existing configuration on the server that runs on the source release. Estimated time: 5 minutes | |
|---|---|---|
|
1. ☐ |
MPS A: Log in as elapconfig. |
|
|
2. ☐ |
MPS A: A successful configuration file setup results in the display of the ELAP Configuration Menu and its associated header information. Select option 1 to display the ELAP configuration. |
|
|
3. ☐ |
MPS A: Configuration information is displayed. Capture and record all information displayed in this output |
ELAP A Provisioning Network IP Address = 10.248.15.17 ELAP B Provisioning Network IP Address = 10.248.15.18 Provisioning Network Netmask = 255.255.255.0 Provisioning Network Default Router = 248.15.1 Provisioning VIP = 10.248.15.19 ELAP A Sync Network Address = 169.254.1.100 ELAP B Sync Network Address = 169.254.1.200 ELAP A Main DSM Network Address = 192.168.120.100 ELAP B Main DSM Network Address = 192.168.120.200 ELAP A Backup DSM Network Address = 192.168.121.100 ELAP B Backup DSM Network Address = 192.168. ELAP A HTTP Port = 80 ELAP B HTTP Port = 80 ELAP A HTTP SuExec Port = 8001 ELAP B HTTP SuExec Port = 8001 ELAP A Banner Connection Port = 8473 ELAP B Banner Connection Port = 8473 ELAP A Static NAT Address = Not configured 10.248.15.17 121.200 10.248.15.18 10.248.15.1 ELAP B Static NAT Address = Not configured ELAP A LSMS Connection Port = Not configured ELAP B LSMS Connection Port = Not configured ELAP A EBDA Connection Port = Not configured ELAP B EBDA Connection Port = Not configured Time Zone = America/New_York |
|
4. ☐ |
MPS A: Record the configuration data. |
Record the configuration, data paying particular attention to the highlighted items in the sample output above. |
|
5. ☐ |
MPS A: Press Return to continue. |
Press return to continue...<return> |
|
6. ☐ |
MPS A: The ELAP Configuration Menu is displayed. Select option 7 to configure the NTP Server. |
|
|
7. ☐ |
MPS A: The ELAP NTP Server Menu is displayed. Select option 1 to display the External NTP Server (if configured). |
|
|
8. ☐ |
MPS A: Record the NTP server information (if configured). |
chronyserver1 <Ipaddress 1> chronyserver2 <Ipaddress 2> Press return to continue...<return> If no NTP server is configured, the output will be as below: There are no External NTP Servers. Press return to continue...<return> Note: NTP is mandatory for ELAP 10.1 and higher releases so if no NTP is configured; it is required to get an NTP server IP ready before proceeding for full upgrade. |
|
9. ☐ |
MPS A: Select e to exit |
|
|
10. ☐ |
MPS A: Select e to exit |
Enter Choice: |
|
11. ☐ |
MPS A: Write down the current ELAP release |
|
|
12. ☐ |
MPS A: Capture the ELAP_PRETTY_ N“ME on ELAP 1”.1 if configured. |
"ELAP_A_PRETTY_NAME" is set to "ELAP_A_NAME" "ELAP_B_PRETTY_NAME" is set to "ELAP_B_NAME" |
|
13. ☐ |
MPS A: Capture the entire uiEdit output for reference if required later. The example output to the right has been truncated to fit this page. |
|
|
13. Error define ☐ |
MPS”A“ Note down the timestamp ! in output. |
Run the following command:
|
|
14. ☐ |
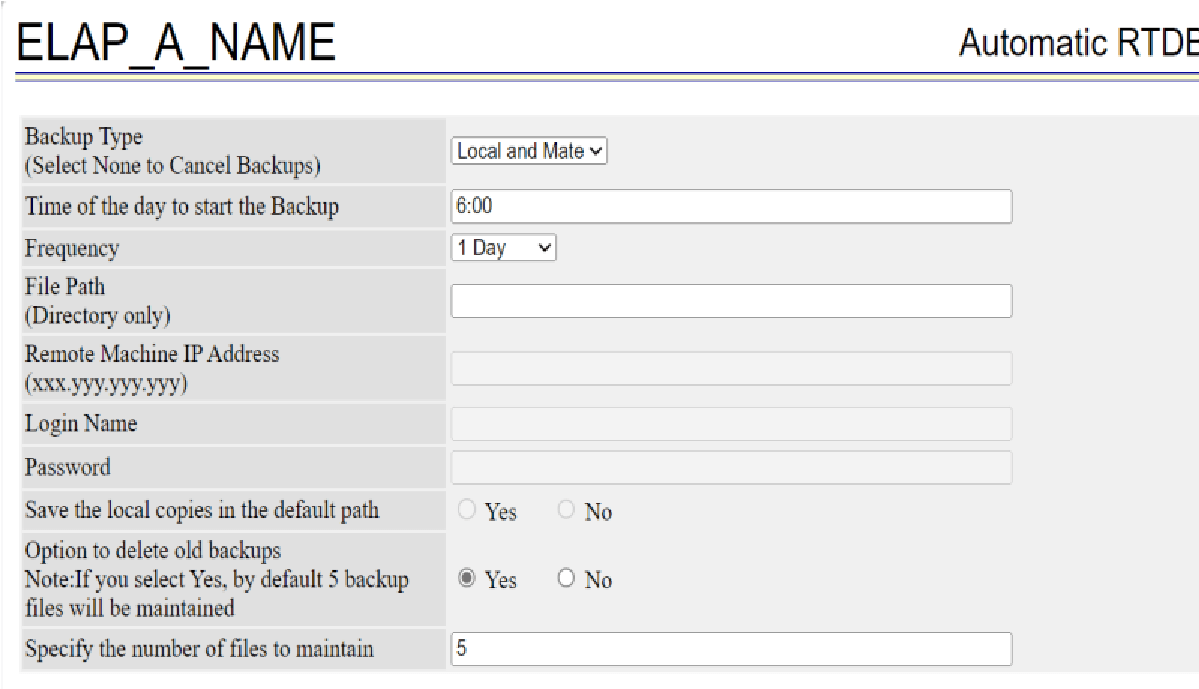
MPS A: Login to ELAP GUI via uiadmin user MPS 1A: Navigate to the main Maintenance menu selection and select “Automatic RTDB Backup” and note down the configuration details |
 |
This procedure is complete!