A Proxy Server Setup
In a clustered environment, you typically have multiple servers running on different machines. To transparently connect to one of the servers, a central routing server is required to direct the client to one of the clustered servers. The routing server can be a hardware-based (load balancer) or software-based (proxy server) solution. This appendix describes how to configure and set up the optional Oracle-provided proxy server.
The Oracle proxy server is not recommended because it cannot support more than 150 concurrent user sessions.
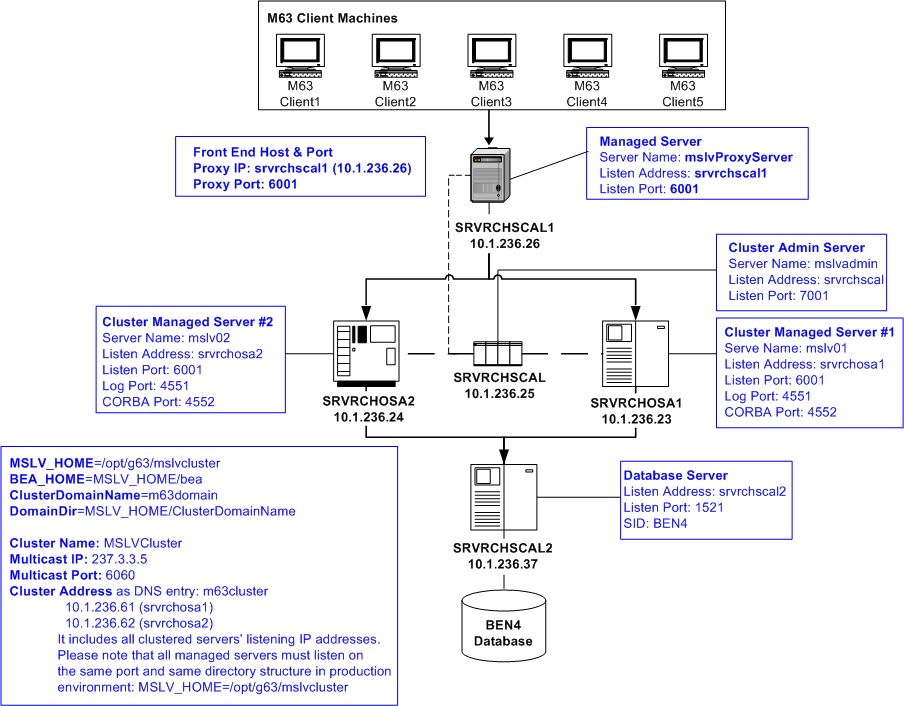
Figure A-1 shows a proxy server in a clustered environment. The proxy server directs the data traffic between the clustered servers, mslv01 and mslv02.
Proxy Server Files
The following files (web.xml and weblogic.xml) are necessary for the proxy server setup. Refer to "Setting up the Proxy Server" for the steps required to create the files.
-
web.xml
<!DOCTYPE web-app PUBLIC "-//Sun Microsystems, Inc.//DTD Web Application 2.3//EN" "http://java.sun.com/dtd/web-app_2_3.dtd">
<web-app>
<servlet>
  <servlet-name>HttpClusterServlet</servlet-name>
    <servlet-class>
      weblogic.servlet.proxy.HttpClusterServlet
    </servlet-class>
<init-param>
    <param-name>WebLogicCluster</param-name>
    <param-value>
       srvrchosa1:6001|srvrchosa2:6001
    </param-value>
  </init-param>
<!--The following two init-parameter tags are required if the proxy server is set up using SSL in a clustered environment.-->
<init-param>
  <param-name>SecureProxy</param-name>
  <param-value>ON</param-value>
</init-param>
<init-param>
  <param-name>DebugConfigInfo</param-name>
  <param-value>ON</param-value>
</init-param>
</servlet>
<servlet-mapping>
  <servlet-name>HttpClusterServlet</servlet-name>
  <url-pattern>/</url-pattern>
</servlet-mapping>
<servlet-mapping>
  <servlet-name>HttpClusterServlet</servlet-name>
  <url-pattern>*.jsp</url-pattern>
</servlet-mapping>
<servlet-mapping>
  <servlet-name>HttpClusterServlet</servlet-name>
  <url-pattern>*.htm</url-pattern>
</servlet-mapping>
<servlet-mapping>
  <servlet-name>HttpClusterServlet</servlet-name>
  <url-pattern>*.html</url-pattern>
</servlet-mapping>
</web-app>-
weblogic.xml
<!DOCTYPE weblogic-web-app PUBLIC "-//BEA Systems, Inc.//DTD Web Application 8.1//EN" "http://www.bea.com/servers/wls810/dtd/weblogic810-web-jar.dtd">
  <weblogic-web-app>
    <context-root>/</context-root>
  </weblogic-web-app>
Setting up the Proxy Server
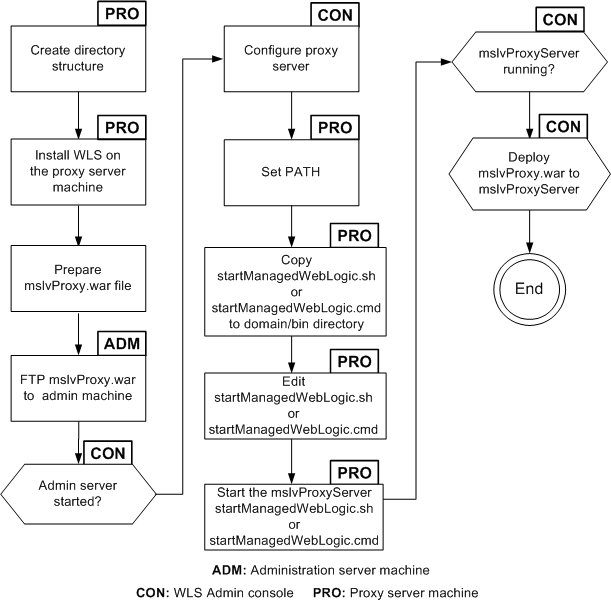
Figure A-2 shows the procedure for setting up the proxy server.
To set up a proxy server:
-
Create the directory structure.
For example: /opt/g63/mslvcluster/m63domain.
-
Install Oracle WebLogic Server on the proxy server machine.
For example: srvrchscal1
-
Prepare the mslvProxy.war file
-
Create a WEB-INF directory under the proxy directory.
-
On the proxy server machine, create a file named web.xml and copy the contents as shown previously, in "Proxy Server Files".
-
Copy the file into the WEB-INF directory.
-
For Windows, enter the following command:
notepad web.xml
-
For UNIX/Linux, enter the following command:
touch web.xml
-
-
On the proxy server machine, create a file named weblogic.xml and copy the contents as shown previously, in "Proxy Server Files".
-
Copy the file into the WEB-INF directory.
-
For Windows, enter the following command:
notepad weblogic.xml
-
For UNIX/Linux, enter the following command:
touch weblogic.xml
Figure A-3 shows the files copied into the newly created WEB-INF directory.
Figure A-3 Command Prompt Window Showing WEB-INF Directory
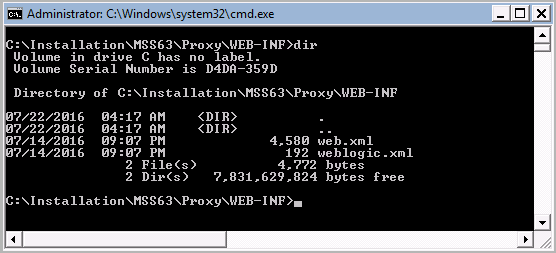
Description of "Figure A-3 Command Prompt Window Showing WEB-INF Directory" -
-
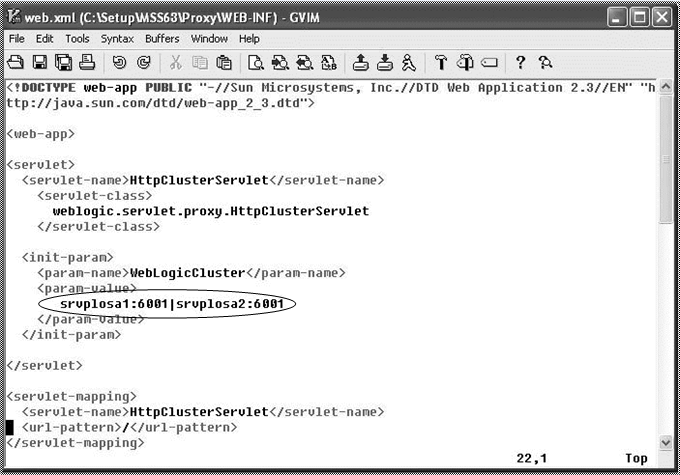
In the web.xml file, add all managed server host machine names and ports in the manner shown in the bold text in Figure A-4.
-
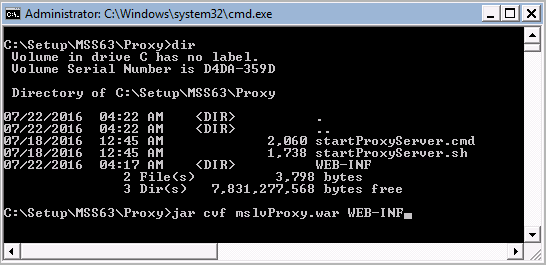
Go to the parent of the WEB-INF directory and type the following command and press ENTER:
jar cvf mslvProxy.war WEB-INF
Figure A-5 shows the command typed at the command line.
-
-
FTP the proxy.war file to the administration server.
-
Start the administration server if it is not running.
-
Create a WebLogic machine for the proxy server by completing the following tasks:
-
Log in to the WebLogic Server Administration Console.
-
In the Domain Structure tree, expand Environment and then select Machines.
-
In the Summary of Machines pane, click New.
-
In the Create a New Machine pane, enter the name of the machine that will host the proxy server in the Name field, select the Machine OS type, and click Ok.
-
In the Change Center pane, click Activate Changes.
-
-
To configure the proxy server, in the left pane, select Environment, select Servers, and then select New in the right pane.
The Create a New Server pane appears.
-
In the Create a New Server pane, enter the following information into the appropriate fields for the proxy server: Name, Machine, Listen Address, and Listen Port and click Finish.
Worksheet references and example values:
Field Name Worksheet Reference Number Example Value Name
Proxy-0610
mslvProxyServer
Machine
Proxy-0620
srvplscal1
Listen Address
Proxy-0620
srvplscal1
Listen Port
Proxy-0630
6001
-
Copy the startManagedWeblogic file to the domain/bin directory. (This script will be used to start the proxy server.)
Figure A-6 shows the srvplscal1_mss63 window.
-
Edit the startManagedWebLogic file, including new values for the parameters in the following list.
Example values from the proxy worksheet are included in the list.
ADMIN_URL=http://srvrchscal:7001
SERVER_NAME=mslvProxyServer
WLS_USER=weblogic
WLS_PW=web_logic
JAVA_VM=-server
MEM_ARGS=-Xms512m -Xmx512m -XX:NewRatio=4
-
Start the proxy server.
Figure A-7 shows the command for starting the proxy server.
Figure A-7 Command for Starting the Proxy Server

Description of "Figure A-7 Command for Starting the Proxy Server" -
From the WebLogic Server Administration Console, under the Domain Structure tree, expand Environment and then select Servers to see the updated list of servers and to view the state of the proxy server.
-
Configure the server and deploy the proxy.war file by completing the following tasks
-
In the Change Center pane, click Lock and Edit.
-
Expand the Domain Structure tree and click Deployments.
The Summary of Deployments pane appears.
-
On the Control tab, click Install.
The Install Application Assistant pane appears.
-
Under Current Location, navigate to the deploy directory and select mslvProxy.war, then click Next.
The Choose targeting style pane appears.
-
Select Install this deployment as an application and click Next.
The Select deployment targets pane appears.
-
Under Clusters, select the proxy server that was created in step 7.
-
Under Source accessibility, select I will make the deployment accessible from the following location.
-
Click Finish.
-
In the Change Center pane, click Activate Changes.
-
Expand the Domain Structure tree and click Deployments.
The Summary of Deployments pane appears.
-
Select mslvProxy.
-
From the Start list, select Servicing all requests.
The Start Application Assistant pane appears.
-
Click Yes.
Ensure that the state of the mslvProxy application has changed from Prepared to Active.
-
