8 Modeling OSM Data
This chapter describes how to model OSM data in an Oracle Communications Order and Service Management (OSM) solution.
Data Modeling Overview
The entity that provides a unified view of all order data relating to various order activities is the order specification order template. All other entities relating to order processing contain a subset of the order data you define in the order template.
You can either model data directly in the order template or you can model data in various OSM entities in Oracle Communications Design Studio. When you add data to these other entities, Design Studio automatically adds the data into the order specification order template.
In general, there are four groups of data that you must model in any OSM solution. These general groups of data are:
-
Incoming order data: You must understand the data structure and contents and decide what pieces are important to supporting the orchestration process. While there can be a large amount of data, orchestration is only concerned with modeling and extracting out information needed to support decomposition and dependency processing. For example, the orchestration functionality is primarily driven by the elements and structures within the ControlData structure.
-
External fulfillment system data: You must determine what data you need to model in OSM for tasks that communicate with external systems or communicate order or task notifications to northbound systems or external users.
-
OSM web client user data: You must determine what data you want users to access when using the OSM Order Management web client to manage orders or when using the OSM Task web client when managing orders or processing tasks.
In addition to identifying and modeling these order data groups, you must also understand how the data flows from each point during order processing. In addition, you must understand whether the data you receive from system A must be transformed or modified before sending it to system B. For example, system A that sends an order with a requested delivery date and time for broadband server may use a different date and time format than system B.
Common areas where data transformation occurs are:
-
Order recognition rule order data rules: You must use an XQuery to map order data to the data specified in the creation task of the order. The data defined on the order may be identical to what is on the creation task, and so the XQuery must map the data into the corresponding parameters, or the data on the order may be different requiring you to manipulate the data so that it conforms with the data you have define in the creation task. See "Modeling the Order Data Rule to Populate the Creation Task" for more information.
-
Within Orchestration using the order transformation manager (OTM): OTM provides OSM the ability to transform order items within the orchestration plan. For more information, see "Modeling the Order Transformation Manager".
-
Within orchestration when OSM identifies order items from order data and maps the data to order item properties. For more information, see "Modeling Orchestration Plans".
-
Between tasks: Automated tasks are the primary means that OSM employs for communicating with external systems. In some cases, the data required by the external system that Task A communicates with may require different parameters or formats than those generated by the creation task and those of other tasks communicating with other systems.
The task of dealing with different message types and formats can be simplified if you use an integration application such as Oracle Application Integration Architecture (Oracle AIA) which defines a canonical order structure for communication between OSM and external fulfillment systems. However, OSM can also directly integrate with external fulfillment systems and transform data immediately at the task within the automated task automation plug-in code.
You also use the data you create in OSM for a variety of other purposes. For example:
-
You can model OSM to add the input message (the entire order) to the order. The order recognition rule that receives the message adds the message to an element designated as XML Type which contains the entire order data. See "Adding the Input Message to the Order Template" for more information.
-
You can use data in the order template to manage orders; for example, you can create order keys used by amendment processing. See "About Order Keys" for more information.
-
You can specify which data in the order template should be considered for amendment processing (data significance). See "About Data Significance" for more information.
-
You can assign behaviors to data in the order template. See "Modeling Behaviors Overview" for more information.
Modeling Order Data
Consider the following data modeling approaches:
-
Data-centric: First model data for a cartridge project and then model the cartridge project entities using specific data, as needed.
-
Entity-centric: First model business processes and entities, and then model the data specifically required by the entities used by the business process.
About the Data Dictionary
Before OSM can receive an order from an order-source system, you need to create the OSM Data Dictionary.
The Data Dictionary is the repository of data elements used in Design Studio. The Data Dictionary defines data types and structures that can be used within OSM orders. For example, you can define a simple type that represents an IP address or a phone number, or more complex types representing addresses, product attributes and so on.
Data elements in a Data Dictionary are used as building blocks of an OSM order. The data elements within a Data Dictionary project can be referenced by other projects in a work space.
Design Studio automatically creates a Data Dictionary when you create an OSM cartridge project. You can use this default Data Dictionary or create multiple data schemas to add data elements or structure within the same project.
Each data schema includes a set of data relevant to the how that data is used. For example, a data schema for mobile services could include mobile-related data such as IMSI and MSISDN.
About the Order Template
When you create a new order model in Oracle Communications Design Studio, you can base the order on an existing order. When you extend an order specification, the extended specification inherits all of the data, tasks, rules, and behaviors of the base specification. You can add new data and behaviors to define unique order specifications and functionality. When you modify a base order specification, the order specifications extended from it are also modified. This means that you can make changes in one place, in the base specification, and those changes apply to the orders that are extended from the base specification.
For example, you might have three order specifications that share a common set of data. You can create a base order that includes configurations common to all three orders. You can then add configurations to each of the three order specifications for the data that is unique to each order specification.
When defining an order specification that is inherited from a base order specification, you cannot edit the inherited order data. For example, you cannot remove or rename data elements inherited from the base order specification. To implement changes to the inherited data, you must edit the data in the base order specification. Design Studio automatically implements those changes among all of the extended order specifications.
The data elements that you can use in an order are defined in the Design Studio Data Dictionary. When you define order data, you can use data elements that already exist in the Data Dictionary data schemas, or you can create new data elements and add them to the Data Dictionary. See "About the Data Dictionary" for more information.
In the data dictionary, you can model the same data element in one or more locations, and assign different type definitions for the elements, such as string or integer, and so on. For example, you might have a data dictionary that contains two instances of a data element called EmployeeID: one defined as a string (defined by the employee's name and a two-digit number), the other defined as an integer (defined by a 6-digit number). Although you can do this in the data dictionary, you cannot have the same data instance with different type definitions in the order template.
To avoid such data element conflicts, you can rename the first instance of the parameter after you import it into an order template using the refactoring function which allows you to rename an imported parameter at the order template level without changing the data dictionary instance from which it is derived. This creates an alias for the imported data element and you can then import the second instance of the data element without any data conflict errors. See Design Studio Modeling OSM Processes Help for more information about renaming data elements in the order template.
Identifying Data Requirements for Order Payload
The incoming order data contains important information about the hierarchy of sales item lines, which can consist of offers, bundles, products, and so on. This data structure information can be used to manage the data when it is passed between different fulfillment systems.
You must model incoming order data in a Design Studio data dictionary. You can either manually build the data dictionary for the incoming order data or you can import an XSD file defined in some other application into Design Studio.
To import the Data Dictionary for the data received in orders, you import the XSD file for that incoming customer order into OSM. The elements in the XSD file are loaded into the Data Dictionary as OSM data elements. Example 8-1 shows part of an XSD file that could be used for importing customer data.
Example 8-1 Elements in Input Message XSD File
<element name="order" type="im:OrderType"/>
<element maxOccurs="1" minOccurs="1" name="numSalesOrder" type="string">
</element>
<element maxOccurs="1" minOccurs="1" name="typeOrder">
</element>
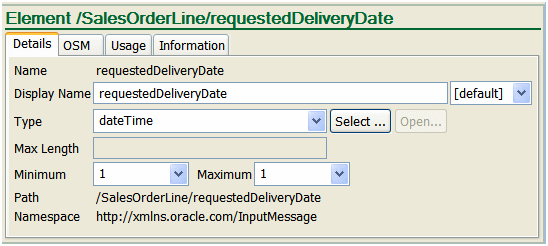
For each data element, you specify attributes about the data element; for example, the data type and display name. Figure 8-1 shows the configuration for a requestedDeliveryDate data element.
Figure 8-1 Data Element Defined in Design Studio
Description of "Figure 8-1 Data Element Defined in Design Studio"
Child XML elements are imported as child data elements. The Path field shows the parent data elements. In this example, the parent data element of requestedDeliveryDate is SalesOrderLine.
Adding the Input Message to an Order Recognition Rule
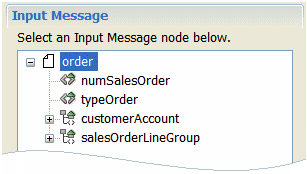
You must add the order data structure of an incoming order to the Input Message area on the Details tab in an order recognition rule.
Figure 8-2 shows an input message specified in a recognition rule.
Figure 8-2 Input Message Specified in a Recognition Rule
Description of "Figure 8-2 Input Message Specified in a Recognition Rule"
The order recognition rule Order Data Rule XQuery transforms order data into the OSM order format. However, you can also add the input order data to an order by adding the order data to the order template. For more information, see "Adding the Input Message to the Order Template".
Adding the Input Message to the Order Template
You can model an order template with the incoming order data so that OSM automatically add the incoming order data to the OSM order in addition to the data generated by an order recognition rule Order Data Rule Xquery. You should not use the incoming order data for order processing, but the order data information can be useful for debugging, order tracking. or reference purposes.
To add the incoming order data to an order you must add the incoming order data to the target order specification Order Template tab Order Template area.
You must designate the root incoming order data element as an XML Type so OSM can store the data more efficiently. In addition, you must also add the incoming order data structure to the creation task so that OSM can add the incoming order data to the OSM order.
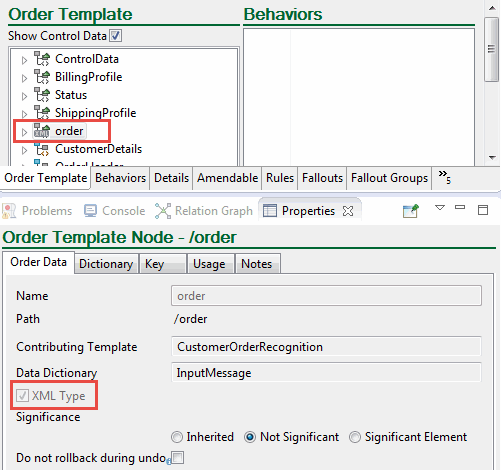
Figure 8-3 shows the input order element order with XML Type selected in the Properties tab Order Data sub-tab.
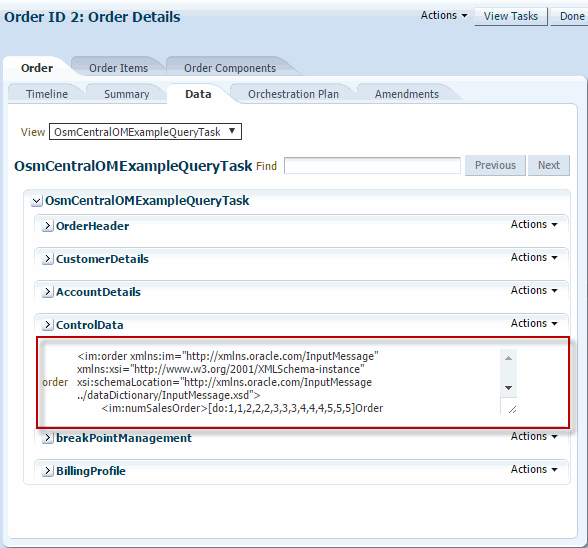
For debugging, order tracking, or reference purposes, you can add the incoming order data to a query task so that operators can view data from the Task web client or the Order Management web client.
Figure 8-4 shows the input order data in the Order Management web client Data tab with the OsmCentralOMExampleQueryTask selected in the View field.
Figure 8-4 Order Management Web Client Input Order Data XML Structure
Description of "Figure 8-4 Order Management Web Client Input Order Data XML Structure"
Modeling Valid Data Keys
Data keys are elements that identify specific instances of multi-instance nodes. For more information about the use of data keys, see "About Order Data Position and Order Data Keys."
When modeling a data key, you must follow the following guidelines.
-
Data key expressions must always return a value. For example, if you could use the following expression to return a key value:
./login/username/text()
However, if either login or username are optional parameters, then this expression might not return a value. Ensure that you model your data and write your key expressions so that data in a valid order will always cause the key expression to return a value.
-
Ensure that parallel key expressions always evaluate to unique values. That is, all of the instances of one multi-instance data element must have unique keys.
If a multi-instance data element is inside another multi-instance data element, the child elements' keys must be unique within each parent element. For example, in the following data structure, you could use ./host/text() as the expression to generate the key for the location element. This would work because it is unique within each of the email-service parent elements, even though it is not unique across the whole order.
<email-service> <address>john.doe@example.com</address> <name>John Doe</name> <quota>5Gb</quota> <location> <host>host_a</host> <operating-system>Linux</operating-system> </location> <location> <host>host_b</host> <operating-system>Solaris</operating-system> </location> </email-service> <email-service> <address>jane.doe@example.com</address> <name>Jane Doe</name> <quota>2Gb</quota> <location> <host>host_a</host> <operating-system>Linux</operating-system> </location> <location> <host>host_c</host> <operating-system>MacOS</operating-system> </location> </email-service> -
Data key expressions must not use children of reference data elements.
Design Studio allows order template elements to be references to elements elsewhere in the order. For example, this allows more than one order component to refer to the same order item. In this way, the different order components can see the latest version of the order item data, while allowing the data to exist (and be updated) in only one place. Data key expressions that refer to descendants of references are not valid.
-
When using descendant data elements in your key expression, consider restricting data key expressions to refer only to direct child elements.
While it is valid for data key expressions to refer to descendants beyond direct child elements, it is easier to ensure compliance with the other criteria when only direct child elements are used.
Modeling Data for Tasks
The following sections describe modeling data requirements for tasks.
Determine Task Data for Manual and Automated Tasks
Each task includes a set of data, which you specify when modeling the task.
The data included in a task is data relevant to the function of the task. Table 8-1 shows some example tasks and the task data they include.
Table 8-1 Examples of Tasks and Task Data
| Task | Task Data |
|---|---|
|
Add capacity |
Bandwidth |
|
Send customer survey |
Name, phone number, address |
|
Query task (to display data in the Task web client) |
Name, phone number, bandwidth, port ID |
When you model a task, you assign it to an order. The available task data is limited to the data that the order requires. At run time, task data can be entered by an OSM user, provided on an incoming order, or provided from a previous task in the order.
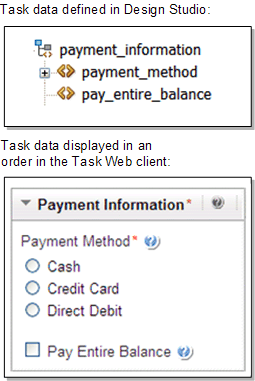
Figure 8-5 shows task data defined in a task in Design Studio and how the data is displayed in an order in the Task web client.
Figure 8-5 Task Data in a Task Specification and in an Order
Description of "Figure 8-5 Task Data in a Task Specification and in an Order"
Tip:
To improve performance, usability, and security, include only the data that is necessary to perform the task. Unnecessary data is not exposed to the user performing the task, even though the order may contain much more data.
When modeling orders, it is common to include the entire XML representation of the order in the order data as an XML data type. If you include the XML data, consider defining smaller XML elements for storing sections of a sales order rather than including a single XML data type that contains the entire sales order. This allows you to map only the parts of the order that are needed for each task. Including the XML representation is typically done only in the modeling process as an aid to development.
In addition to defining the data included in each task, you can use behaviors in manual tasks to manipulate many aspects of how the data is displayed, formatted, and validated. For example, you can specify if data is read-only, or you can modify the value of the data in a task. See "Modeling Behaviors Overview" for more information.
Determine Task Data for Data Returned from Fulfillment Applications
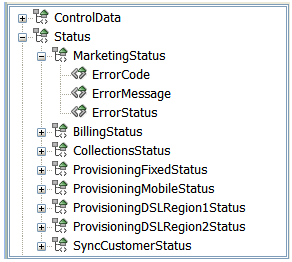
You can configure the order template to hold status data returned from external systems. Figure 8-6 shows an order template structure that holds status data.
Figure 8-6 Status Data in the Order Template
Description of "Figure 8-6 Status Data in the Order Template"
Generating Multiple Task Instances from a Multi-Instance Field
Some tasks require multiple task instances to complete. For example, you might need to create three task instances to retrieve three different address fields. To accomplish this, you designate a field as a pivot data element for the task. When OSM runs the task at run time, the system generates a separate task instance for each separate instance of the pivot data element in the order. The system creates as many instances of the task as there are instances of the data field or data structure, up to the maximum number defined for the field. This feature works for a structure of data also. For example, if the address is a structure called Address, with nested elements of Street, City, and Postal Code, the system generates an instance of a task for each instance of the structure. The data that is visible to the task instance will be restricted to data structure that it is for, and that task will not have visibility to the other instances of the data.
Note:
OSM compensation processing does not support task pivot data elements.
Modeling Data for Orchestration
Define the orchestration data on the entity that best reflects its structure, rather than defining all of the data on the order specification. Design Studio generates the order level order template by aggregating the order template definitions for the order item specifications and order components with any data defined at the order level.
You should define data at the level where it is needed:
-
Order Item specification: Define ControlData/OrderItem and all of the order item properties on the order item specification.
The OracleComms_OSM_CommonDataDictionary model project contains predefined base data elements for control data. It is recommended that you use the data schema of this model project to add the ControlData/OrderItem base data element to the order item specification Order Template tab.
-
Order component: Define ControlData/Functions/OrderComponentName and any other data needed by the tasks in the process that execute this component in the appropriate order component template.
If you use the OracleComms_OSM_CommonDataDictionary model project (recommended) and your orchestration entities are preconfigured correctly, Design Studio automatically generates this structure on the order template of the order component and the order template of the order.
Using this method supports:
-
Encapsulation
-
Re-factoring: Modify order template data at the entity level to which it is associated because this highlights the connection between an entity and its order template data.
-
Maintenance: Modifications to order item specification and order component templates help the designer understand the impact of changes, including possible breaks in compatibility.
-
Traceability: Using this method provides direct traceability from order template data to the modeling entity to which it is attached.
About Order Item Control Data
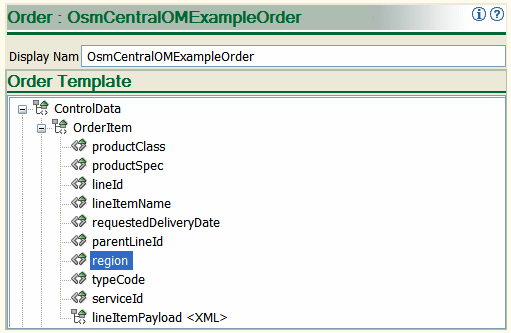
In addition to defining order item properties in the order item specification, you need to provide a storage area for the order item properties. You do so by adding control data to the order item specification Order Template tab. This definition is automatically added to the order's order template. This makes it easier to track which entity is the master of the data and enables easier refactoring and maintenance of the overall order specification. Figure 8-7 shows the order item properties in the control data in an order template.
Figure 8-7 Order Item Properties Included in the Order Template
Description of "Figure 8-7 Order Item Properties Included in the Order Template"
When you define the control data, note the following:
-
The name used in the control data must exactly match the spelling and case of the order item property name.
-
Make sure that the Data Dictionary properties are correct for the type of data; for example, string or number.
-
Configure each data element as a multi-instance data element.
-
Minimum = 0
-
Maximum = Unbounded
Note:
To define data properties, you edit the entry in the data schema, not in the order item specification.
An instance of ControlData/OrderItem is created for each data element returned by the order item selector from the orchestration sequence (see "About Creating Order Items from Customer Order Line Item Node-Sets").
-
The OracleComms_OSM_CommonDataDictionary model project contains predefined base data elements for control data. Oracle recommends that you use the data schema of this model project to add the ControlData/OrderItem structure to the order item specification Order Template tab.
About Order Template Data
The order template includes control data. Control data is used by OSM to generate the orchestration plan. Control data is used only for orchestration.
There are typically two areas of the order control data:
-
ControlData/OrderItem provides the data and structure of order items received in the incoming customer order.
-
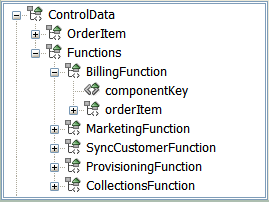
ControlData/Functions stores the structure of the function order components generated by the first level of decomposition. Figure 8-8 shows function components represented in the order template. The types of functions (BillingFunction, MarketingFunction, and so on) represent the function-level order components.
Figure 8-8 Functions Data in the Order Template
Description of "Figure 8-8 Functions Data in the Order Template"
You manually model the order control data of order items in Design Studio. Control data for function order components is automatically generated by Design Studio. See "About Modeling Control Data" in Modeling OSM Processes for information on how control data is modeled and generated.
Orchestration plan generation requires a specific order template structure which you must model at design time.
ControlData
   OrderItem
   Functions
      OrderComponentName
         componentKey
         calculatedStartDate
         duration
         OrderItem
            orderItemRef
About Order Item Specification Data
This is a multi-instance node that OSM populates with a set of order items generated off the in-bound message. The children of this structure must exactly match the set of order item properties defined on the Order Item specification editor in Design Studio.
The OracleComms_OSM_CommonDataDictionary model project contains predefined base data elements for control data. It is recommended that you use the data schema of this model project to add the ControlData/OrderItem data element to the order item specification Order Template tab.
See "About Modeling Control Data" in Modeling OSM Processes for instructions on modeling the ControlData/OrderItem structure.
About ControlData for Order Component Data
Order component information is stored in the template in ControlData/Functions/OrderComponentName. This is a multi-instance node that OSM populates with the set of order components generated by executing the decomposition rules through an orchestration sequence. OrderComponentName must be defined for each order component included in a fulfillment pattern's orchestration plan. This section of the ControlData represents all of the order components in the orchestration plan. If you use the OracleComms_OSM_CommonDataDictionary model project, Design Studio automatically generates data (OrderComponentName) and adds it to the ControlData/Functions structure for each order component that is associated with the fulfillment pattern that is part of the orchestration plan.
Each order component is assigned a unique key, called the order component ID, which is stored in the componentKey element. For information about how the component ID is determined, see "About Component Names and Component IDs."
OSM populates the calculatedStartDate (dateTime type) and duration (string type) nodes for each ControlData/Function. With calculatedStartDate and duration per Function, both central order management and service order management solutions can use these values as the requested delivery date for the order line in a downstream system. based on the modeling done in the Order Component Specification entity, the date does affect the runtime behavior of the order component. If there is a Duration Value associated with a dependency, it is used in the order component start date calculation since this value is relative value to the orchestration dependency.
OSM populates the multi-instance orderItem node with the set of order items that have been decomposed into this order component. The order items are accessed through orderItemRef, which is a reference node to ControlData/OrderItem. A reference node is used to point to the actual storage location of the order item so that updates to the order item data are reflected in all order components the order item is referenced from.
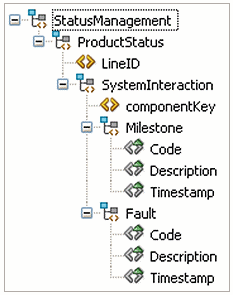
You can also store status data in the order item data and in the function data. Figure 8-9 shows a structure for storing status data. In this example:
-
The LineID data element provides a reference to the order line item in the incoming customer order.
-
The SystemInteraction data element stores data about status events; for example, a status code, description, and timestamp.
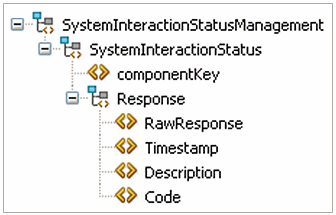
Figure 8-10 shows a structure for storing status data for functions. In this example:
-
The componentKey data element provides a reference to the order component instance.
-
The Response data element stores the message from the external system, as well as the timestamp, description, and status code.
Modeling Data for Fulfillment States
Fulfillment state processing requires specific structures and data elements inside the order template. The specific locations of the data can be changed using XML catalog: the default locations are presented here. See "About XML Catalogs" for more information about using XML catalogs in OSM. See "Sample XQuery for Changing Default Data Locations" for more information about changing the default data locations.
About ControlData for External Fulfillment States
External fulfillment state information is populated for order components.
The default location for external fulfillment state information is ControlData/Functions/OrderComponentName/orderItem/ExternalFulfillmentState.
Write the automation code so that it populates the information in the correct place. For example, the following automation code updates the ExternalFulfillmentState value whenever a response containing a fail value returns or passes on any other value in the response:
</UpdatedNodes>
  {(
      for $orderItem in $component/oms:orderItem
      let $lineId := $orderItem/oms:orderItemRef/centralom:lineId/text()
      return
      (
          if ($responseRoot/res:lineResponses/res:response[@id=$lineId]/text() = 'fail') then
          (
              <Update path="/oms:ControlData/oms:Functions/oms:BillingFunction/oms:orderItem[@index='{$orderItem/@index}']">
      <ExternalFulfillmentState>{$responseRoot/res:status/text()}</ExternalFulfillmentState>
              </Update>
          )
          else
          (
              <Update path="/oms:ControlData/oms:Functions/oms:BillingFunction/oms:orderItem[@index='{$orderItem/@index}']">
      <ExternalFulfillmentState>{$responseRoot/res:status/text()}</ExternalFulfillmentState>
              </Update>
          )
      )
  )}
</OrderDataUpdate>
About ControlData for Order Fulfillment State
OSM populates the order fulfillment state based on the configuration in the order fulfillment state composition rule set.
The default location for OSM to populate the order fulfillment state is ControlData/OrderFulfillmentState. The Data Dictionary contains a root-level OrderFulfillmentState element. For cartridges created in a pre-7.2 version of OSM, drag the root-level OrderFulfillmentState element into the ControlData node on the order. For new cartridges, the element will get added automatically to the order template as a child of ControlData.
About ControlData for Order Item Fulfillment State
OSM populates the order item fulfillment state based on the configuration in the order item fulfillment state composition rule set.
The default location for OSM to populate the order item fulfillment state is ControlData/OrderItem/OrderItemFulfillmentState. The Data Dictionary contains a root-level OrderItemFulfillmentState element. For order items in cartridges created in a pre-7.2 version of OSM, drag the root-level OrderItemFulfillmentState element into the ControlData/OrderItem node on the order. For new cartridges and order items, the element will get added automatically to the order template as a child of ControlData/OrderItem.
Fulfillment States and Point of No Return
If points of no return have been configured using fulfillment states, OSM populates the point of no return when processing the order item fulfillment state composition rules. For more information about points of no return, see OSM Concepts.
The default location for OSM to populate the point of no return value is ControlData/OrderItem/PointOfNoReturn.
Fulfillment State and Point of No Return Initial Values
You can set initial values for order item fulfillment states and points of no return, so that these values will appear on the order before any processing takes place. See "Sample XQuery for Changing Default Data Locations" for more information about setting these values.
Sample XQuery for Changing Default Data Locations
To change the default locations and set initial values for point of no return and order item fulfillment state, include an XQuery file in the XML catalog. To use the defaults, do not provide a file.
To include your custom XQuery file in the cartridge, include a line similar to the following in the XML catalog file for your cartridge:
<rewriteURI uriStartString="cp:oracle/communications/ordermanagement/execution" rewritePrefix="osmmodel:///CartridgeName/CartridgeVersion/resources/Directory"/>
For more information about using XML catalogs, see "About XML Catalogs".
If you choose to configure a custom file, you should include all of the functions, even those for defaults you are not changing. This will clarify the configuration and assist in maintenance activities. The purpose of each function is indicated in comments in the file. For all values that specify order template locations (for example /OrderLifeCycleManagement), begin the value with a forward slash, as shown below.
xquery version "1.0";
module namespace fulfillmentstatemodule = "http://xmlns.oracle.com/communications/ordermanagement/fulfillmentstatemodule";

declare namespace saxon="http://saxon.sf.net/";
declare namespace xsl="http://www.w3.org/1999/XSL/Transform"
declare namespace oms = "urn:com:metasolv:oms:xmlapi:1";

(: Returns the composite fulfillment state path for an order. :)
declare function fulfillmentstatemodule:getOrderCompositeFulfillmentStatePath ($orderMnemonic as xs:string) as xs:string {
    "/ControlData/OrderFulfillmentState" };

(: Returns the composite fulfillment state path for an order item. :)
declare function fulfillmentstatemodule:getOrderItemCompositeFulfillmentStatePath ($orderMnemonic as xs:string) as xs:string {
    "/ControlData/OrderItem/OrderItemFulfillmentState" };

(: Returns the default order item external fulfillment state path. :)
declare function fulfillmentstatemodule:getOrderItemExternalFulfillmentStatePath ($orderMnemonic as xs:string) as xs:string {
    "ExternalFulfillmentState" };

(: Returns the default type of the order item external fulfillment state path.
   Valid values are RELATIVE_PATH and ABSOLUTE_PATH. :)
declare function fulfillmentstatemodule:getOrderItemExternalFulfillmentStatePathType ($orderMnemonic as xs:string) as xs:string {
    "RELATIVE_PATH" };

(: Returns the point of no return path for an order item. :)
declare function fulfillmentstatemodule:getOrderItemPoNRPath ($orderMnemonic as xs:string) as xs:string {
    "/ControlData/OrderItem/PointOfNoReturn" };

(: Returns the name of the initial fulfillment state. :)
declare function fulfillmentstatemodule:getOrderInitialFulfillmentStateName ($orderMnemonic as xs:string) as xs:string {
    "" };

(: Returns the namespace of the initial fulfillment state. :)
declare function fulfillmentstatemodule:getOrderInitialFulfillmentStateNamespace ($orderMnemonic as xs:string) as xs:string {
    "" };

(: Returns the initial point of no return value of an fulfillment state. :)
declare function fulfillmentstatemodule:getOrderItemInitialPoNR($orderMnemonic as xs:string) as xs:string {
    "" };

declare function fulfillmentstatemodule:getExternalFulfillmentStates(
    $orderData as element()) as element()?
{
    let $orderMnemonic :=
        if (fn:exists($orderData/OrderType))
        then $orderData/OrderType/text()
        else ""
    let $orderItems := $orderData/_root/ControlData/OrderItem
    where (fn:exists($orderItems))
    return
        <oms:ExternalFulfillmentStates>
        {
            for $orderItem in $orderItems
            let $orderItemIndex := $orderItem/@index
            let $components := $orderData/_root/ControlData/Functions/*[orderItem/orderItemRef/@referencedIndex=$orderItemIndex]
            let $externalFulfillmentStatePath := fulfillmentstatemodule:getOrderItemExternalFulfillmentStatePath($orderMnemonic)
            let $externalFulfillmentStatePathExistsCheck := fn:concat($externalFulfillmentStatePath, "[text()!='']")
            let $externalFulfillmentStateExists := fn:exists($components/orderItem[orderItemRef/@referencedIndex=$orderItemIndex]/saxon:evaluate($externalFulfillmentStatePathExistsCheck))
            where (fn:exists($components) and $externalFulfillmentStateExists=fn:true())
            return
                <oms:OrderItemExternalFulfillmentState index="{$orderItemIndex}">
                {
                    for $component in $components
                    let $componentKey := fn:normalize-space($component/componentKey/text())
                    let $componentId := $component/@index
                    let $externalFulfillmentStateValuePath := fn:concat($externalFulfillmentStatePath, "[last()]/text()")
                    let $externalFulfillmentState := fn:normalize-space($component/orderItem[orderItemRef/@referencedIndex=$orderItemIndex]/saxon:evaluate($externalFulfillmentStateValuePath))
                    where (fn:exists($externalFulfillmentState) and $externalFulfillmentState != "")
                    return
                        <oms:OrderItemComponentState componentId="{$componentId}">
                            <oms:ComponentKey>{$componentKey}</oms:ComponentKey>
                            <oms:ExternalFulfillmentState>{$externalFulfillmentState}</oms:ExternalFulfillmentState>
                        </oms:OrderItemComponentState>
                }
                </oms:OrderItemExternalFulfillmentState>
        }
        </oms:ExternalFulfillmentStates>
};
Modeling Data for Processing States
Processing states requires specific structures and data elements inside the order template.
About ControlData for Order Component Order Item Processing States
Order component order item processing state information is populated for order components.
The default location for order component order item fulfillment state information is ControlData/Functions/OrderComponentName/orderItem/FunctionProcessingState.
Write the automation code so that it populates the information in the correct place. For example, the following automation code updates the FunctionProcessingState to the UndoFailed value whenever a response containing a fail value returns or to the Completed value whenever any other response returns:
</UpdatedNodes>
  {(
      for $orderItem in $component/oms:orderItem
      let $lineId := $orderItem/oms:orderItemRef/centralom:lineId/text()
      return
      (
          if ($responseRoot/res:lineResponses/res:response[@id=$lineId]/text() = 'fail') then
          (
              <Update path="/oms:ControlData/oms:Functions/oms:BillingFunction/oms:orderItem[@index='{$orderItem/@index}']">
                  <oms:FunctionProcessingState>UndoFailed</oms:FunctionProcessingState>
              </Update>
          )
          else
          (
              <Update path="/oms:ControlData/oms:Functions/oms:BillingFunction/oms:orderItem[@index='{$orderItem/@index}']">
                  <oms:FunctionProcessingState>Completed</oms:FunctionProcessingState>
              </Update>
          )
      )
  )}
</OrderDataUpdate>Modeling Orders With Data Fields Above 1000 Characters
Standard OSM Design Studio data elements and structures can support a maximum of 1000 characters. However, in some cases it may be necessary to model data that exceed this limit. Before you model order data fields than can contain more than 1000 characters, you must carefully decide whether these fields are necessary. Unnecessary data within an order can reduce the order processing performance of OSM.
The following sections describe ways to achieve data length for OSM data above 1000 characters.
Using XML Types for Data Fields Above 1000 Characters
In Design Studio, you can model data dictionary structures as XML types from the Order specification, Order Template, Properties sub-tab, Order Data sub-tab. The structure must be empty and contain no children elements or structures for it to be designated as XML type. Structures defined as XML types in the data dictionary can contain XML documents. You can also use XML schema files to validate the XML structures in the XML types.
Oracle recommends this option when the data is not human editable or readable in the OSM user interfaces because the data is represented as XML. For example, the XML data can be captured as follows, where <largetext> is the name of the structure designated as XML type:
<largetext>
Text to be inserted here
</largetext>
When you have defined the XML type structures in the Order specification Order Template, then included them as a part of Manual or Automated Task Data, you can access the XML data using:
-
The OSM Task web client Order Editor screen (see OSM Task Web Client User's Guide for more information).
-
XML API GetOrder and UpdateOrder transactions (see OSM Developer's Guide for more information).
-
OSM Web Service GetOrder and UpdateOrder OSM operations (see OSM Developer's Guide for more information).
-
Order access and updates performed using Automated Task automation plug-ins (see "About Automation Plug-ins" for more information).
This approach has the following limitations:
-
You cannot specify XML type data as significant for amendment processing. Changes to this data does not trigger compensation.
-
XML types are not visible in the OSM reporting interface.
To enable XML schema validation:
-
Create schema files for the required XML data type.
-
Use the Java perspective Package Explorer view to copy the schema files into the cartridge project data dictionary folder where the XML data type has been defined.
Using Order Remarks for Data Fields Above 1000 Characters
You can add Remarks that contain text to orders during order processing. Remarks can be retrieved and updated using:
-
The OSM Task web client Remarks and Attachments screens (see OSM Task Web Client User's Guide for more information).
-
XML API Getorder and UpdateOrder transactions (see OSM Developer's Guide for more information).
-
OSM Web Service GetOrder and UpdateOrder operations (see OSM Developer's Guide for more information).
-
Order access and updates performed using Automated Task automation plug-ins (see "About Automation Plug-ins" for more information).
This approach has the following limitations:
-
Remarks can store up to 4000 bytes of data. Depending upon the character set configured in your database, the number of characters will vary.
-
Remarks associated with orders are only editable for a certain time after you add them. This time limit is defined by the remark_change_timeout_hours parameter contained in the oms-config.xml file. You can edit the value associated with this parameter to change the number of hours that remarks are editable. The default value is 24 hours. See OSM System Administrator's Guide for more information about working with the oms-config.xml file.
Using Attachments for Data Fields Above 1000 Characters
You can also add file attachments to remarks. File attachments can contain large amounts of data and you can store them in different formats. You can access attachments with:
-
The OSM Task web client using the Remarks and Attachments screens (see OSM Task Web Client User's Guide for more information).
-
XML API Getorder and UpdateOrder transactions (see OSM Developer's Guide for more information).
-
OSM Web Service GetOrder and UpdateOrder operations (see OSM Developer's Guide for more information).
Attachments are governed by the max_attachment_size parameter in the oms-config.xml file. You can edit the value associated with this parameter to change the maximum attachment size. The default value is 10MB. See OSM System Administrator's Guide for more information about working with oms-config.xml.
Note:
When the remark change threshold is exceeded (remark_change_timeout_hours), you can no longer add or delete attachments to the remark.
Using Data Providers to Retrieve Data
This section describes how to use data providers to retrieve data when modeling orders in OSM.
About Data Providers and Adapters
An Oracle Communications Design Studio data provider is an instantiation of adapter (which is a Java class) that can retrieve data in an XML format from external systems. Data Providers are used when defining Data Instance behaviors (see "Using the Data Instance Behavior to Retrieve and Store Data" for more information). Design Studio provides several built-in Data Providers to retrieve external XML instances from specific sources such as an Objectel server extension or a SOAP web service. Additionally, you can create your own custom Data Provider (see "Custom Data Providers" for more information).
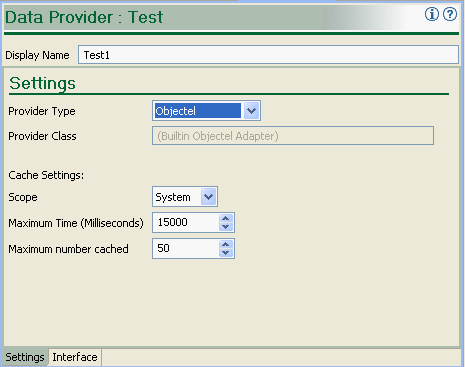
In Design Studio, the Data Provider editor Settings tab (Figure 8-11) allows you to set the Data Provider type using Provider Type. Types of Data Providers include:
When you select any of the above choices other than a custom data provider, the Provider Class field becomes disabled and is populated with the OSM implementation of the adapter. When you select Custom, the Provider Class field is enabled because you must supply the class name of the custom adapter that you write. See "Custom Data Providers" for detailed information.
Data Provider Interface Tab
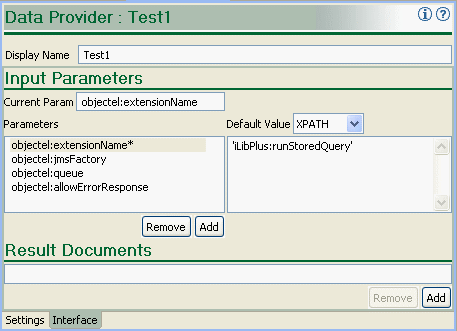
Data providers, both built-in and custom, can take parameters as input, as shown in the Interface tab (Figure 8-12). Parameter names are free-form text, but are dictated by the data provider's expected input. An asterisk (*) appears next to mandatory parameters, and each parameter's corresponding value can be specified as either XPath 1.0 or XQuery 1.0. In addition to the functions provided by the XPath 1.0 or XQuery 1.0 standards, OSM provides a custom function, instance(string) that allows the output of one data provider to be used as the input of another. The parameters required by each of the built-in data providers is documented in the sections that follow.
For instructions on how to define these data providers in Design Studio, including field-level detail, see "Data Provider Editor" in Modeling OSM Processes.
Accessing Data through Data Providers
To use a Data Provider, you include a data element in the order template, define a behavior for it and use an XPath expression to access the Data Provider and extract the data that you wish to display in the data element.
For example, the following XPath illustrates how to call a web service provider instance named "DataInstance" and return the value of the "my_element" view data element.
instance('DataInstance')/Data/_root/my_element
For XQuery, you would use vf:instance().
Augmenting or Overriding Data
In most cases, a data provider references order data from an external source, another behavior, or as static values defined within the data provider. In addition to these options, you can also add explicit parameter values from within an XQuery or XPath that augment or override the parameters defined in the OSM data dictionary.
For example, the following variable can be declared with parameters that have not been defined within the OSM data dictionary from within an XQuery:
declare variable $dataInstanceParams :=
    <params>
        <oms:url>file://users/bdueck/catalog.xml</oms:url>
        <fooParam>barValue</fooParam>
    </params>;
You can call a data instance function using a sequence of parameters declared in the variable above. For example:
log:info($log,local-name(vf:instance($order/oms:GetOrder.Response/oms:_root/oms:data[1],'DataInstance',$dataInstanceParams/*)/*[]))
You can call a data instance function using parameters passed as parameters on the function one by one. For example:
log:info($log,local-name(vf:instance($order/oms:GetOrder.Response/oms:_root/oms:data[1],'DataInstance',<oms:url>file://us/catalog.xml</oms:url>)/*[1])),
You can call a data instance function using parameters passed as parameters on the function one by one and include two parameters. For example:
log:info($log, local-name(vf:instance($order/oms:GetOrder.Response/oms:_root/oms:data[1],'DataInstance',<oms:url>file://us/catalog.xml</oms:url>,<foo>bar</foo>)/*[1]))
Objectel
This adapter provides a reliable transport call into Objectel. Although JMS is an asynchronous protocol, the Objectel adapter itself is not. While JMS simplifies transaction management, recovery, offline capabilities, and security, these benefits are not relevant when considered within the context of a behavior. The JMS adapter utilizes additional resources in the application server in the form of temporary JMS destinations to which Objectel sends the response. These can be expensive if an order has many adapters being called concurrently. It is not recommended to use this adapter in this scenario.
Parameters
-
objectel:extensionNameDescription: the name of the Objectel server extension to call.
Mandatory/Optional: Mandatory
-
objectel:jmsFactoryDescription: the name of the JMS factory to be used to access Objectel's JMS queue.
Mandatory/Optional: Optional
Default value -
com.oracle.objectel.XMLJMS.QueueConnectionFactory -
objectel:queueDescription: The name of the Objectel receive queue.
Mandatory/Optional: Optional
Default value: -
com.oracle.objectel.XMLJMS.QueueConnectionFactory -
objectel:allowErrorResponseDescription: an optional Boolean parameter name that if specified controls what happens if Objectel returns an error response. If this parameter is set to false (default), an error response from Objectel triggers an exception to be thrown which is in turn displayed as a constraint violation. If this parameter is set to true, the error response is returned by the ObjectelAdapter as a valid instance. This allows another Constraint behavior to apply to that same instance and display an error message accordingly. The benefit of using the default (false) is that you do not have to write an additional behavior to display a default error message. The constraint violation message looks like an exception with a stack trace, but shows the error description returned by Objectel at the top of the message. The benefit of setting this parameter to true is that you have greater control over when the error is shown, at what severity, and what message is displayed.
-
false: If this parameter is set to false (the default), an error response from Objectel throws an exception, which is then displayed as a constraint violation. By using false you can avoid writing an additional behavior to display only a default error message. With this method, the constraint violation message looks like an exception with a stack trace, but shows the error description returned by Objectel at the top of the message.
-
true: If this parameter is set to true, the error response is returned by the ObjectelAdapter as a valid instance. This allows another Constraint behavior to apply to that same instance and display an error message accordingly. By setting the parameter to true, you have greater control over:
-
When the error should be shown
-
The severity level displayed
-
The exact error message to display.
-
-
All other parameters are passed directly as name/value pairs to the server extension.
-
Order
This adapter lets you use order data from any OSM order as an external instance. This is useful for using related order data from other orders within OSM.
Parameters
-
oms:OrderIDDescription: The order ID of the order to be retrieved.
Mandatory/Optional: Mandatory
-
oms:ViewDescription: The view (query task) to use when retrieving order data.
Mandatory/Optional: This is required if the oms:OrderHistID is not supplied.
-
oms:OrderHistIDDescription: The order history ID to use when retrieving order data.
Mandatory/Optional: This is required if oms:View is not supplied.
Adding a New Order Data Provider
To add a new Data Provider which uses the Order adapter:
-
In Design Studio, add a new Data Provider. From the Studio menu, select New, then select Order and Service Management, and then select Data Provider.
-
In the Data Provider Wizard, enter a name and folder for the Data Provider and set Provider Type to Order.
The new Order Data Provider is added to the Design Studio project.
-
Edit the Data Provider.
-
In the Data Provider editor, on the Input Parameters section of the Interfaces tab, specify values for either the oms:View or oms:OrderHistID parameters.
-
Set the Default Value to either XQuery or XPath and enter your request code in the Default Value edit box.
-
Optionally specify the XML structure of the data in the Results Document edit box.
The definition of GetOrderResponse is located in the order management web service schema at SDK\XMLSchema\GetOrder.xsd.
For more information, see "About Modeling Control Data" in Modeling OSM Processes. Also, see "Accessing Data through Data Providers".
Property File
This adapter retrieves an external Java property file with a given name from the classpath. The format of the XML instance returned by this adapter is specified as:
http://docs.oracle.com/javase/8/docs/api/java/util/Properties.htmlParameters
-
oms:urlDescription: Specifies the file name of the Java property file. The file must be on the classpath and must be in the format of a Java property file.
Mandatory/Optional: Mandatory
SOAP
This adapter lets you access web services from OSM or an external web service server, using the HTTP protocol. You can call SOAP web services from OSM or an external web service server and use the responses within behaviors.
Note:
If you need to configure a proxy server to access the internet, add the following parameters to the OSM WebLogic server startup script:
JAVA_OPTIONS="${JAVA_OPTIONS} -Dhttp.proxyHost=ip_address -Dhttp.proxyPort=port
where ip_address and port are the IP address and port of the proxy server.
For web service calls specific to OSM, use the Web Service adapter. See "Web Service".
For general web services calls, use the SOAP adapter.
Parameters
-
soap.endpointDescription: Specifies the URL to which the SOAP request will be sent.
Mandatory/Optional: Mandatory
-
soap.actionDescription: Contains the URI that identifies the intent of the message.
Mandatory/Optional: Optional
-
soap.envelopeDescription: Specifies the root element of a SOAP message.
Mandatory/Optional: Mandatory, if the
soap.bodyparameter is not defined. -
soap.bodyDescription: Contains the SOAP message intended for the endpoint. If the SOAP body node is not included in the
soap.bodycontent, it will be added by the SOAP Adapter.Mandatory/Optional: Mandatory, if the
soap.envelopeparameter is not defined. -
soap.headerDescription: Contains XML data that affects the way the application-specific content is processed by the message provider. If the SOAP header node is not included in the
soap.headercontent, it will be added by the SOAP Adapter.Mandatory/Optional: Optional
-
oms:credentials.usernameDescription: Specifies an authentication user name.
Mandatory/Optional: Optional
-
oms:credentials.password: An optional authentication parameterDescription: Specifies an authentication password.
Mandatory/Optional: Optional
-
oms:credentials.scope.host: An optional authentication parameterDescription: Specifies an authentication host parameter.
Mandatory/Optional: Optional
-
soap.allowErrorResponse:Description: When set to true, the adapter returns SOAP fault messages to the calling behavior; otherwise, the adapter throws an exception when a SOAP fault response is returned.
Mandatory/Optional: Mandatory
Example of soap.body Parameter
The following is an example of a SOAP body, which would be populated in the soap.body parameter.
<instance name="us-addr" xsi:type="externalInstanceType">
<adapter>com.mslv.oms.view.rule.adapter.SOAPAdapter</adapter>
<parameter name="soap.endpoint">'http://ws2.serviceobjects.net/av/AddressValidate.asmx'</parameter>
<parameter name="soap.body" xsi:type="xqueryType">
<soap:Body soap:encodingStyle="http://schemas.xmlsoap.org/soap/encoding/" xmlns:soap="http://schemas.xmlsoap.org/soap/envelope/" xmlns:xsi="http://www.w3.org/2001/XMLSchema-instance">
<sa:ValidateAddress xmlns:sa="http://www.serviceobjects.com/">
<sa:Address xsi:type="soapenc:string">{ ../street/text() }</sa:Address>
<sa:City xsi:type="soapenc:string">{ ../city/text() }</sa:City>
<sa:State xsi:type="soapenc:string">{ ../state/text() }</sa:State>
<sa:PostalCode xsi:type="soapenc:string"/>
<sa:LicenseKey xsi:type="soapenc:string">{ ../soap_license_key/text() }</sa:LicenseKey>
</sa:ValidateAddress>
</soap:Body>
</parameter>
</parameter name="soap.action">'http://www.serviceobjects.com/ValidateAddress'</parameter>
<cache>
<scope>NODE</scope>
</cache>
</instance>
Example of soap.envelope Parameter
The following is an example of a SOAP envelope, which would be populated in the soap.envelope parameter.
<?xml version="1.0" encoding="UTF-8"?>
<com:modelEntity xmlns:xsi="http://www.w3.org/2001/XMLSchema-instance"
 xmlns:adapt="http://xmlns.oracle.com/communications/sce/osm/model/adapter"
 xmlns="http://xmlns.oracle.com/communications/sce/osm/model/adapter"
 xmlns:com="http://www.mslv.com/studio/core/model/common"
 xmlns:prov="http://xmlns.oracle.com/communications/sce/osm/model/provisioning"
 xsi:type="adapt:adapterType" name="Send_Order">
  <com:displayName>Send_Order</com:displayName>
  <com:saveVersion>49</com:saveVersion>
  <com:interface>
    <com:inputParameter xsi:type="adapt:xpathInputParameterType" name="soap.endpoint">
<adapt:contentType>XPATH</adapt:contentType>
<adapt:defaultValue>'http://localhost:7001/osm/wsapi'</adapt:defaultValue>
</com:inputParameter>
<com:inputParameter xsi:type="adapt:xpathInputParameterType" name="soap.envelope">
  <adapt:contentType>XQUERY</adapt:contentType>
  <adapt:defaultValue>
  <soapenv:Envelope xmlns:soapenv="http://schemas.xmlsoap.org/soap/envelope/"
 xmlns:osm="http://xmlns.oracle.com/communications/ordermanagement">
  <soapenv:Header>
    <wsse:Security soapenv:mustUnderstand="1"
 xmlns:soapenv="http://schemas.xmlsoap.org/soap/envelope/"
 xmlns:soapenc="http://schemas.xmlsoap.org/soap/encoding/"
xmlns:wsu="http://docs.oasis-open.org/wss/2004/01/oasis-200401-wss-wssecurity-utility-1.0.xsd"
 xmlns:xsi="http://www.w3.org/2001/XMLSchema-instance"
 xmlns:xsd="http://www.w3.org/2001/XMLSchema"
xmlns:wsse="http://docs.oasis-open.org/wss/2004/01/oasis-200401-wss-wssecurity-secext-1.0.xsd">
       <wsse:UsernameToken wsu:Id="UsernameToken-10570647">
          <wsse:Username>osm</wsse:Username>
          <wsse:Password Type="http://docs.oasis-open.org/wss/2004/01/oasis-200401-wss-username-token-profile-1.0#PasswordText">administrator</wsse:Password>
       </wsse:UsernameToken>
    </wsse:Security>
  </soapenv:Header>
  <soapenv:Body>
     <osm:CreateOrderBySpecification xmlns:osm="http://xmlns.oracle.com/communications/ordermanagement" xmlns:soapenc="http://schemas.xmlsoap.org/soap/encoding/" xmlns:xsi="http://www.w3.org/2001/XMLSchema-instance" xmlns:xsd="http://www.w3.org/2001/XMLSchema">
        <osm:Specification>
           <osm:Cartridge>
              <osm:Name>LGT_PSTN_Corp</osm:Name>
              <osm:Version>1.0.0</osm:Version>
           </osm:Cartridge>
           <osm:Type>LGT_PSTN_CorpOrder</osm:Type>
           <osm:Source>LGT_PSTN_CorpOrder</osm:Source>
        </osm:Specification>
        <osm:Reference>Create by WebService</osm:Reference>
        <osm:Priority>5</osm:Priority>
        <osm:AutoAddMandatoryData>true</osm:AutoAddMandatoryData>
        <osm:StartOrder>true</osm:StartOrder>
        <osm:Data>
           <_root>
 	            <Customer_info>
                <Customer_name>Sample_cust</Customer_name>
                <Customer_Address>Anytown</Customer_Address>
                <Customer_region>1</Customer_region>
                <Customer_contact>391-322-1323</Customer_contact>
         		    </Customer_info>
 	            <Order_info>
                <Order_Id> 1000006</Order_Id>
                <Order_version>1 </Order_version>
		             </Order_info>
 	            <Service_info>
                 <Service_Type>1</Service_Type>
                 <Corp_TelephoneNumber>900893322 </Corp_TelephoneNumber>
		             </Service_info>
           </_root>
         </osm:Data>
      </osm:CreateOrderBySpecification>
   </soapenv:Body>
  </soapenv:Envelope></adapt:defaultValue>
</com:inputParameter>
    <com:inputParameter xsi:type="adapt:xpathInputParameterType" name="oms:credentials.username">
       <adapt:contentType>XPATH</adapt:contentType>
       <adapt:defaultValue>'osm'</adapt:defaultValue></com:inputParameter>
    <com:inputParameter xsi:type="adapt:xpathInputParameterType" name="oms:credentials.password">
      <adapt:contentType>XPATH</adapt:contentType>
      <adapt:defaultValue>'administrator'</adapt:defaultValue>
  </com:inputParameter>
  </com:interface>
  <com:implementation xsi:type="adapt:adapterImplementationType">
    <adapt:builtInType>SOAP</adapt:builtInType>
  </com:implementation>
  <adapt:cache enabled="true">
    <adapt:scope>SYSTEM</adapt:scope>
    <adapt:timeout>15000</adapt:timeout>
    <adapt:maxsize>50</adapt:maxsize>
  </adapt:cache>
</com:modelEntity>
XML Attachment
This adapter lets you use an attachment from any OSM order as an external instance. It is useful for using related-order-data from other orders within OSM.
Parameters
-
oms:OrderIDDescription: The order ID of the order to be retrieved.
Mandatory/Optional: Mandatory
-
oms:FileNameDescription: The name of the attachment to use when retrieving the order data.
Mandatory/Optional: Mandatory
XML File
This adapter lets you use an XML file accessible from any URL as an external instance. It is useful for integrating external XML data located in a file system, FTP site, from HTTP, or in a Java JAR file.
Parameters
-
oms:urlDescription: The URL of the file to retrieve.
Mandatory/Optional: Mandatory
XML Validation
This adapter validates a provided XML instance document according to a user-defined schema. The document may be provided either as a URL or as an element. The schema may also be provided as a URL or as an element. The returned document conforms to the element specified by http://xmlns.oracle.com/communications/ordermanagement#ValidationResult.
Parameters
-
documentDescription: The file name of the XML document to validate.
Mandatory/Optional: Mandatory
-
schemaDescription: The file name of the XSD used to perform the XML validation.
Mandatory/Optional: Mandatory
JDBC
This adapter lets OSM query any JDBC database, then use the results within a behavior. This adapter is particularly useful for acquiring information stored in an external database.
Parameters
-
oms:dataSourceDescription: The JNDI name of the data source providing the database connection information. For example
<code>'mslv/oms/oms1/internal/jdbc/DataSource'. The data source must be defined through the WebLogic server console.Mandatory/Optional: Mandatory
-
oms:sqlDescription: The SQL that is sent to the database. To run a SQL stored procedure, this parameter must comply with the format specified by:
http://docs.oracle.com/javase/8/docs/api/java/sql/CallableStatement.htmlMandatory/Optional: Mandatory
-
in:1 . . . in:nDescription: 1 to n additional optional input parameters may be supplied that are bound to parameters defined in the oms:sql value.
Mandatory/Optional: Optional
-
out:1 . . . out:nDescription: 1 to n additional optional output parameters that are used when calling SQL stored procedures that have output parameters defined. The parameter value specifies the SQL type name of the parameter, and must be defined at:
http://docs.oracle.com/javase/8/docs/api/java/sql/Types.htmlMandatory/Optional: Optional
Web Service
This external instance adapter lets you invoke the GetOrder and FindOrder OSM Web Service operations. The adapter acts as a wrapper around OSM's Web Service API for these two web service operations, allowing them to be called from external instances.
For other web service calls, use the SOAP adapter. See "SOAP" for more information.
Parameters
-
soap.requestDescription: Set this parameter to one of the following:
-
The contents of what would normally be in the Body element of the web service request. For example, ord:GetOrder or ord:FindOrder.
-
A soap:Envelope element, that is, the entire soap request.
-
A soap:Body element, that is, the body element of the soap request.
Mandatory/Optional: Mandatory
-
See OSM Developer's Guide for more information about GetOrder and FindOrder web service transactions.
Adding a New Web Service Data Provider
To add a new Data Provider which uses the Web Service adapter:
-
In Design Studio, add a new Data Provider. From the Studio menu, select New, then select Order and Service Management, and then select Data Provider.
-
In the Data Provider Wizard, enter a name and folder for the Data Provider and set Provider Type to Web Service.
The new Web Service Data Provider is added to the Design Studio project.
-
Edit the Data Provider.
-
In the Data Provider editor, on the Input Parameters section of the Interfaces tab, select the soap.request* parameter.
-
Set the Default Value to XQuery and enter the request XQuery code in the Default Value edit box. See "Sample soap.request XQuery" for an example.
You can optionally specify the request as an XPath instance instead by setting the Default Value to XPath and entering the request XPath code in the Default Value edit box.
-
Optionally specify the XML structure of the data in the Results Document edit box.
Definitions of FindOrderResponse and GetOrderResponse declarations are located in the order management web service schema at SDK\WebService\wsdl\OrderManagementWS.xsd.
For more information, see "About Modeling Control Data" in Modeling OSM Processes.
Sample soap.request XQuery
The following is a soap.request XQuery example for a web services Data Provider. You can also specify the input as a SOAP envelope or a SOAP Body.
<ord:GetOrder xmlns:ord="http://xmlns.oracle.com/communications/ordermanagement">
   <ord:OrderId>1</ord:OrderId>
   <ord:View>review_details_view</ord:View>
   <ord:AmendmentFilter>
   <ord:LevelOfDetail>AmendmentsSummary</ord:LevelOfDetail>
   </ord:AmendmentFilter>
   <ord:LifecycleEventFilter>
   <ord:RetrieveLifecycleEvents>true</ord:RetrieveLifecycleEvents>
   </ord:LifecycleEventFilter>
</ord:GetOrder>
Accessing Data
To use the Data Provider, include a data element in the order template, define a behavior for it, and use an XPath expression to access the Data Provider and extract the data to display in the data element. See "Accessing Data through Data Providers".
Whenever the Web Service adapter is called through a Data Provider, GetOrderRequest is executed and a response returned. If logging is set to debug for the OrderAdapter, a message similar to the one below is displayed on the WebLogic Administration console:
<09-Feb-2012 2:57:57,884 IST PM> <DEBUG> <adapter.OsmWebServiceAdapter> <ExecuteThread: '10' for queue: 'oms.web'> <<GetOrderResponse xmlns="http://xmlns.oracle.com/communications/ordermanagement">
    <OrderSummary>
        <Id>16</Id>
        <Specification>
            <Cartridge>
                <Name>view_framework_demo</Name>
                <Version>1.0.0.0.0</Version>
            </Cartridge>
            <Type>vf_demo_web</Type>
            <Source>vf_demo_web</Source>
        </Specification>
        <State>open.running.in_progress</State>
        <Reference>N1</Reference>
        <CreatedDate>2012-02-08T17:55:31.000+05:30</CreatedDate>
        <ExpectedDuration>P1D</ExpectedDuration>
<ExpectedOrderCompletionDate>2012-02-09T17:55:37.000+05:30</ExpectedOrderCompletionDate>
        <ProcessStatus>n/a</ProcessStatus>
        <Priority>5</Priority>
    </OrderSummary>
    <Data>
        <osmc:_root
            xmlns:osmc="urn:oracle:names:ordermanagement:cartridge:view_framework_demo:1.0.0.0.0:view:enter_account_information" index="0">
            <osmc:account_information index="1328703937231">
                <osmc:first_name index="1328703937242">name</osmc:first_name>
                <osmc:last_name index="1328703937243">lastname</osmc:last_name>
                <osmc:country index="1328703937244">US</osmc:country>
                <osmc:address_information index="1328703937233">
                    <osmc:address_details_us index="1328703937236">
                        <osmc:validate_address_via_soap index="1328703937238">No</osmc:validate_address_via_soap>
                        <osmc:street index="1328703937239">street</osmc:street>
                        <osmc:city index="1328703937241">city</osmc:city>
                        <osmc:state index="1328703937240">MI</osmc:state>
                        <osmc:zip_code index="1328703937237">12323</osmc:zip_code>
                    </osmc:address_details_us>
                    <osmc:address_details_ca index="1328703937234">
                        <osmc:validate_address_via_soap index="1328703937235">No</osmc:validate_address_via_soap>
                    </osmc:address_details_ca>
                </osmc:address_information>
            </osmc:account_information>
            <osmc:info_roopa index="1328703937245">nikhil</osmc:info_roopa>
        </osmc:_root>
    </Data>
</GetOrderResponse
Custom Data Providers
In addition to the built-in data providers described in previous sections, Design Studio supports custom data providers. You can develop a custom data provider class in a project in Design Studio as part of a solution. This provider class must implement the com.mslv.oms.view.rule.ExternalInstanceAdapter interface. This interface is documented in the Javadocs distribution found in the OSM SDK.
The implementation class can be made available to the OSM run time system in two ways:
-
Package the class into an Java archive (jar file) with an arbitrary name and place the jar file in the resources directory of the Studio project(s) that define Behaviors referencing the data provider. The class will be available as soon as the project is deployed
-
Add the compiled adapter class to the customization.jar file in the oms.ear file. The class will be available as soon as the OSM application is redeployed. See OSM Developer's Guide for information about unpacking, packing, and redeploying the oms.ear file.
The ExternalInstanceAdapter.retrieveInstance(ViewRuleContext, Map) method provides a Map of name/value pairs of arguments defined in the data provider's Design Studio definition and their corresponding values for an invocation of an instance of this class. The com.mslv.oms.view.rule.adapter.AbstractAdapter class provides a number of methods to assist in extracting properly type cast parameter values from that Map. AbstractAdapter is included in the automation_plugins.jar archive found in the osmLib directory of a Design Studio OSM project, as well as in the automation/automationdeploy_bin subdirectory of an OSM SDK installation.
Handling Parameters
Custom data providers, like built-in providers, support input parameters. The following examples illustrate how to access those parameters.
Example 1 (incorrect usage)
String stringParamValue = (String) parameters.get(MY_STRING_PARAM); The value returned by parameters.get(...) may not be a String, resulting in a ClassCastException.
Example 2 (incorrect usage)
String stringParamValue = parameters.get(MY_STRING_PARAM).toString(); The parameters.get() call may return a null value resulting in a null pointer exception. Also, the value returned may be an XML DOM fragment, requiring a more sophisticated mechanism for value extraction than simply calling toString().
Example 3 (correct usage)
String stringParamValue = = getStringParam(parameters, MY_STRING_PARAM); The getStringParam(Map, String) call automatically performs the appropriate conversion to coerce a parameter value into a String. This method is intended for extracting a required parameter value. If a value for MY_STRING_PARAM was not provided, or if the value cannot be coerced into a String, a BadParameterException is thrown. To retrieve optional parameter values, use getStringParam(Map, String, String) instead; see Example 4.
Example 4 (correct usage)
String stringParamValue = getStringParam(parameters, MY_STRING_PARAM, "a default value"); The MY_STRING_PARAM parameter is retrieved as an optional parameter. If a value for MY_STRING_PARAM is provided, it is returned, otherwise, "a default value" is returned.The AbstractAdapter class also provides similar methods to extract boolean, numeric, and XML DOM Node parameter values:
-
boolean booleanParamValue = getBooleanParam(parameters, MY_BOOLEAN_PARAM); -
int intParamValue = getIntParam(parameters, MY_NUMBER_PARAM); -
Node nodeParamValue = getNodeParam(parameters, MY_NODE_PARAM);
The following code snippet illustrates a simple custom data provider class:
/*
* Copyright © 1998, 2012, Oracle and/or its affiliates. All rights reserved.
*/
package oracle.communications.ordermanagement.example;
import java.util.Map;
import oracle.communications.ordermanagement.util.xml.XMLHelper;
import org.w3c.dom.Document;
import org.w3c.dom.Element;
import com.mslv.oms.view.rule.ExternalInstanceAdapter;
import com.mslv.oms.view.rule.ViewRuleContext;
import com.mslv.oms.view.rule.adapter.AbstractAdapter;
/**
* <p>
* This class exemplifies a custom Data Provider. In particular, it demonstrates a provider that returns the familiar "Hello World!"
* example. The data returned by this provider can in turn be used as input to any Behavior type.
* </p>
* <p>
* Like all data providers, this class implements the {@link ExternalInstanceAdapter} interface. This interface defines a single method,
* {@link ExternalInstanceAdapter#retrieveInstance(ViewRuleContext, Map) retrieveInstance(ViewRuleContext, Map)}. The
* {@link ViewRuleContext} argument provides various context hooks to this Data Provider implementation instance. The <code>Map</code>
* argument contains the name/value pairs of arguments defined in the Data Provider's Studio definition and their corresponding values for
* the current invocation of this Data Provider implementation instance. It additionally extends the {@link AbstractAdapter} class.
* <code>AbstractAdapter</code> provides a number of utility methods for retrieving properly type-cast parameters from the parameter
* <code>Map</code>.
* </p>
*
* @author Copyright © 1998, 2012, Oracle and/or its affiliates. All rights reserved.
*
*/
public final class ExampleProvider extends AbstractAdapter implements ExternalInstanceAdapter {
/**
* The name of a parameter that specifies the salutation to return from {@link #retrieveInstance(ViewRuleContext, Map)}. For example, if
* a value of <code>Goodbye</code> is specified, the message <code>Goodbye World!</code> will be returned. This example does not require
* this parameter to exist. If it does not, the message <code>Hello World!</code> will be returned.
*/
public static final String SALUTATION_PARAM_NAME = "salutation";
private static final String DEFAULT_SALUTATION = "Hello";
/**
* <p>
* This implementation simply returns the root {@link Element} of a {@link Document} containing the <code>String "Hello World!"</code>
* in the contents, i.e., the root of the XML:
*
* <pre>
* <response>
* <message>Hello World!</message>
* </response>
* </pre>
*
* </p>
* <p>
* The <code>instance('<var>name</var>')</code> Behavior function resolves to the document root element returned by this method.
* Therefore, the syntax for locating this provider's message (assuming the Data Provider associated with this class is named
* <code>ExampleProvider</code>) is <code>instance('ExampleProvider')/message</code>.
* </p>
*
* @param ctx
* provides various context-specific hooks for use by this instance
* @param params
* <code>Map</code> of name/value pairs, where the key is the parameter name defined in the Data Provider definition that is
* associated with this class, and the value is the resolved value of that parameter for a specific invocation of this
* method. This example does not expect or require any parameters.
* @return the root <code>Document Element</code>
*/
@Override
public Element retrieveInstance(final ViewRuleContext ctx, final Map<String, Object> params) throws Exception {
/*
* This demonstrates how to use the utility methods inherited from AbstractAdapter to return a parameter value, though here the
* "salutation" parameter is not expected to exist.
*/
final String salutation = getStringParam(params, SALUTATION_PARAM_NAME, DEFAULT_SALUTATION);
/*
* Create the response. An actual provider implementation would likely calculate or retrieve the response from an external system.
*/
final String response = "<response><message>" + salutation + " World!</message></response>";
/*
* The code invoking this method expects a org.w3c.dom.Document root org.w3c.dom.Element. The XMLHelper utility class provides a
* number of DOM manipulation methods, including various String parsers.
*/
final Document responseDoc = XMLHelper.parseText(response, false);
return responseDoc.getDocumentElement();
}
}
