Microsoft Hyper-V
Virtual Appliances deployed on Microsoft Hyper-V are subject to the following configuration limitations:
- Hyper-V does not support layer 2 bridging; therefore, the Passthrough Service is not supported in Virtual Appliances deployed on Hyper-V.
- Hyper-V does not support multiple VLANs to use a single virtual interface, therefore only one VLAN can be supported on an Interface Group.
Important: When shutting down Virtual Appliances deployed on Hyper-V, use the “Shut Down” option rather than the “Turn Off” option to ensure graceful shutdown. If the “Turn Off” option is used, the Virtual Appliance may not start up properly.
Deploy the Virtual Appliance in Hyper-V
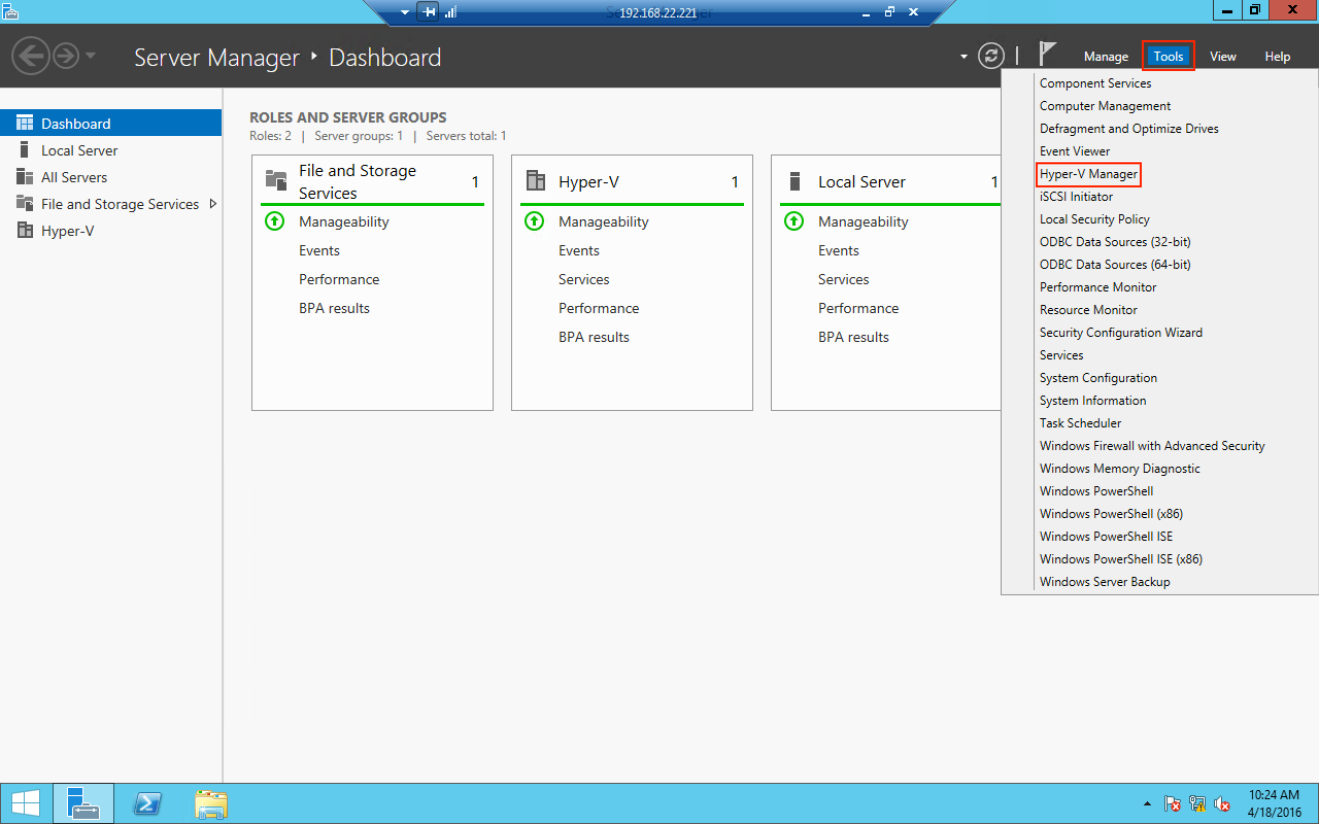
- Open
Server
Manager, select the
Tools pull-down
menu, and click
Hyper-V
Manager. This will open the Hyper-V Manager window.
- In the
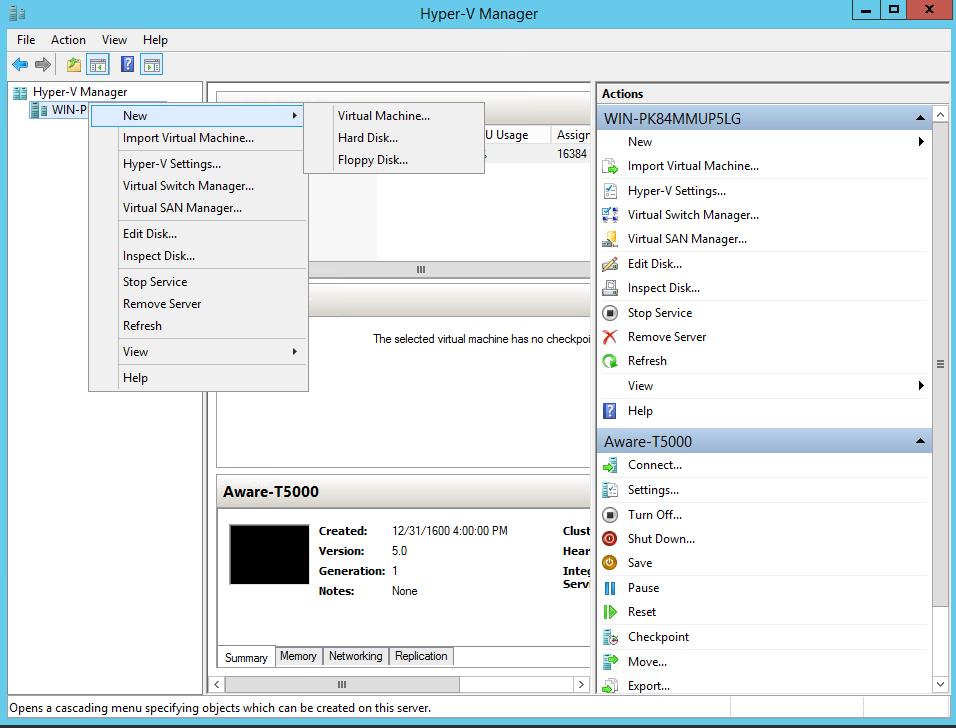
Hyper-V Manager window, make sure your server is selected from the dropdown
list in the left. Select
New, and then
Virtual
Machine. This will open the New Virtual Machine Wizard.
- Review the Before You Begin tab, then click next.
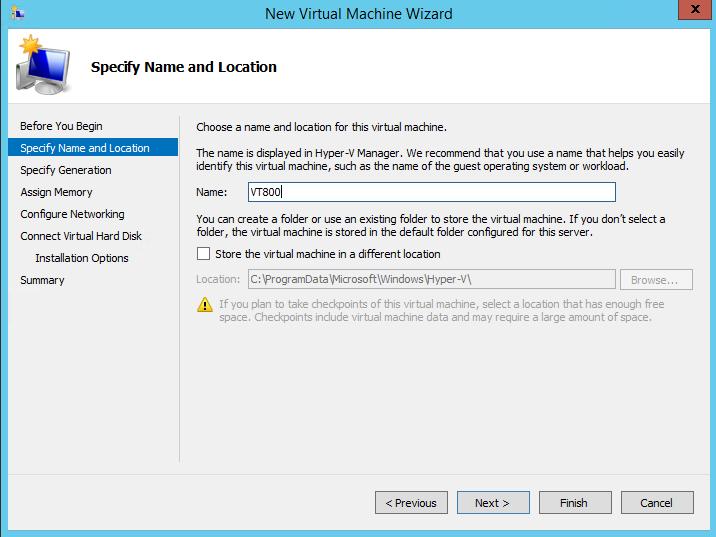
- On the
Specify
Name and Location tab, type an appropriate name for your virtual
machine into the name box. Click
Next.
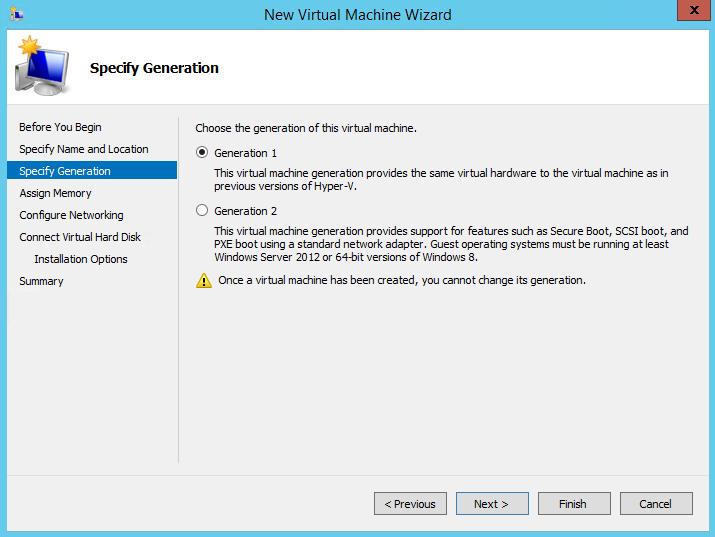
- On the
Specify
Generation tab, ensure that
Generation
1 is selected and click
Next.
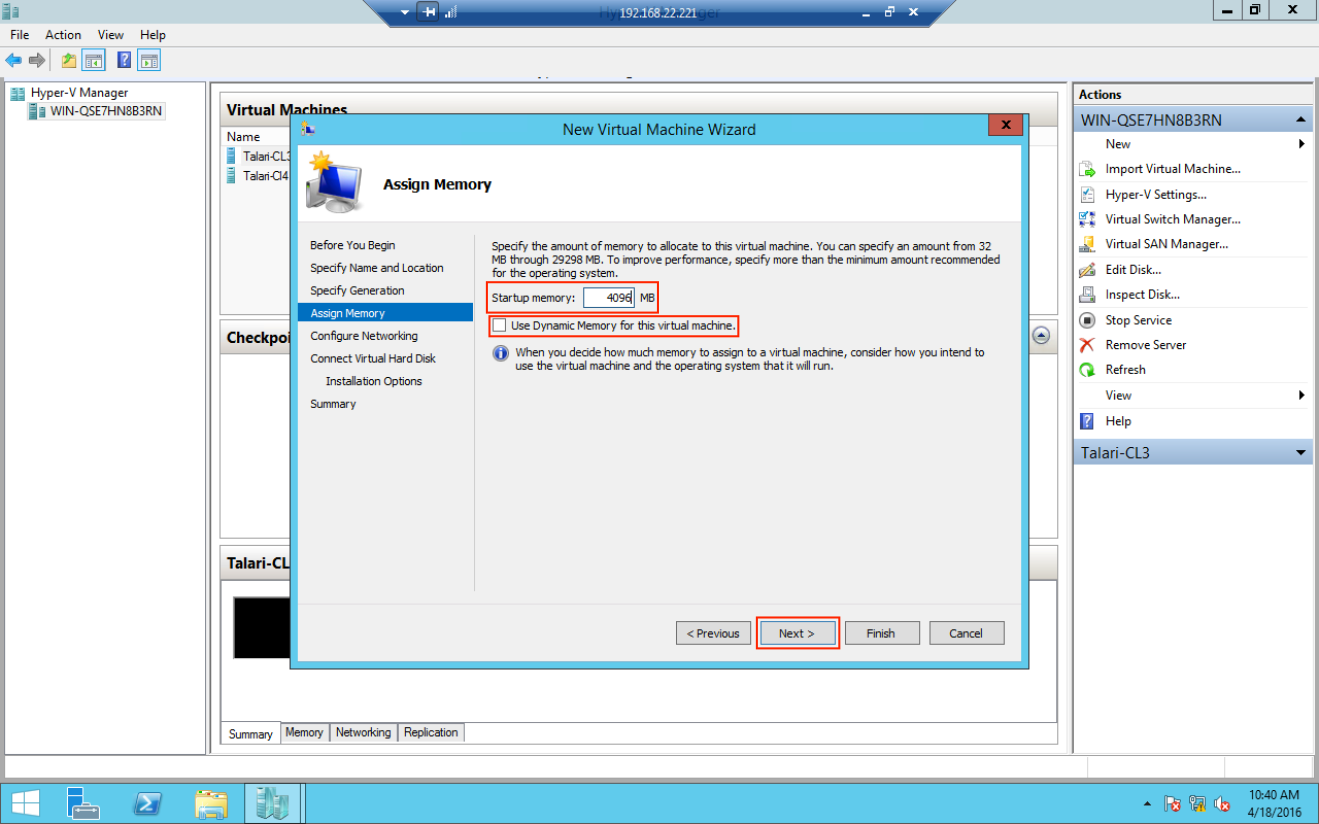
- On the
Assign
Memory tab, chose the appropriate amount of memory necessary for
the Virtual Appliance being deployed and input that value into the Startup
memory box. Confirm “Use Dynamic Memory for the virtual machine” is not
selected, then click
Next.
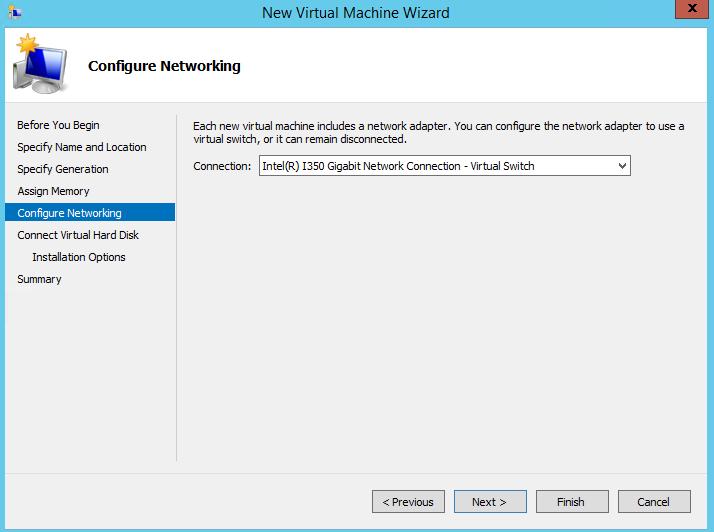
- On the
Configure
Networking tab, select a Virtual Switch to connect to the default
network adapter. This network adapter will be used as the management interface
for the Virtual Appliance. If you have not yet configured any Virtual Switches,
you may leave the network adapter disconnected for the moment. Click
Next.
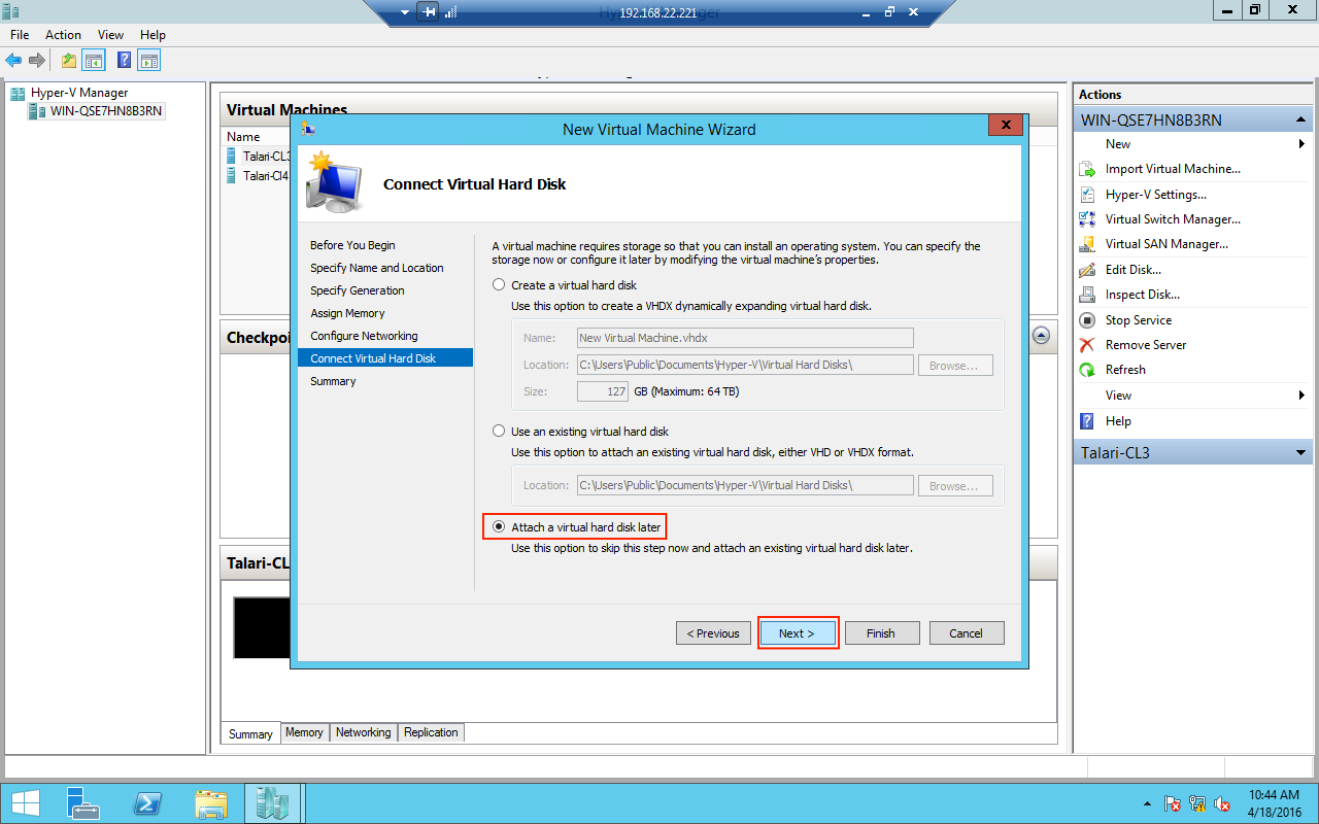
- On the
Connect
Virtual Hard Disk tab, select the "Attach a virtual hard disk
later" option and click
Next.
- On the Summary page, review the information for accuracy then click Finish.
- The next
step is to use the Virtual Switch Manager to configure Virtual Switches for the
network interface ports. If this has already been done for other virtual
machines on the server, skip to the next step.
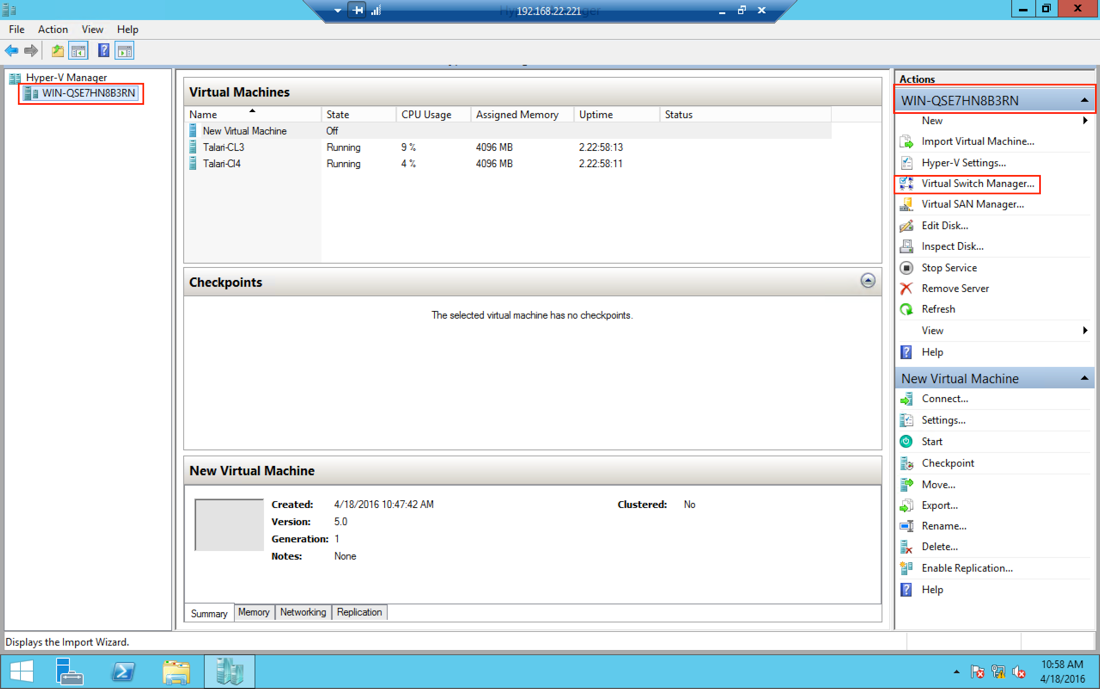
- On the
Hyper-V Manager window, select the server and from the dropdown then select
Virtual
Switch Manager.
- Select New Virtual Switch, make sure External Network (for connection to external Ethernet ports) is selected under type, and click Create Virtual Switch.
- In the Name box, choose an appropriate name for the Virtual Switch (i.e. MGT, WAN, or LAN).
- Under Connection Type, choose the physical NIC this Virtual Switch will represent. Disable the "Allow management operating system to share this network adapter" option, unless this is the management NIC and you would like it to be shared among VMs.
- Under
VLAN
ID, allow tagging and choose the VLAN if required, click
Apply.
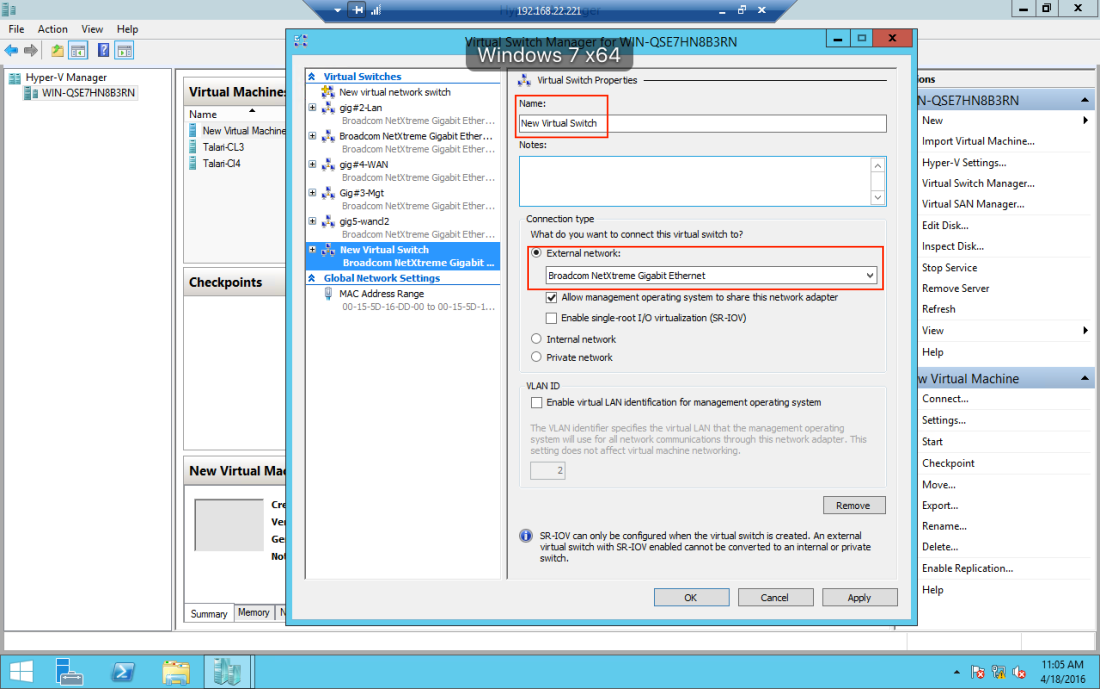
- Repeat these steps for each NIC that will be used on the virtual appliance. Then, click OK. In a typical deployment the virtual appliance will require a minimum of three NICs – Management, LAN, and WAN.
- On the
Hyper-V Manager window, select the server and from the dropdown then select
Virtual
Switch Manager.
- Back on the
Hyper-V Manager window, select the new virtual machine and click
Settings.
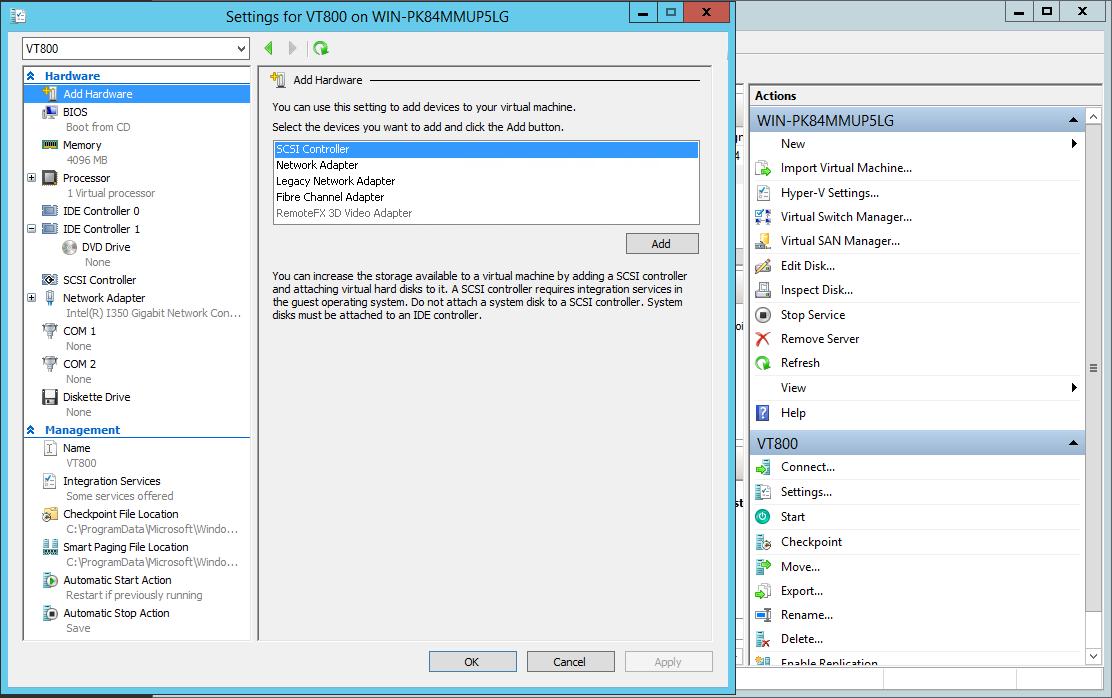
- In the
settings window for your virtual machine select the
IDE
Controller 0 from the Hardware dropdown menu. Ensure that Hard
Drive is selected and click
Add.
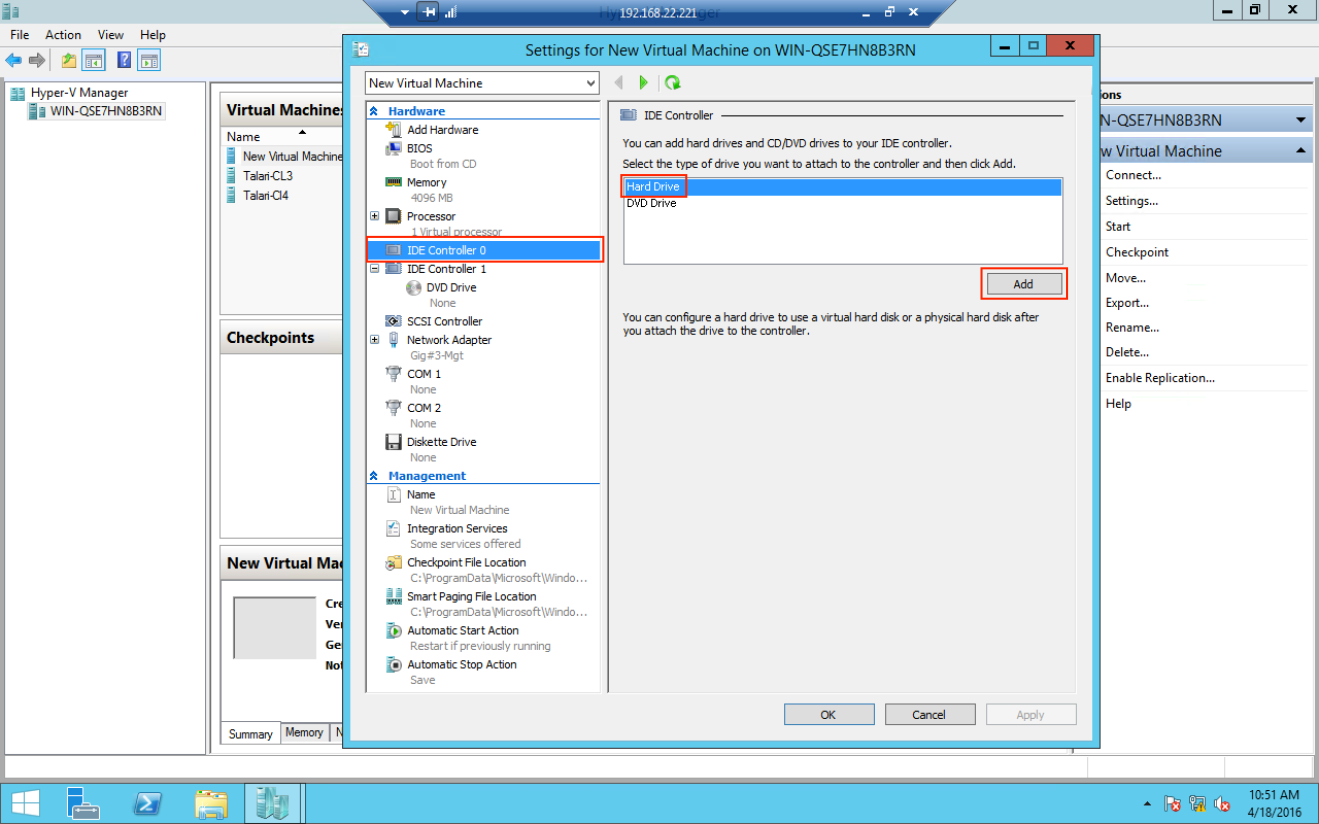
- In the
settings window for your virtual machine select the
IDE
Controller 0 from the Hardware dropdown menu. Ensure that Hard
Drive is selected and click
Add.
- Under Media, choose Virtual Hard Disk and browse to where the .vhd for the Virtual Appliance is stored on the server. Click Apply then OK.
- Go back to your virtual machine Settings window. You will notice that one network adapter has already been created during the VM deployment. This network adapter provides management connectivity for the Virtual Appliance. If it is not connected to the Virtual Switch designated for management traffic, select that Virtual Switch from the dropdown and click Apply.
- You will
need to create network adapters for the remaining data ports that will be used
on your Virtual Appliance. Select
Add
Hardware from the Hardware dropdown menu, then
choose
Network
Adapter and click
Add.
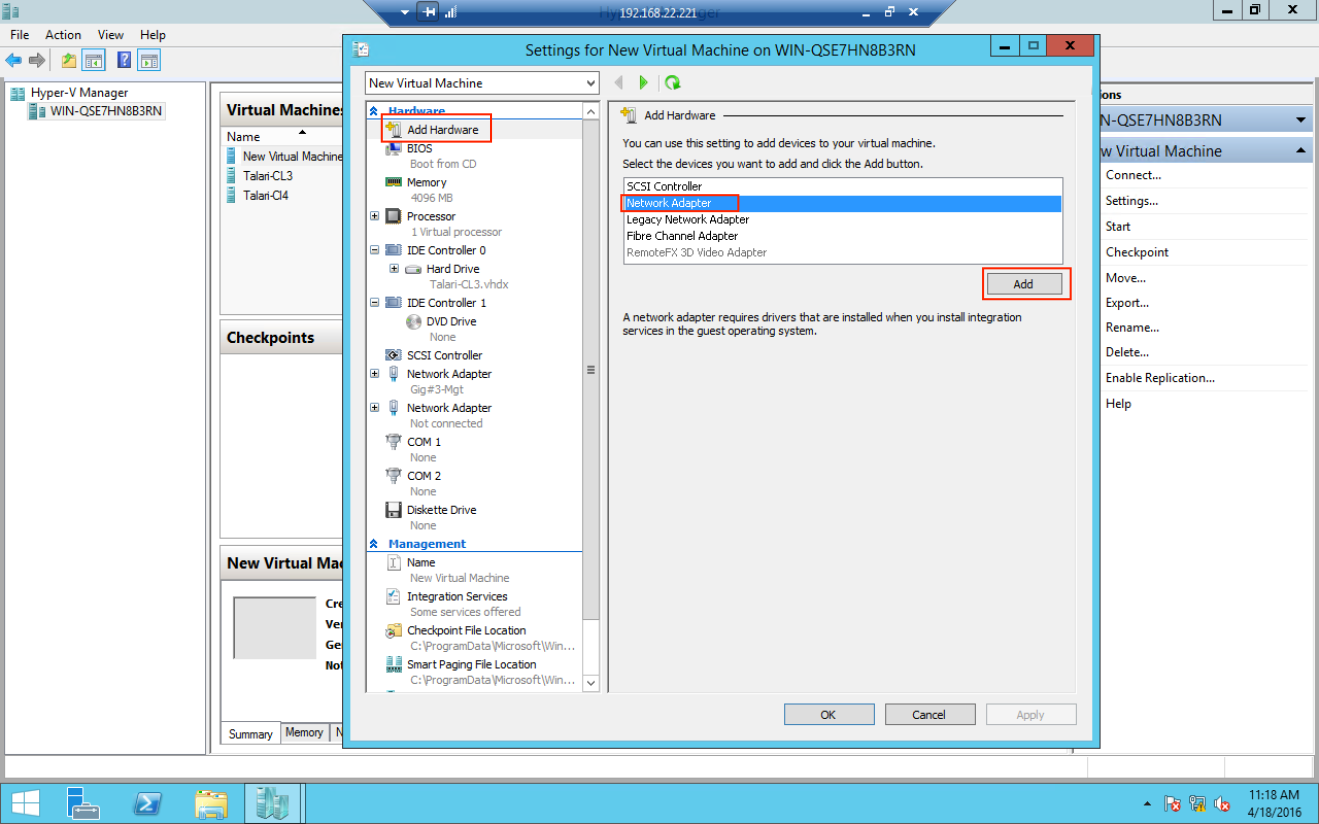
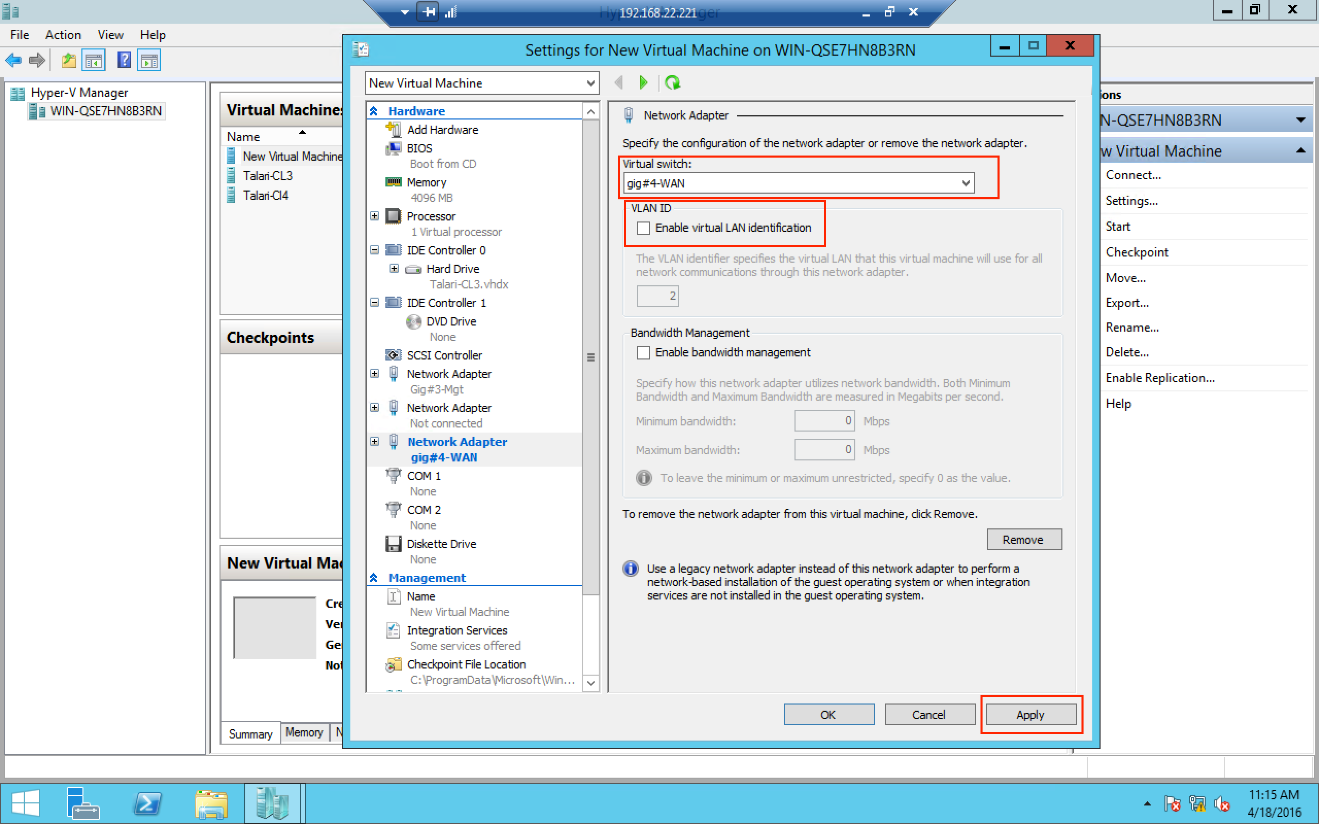
- Choose the
appropriate previously configured Virtual Switch for the desired physical port
from the dropdown menu. If VLAN tagging will be used on this port, select the
Enable
virtual LAN identification button. Click
Apply and repeat for
each virtual machine port. Click
OK when all network
adapters have been created.
- Finally, the
Memory Weight for the Virtual Appliance must be set to High. Select
Memory from the
Hardware dropdown menu. Ensure that the slider for
Memory
Weight is set to
High, then click
Apply.

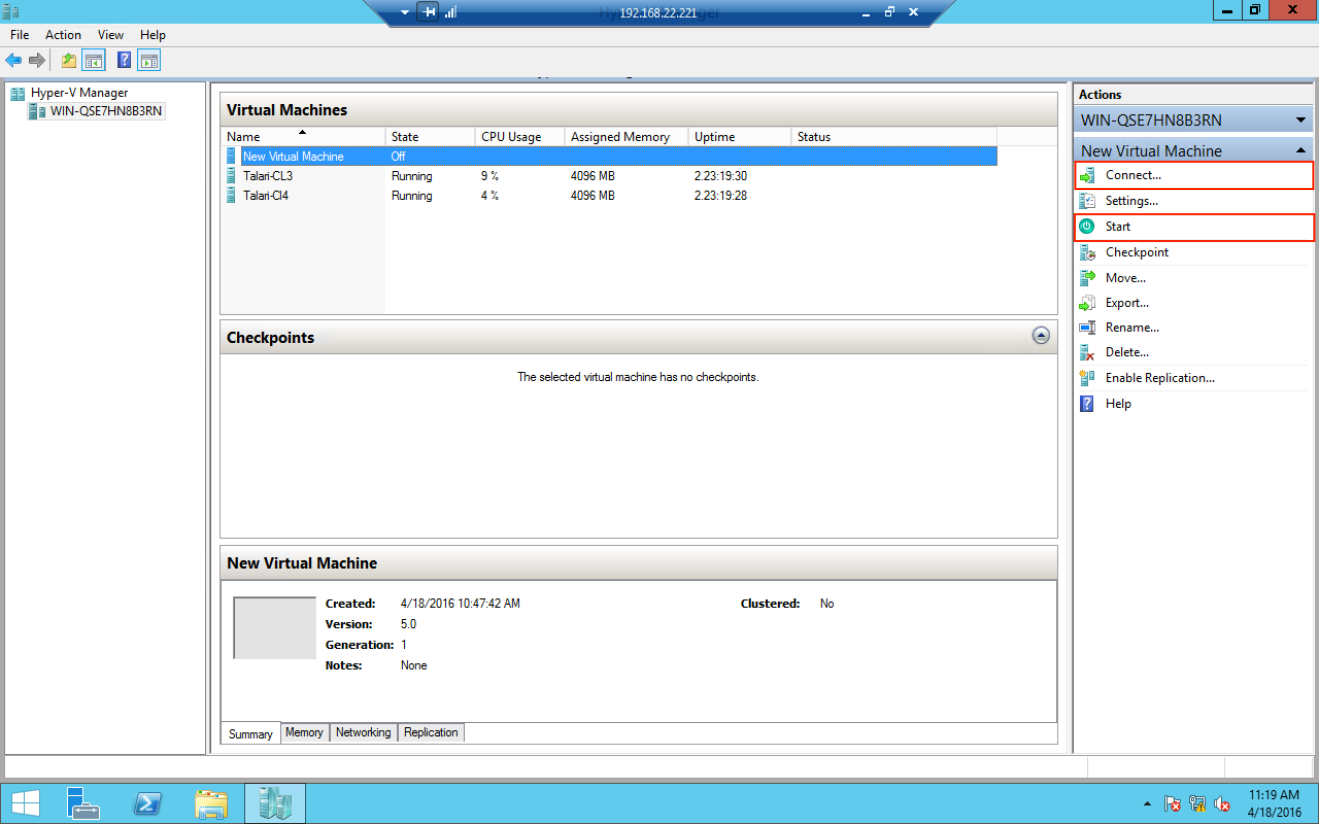
- At this point the Virtual Appliance is ready for boot. Click Start from the VM's dropdown menu, then Connect to console into the device.
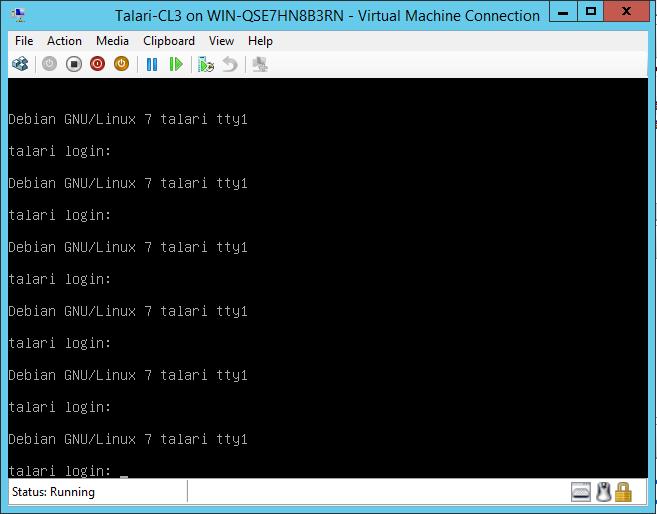
- Verify that
the Virtual Appliance boots properly by hitting return to get the login prompt.
- Log into the
Virtual Appliance using the default credentials (talariuser/talari) and
determine the management IP address as displayed at login as Host IP. If DHCP
is not configured for this Ethernet segment, there will not be an IP address
displayed at login (see below) so the user will have to manually configure the
management IP address on the Appliance.
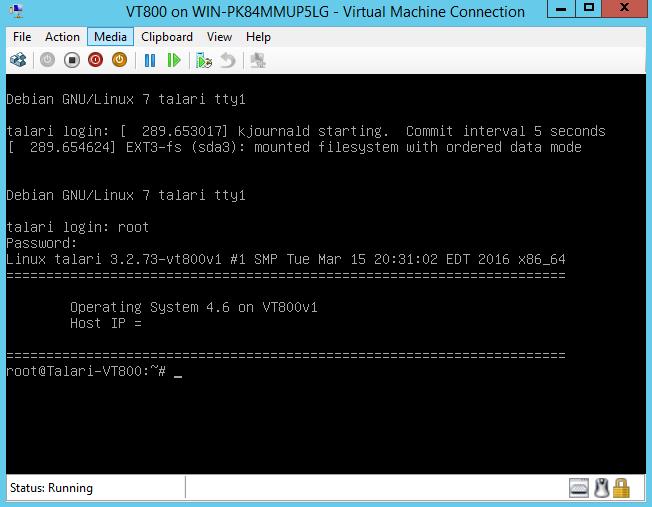
To manually configure a management IP address on the Virtual Appliance:
- Run the tcon command to acquire the console.
- Run the management_IP command.
- At the set_management_ip> prompt type set interface followed by the IP, subnet mask, and gateway (e.g., set interface 172.16.28.31 255.255.255.0 172.16.0.6).
- Hit Enter.
- Type apply and hit Enter.
- Run main_menu to exit.
Once access to the management IP has been confirmed, you may configure and license the Virtual Appliance.
Configure and License the Virtual Appliance
- If you intend to deploy your Virtual Appliance as a Network Control Node, skip to step 6. Otherwise, access the Talari Configuration Editor available from the web console of your Network Control Node or your Oracle SD-WAN Aware instance.
- From the Talari Configuration Editor, modify your current Configuration to include the Virtual Appliance as a new Site or as an update to an existing Site.
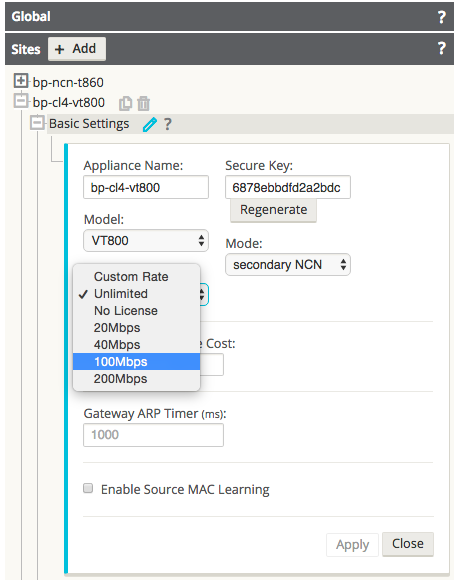
- Under
Sites →
[Virtual Appliance Site Name] → Basic Settings, when you choose a
Virtual Appliance model from the
Model drop-down
menu, you will also be given the option to choose the correct license from the
License drop-down
menu.
- Stage the modified Configuration on your network as you would any other configuration change.
- Download the staged Appliance Package for the Virtual Appliance to your local workstation.
- Open any supported browser
and navigate to the management IP of the Virtual Appliance. At the
Login prompt enter
the following credentials and click
Login:
Login: talariuser Password: talari
- Request a license for the Virtual Appliance by submitting the Hardware Identifier (found on the Home page when you log in) to your Sales Representative. Your Sales Representative will issue a License file based on the performance level you specified.
Note:
If you have a pre-prepared Appliance Package for the Virtual Appliance, continue with step 8. If you do not have a pre-prepared Appliance Package for the Virtual Appliance, click Advanced Config to manually configure and license your Virtual Appliance.- Under
One Touch
Start, click
Browse and select
the pre-prepared Appliance Package from your workstation.

- Select Client or Network Control Node (NCN) and click Apply Package.
- Once the Appliance Package is uploaded the Client Setup Complete (or NCN Setup Complete) page will load.

Note:
The Service starts automatically, but before you can take advantage of the performance level you purchased a license for, you must upload the license to the Virtual Appliance. An unlicensed Virtual Appliance will override the permitted rates of all configured WAN Links so their total does not exceed 10 Mbps full-duplex (i.e., 20 Mbps total).- Download the License file issued by your Sales Representative to your workstation. From this page or the Manage Appliance → License Information page, click the Browse button and choose the License file you downloaded.
- Click Upload License. The page will reload to display your License Information.
Note:
In order for the license to take effect, the Service must be restarted.Important:
When shutting down Virtual Appliances deployed on Hyper-V, use the “Shut Down” option rather than the “Turn Off” option to ensure graceful shutdown. If the “Turn Off” option is used, the Virtual Appliance may not start up properly.