VMware ESXi
Note:
You must perform the following procedure from a Microsoft Windows environment.Prerequisites
- Virtual Image for ESXi
- Full Install for VMWare file for the desired Virtual Appliance
- vSphere client
Prepare to Deploy the Virtual Appliance
- From the
Inventory available,
click the server's IP address then click the
Configuration tab.
Figure 2-1 VM Server Configuration Tab

- Click Networking from the left menu then click the Add Networking… link.
- Choose
Virtual
Machine as the
Connection
Type and click
Next.
Note:
The physical network adapters on the server appliance (vmnic1, vmnic2, etc.) can only be assigned to a single vSphere standard switch. Once a vmnic is assigned to a vSphere standard switch, it will no longer be available when creating a new vSphere standard switch. - Click
Create a
vSphere standard switch, choose one of the available virtual
machine NICs, and click
Next.
Figure 2-2 Create a Switch

- Give the Virtual Machine Port Group for the switch you created in step 4 an appropriate Network Label. If VLAN tags will be used on the associated appliance port, set the VLAN ID field to All (4095). Click Next.
- Confirm that the information for the new virtual switch is correct then click Finish.
- If this switch will be attached to the appliance management port, skip to step 18. Otherwise, after creating the switch, remain on the Networking panel of the Configuration tab and locate the switch within the panel. You may need to scroll down.
- Click Properties... for the switch. Then, from the Ports tab, highlight the Virtual Machine Port Group and click Edit…
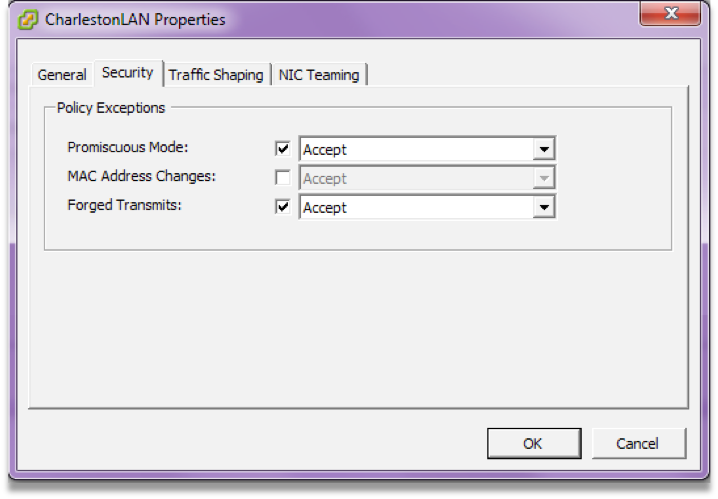
- On the
Security tab ensure
that
Promiscuous
Mode and
Forged
Transmits are set to
Accept then click
OK.
Figure 2-3 Configure Promiscuous Mode
- Repeat steps 4 through 9 to create a separate virtual switch for each Virtual Appliance port that will be used in your deployment.
- Repeat steps 4 through 9, and do not choose a virtual machine NIC to create a null virtual switch for Virtual Appliance ports that will not be used in your deployment.
Note:
Virtual Appliances have 7 network ports. All 7 network ports must be assigned to a virtual switch even if you do not intend to use all of them in your deployment. A null virtual switch that is not tied to any physical NIC can be used for this purpose.Deploy the Virtual Appliance
- Click
File,
Deploy OVF
Template...
Figure 2-4 Deploy OVF Template

- Browse to the location of the Appliance VM Image (.ova package) that you downloaded. Select the file and click Open.
- Click Next and a screen will display information for the VM being imported.
- Click Next and a screen will display the End User License Agreement. After reading, click Accept then click Next.
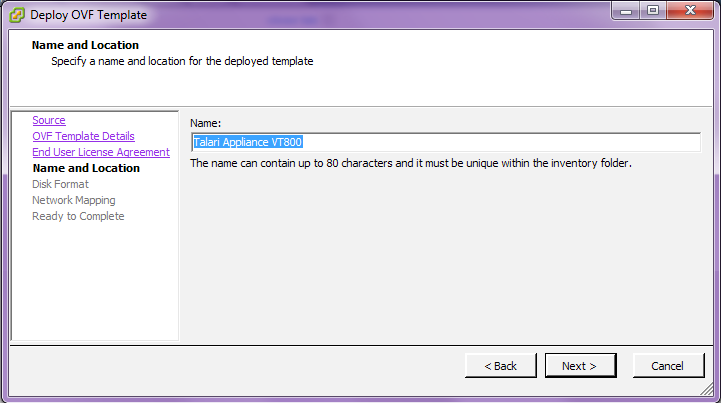
- The
Name and
Location screen displays a default name for the VM. Change the name
if desired and click
Next.
Figure 2-5 Name the VM
- Accept the default settings on the Disk Format screen and click Next.
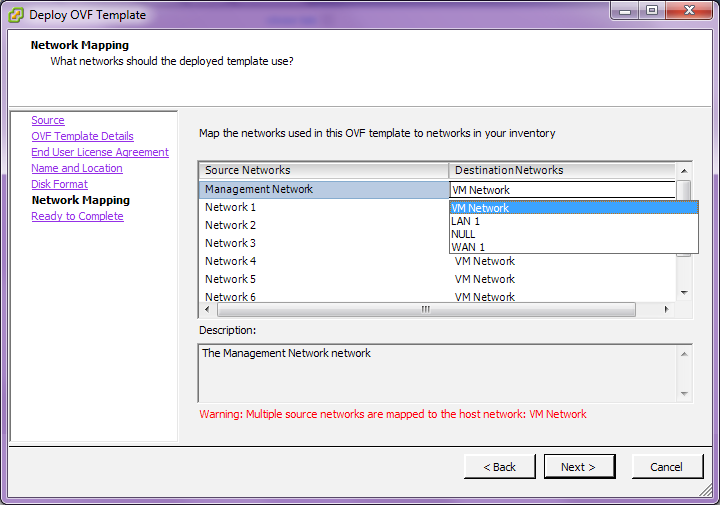
- On the
Network
Mapping screen, use the drop-down menus under
Destination
Networks to assign the Virtual Appliance ports (Source Networks) to
the previously configured virtual switch port groups. Any port that will not be
used in your deployment must be assigned to the null virtual switch (see step
19 of
Prepare to
Deploy the Virtual Appliance). Click
Next.
Figure 2-6 Map Networks from Inventory
- Click
Finish on the
Ready to
Complete screen.
Note:
Decompressing the disk image onto the server could take several minutes.
Configure the Virtual Machine
- If this is the first time you have used the vSphere Client, you may need to click the Inventory icon, identify the server, and expand its inventory list.
- Click the name of your Virtual Appliance's VM in the inventory list.
- Click the Summary tab and click Edit Settings underneath the Commands section to open the Virtual Machine Properties window.
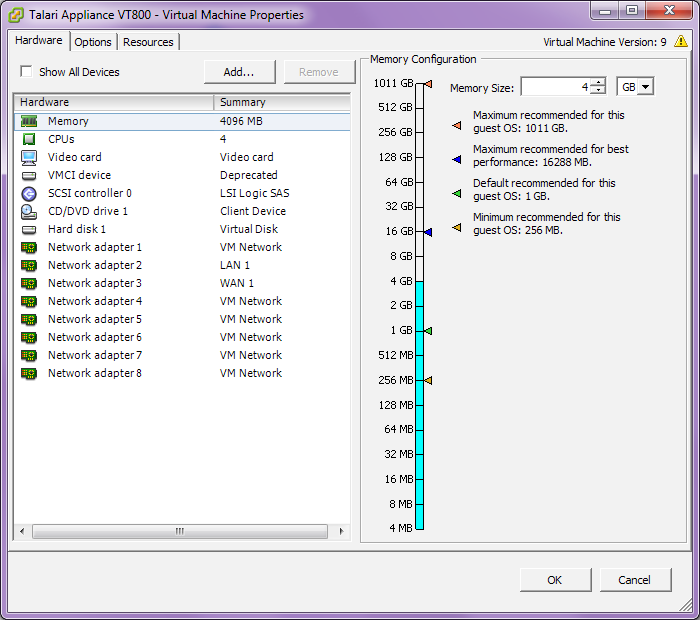
- Click
Memory from the
Hardware tab of the
Virtual
Machine Properties screen and ensure that the required amount of
memory is configured for the intended performance level of your Virtual
Appliance (see the
Virtual
Machine Specifications section for details).
Figure 2-7 Adjust Memory Size
- Click
CPUs from the
Hardware tab of the
Virtual
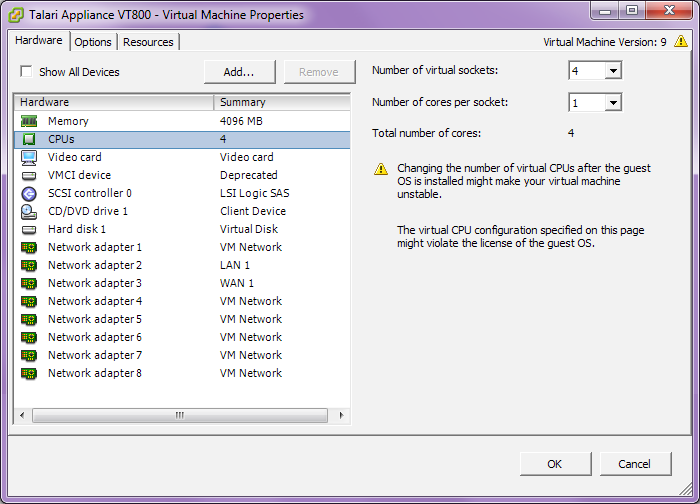
Machine Properties screen and ensure that the required number of
cores (i.e., Virtual CPUs) is configured for the intended performance level of
your Virtual Appliance (see
Virtual
Machine Specifications section for details). You may configure
these cores on a single virtual socket or across multiple virtual sockets.
Figure 2-8 Adjust the Number of Sockets and Cores
Note:
The number of virtual sockets should either be 2 or 4, based on the licensed performance from Virtual Machine Specifications section. The number of cores per socket must be 1. - Click Hard disk 1 from the Hardware tab of the Virtual Machine Properties screen and ensure that at least 160GB of storage is configured in the Provisioned Size field.
Figure 2-9 Add Hard Disk
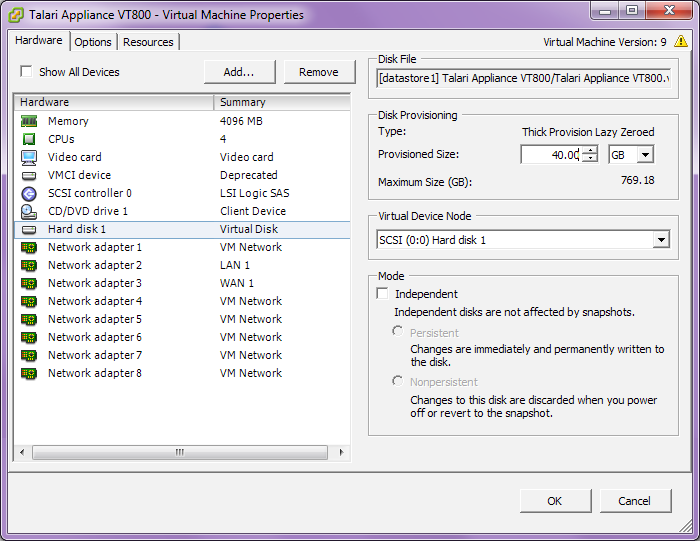
Click OK to save the changes to the Virtual Appliance and exit the Virtual Machine Properties screen.
Start the Virtual Appliance
- From the inventory list, make sure your new VM is still selected and power it on by clicking the green Play icon.
- Click the
Console tab in the
right hand pane of the vSphere Client screen then click inside the console
screen and hit
Enter.
Note:
To exit the console, release the mouse by pressing and holding the Ctrl and Alt buttons simultaneously. - At the
login prompt enter
the following credentials:
Login: talariuser
Password: talari
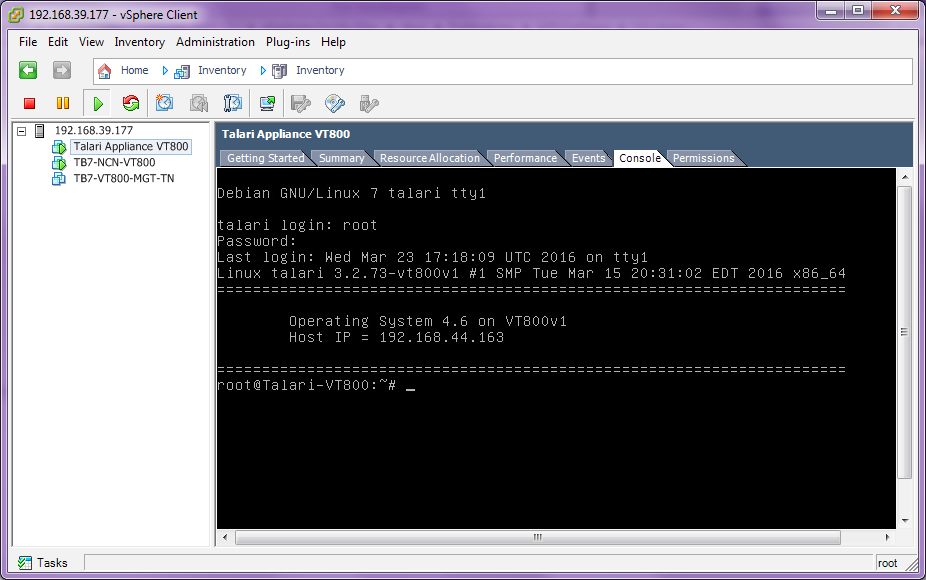
- The Edge OS level and Host
IP are displayed.
Note:
The Virtual Appliance is configured to use DHCP by default. If you want to manually configure the management IP, follow steps 5 through 9; otherwise, take note of the Host IP and skip to Configure and License the Virtual Appliance.Figure 2-10 Virtual Appliance Console Login
- Run the tcon command to acquire the console.
- Run the management_IP command to enter the set_management_ip prompt.
- Run set interface <ip_address> <subnet_mask> <gateway_ip_address> (e.g., set interface 192.168.44.196 255.255.240.0 192.168.35.2).
- Run apply.
- Run main_menu to exit the set_management_ip prompt.
Configure and License the Virtual Appliance
- If you intend to deploy your Virtual Appliance as a Network Control Node, skip to step 6. Otherwise, access the Configuration Editor available from the web console of your Network Control Node or your Oracle SD-WAN Aware instance.
- From the Configuration Editor, modify your current configuration to include the Virtual Appliance as a new Site or as an update to an existing Site.
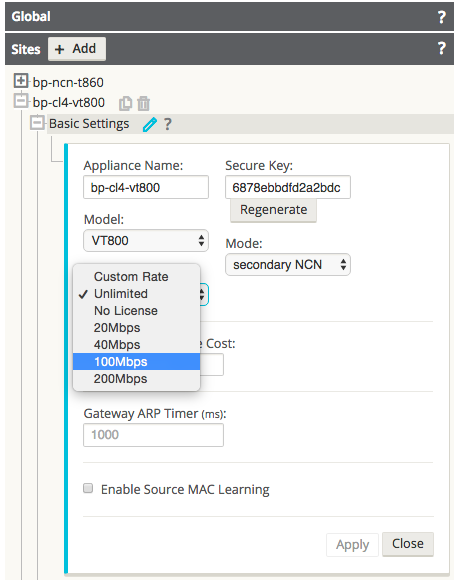
- Under
Sites →
[Virtual Appliance Site Name] → Basic Settings, when you choose a
Virtual Appliance model from the
Model drop-down menu
also choose the correct license from the
License drop-down
menu.
Figure 2-11 Choose Correct Virtual Appliance License from the Configuration Editor
- Stage the modified configuration on your network as you would any other configuration change.
- Download the staged
Appliance Package for the Virtual Appliance to your local workstation.
Note:
At this point, if desired, continue and complete the Change Management process to activate the configuration changes across Edge in preparation for the Virtual Appliance addition. - Open any supported browser
and navigate to the management IP of the Virtual Appliance. At the
Login prompt enter
the following credentials and click
Login:
Login: talariuser Password: talari
- Request a license for the
Virtual Appliance by submitting the
Hardware
Identifier (found on the
Home page when you
log in) to your Sales Representative. Your Sales Representative will issue a
License file based on the performance level you specified.
Note:
If you have a pre-prepared Appliance Package for the Virtual Appliance, continue with step 8. If you do not have a pre-prepared Appliance Package for the Appliance, click Advanced Config to manually configure and license your Virtual Appliance. - Under
One Touch
Start, click
Browse and select
the pre-prepared Appliance Package from your workstation.
Figure 2-12 Oracle SD-WAN Edge Software Home Screen

- Select Client or Network Control Node (NCN) and click Apply Package.
- Once the Appliance Package
is uploaded the
Client
Setup Complete (or NCN Setup Complete) page will be displayed.
Figure 2-13 Client Setup Complete

Note:
The service starts automatically, but before you can take advantage of the performance level you purchased a license for, you must upload the license to the Virtual Appliance. An unlicensed Virtual Appliance will override the permitted rates of all configured WAN Links so their total does not exceed 10 Mbps full-duplex (i.e., 20 Mbps total). - Download the License file issued by your Sales Representative to your workstation. From this page or the Manage Appliance → License Information page, click the Browse button and choose the License file you downloaded.
- Click Upload License. The page will reload to display your License Information.
Figure 2-14 Successfully Licensed Virtual Appliance
Note:
In order for the license to take effect, the Service must be restarted.Troubleshooting VM Permissions
If you encounter permissions issues attempting to run a Virtual Appliance on VMware ESXi, highlight the Virtual Machine from the server's Inventory list and click the Permissions tab to verify that the correct users have Administrator access to the Virtual Appliance. If the necessary users are not listed and/or their role is not set properly, you must contact your VMware server's administrator for help.
