7 Design Studio Packaging and Integrated Cartridge Deployment
This chapter provides Design Studio information about building, packaging, and deploying cartridge projects to environments. Additionally, this chapter describes tools and processes that you can use to prepare your solutions for a production environment.
About Packaging and Cartridge Deployment
When building, packaging, and deploying cartridge projects:
-
Oracle recommends that you review Design Studio Developer's Guide and the developer's guide for each Oracle Communications application in your solution. These guides provide information about packaging and cartridge development.
-
You can automate the process of building and packaging applications. See Design Studio System Administrator's Guide for more information about automating build processes.
-
Package projects to facilitate the import of solution components into the Design Studio workspace and the deployment of an OSS solution.
-
Create a model project to contain all simple data elements and structured data elements that you use in multiple applications. Package these model projects separately from your application-specific cartridge projects (for example, Inventory, OSM, ASAP, and Network Integrity projects) and define project dependencies to use these model definitions.
-
Group all cartridge projects by application for ease of maintenance.
-
Create separate cartridge projects for content that is not specific to a solution domain. This enables reuse.
-
When defining entities, ensure that you organize them such that they do not create any cyclic dependencies when defining project dependencies.
-
When organizing application-specific components, consider that the requirements may differ among applications. For example:
-
For Oracle Communications Unified Inventory Management (UIM) solution components, you can package Service, Resource, and Infrastructure specifications in different cartridge projects and define project dependencies accordingly. You can package multiple UIM cartridges together and deploy them collectively. See UIM System Administrator's Guide for more information about grouping and deploying multiple cartridges.
-
For OSM solution components, you can package cartridge projects based on the function they perform. For example, you can separate cartridge projects containing service orders from those that contain technical orders. You can divide the cartridge projects for each function into smaller component cartridge projects. You can assemble component cartridge projects serving a particular function in a composite cartridge project. Composite cartridge projects simplify the deployment of OSM cartridges, because when you deploy a composite cartridge, Design Studio automatically deploys all included component cartridges, as well.
-
Collaborating in Teams
Because solution development workflow among project team members is complex, Oracle recommends the following practices to facilitate the editing and sharing of solution components.
Using Software Configuration Management Systems
Use a software configuration management (SCM) system to coordinate concurrent revisions and establish baselines of software. A baseline is a snapshot of the state (a particular revision) of all artifacts contributing to the overall solution at a particular milestone in the project schedule, as the team works iteratively and incrementally toward completion.
The Eclipse platform provides support for SCM systems. Two examples of SCM systems are Subversion and Git. You can install the plug-ins for Subversion or Git (Subclipse and Egit, respectively) in Design Studio for either one of these SCM systems, or use a different SCM system that is supported by Eclipse. See the Eclipse Help for more information about using Subversion or Git with Eclipse.
Note:
Do not check into an SCM repository any artifacts in the bin, cartridgeBuild, and out directories of any cartridge project. These directories contain artifacts that are generated temporarily during builds and do not need to be stored.
See Design Studio Developer's Guide for more information about working with source control.
Using Continuous Integration
Design Studio enables you to implement continuous integration software development. Continuous integration employs processes that allow you to continually verify software quality.
In a continuous integration development environment, developers check-in code, and that code is picked up by automated builds. Metrics on code quality are gathered (based on industry standard rules or custom defined rules) and the metrics are made available to a management team through a version of management reporting.
Continuous integration offers many advantages for a project team, where each member is contributing components that must function in close collaboration with components developed by others. Continuous integration processes help discover when these components stop functioning together.
Building Projects
Individual developers can perform a build locally (in their own Design Studio workspace) and check-in the resulting cartridge binary to the SCM repository to share the new build with the team. However, Oracle recommends enabling a continuous integration server to perform automated builds using source artifacts retrieved directly from the SCM repository. You can run Design Studio using Apache Ant to facilitate automated builds.
Note:
Oracle recommends that solution developers disable the Build Automatically setting in the Project menu in Design Studio. Initiate builds explicitly, when you need them, by cleaning the project. The Clean build option enables you to run a build only when a set of coordinated changes are ready to deploy and test. See Design Studio Help for more information about these options.
See Design Studio System Administrator's Guide for more information about automating builds. See the Design Studio Help for more information about building and packaging projects.
Setting Up Integration Test Environments
Oracle recommends setting up an integration test environment, to continuously deploy solution components and test them together in integrated scenarios. Integration test environments facilitate discovery of incompatibilities, breakage, and errors related to component interaction and collaboration. See "Testing Design Studio Solutions" for more information.
Using Continuous Integration Systems
You can use a continuous integration system like Hudson to automate builds and test continuously. Hudson makes it easier for developers to integrate changes to a project and provides a way for various teams to frequently obtain fresh builds. Hudson supports software like Apache Subversion and Git, and can generate a list of changes made into the build from the VCS system. Hudson also executes Apache Ant and Apache Maven based projects, as well as arbitrary shell scripts and Windows batch commands.
Communicating Changes
Because changes to solution components occur during solution development, it is essential to understand the impact of any changes on other solution components and communicate them to other team members. When making changes, consider the following:
-
Changes made to a common data model, such as removing simple or structured data elements or updating their definitions, may impact application-specific cartridge projects that have a project dependency on the model project.
-
Changes made to a data model defined in an application-specific cartridge project may impact other cartridge projects that share those definitions.
-
Changes that affect the content of a request or response of web service operations used for integration between applications (such as capture interaction, process interaction, createOrderByValue, and so forth) can impact other solution components.
Working with Design Studio Builds
Builds are processes that update existing resources and create new resources. You run builds against projects to create or modify workspace resources. The type of project determines the type of build. For example, when you run a build for a Java project, the build converts each Java source file (.java files) into one or more executable class files (.class files).
You run build processes against projects to create or modify workspace resources. There are two kinds of builds:
-
Incremental builds, which affect only the resources that have changed since the previous build was computed.
-
Clean builds, which affect all resources.
There are two ways to run builds: automatically and manually.
-
Automatic builds are always incremental and always affect all projects in the workspace.
-
Manual builds can be incremental or clean, for specific projects or for the entire workspace.
Build processes detect errors in your projects. You must resolve all errors in a cartridge project before you can deploy it to a run-time environment.
About Incremental Builds
By default, incremental builds are performed automatically when you save resources. To ensure that builds are performed automatically when you save resources, you must confirm that the Build Automatically option is selected (you can access this option from the Project menu).
You can disable automatic building and manually invoke incremental builds, if, for example, you want to finish implementing cartridge changes before building the project.
To manually run incremental builds on projects, disable Build Automatically. When you disable Build Automatically, the incremental build options become available. You can:
-
Select Build All to build all projects in the workspace.
-
Select Build Project to clean a specific project.
These options affect only the resources that have changed since the last build. You can also manually run clean builds against specific projects or against all projects in the workspace.
About Clean Builds
You run clean builds by selecting Clean from the Project menu. In the Clean dialog box, you can clean all projects in the workspace or limit the clean and build to a specific project or group of projects. Additionally, you can start a build immediately if you want to clean and build the selected projects in a single step.
About the Design Studio Builder Process
The Design Studio Builder process generates several artifacts automatically every time you create a cartridge project or make a change to a cartridge project. You can access the following from the Package Explorer view of the Java perspective or from the Navigator view of the Resource perspective:
-
The cartridge archive file that Design Studio sends to the run-time server when deploying a cartridge. The file is located in the cartridgeBin directory.
-
A pre-compressed version of the cartridge archive file, which contains all folders, subfolders, and files in the archive. This directory is contained in the cartridgeBuild directory. When you make a change to a cartridge, the Builder process makes changes in the cartridgeBuild directory, then it builds the file.
Note:
The Builder process is automated; consequently, you should not make any changes in the cartridgeBuild or cartridgeBin directories (any changes you make will be overwritten) or check these directories into source control.
Working with Integrated Cartridge Deployment
After building and packaging Inventory, OSM, Activation, and Network Integrity cartridge projects, you can deploy them from Design Studio to test environments. Design Studio-integrated cartridge deployment enables you to manage cartridges in the test environment consistently, manage common test environment connection parameters across the design team, and compare cartridge version and build numbers in the development environment with those of the cartridges deployed in the test environment.
You manage the cartridge project variables and the system parameters for run-time application instances in environment projects. You can save these environment projects in source control and share them among solution designers.
About Cartridge Deployment
The following tasks are done once before deploying cartridge projects from Design Studio. The information can then be shared among team members:
-
Create an Environment project.
-
Create a new Environment entity to contain the connection parameters necessary to connect to the test environment.
-
Query the test environment to determine what's already on the test environment server.
-
Define any environment-specific variables for the test environment.
The final two steps in the deployment process are to deploy and test your cartridges. You perform these steps iteratively, in combination with making incremental design improvements or updates and building the cartridge projects as necessary.
About the Environment Perspective
The Environment perspective is a collection of views that enable you to create and manage the attributes associated with your environment. You use the Environment perspective to deploy and undeploy cartridge projects to one or more test environments.
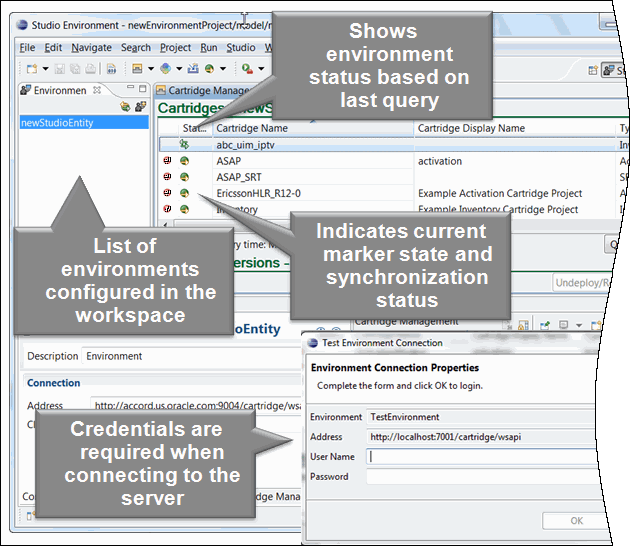
Two important components of the Environment perspective are the Studio Environment Editor and the Cartridge Management view. The Cartridge Management view displays the selected environment information obtained from the most recent queried state. See "About the Cartridge Management View" and "About the Studio Environment Editor" for more information.
Design Studio requires a WebLogic user name and password from any person attempting to deploy to an environment (to protect against unauthorized access to environment servers). Design Studio collects authentication details for connection when required, and securely disposes this information when the application closes.
See Design Studio System Administrator's Guide for information about setting up users for Design Studio deployment.
About the Cartridge Management View
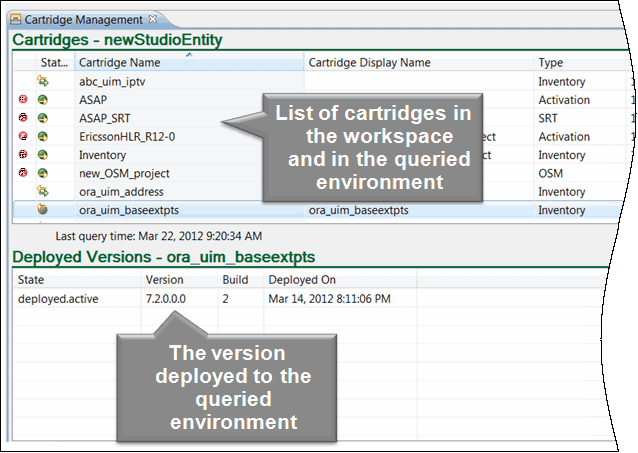
After you query the test environment, you can use the Cartridge Management view to review and manage your cartridge project deployments. The Cartridge Management view is a dashboard. It facilitates the deployment process and enables collaboration among team members by displaying all of the cartridge projects in the workspace and all of the cartridges deployed to the server. For example, if you're uncertain whether to deploy your piece of the solution, you can query an environment to see what versions of a cartridge other team members have deployed.
The Cartridge Management view includes a status column to indicate which cartridges have been deployed and, if so, whether they are synchronized with the target environment. You use the Cartridge Management view to deploy cartridges in the Design Studio workspace and undeploy them from run-time environments.
The Deployed Versions table lists which cartridge version and build combination is currently deployed in the target environment (for the selected cartridge). The last refresh time appears at the bottom of the table. Design Studio refreshes the table after cartridge queries, imports, deploys, and undeploys.
Deployment Synchronization States
The Cartridge Management view includes reconciliation details of environments and the present workspace. When you query an environment, Design Studio displays the cartridges in the workspace, those on the server, and whether the cartridges are synchronized.
The synchronization states are:
-
In-synch, meaning that the cartridge exists in the workspace and in the run-time environment, and the versions are identical.
-
Out-of-synch, meaning that the cartridge exists in the workspace and in the run-time environment, but the versions are not synchronized.
-
On server, not in workspace, meaning that the cartridge exists in the run-time environment but it does not exist in the workspace.
-
In workspace, not on server, meaning that the cartridge exists in the workspace but it does not exist in the run-time environment.
State information is updated each time a cartridge management action occurs or when you explicitly query the environment.
Figure 7-3 Cartridge Deployment Synchronization
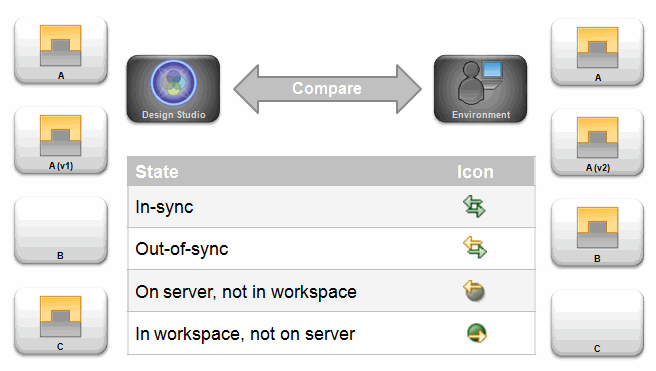
Description of "Figure 7-3 Cartridge Deployment Synchronization"
About the Studio Environment Editor
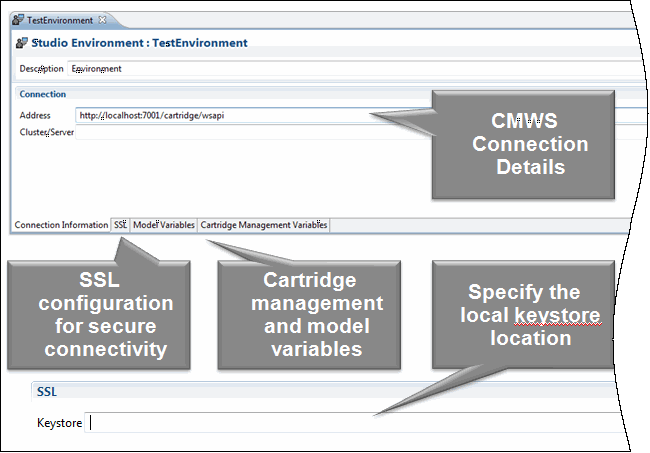
The Studio Environment editor enables you to define the run-time environment connection information, define the Secure Sockets Layer (SSL) keystore file location, review and edit the cartridge and model variables defined for cartridge projects, and to define application-specific connection information.
About Model Variables
When you create cartridge projects, some of the information you provide may depend on a specific environment. If you have environment-specific values for variables that you will need at run time, you can create tokens for the variables and later define values for each environment in which you will use the variable. These tokens, also known as model variables, are placeholders for environment-specific values that can be defined at the time of deployment.
For example, consider that you must define the credentials used for running automated tasks in two different environments (your testing environment and your production environment) and that the value required by the testing environment is different than that required by the production environment. Rather than editing the variable value in the source code each time you deploy to one of these environments, you can create a model variable, then define environment-specific values for that variable.
Model variables enable you to realize run-time-specific values at deployment time. During model design, you use a placeholder variable to represent the specific environment value.
Select the Sensitive option on the Model Variables tab to secure model variable values from unwanted disclosure. Variables marked as sensitive are protected using encryption.
About Cartridge Management Variables
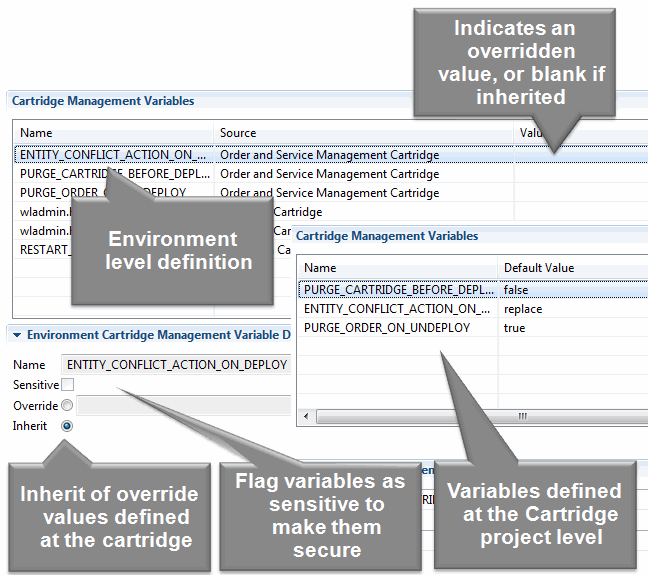
Cartridge management variables specify deployment directives that affect the behavior of a cartridge project deployment. For example, a variables can indicate whether a component should restart after deployment or whether run-time data should be purged as part of deployment. Design Studio variables can be defined at a project level or as overriding values specific to an environment.
Select the Sensitive option on the Cartridge Management Variables tab to secure cartridge management variable values from unwanted disclosure. This option should be used in conjunction with SSL communication to fully secure variable values. Variables marked as sensitive are protected using encryption.
Preparing Solutions for Production Environments
Deployment to production environments should be done through a controlled and scripted process. This process should be verified in a staging environment prior to execution against a production environment.
When preparing your solutions for a production environment, you can use the Design Studio testing tools to ensure that solutions are free from errors, and use the Cartridge Management Tool and automated build processes to automate the production process.
Testing Design Studio Solutions
Oracle recommends setting up an integration test environment to continuously deploy solution components and test them together in integrated scenarios. Integration test environments facilitate early discovery of incompatibilities, breakage, and mismatches in component interaction and collaboration.
An integration test environment is composed of the following:
-
A server run-time environment
The environment includes the database server, application servers, OSS applications, and service provisioning solution components. Oracle recommends that you develop scripts that automate the deployment of solution components that are produced by a successful automated build.
-
An automated test driver
The automated test driver initiates the execution of automated tests and collects the test results for reporting quality metrics.
-
Set-up and tear-down scripts
These scripts load seed data, purge test data, and reset the state of the system to ensure that test execution is reliably repeated.
Testing Activities
Table 7-1 lists some solution testing activities, tools, and recommendations.
Table 7-1 Recommended Test Activities
| Activity | Tool | Recommendations |
|---|---|---|
|
Unit and integration testing for ASAP solution components |
Design Studio for ASAP (manual)soapUI (automated) |
Configure ASAP to run in development/test and loopback mode when testing network elements.Use the createOrderByValue request to submit an order for execution.Represent each test case by the CSDLs that are captured on the order and submitted to ASAP for execution.Use HermesJMS to listen for events from the JMS Topic to validate whether an order executed successfully. |
|
Unit and integration testing for OSM solution components |
Design Studio for OSM (manual)soapUI (automated) |
Configure store-and-forward queues in OSM to forward to emulators (mock implementations that reply with prerecorded results) for UIM and ASAP. Mocking is optional. Oracle recommends that you call UIM and OSM in an integration test environment, if mocking is unavailable.Represent each test case by the product actions captured on the AIAProvisioningOrderEBM and submitted to OSM for execution. |
|
Unit and integration testing for UIM solution components |
soapUI |
Create a test case with test steps that call the web service operations (captureInteraction, processInteraction, updateInteraction) in sequence. The captureInteraction request carries the inputs for autodesign into the business interaction. The processInteraction response returns the result of autodesign. Use XPath expressions to validate the autodesign logic. |
|
Manual integration and system testing for end-to-end scenarios |
Design Studio for OSM |
In a fully integrated test environment, submit customer orders as AIA ProvisioningOrder EBMs that have coverage of the end-to-end scenarios. |
|
Automated integration and system testing for end-to-end scenarios |
soapUI |
In a fully integrated test environment, submit customer orders as AIA ProvisioningOrder EBMs that have coverage of the end-to-end scenarios. Oracle recommends that you use automated testing. |
Automating Builds
You can configure automated builds to script build processes of cartridge projects. For example, multiple team members can check projects into a source control system, which itself is connected to a secure server maintained by a system administrator. The administrator can schedule automated builds so that official builds can be made available to organizations, such as testing or operations. When using automated builds, no user interface interaction is necessary to build your cartridge projects.
To automate Design Studio builds, create a process that builds a cartridge project, and schedule that process to run using a build automation system.
Running frequent automated builds to verify and test code integrations and to check run-time product archives helps to detect integration errors.
See Design Studio System Administrator's Guide for more information about automating builds.
About the Cartridge Management Tool
The Oracle Communications Cartridge Management Tool (CMT) is available on the Oracle software delivery website. The CMT is a command line tool that enables you to deploy cartridges to run-time environments. Oracle recommends that you use the CMT to deploy to production run-time environments.
See Design Studio Developer's Guide for more information about the CMT.
