HA Upgrade

In the descriptions and processes outlined below, ORACLE-1 is initially the active system and ORACLE-2 is initially the standby system. Please read the following procedures carefully before beginning the upgrade. If necessary, you can back out of the upgrade once during the upgrade procedure and once after you have completed the upgrade procedure.

Note:

See the diagram below, which addresses how the HA Upgrade procedures' sequence includes rebooting the standby system first to avoid service interruption.

Figure 13-1 Configure and Reboot Standby First for HA Procedures
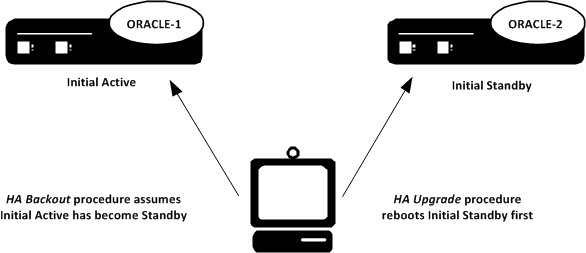

For Upgrade and Backout, perform procedures on Standby first.

Note:

Do not upgrade a non-LI HA deployment with an LI image or vice-versa if you wish to perform a hitless upgrade. This procedure results in a non-hitless upgrade, requiring that you reboot devices per your upgrade procedure, and then reboot all upgraded devices again to establish the new deployment type.

HA Upgrade Procedure

This procedure upgrades HA deployments.

Note:

In the procedure below, ORACLE-1 is the active system and ORACLE-2 is the standby system. The standby system should be rebooted first.
  1. Confirm that ORACLE-1 and ORACLE-2 start up and are synchronized.

    Ensure that the running and current configurations on ORACLE-1 and ORACLE-2 have the same number. In the following examples, all of the configuration versions are 5.

    On ORACLE-1 and ORACLE-2, use the show health command to ensure all processes are synchronized.

    On ORACLE-1, show the current configuration version by using the ACLI display-current-cfg-version command. Then use the same command on ORACLE-2 and be sure that its current configuration version is the same as the one on ORACLE-1.

    ORACLE-1# display-current-cfg-version
    Current configuration version is 5
    ORACLE-1#
    ORACLE-2# display-current-cfg-version
    Current configuration version is 5
    ORACLE-2#

    On ORACLE-1, show the running configuration version by using the ACLI display-running-cfg-version command. Then use the same command on ORACLE-2 and be sure that its running configuration version is the same as the one on ORACLE-1.

    ORACLE-1# display-running-cfg-version
    Running configuration version is 5
    ORACLE-1#
    ORACLE-2# display-running-cfg-version
    Running configuration version is 5
    ORACLE-2#
  2. On ORACLE-2, before loading the software image to the flash, check the remaining space in the /boot directory using the ACLI show space boot command.
    ORACLE-2# show space boot
    boot: 24759488/25760512 bytes (99%) remaining
    ORACLE-2#

    If you see less than 50% of the space remaining, delete older stored firmware images to make space.

    At a minimum, we recommend that you leave the diags.gz file and the currently running release on the flash memory (in the event that a rollback is required).

  3. Upload the SBC software image file and stage three bootloader to the /boot directory using an SFTP client. (See the instructions on updating the Stage 3 Bootloader.)
  4. Change the boot configuration parameters on ORACLE-2 to use the appropriate new release software image.

    Note:

    Changing the file name boot parameter configuration, as shown below, performs the same function as running the set-boot-file command.

    Note:

    From the point that you upgrade the image file, do not make any configuration changes. Likewise, do not use the save-config or activate-config commands. Once you execute the save-config command, the configuration can not be guaranteed to be backward compatible should you have to back out of the upgrade.

    Access the boot parameters on ORACLE-2:

    • In the ACLI configure terminal menu, type bootparam and press <Enter> to being displaying the list of boot parameters.

      Scroll through the boot parameters by pressing <Enter>. Stop when you reach the file name boot parameter.

      The following example uses the filenames /boot/nnSCZ840m5.64.bz and /boot/nnSCZ900.64.bz.

      ORACLE-2# configure terminal
      ORACLE-2(configure)# bootparam
      '.' = clear field;  '-' = go to previous field;  ^D = quit
      boot device          : eth0
      processor number     : 0
      host name            : boothost
      file name            : /boot/nnSCZ840m5.64.bz /boot/nnSCZ900.64.bz

      As shown above, type the new Release file name next to the previous one, including the path. Press <Enter> to continue scrolling through the boot parameters.

      Reboot ORACLE-2.

  5. After ORACLE-2 has completed the boot process, use the verify-config command to confirm that the configuration has been upgraded properly.
    ORACLE-2# verify-config
  6. Confirm the ORACLE-2 is running the new boot image using the show version command.
    ORACLE-2# show version
    Acme Packet 4600 SCZ9.0.0 
    Build Date=09/09/15
    
  7. Use the show health command to confirm that ORACLE-2 is the standby system.
  8. As you did for ORACLE-2, upload the SBC software image file and stage three bootloader to the /boot directory using an SFTP client. (See the instructions on updating the Stage 3 Bootloader.)
  9. Trigger a switchover from ORACLE-1 so that the standby system transitions to active, and vice-versa.
    ORACLE-1# notify berpd force
  10. Wait while ORACLE-2 transitions to the active state, then confirm that ORACLE-1 and ORACLE-2 are fully synchronized as explained in step 1.
  11. Reboot the newly-standby ORACLE-1.
    ORACLE-1# reboot
  12. As you did for ORACLE-2, configure the boot parameters on ORACLE-1 to boot from the new software image. Then reboot ORACLE-1.
    ORACLE-1# reboot
    --------------------------------------------------------
    WARNING: you are about to reboot this SD!
    --------------------------------------------------------
    Reboot this SD [y/n]?: y

    Rebooting ORACLE-1 causes ORACLE-2 to become the active system in the HA node.

  13. When ORACLE-1 is finished rebooting, use the show health command to confirm that it is in the standby state.

    Note:

    If you need to revert to the older image, use the HA Backout Procedure.

sip-feature-caps

Configure to support SRVCC handover and other ATCF functionality.

Parameters

state
When enabled, the feature adds the Feature-Caps header to messages.
  • Default: disabled
  • Values: enabled | disabled
atcf-management-uri
Identifies the feature capability indicator that will be used to transport the ATCF management URI. When the value is management and the value of state is enabled, the Feature-Caps header "g.3gpp atcf-mgmt-uri" is added and the value of atcf-psi-dn in the sip-config configuration element. When the value is psi and the value of state is enabled, the Feature-Caps header "g.3gpp atcf-psi" is added and the value is the value of atcf-psi-dn in the sip-config configuration element.
  • Default: disabled
  • Values: disabled | management | psi
atcf-alerting
When enabled, the system adds the Feature-Caps header to messages and turns on the alerting feature.
  • Default: disabled
  • Values: enabled | disabled
atcf-pre-alerting
When enabled, the system adds the Feature-Caps header to messages and turns on the pre-alerting feature.
  • Default: disabled
  • Values: enabled | disabled

Path

sip-feature-caps is an element within the session-router path.