Alarm and Event Configuration Tasks

The following sections describe the Alarms table and Events table, with their accompanying features. The Events table shows a one to one correspondence with all device traps and generated server events. The Events table maintains the precise history of all events created and recorded. The Alarms table summarizes the Events table by showing the most recent update for the specific categories, failed resources, state and devices in each row.

Manage How Alarms are Displayed

  1. Expand the Fault Manager slider and select Alarms.
  2. In the alarms pane, select an alarm that you want to view and click View.

    Note:

    Alternatively, you can double-click the alarm.
  3. In the Alarm detail dialog box, view the following fields:

    Note:

    The following fields in the Alarm detail dialog box also describe the columns displayed in the alarm table in the alarms pane. The hidden fields described in this table are associated with the alarm table only.

Manage How Events are Displayed

  1. Expand the Fault Manager slider and select Events.
  2. Glide your mouse over a column and click the drop-down list that appears next to any column heading.
  3. In the events pane, select an event that you want to view and click View.

    Note:

    Alternatively, you can double-click the event.
  4. In the Event detail dialog box, view the following fields:

    Note:

    The following fields in the Event detail dialog box also describe the columns displayed in the events table in the events pane. The hidden fields described in this table are associated with the events table only.

Navigate Multiple Fault Manager Pages

  1. Expand the Fault Manager slider and choose from the following options:
    • Events
    • Alarms
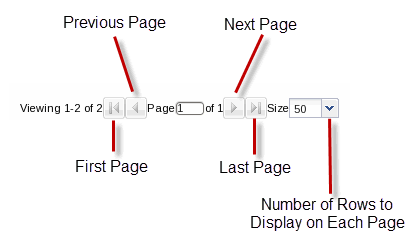
  2. At the top right area of the Events or Alarms pane, click the navigation icons to display the desired first page, previous page, next page, and the last page, and the number of rows to display on each page.
    Refer to the preceding text for a description of this figure.

Manage the Page View for Events and Alarms

  1. Expand the Fault Manager slider and select from the following options:
    • Events
    • Alarms
  2. In the alarms or events pane, you can select from the following actions:

Search for Alarms or Events by Specifying a Criteria

You can search for events and alarms by specifying one, some, or all of the search selection criteria. For example, you can select alarms for a specific IP address during a specified date-time range.

  1. Expand the Fault Manager slider and select from the following options:
    • Events
    • Alarms
  2. In the alarms or events pane, click Search.
  3. In the Filter search dialog box, complete the following fields:

Change the Number of Alarms or Events in a Table

  1. Expand the Fault Manager slider and select from the following options:
    • Events
    • Alarms
  2. At the top of the events or alarms pane, click the Size drop-down list.

    Note:

    By default, 50 table items are displayed.
  3. Click the appropriate value.

Save Alarms or Event Data to a File

You can save event or alarm data in the content area to a comma-separated values (CSV) file that stores table data (numbers and text) in plain-text form.

  1. Expand the Fault Manager slider and select from the following options:
    • Events
    • Alarms
  2. In the events or alarms pane, click Save to file.
  3. In the save dialog box, select either to open the file or save the file.

    Note:

    If you save the file, the file is saved to your browser's default download location.
  4. Click OK.

Delete Alarms or Events

The appropriate administrator privileges must be assigned to delete alarms or events.

Note:

Deleting an alarm in Oracle Communications Session Delivery Manager has no affect on the node because the node is unaware that Oracle Communications Session Delivery Manager displayed the alarm or deleted it from the alarms table.
  1. Expand the Fault Manager slider and select from the following options:
    • Events
    • Alarms
  2. In the alarms or events table, click the alarm or event that you want to remove and click Delete.
  3. In the Delete dialog box, click Yes to confirm the deletion of the alarm or event.
Specify a Criteria to Delete Alarms and Events

The appropriate administrator privileges must be assigned to delete alarms or events.

Use this task to specify one or more criterion for deleting alarms or events from Oracle Communications Session Delivery Manager.
  1. Expand the Fault Manager slider and select from the following options:
    • Events
    • Alarms
  2. In the events or alarms pane, click Delete by criteria.
  3. In the Delete event dialog box, complete the following fields:

    Note:

    When there is a high number of faults that are being sent from devices, a purge interval of 2 days for events and 7 days for alarms is suggested.
  4. Click OK.

Configure When Event and Alarm Data is Deleted

  1. On the main menu, click Settings, Faults, Fault configuration.
  2. In the Fault configuration dialog box, complete the following fields:
  3. Click OK.
  4. In the success dialog box, click OK.