Plugin Tasks

Use the following tasks to perform product plugin actions in Oracle Communications Session Delivery Manager.

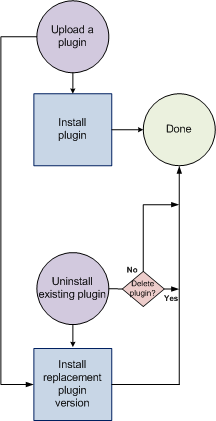
The following figure shows the life cycle of a plugin.

Figure 3-1 Plugin life cycle

The figure shows the life cycle of a plugin where a plug-in is uploaded and next installed for the first time or a new plug-in is uploaded, the existing plug-in is uninstalled and the new plugin is installed.

When you perform upload, install, uninstall, replace, and delete plugin actions on one node, the other nodes of the cluster are signaled to apply the same action. All users who are logged into a node, other than the one where the action was initiated, should refresh their browser to have their GUI updated for the new functionality. If some functionality is still not available, re-login to the node.

Upload a Plugin

Use this task to upload your product plugin from the system where your software distribution media containing the product plugin is kept to OCSDM.

Note:

If you have upgraded from a previous version of OCSDM, the (element manager) product plugin that manages your devices is uploaded and installed automatically on your system and appears on the Plugin Management Tool pane in the Element Manager Plugins table. If you installed OCSDM for the first time, no product plugins appear in the table.
  1. On the menu bar, select Tools, Plugin Management.
  2. In the Plugin Management Tool pane, click Upload.
  3. In the Upload Plugin dialog box, click Browse to navigate to the directory on your system where you keep the product plugin software package to upload to OCSDM.
    For example:
    sd1.0_Package.zip
  4. In the Upload Plugin dialog box, click Upload.
    A dialog box displays showing the upload was successful and the plugin appears in the Element Manager Plugins table in the EM (element manager) tab.

Install a Plugin

Use this task to install the product plugin in OCSDM.

Note:

One version only of a plugin can be installed at a time.
  1. On the menu bar, select Tools, Plugin Management.
  2. In the Element Manager Plugins table, select the plugin row and click Install.
  3. In the plugin installation dialog box, click Yes to continue the product plugin installation. Your installed plugin contains instructions that initiate core features and functionality in OCSDM. This results in new functionality displaying in existing sliders and new sliders appearing in OCSDM.
  4. If the dialog box shows that the installation failed, you are prompted to resolve the identified problem. Once the problem is fixed, click Recover to put the system into a state where another installation of the plugin can be attempted.

Uninstall a Plugin

When a plugin is uninstalled, it is out of service. OCSDM loses the ability to manage the network functions (NF) and their respective devices that are dependent on this plugin. For example, configuration, polling, trap processing, device statistic gathering, and so on are suspended. However, the devices themselves continue to operate normally on the network.

  1. On the menu bar, select Tools, Plugin Management.
  2. In the Element Manager Plugins table, select the installed plugin row and click Uninstall.
  3. In the confirmation dialog box, click Yes.
  4. In the success dialog box, click OK.

    Note:

    The plugin continues to be listed in the Element Manager Plugins table on the EM tab. The Status column shows the state of the plugin as UNINSTALLED and the functionality of that plugin ceases. For example, sliders, folder and leaf nodes may disappear and fields, drop down lists, and so on may disappear from functionality that remains.
  5. If the dialog box shows that the plugin failed to uninstall, you are prompted to resolve the identified problem if applicable. Once any applicable error(s) are fixed, click Recover until it is successfully uninstalled.

You can now choose to install a new product plugin, new version of a product plugin, or install a previous version of a product plugin.

Replace a Plugin

You can replace an existing product plugin to a different version of the same product plugin.

OCSDM service continues for plugin network functions (NF) and their respective devices when the replacement version of the plugin is installed successfully.

Note:

More than one version of a plugin can be uploaded to OCSDM.
  1. On the menu bar, select Tools, Plugin Management.
  2. In the Element Manager Plugins table, select the plugin row and click Install.

    Note:

    A warning appears that this process suspends OCSDM service for any devices associated with the plugin.
  3. In the dialog box that appears, click Yes to continue the product plugin installation.
    A dialog box displays the successful replacement of the plugin and all affected services return to operation. If there are any NFs that are no longer supported by the installed plugin, all devices belonging to these NFs are marked as unmanageable and can be removed by the system administrator manually.
  4. If the dialog box shows that the replacement of the plugin failed, you are prompted to resolve the identified problem if applicable. Once any applicable error(s) are fixed, click Recover to put the system into a state where another installation of the plugin can be attempted.

Delete a Plugin

When you delete a product plugin from the Element Manager Plugins table, the product plugin .zip file that exists on the OCSDM server is deleted.

Note:

You can delete a plugin from OCSDM only after you uninstall the plugin first. See the Uninstall a Plugin section for more information.
  1. On the menu bar, select Tools, Plugin Management.
  2. In the Element Manager Plugins table, select the uninstalled plugin row and click Delete.
    The following options are presented, depending on whether or not other uninstalled versions of a plugin are present:
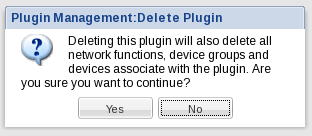
    • If you are deleting the last remaining version of an uninstalled product plugin, the following confirmation dialog box appears:
      The message warns that deleting this plugin will also delete all network functions, device groups and devices associated with the plugin.
    • If you are deleting one plugin version among others, a confirmation dialog box appears with the following options:
      • Check the Clean up NFs checkbox to remove network functions (NFs) and any devices associated with the plugin from OCSDM.
      • Check the Clean up file system checkbox to clean the plugin directory on the OCSDM server. For example:
        AcmePacket/NNCArchive/pluginArchive/<pluginVendorProduct>/<pluginName>/temp
        
  3. Click Yes in the confirmation dialog box to complete the deletion of the plugin.
  4. In the success dialog box, click OK.

    Note:

    If the plugin displays a Failed_Delete status, the system prompts you to confirm the deletion of the plugin to force its deletion.
    The plugin is no longer listed in the Element Manager Plugins table on the EM tab.

View Plugin Information

Use this section to view status information for your plugin during installation.

  1. On the menu bar, select Tools, Plugin Management.
  2. In the Plugin Management Tool pane, you can view plugin information in the following columns displayed in the Element Manager Plugins table on the EM tab:

    The following Element Manager Plugins table shows an example of a cluster installation with two-nodes. Two versions of the session delivery (SD) plugin exist (v1.0. and v2.0), and only one version is installed at a time. This example also shows how the plugin status can become unsynchronized across the nodes of a cluster in the case of the EnterpriseExt plugin where the delete action is processed on 10.196.65.3 OCSDM server node, but not completed yet on the 10.196.65.19 OCSDM server node.

    Refer to the preceding text for a description of this figure.

Edit the Plugin Description

  1. On the menu bar, select Tools, Plugin Management.
  2. In the Plugin Management Tool pane, click Edit.
  3. In the Plugin Management Edit Plugin dialog box, change, add or remove a description in the Plugin Description field.
  4. Click Update.