12 Using the Events Tab
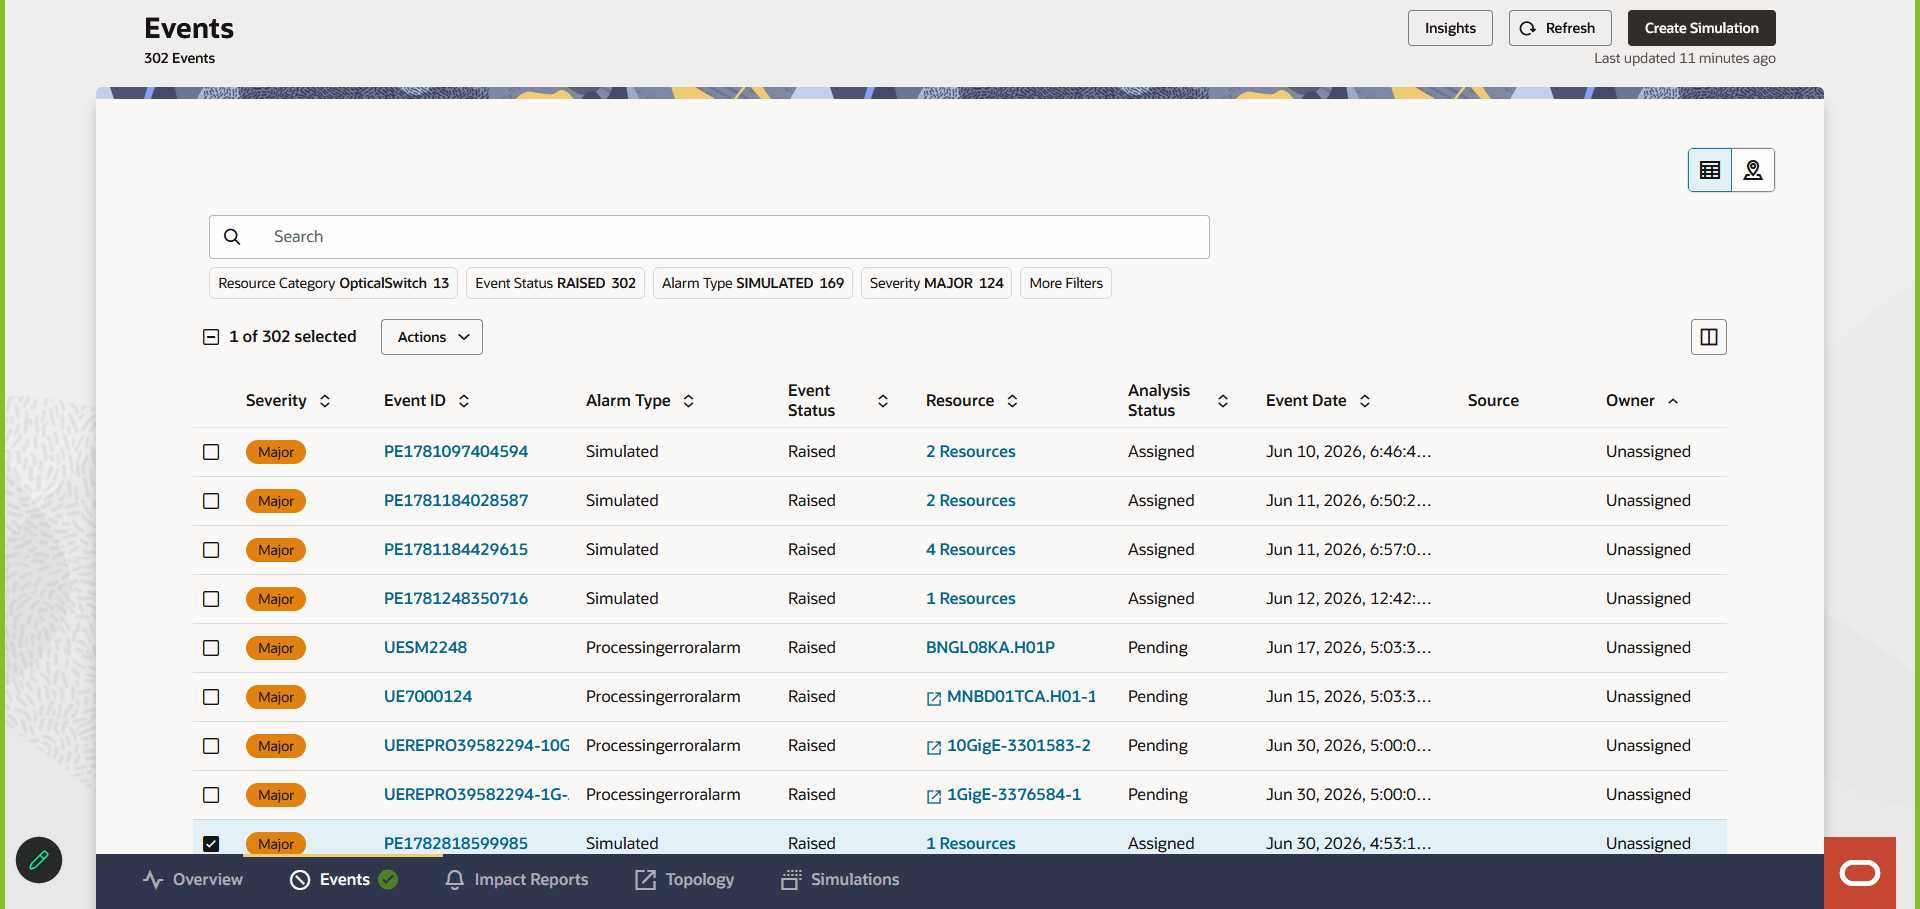
You use the Events tab to view the list of all events occurred in a table with the following columns:
Table 12-1 Events Columns
| Column | Description |
|---|---|
| Severity | The severity of the alarms. The alarm severities are:
|
| Event ID | A unique ID for the event. |
| Alarm Type | The alarm type of the event. See "About Alarm Types" for the list of alarm types. |
| Event Status | The event status that you get from the assurance system. See "About Event Statuses" for more information. |
| Resource | The resource that on which the event has occurred. This is a hyperlink, clicking on which you can view the summary of the corresponding resource in UIM.
If you are an authorized user, you can decrypt the encrypted values using the Decrypt icon from the resource summary Characteristics side pane of the General Information tab. |
| Analysis Status | The lifecycle status of the impact data analysis. See "About Analysis Status" for more information. |
| Created On | The date when the event was created. |
| Source | The source of the event, which is the unique identifier of the assurance system from which the event is collected. |
| Owner | The person who is assigned to work on the alarm event. |
Using the Events tab, you can perform the following:
- Viewing the list of events.
- Searching and filtering the events using customizable filter chips.
- Customizing the columns.
- Viewing insights of the events.
- Performing actions on the selected events.
- Toggling between table view and map view.
Note:
Any SmartSearch filters applied in the Table view are automatically reflected in the Map view, ensuring a consistent view of filtered event data.
The following figure shows the Events tab of Service Impact Analysis.
Figure 12-1 Events tab of Service Impact Analysis
Viewing the List of Events
The Events tab provides the details of all events that have occurred. You can scroll down to view the list of all events.
The Events tab can include simulated events, simulated child events, and planned events. Use the event source, alarm type, creation type, or other available filter values to distinguish these events from events received from an assurance system. Verify the exact column and filter labels.
To view the list of events:
- Navigate to the Events tab.
The list of events appears in a table.
- (Optional) Click the Map View icon on the top-right corner to view heatmap of the events.
Note:
You can toggle between Table View and Map View using the corresponding icons on the top-right corner of the Events page. - Search the events using the filter options. See "Searching and Filtering the Events" for more information.
- Sort the columns using the corresponding sort options.
- Click on the required event ID link to view the event details.
The Event Details panel appears that shows the event summary. See "Working with Event Details" for more information.
- Click on the required resource link to open the corresponding resource summary.
- Select a row using the corresponding checkbox.
- (Optional) Select all rows in the table using the total count checkbox.
- Select an option from the Actions list. See "Performing Actions on the Selected Events" for more information.
- Click Insights on the top-right corner of the Events page to view the insights. See "Viewing Insights of the Events" for more information.
- Click the Refresh icon beside the Insights button to refresh the events list.
Working with Event Details
You can use the Event Details panel to view and edit an event and initiate the analysis.
For a simulated event, Event Details provides access to the simulated impact summary. From the summary, you can review potential impacts, open affected resources in Inventory or Topology, view impact details, or schedule the simulated event.
To do so:
- From the list of events, click on the required event ID.
The Event Details panel appears.
- Click on the links for Alarm Details to view the alarm
details.
The Alarm Details pop-up window appears that shows the alarm details.
Note:
The Alarm Details link provides the entire message sent from the assurance system for additional information. - Click Edit Event to edit the event description and owner.
- Enter the change description in Description.
- Select the owner of the change from Owner.
- Click Save.
The changes are saved.
- On the top-right corner of the Event Details panel, click on the ellipses
option and select either of the following:
- View Resource in Topology to view the resource in ATA.
- View Resource in Inventory to view the resource summary in UIM.
- Click Initiate Analysis to start a new analysis.
The system performs an analysis, and you will get a notification after the analysis completes. See "About Analysis Status" for more information on analysis lifecycle statuses.
Note:
When you initiate an analysis, the analysis status is changed to INITIATED and then will be changed to COLLECTED after the analysis is successfully completed.
The analysis status changes to FAILED if there is a system failure during the impact gathering phase.
- Click View Impact Summary to view the impact summary. See "Viewing Impact Summary" for more information.
Viewing Impact Summary
You can view a summary of an impact analysis for an unplanned event, simulated event, or planned event.
Customer Insights groups the resources impacted by the selected event by customer. Use Customer Insights to identify the customers affected by the event.
The number under Customers is a link only when the event has one or more impacted customers and you have the CustomerInsights: View permission. If the event has no impacted customers or you do not have this permission, the number is displayed as text and is not a link.
Click the number under Customers to open Customer Insights for the selected event. Click the Back icon to return to the Impact Summary page.
To do so:
- From the Event Details panel of a selected event, click View
Impact Summary after you perform a new impact analysis.
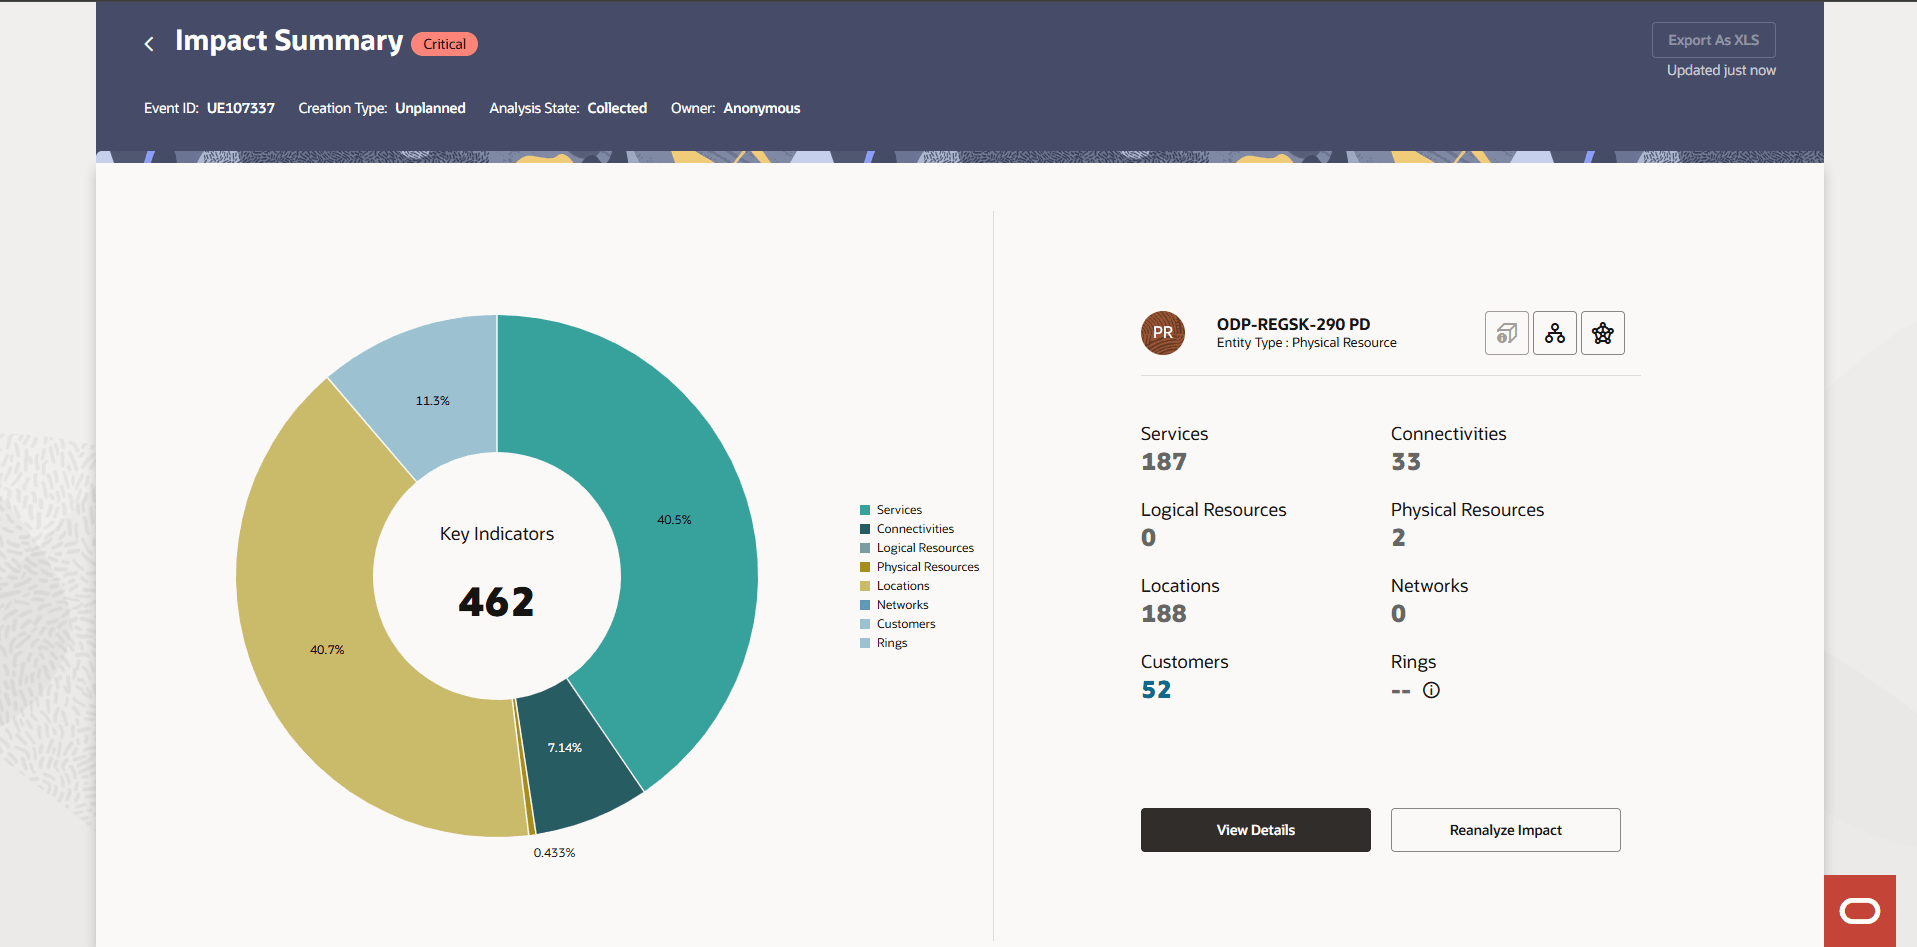
The Impact Summary page appears with further analysis of the event. The impact analysis details include Event ID, Creating Type, Analysis State, and Owner.
- For a simulated event, click Schedule Event to provide the planned-change details and create a planned event.
- Use the pie chart to understand the impact analysis.
- Hover over the pie chart for more details on the event.
- Hover over the resources legend to highlight the corresponding resource details in the pie chart.
- Click on the View Resource in Inventory icon to open the resource summary in UIM.
- Click on the View Resource in Topology icon to open the resource details in ATA.
- Click the Customers count link to open Customer Insight page. See "unresolvable-reference.html" for more information.
- Click View Details at the bottom of the page to view further details on the
impact analysis details.
The Impact Analysis Details page appears. See "Working with Impact Analysis Details" for more information.
- Click Reanalyze Impact to delete the current impact and run the impact analysis again.
- Click Schedule Event or Reschedule Event to schedule or reschedule an event.
The Schedule Planned Event panel appears on the right side.
Note:
If you have already scheduled an event, you can only see Reschedule Event button.- Enter the corresponding details in the Schedule Planned Event panel.
- Click Schedule Event or Reschedule Event to schedule or reschedule the event.
- Click the Calculate Rings icon on the top-right of the summary pane. See "Calculating Ring Impacts" for more information.
- On the top-right corner of the page, click Export As XLS to export the
analysis into a spreadsheet.
The spreadsheet is downloaded to your system.
- On the top-left corner of the page, click on the Back icon to go back to the Events tab.
The following figure shows the impact summary of a selected event:
Figure 12-2 Impact Summary View of a Selected Event
Viewing Customer Insights of the Events
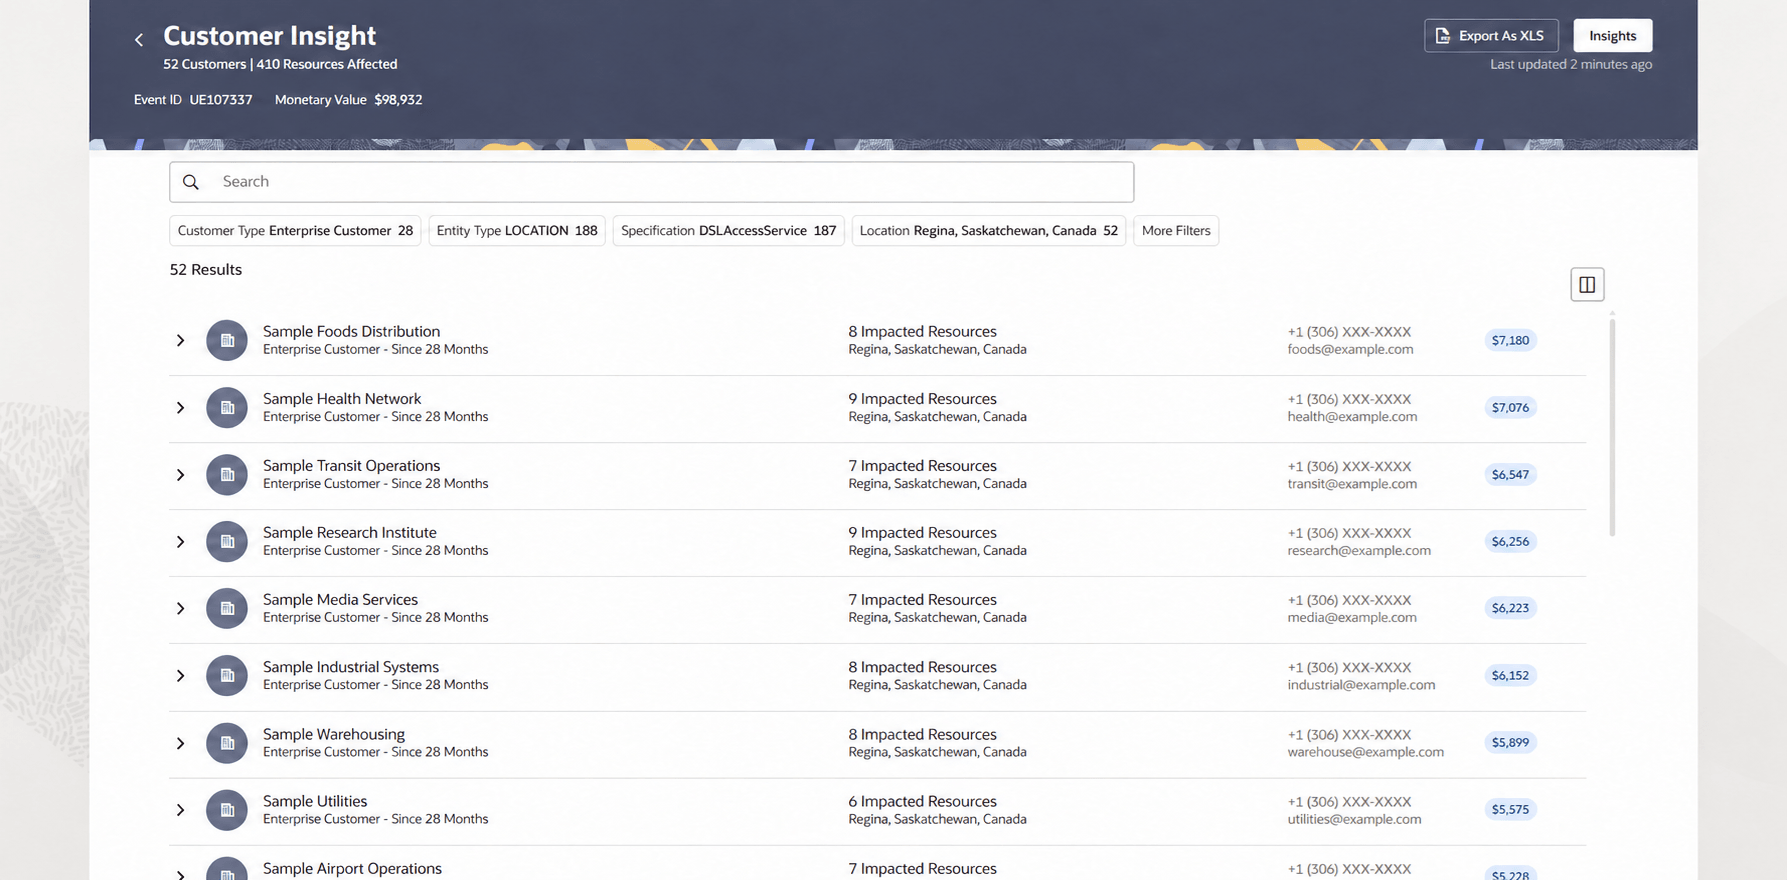
You can view customer insights that include the following details:
- Customer name: This field provides name of the corresponding customer.
- Customer type: The valid customer types are Enterprise Customer and Retail Customer
- Customer since: This field is automatically populated based on the customer start date.
- Impacted resources count: This field provides the list of all impacted resources of the corresponding customer. Expanding
- Customer location: This field provides location of the corresponding customer.
- Customer phone number and email ID: This field provides the phone number and the email ID of the customer base location.
- Bill amount or Customer tier: The bill amount provides the sum of one bill amount per unique matching customer. The customer tier provides the priority from highest to lowest. The default values are
platinum,gold,silver, andbronze.
The following figure illustrates the Customer Insight page.
To view and analyze customer insights:
- On the Simulated Impact Summary page, click on the count link under Customers.
The Customer Insight page appears with list of all customers and their corresponding details in a table.
- Expand a customer record to view the corresponding impacted resource details.
- (Optional) Use search filters to filter the customers data.
- Click Export As XLS on the top-right corner to export the customer details to an Excel sheet.
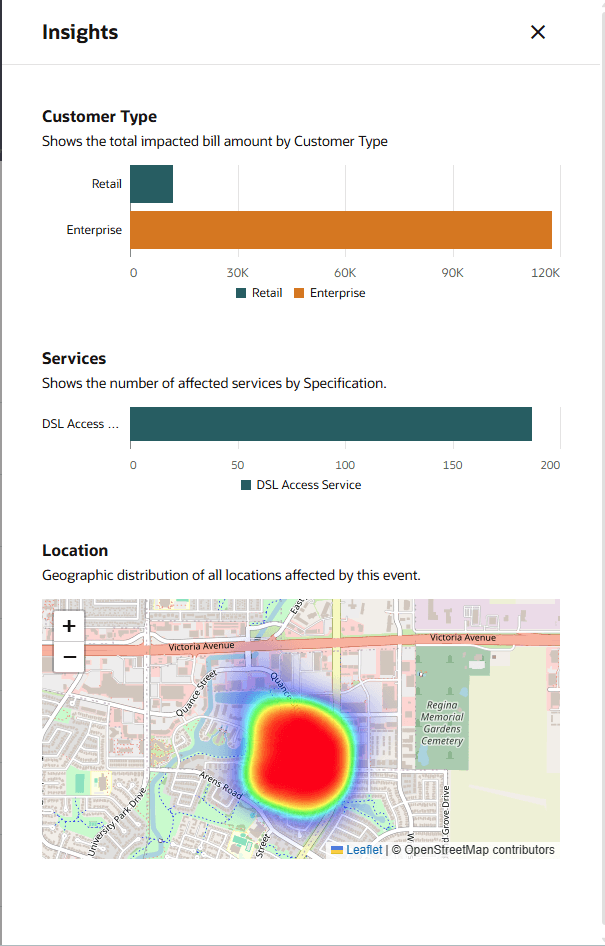
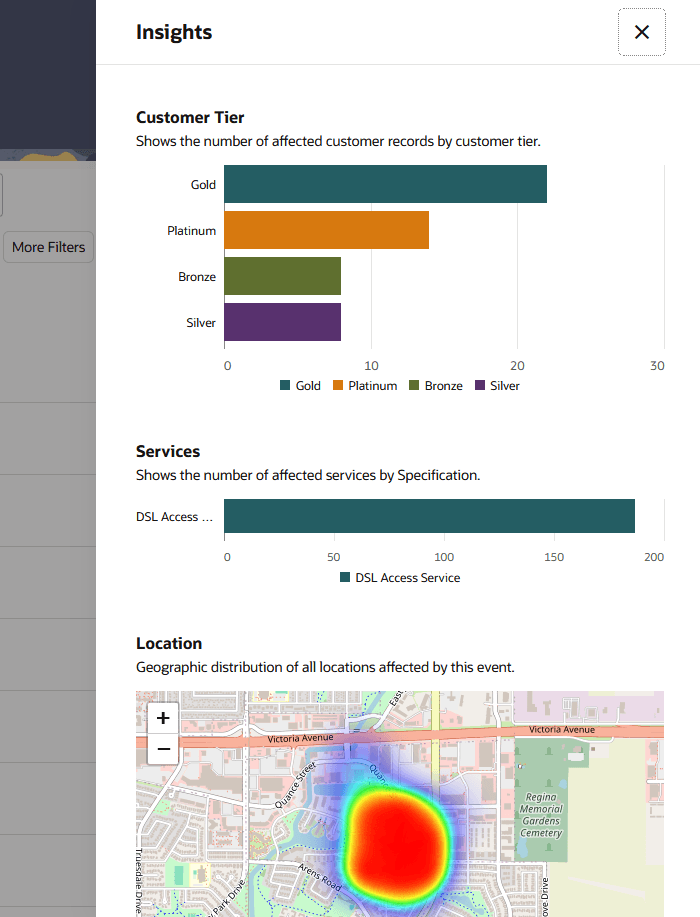
- Click Insights on the top-right corner to open and view the following insights:
- Customer Type or Customer Tier: The Customer Type field provides the total impacted bill amount for each customer type. The Customer Tier field provides the number of customers in each tier.
- Services: This field provides the number of affected services for each specification.
- Location: This field provides the geographic distribution of all locations affected by the event for all customers on a heatmap.
The following figures illustrates the Insights panel that shows customer type along with services and heatmap.
Figure 12-4 Insights with Customer Type, Services, and Heatmap
The following figures illustrates the Insights panel that shows customer tier details along with services and heatmap.
Figure 12-5 Insights with Customer Tier, Services, and Heatmap
Calculating Ring Impacts
Ring impact analysis identifies ring topologies that are affected by an impact analysis event. Ring calculations evaluate the directly impacted connectivity associated with the event.
Each calculation uses one calculation method. When you calculate rings again by using a different method, the new calculation replaces the results of the earlier calculation.
Ring impact analysis returns only rings associated with directly impacted connectivity. It does not return every ring that matches the selected calculation method.
Use Calculate Rings to identify rings affected by an event.
Consider the following conditions before you start calculating ring impacts:
- You must be assigned the Analyst role or Administrator role.
- For a planned or simulated event, select a specific resource before calculating rings. Ring calculation is not supported when the resource selection is All.
To calculate ring impacts:
- In the Events tab, open the required event.
- Click View Impact Summary.
- For a planned or simulated event, select a specific resource by name or ID.
Note:
Do not select All. - Click Calculate Rings.
- In the Select Ring Calculation Method dialog box, select a calculation method.
- Click Calculate Rings.
The calculation starts. While the calculation is in progress, the action is unavailable and indicates that ring calculation is in progress.
Note:
Calculate Rings remains visible when the resource selection is All. If you select it while All is selected, the calculation does not start and existing results do not change. The following message appears:Calculate Rings is not supported for All resources. Please select specific resource to calculate rings.Selecting a Ring Calculation Method
Select the calculation method that provides the most appropriate scope for identifying affected rings.
Table 12-2 Ring Calculation Methods
| Method | Description |
|---|---|
| Ring Name | Uses the Ring Name associated with the directly impacted connectivity. Use this method when discovered network data identifies the ring in which the connectivity participates. |
| Network | Uses the network associated with the directly impacted connectivity as the search context. |
| Specification | Searches for rings by using the specification of the directly impacted connectivity. |
| Rate Code | Searches for rings by using the rate code of the directly impacted connectivity. |
| Technology | Searches for rings by using the technology of the directly impacted connectivity. |
| User Policy | Uses a policy configured by your administrator to select the appropriate calculation method. |
Use the most specific method that is appropriate for the event. Ring Name and Network typically provide a narrower search scope than Specification, Rate Code, or Technology.
Note:
When you use the Specification, Rate Code, or Technology method, an edge that contains multiple connectivities is treated as having equivalent connectivity. The calculation evaluates one connectivity for the edge rather than evaluating all possible connectivity combinations.
The selected method defines where Service Impact Analysis searches for affected rings. The calculation returns only affected rings, not all rings that match the method criteria.
Viewing Ring Calculation Results
After ring calculation completes, the Rings value on the Impact Summary page displays the result. Select the information icon next to the value to view the calculation method that was used. You can select a ring calculation method using the Calculate Rings icon on the top-right corner of the summary pane.
Table 12-3 Ring Calculation Results
| Rings Value or State | Meaning | Recommended Action |
|---|---|---|
-- |
Rings have not been calculated, or the results were cleared when the impact was reanalyzed. | Click Calculate Rings and select a calculation method. |
Calculating |
The ring calculation request is in progress. | Wait for the calculation to complete. Do not start another calculation or reanalyze the impact. |
Positive count |
One or more affected rings were identified. | Select the information icon to view the calculation method. Click View Details to review the ring records. |
0 |
No affected rings were identified. | Review the calculation method and select a broader or more appropriate method, if required. |
FAILED |
The ring calculation could not complete. | Review the displayed failure details, correct the condition, and calculate rings again by using an appropriate method. |
For planned and simulated events, the All resource selection displays an aggregated Rings count for the parent event as follows:
- A positive count indicates that one or more child resources have calculated affected rings.
- A value of
0indicates that ring calculation completed for every child resource and no affected rings were found. - A value of
--indicates that ring calculation has not completed for every child resource. For example, some child resources can have a result of 0 while other child resources have not been calculated.
Hover over the Rings Information icon to view the resources and method considered for ring calculations.
Note:
The ring calculations work only for ports and Device interfaces.Recalculating Ring Impacts
Use Recalculate Rings to calculate rings by using a different method.
A new calculation replaces the existing ring impact results. It does not combine results from multiple calculation methods.
For planned and simulated events, select a specific resource before recalculating rings. Do not recalculate rings while the resource selection is All.
Reanalyzing an Impact After Calculating Rings
Reanalyzing an impact discards the current impact analysis and all calculated ring results.
Are you sure you want to reanalyze? Doing so requires recalculation of the rings. Click Reanalyze to continue. The analysis restarts, the Rings value returns to --, and you must calculate rings again after the impact analysis completes.
Working with Impact Analysis Details
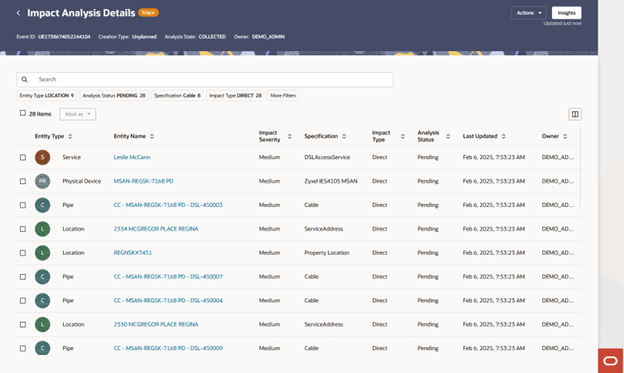
You use the Impact Analysis Details page to understand more about the generated impact analysis. The Impact Analysis Details page shows the following details of the analysis:
- Entity Type
- Entity Name
- Impact Severity
- Specification
- Impact Type
- Analysis Status
- Last Updated
- Owner
- Protection Level
- Insights
The Impact Analysis Details page shows the following details of entities impacted because of the analysis:
Table 12-4 Impact Analysis Details
| Impact Analysis Details Column | Description |
|---|---|
| Entity Type | The entity or resource type from UIM. The valid values
are:
|
| Entity Name | The name or ID of the entity or resource from UIM. This is a hyperlink and displays the entity details in a side panel. |
| Impact Severity | The severity level of the impact. The valid values
are:
|
| Specification | The resource or entity specification from UIM. |
| Impact Type | The impact type. The valid values are:
|
| Analysis Status | The analysis status. The valid values are:
|
| Last Updated | The date when the impact was last updated. |
| Owner | Name of the owner who is assigned with the impact to resolve. |
| Protection Level | The protection level of the event. |
A ring record represents an affected ring topology identified by ring impact analysis. For a ring record, the Specification value identifies the calculation method used to identify the ring.
To view an affected ring in Active Topology Automation:
- On the Impact Analysis Details page, locate a record with the Entity Type value
RING. - Click the ring name.
The ring details appear in the details drawer.
- In the details drawer, click the overflow menu and select View Resource in Topology.
Active Topology Automation opens the selected ring in a new browser tab by using the Circular Layout. The topology view preserves the ring context when it is available.
Note:
View Resource in Inventory is disabled for ring records.The Impact Analysis Details workflow applies to impacts identified for assurance, simulated, and planned events. Before generating a report, review each impacted entity and mark the result as qualified or disqualified.
To work on the Service Impact Analysis details:
- Open the Impact Analysis Details page.
- Enter a name or a value in Search to view the corresponding search results.
- Use the filter tags available and select the corresponding values to choose the filter values.
- Click More Filters to customize the filters.
- From the results table, select the required analysis record.
- Select Assign Owner from the Mark as list to assign the owner.
- Select Change Impact Severity to select a severity value from the list in the Change Impact Severity panel and then click Save.
- Click Analyze Result, select the required value from the Analyze Result panel, and then click Mark.
- Click Insights on the top-right corner to view the following impact insights:
- A heatmap showing the impacted nodes as per the map location.
- A bar graph showing marked and pending events.
- A bar graph showing the number of entities according to specifications.
- A pie chart showing the number of impacted entities according to the severity.
- From the More Actions list on the top-right corner, select either of the following:
- Export As XLS to export the analysis to a spreadsheet.
Note:
The Export As XLS is disabled by default. It is enabled after you select the entities that you want to export. - Generate Report to generate a report.
The Analysis Status value gets changed to COMPLETED after the report is generated.
Note:
You can no longer modify the analysis details after the Analysis Status value becomes COMPLETED.
All impacted items of the event should be analyzed to either Qualified or Disqualified to generate the report.
- Export As XLS to export the analysis to a spreadsheet.
- Click Insights on the top-right corner.
The Insights panel appears that helps you understand further details about the analysis. See "Viewing Insights of the Events" for more information.
- (Optional) Hover over the corresponding insights details to view more details.
- On the top-left corner, click on the Back icon to go back to the Impact Summary page.
The following figure shows the Impact Analysis Details page that opens from the Impact Summary page.
Figure 12-6 Impact Analysis Details Page
Searching and Filtering the Events
You can search by entering the required value of the event or by using filter options. The filter options can be used to view the list of events according to the selected filter criteria. Each of the filter options displays the number of records or events exist for the corresponding filter option.
To search and filter the events:
- In the Events tab, enter the required value in the Search field.
The list of events appears as per the searched criteria.
- To filter the list of events, use the following filter chips or
options:
- Resource Category
- Event Status
- Alarm Type
- Severity
- (Optional) Use More Filters to customize the filter tags.
The corresponding filter criteria is added to the search criteria.
- Select the corresponding values within the filtered criteria to filter
the list further.
The corresponding filtered list appears.
Customizing the Events
You can customize the events table columns that can help you in viewing only the required event details. You can hide the other details.
To customize the columns:
- In the Events tab, click on the Columns icon on the
top-right corner of the events table.
The Columns panel appears.
- Select the required columns and deselect the columns that you do not need.
- (Optional) Type the column name in the Search field to search and choose it.
- Click Restore Defaults to restore the default columns.
- Close the Columns panel to reflect the changes.
Viewing Insights of the Events
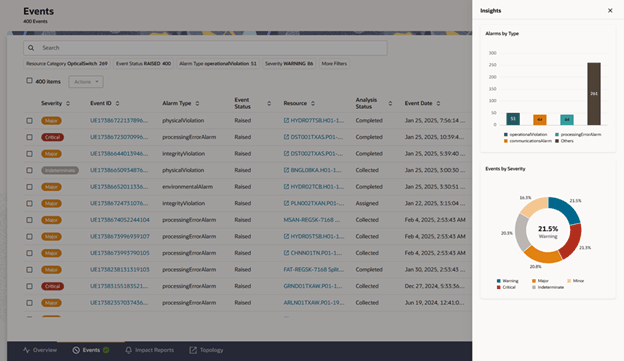
You can view additional analysis on the events using the Insights panel.
To view insights of the events:
- In the Events tab, click Insights on the top-right corner of the
page.
The Insights panel appears with additional analysis on the list of events.
- In the Alarm by Type section of the insights, hover over the corresponding alarm type to view the details.
- In the Events by Severity section of the insights, hover over the pie chart to view the details.
- Use the severity legend at the bottom of the Insights panel to understand the colors used for alarm severities.
Performing Actions on the Selected Events
You can perform actions on events depending on the role you are assigned with. You can select multiple events and perform an action on the selected events.
See "About Authentication" in Unified Inventory and Topology Deployment Guide for more information on the Service Impact Analysis roles.
You can perform the following actions using the Actions menu from the Events tab:
- Assign owner: You can assign an owner to resolve the event. You need necessary permissions to perform this action.
- Reject event: You can remove the event from the list without deleting the event record. You reject an event when the assurance system has sent an improper event. The status changes to REJECTED and this enables you to track the invalid events. These events are stored separately in case analysis needs to be done on the reason behind the assurance system sending invalid events. You need necessary permissions to perform this action.
- Delete events: You can purge the event so that the event is no longer available. You need necessary permissions to perform this action.
- Generate report: You can generate reports. All impacted items in the event should be analyzed to either Qualified or Disqualified to generate a report.
To perform actions on the selected events:
- In the Events tab, select the required event or events.
- Select an option from the Actions menu to perform the following:
- Select Assign Owner to assign an owner to the event or events. See "Assigning an Owner to the Events" for more information.
- Select Reject Event and then click Reject from the dialog box to reject the selected event or events.
- Select Delete Event and then click Delete to delete the selected event or events.
- Select Generate Report and then click Confirm to generate reports for the selected event or events.
Assigning an Owner to the Events
You can assign an owner if you have the necessary permission to perform this action.
See "About Authentication" in Unified Inventory and Topology Deployment Guide for more information on the Service Impact Analysis roles.
You can assign an owner to the selected events.
To do so:
- In the events table, select the required events.
- Select Assign Owner from the Actions menu.
The Assign Owner popup appears.
- Enter a name in Search and select it.
- (Optional) Use the dropdown arrow in the Search field to select a name.
- Click Assign to assign the owner.
- (Optional) Click Cancel to cancel it.