Custom
In this section you can change settings related to custom layers in Vision. The following steps should be followed, in order, when creating a custom layer:
-
Add Custom Layer
-
Upload any images referenced in the custom layer
-
Upload Custom Layer JSON data/file
Viewing Existing Custom Layers
In this tab you can view and edit all existing custom layers in Vision. The following path shows you how to navigate in the UI:
- Custom -> View
The following figure shows the view for all added custom layers in Vision.

Description of illustration custom-view.png
You can edit the following columns:
-
Name: Name of the custom layer.
-
Use layer: set to true if you wish to have the layer available to use from the sidebar.
-
Refresh rate: Set interval in minutes you want the layer to be refreshed. Set to 0 if the data is static and it will only be loaded once when the map is loaded.
-
Display on load: Set to true if you wish to have the custom layer displayed on map start-up.
Adding a Custom Layer
Use this tab to add a new custom layer to be used in Vision. The data selected is polled every x amount of minutes, where x is the value entered in the refresh rate field. This only happens if refresh rate is set to a value greater than 0. The layer will then be updated based on changes to the data. The following shows you how to navigate in the UI:
- Custom -> Add
The following figure shows the form for adding a custom layer to Vision.
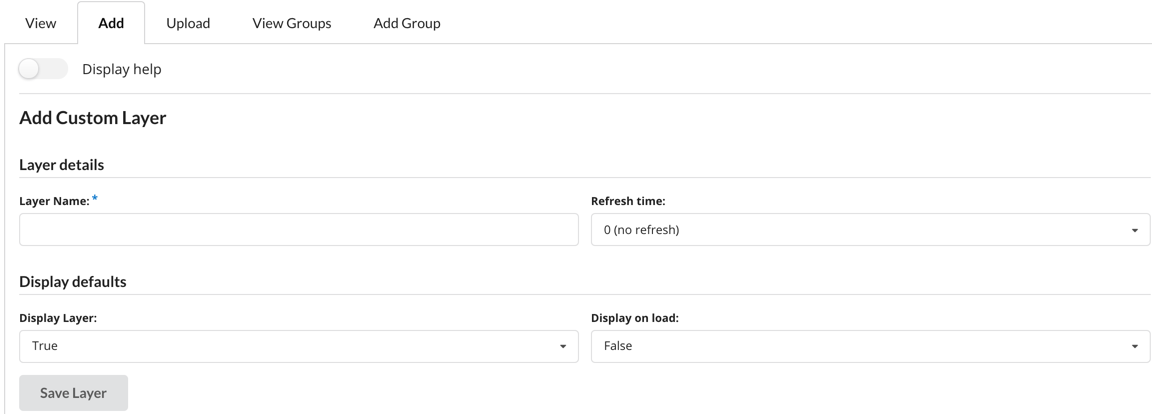
Description of illustration custom-form.png
Use this interface to add a custom layer in Vision.
-
Click the Display Help slider for more help on this page.
-
Mandatory fields are Layer Name and Select File.
Upload a Custom Layer File & Image
The following path show you how to navigate in the UI:
- Custom -> Upload
This tab allows you to upload a data/file or image so that it can be used for a custom layer. Click the display help slider for more help on this page.
To upload data:
The following figure shows the form for uploading data for a custom layer:
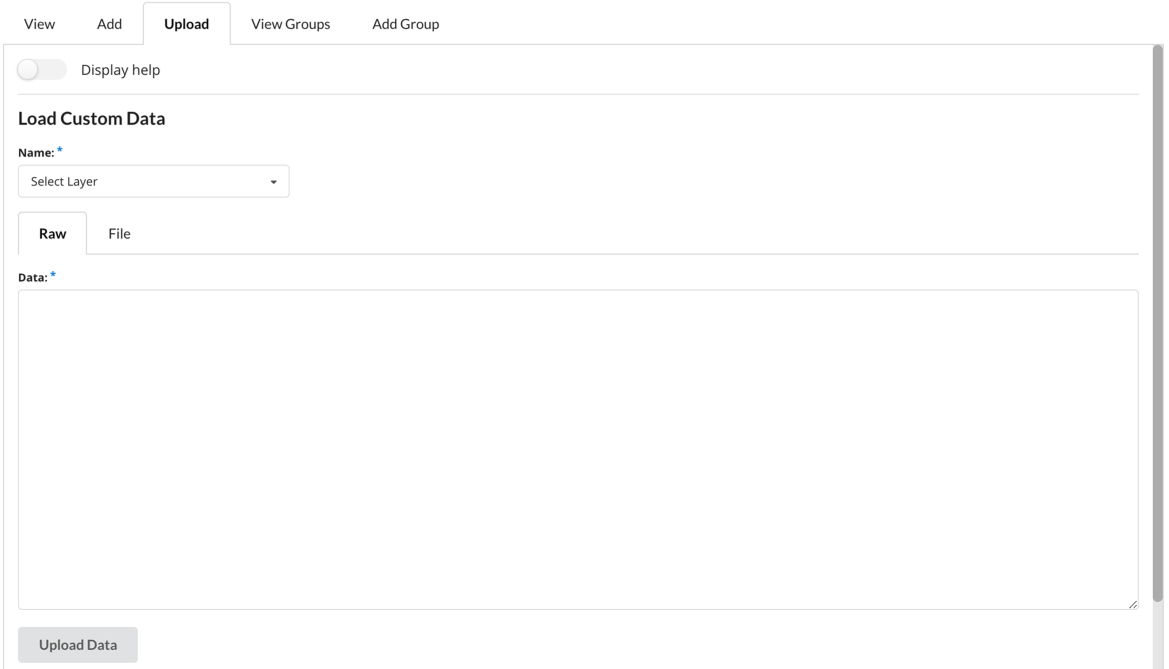
Description of illustration custom-upload-form-data.png
-
Select the name of the layer you want to upload the data for, under the Load Custom Data title.
-
Select the Raw tab in the form.
-
Input the json for the layer into the text field, making sure it is correctly formatted JSON.
-
Click submit to upload your data.
To upload a file:
The following figure shows the form for uploading a file for a custom layer:
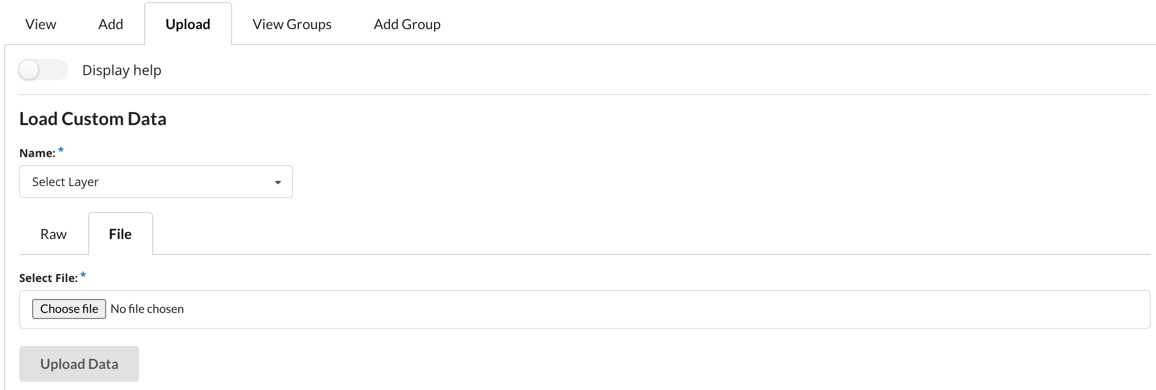
Description of illustration custom-upload-form-file.png
-
Select the name of the layer you want to upload the data for, under the Load Custom Data title.
-
Select the File tab in the form.
-
Click Choose File under the Load Custom Data title.
-
Browse and select your file.
-
Click Upload Data to upload your file
To upload an image:
The following figure shows the form for uploading an image file for use in a custom layer:

Description of illustration custom-upload-form-layer-image.png
-
Click Choose File under the Load Custom Image title.
-
Browse and select your file.
-
Click Upload Image to upload your file.
Viewing Custom Groups
The following path shows how to navigate in the UI:
- Custom -> View Groups
The following shows the Custom Groups view.

Description of illustration custom-groups-view.png
This tab gives a list of all custom groups currently in Vision. This list can be ordered by clicking on the column you wish to order by. You can edit the following columns:
-
Name: Name of the custom group.
-
Custom Layer IDs: IDs of the entities that are in the group.
-
User IDs: IDs of the users that are in the group.
To edit a custom group, click the pencil on the end of the row. A form will be displayed to allow you to make changes, click Edit Item to confirm the changes. A popup appears asking you to confirm your edit.
Adding an Custom Group
The following path shows how to navigate in the UI:
- Custom -> Add Group
The following figure shows the form for adding a Custom Group.
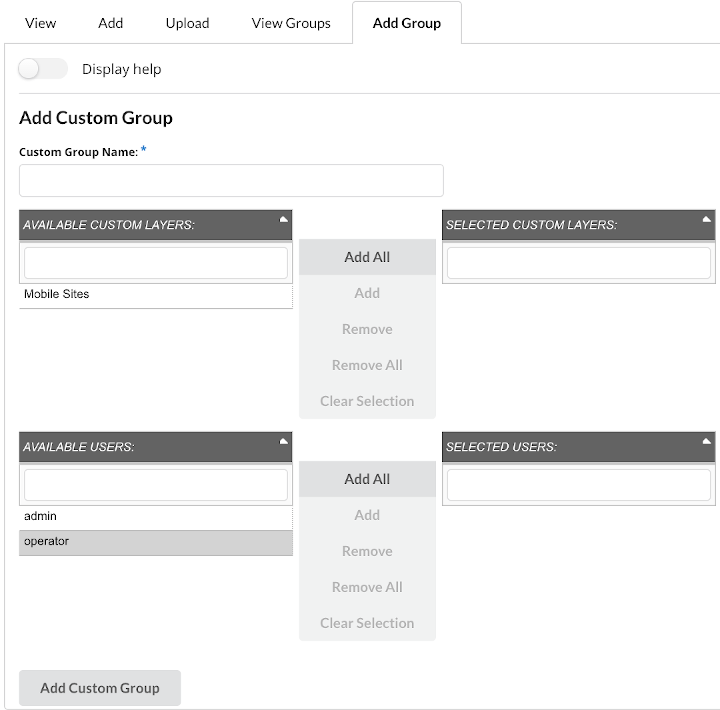
Description of illustration custom-group-form.png
This tab allows you to add in a single custom group. The only mandatory field is Name. Click Add Custom Group after fields are filled out to create a custom group.
For more information on how to interact with this form see Adding a Group.