Managing Settings
The Settings page is used to view and change settings and configuration items for Vision. To access the Settings page click the Settings icon on the Menu Bar.
Editing and Deleting Data in Settings
To edit or delete a setting or configuration item you first select the relevant section from the side menu. This opens the View tab for that section which displays a table with the current settings or configuration items. The ability to edit or delete settings and configuration items is permissions based.
Editing Data
In each table, at the end of each row you will find an edit button as shown in the following figure.

Description of illustration edit-row.png
To edit a row you must first left-click this button, when active the icon will change to a tick. You must then left-click the field you want to edit, edit the data and then click the tick to submit the changes. You can edit multiple fields before submitting. A popup box will then ask you to confirm the changes. If the tick is left-clicked without any changes being made it will exit the edit.
To edit a row in the links or any of the View Group tables, you must left-click this button. However, upon clicking a popup will be shown, this popup contains the current data for that row. The data can then be edited. To confirm any changes, click the Edit Item button. To cancel any changes, click the Cancel button.
Not all columns can be edited, which columns can be edited will be stated in each setting's section.
Deleting the Data
In most tables at the end of each row you will find a delete button as seen in the following figure.

Description of illustration delete-row.png
Note that not all tables allow deletion of rows, if a table does not support this then the delete button will not appear. To delete a row, click this button, a popup box will then ask you to confirm that you want to delete this row.
Searching the Data
- The search feature is started by clicking the search button in the menu bar.
- After entering at least three characters the search will start to return matches based on your input.
- On the Settings page you can use this to search the currently displayed table.
For more information on the search feature see Using the Search Feature
Adding a group
The following sections in the settings menus have an ability to control what the user can see:
-
Entities
-
Layers
-
Custom
-
Dashboards
-
Links
Clicking the Add Group heading in one of these sections will bring up the form for adding a group, for example the following figure shows the add entities group form.
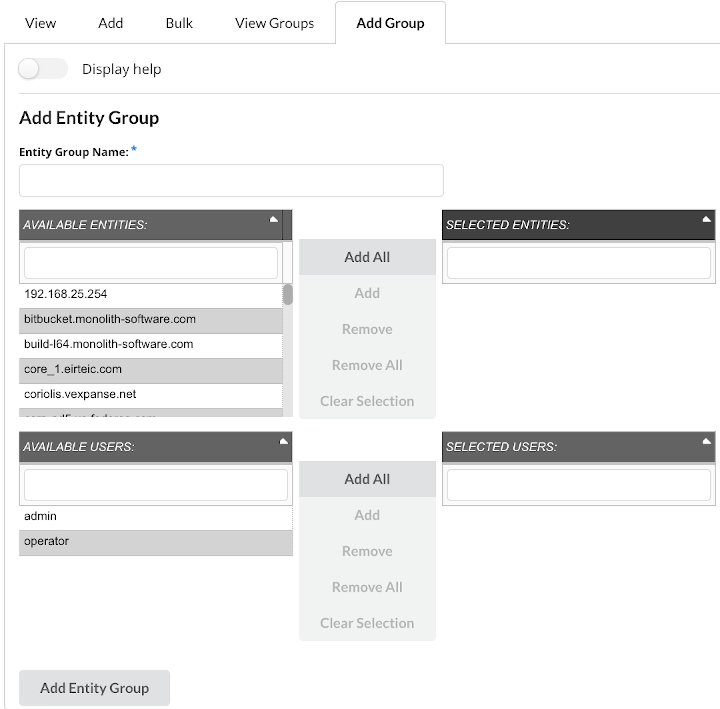
Description of illustration entity-group-form.png
You must provide a name for each group you create. The first section in the form allows you to select what entities/layers/custom/dashboards/links will be in the group. The second section will allow you to select what users will be in the group.
To add something to the group select it with left click in avaliable table and click the Add button. Use the Add All button to add every entry in the available table to the group. Adding more than one item at a time to the group can be done by selecting multiple items in the table.
To remove items from the group select it with left click in selected table and click the Remove button. Use the Remove All button to remove every entry in the selected table to the group. Removing more than one item at a time to the group can be done by selecting multiple items in the table.
To find a specific item in a table, search the table using the text field at the top of the table. The Clear Selection button will clear any selected entries in the tables.