Layers
This section allows you to change setting related to layers. A layer image is required when adding a new layer. If you are not using one of the provided base layer images; the following steps should be completed, in order, when adding a new layer. Otherwise, just follow Adding a Layer.
-
Upload layer image
-
Add a new layer
Viewing the Layer
The following path shows how to navigate in the UI.
- Layers -> View
The following figure shows the Layers table.

Description of illustration layers-view.png
In this tab you can view all existing layers in Vision. You can edit the following columns:
-
Name: Name of the layer.
-
Image path: Path to image that the layer uses for its markers.
-
Display on load: Set to true if you want the layer to be visible when the map is opened.
-
Type: Defines the type of entities that reside on the layer. Use pLink to define a layer for pLink events otherwise use point.
Adding a Layer
The following path shows how to navigate in the UI.
- Layers -> Add
The following figure shows the form for adding a layer:

Description of illustration layers-form.png
In this tab you can add a single additional layer. Click the display help slider for more help on this page. The mandatory fields are Layer Name and Layer type. If an image is not selected in the Select Image combo box, the layer will default to use the Unknown.png image. When the form is complete, click the Add Layer button to add your layer to Vision.
Upload a Layer Image
The following path shows you how to navigate in the UI:
- Layers -> Upload
The following figure shows the form for uploading an image:

Description of illustration layers-image-form.png
This tab allows you to upload an image so that it can be used for a layer. Click Display Help for more help on this page.
-
Click Choose File.
-
Browse and select your file.
-
Click Submit to upload your image
Viewing Layer Groups
The following path shows how to navigate in the UI:
- Layers -> View Groups
The following shows the Layer Groups view.

Description of illustration layer-groups-view.png
This tab gives a list of all layer groups currently in Vision. This list can be ordered by clicking on the column you wish to order by. You can edit the following columns:
-
Name: Name of the layer group.
-
Layer IDs: IDs of the layers that are in the group.
-
User IDs: IDs of the users that are in the group.
To edit a layer group, click the pencil on the end of the row. A form will be displayed to allow you to make changes, click Edit Item to confirm the changes. A popup appears asking you to confirm your edit.
Adding a Layer Group
The following path shows how to navigate in the UI:
- Layers -> Add Group
The following figure shows the form for adding a Layer Group.
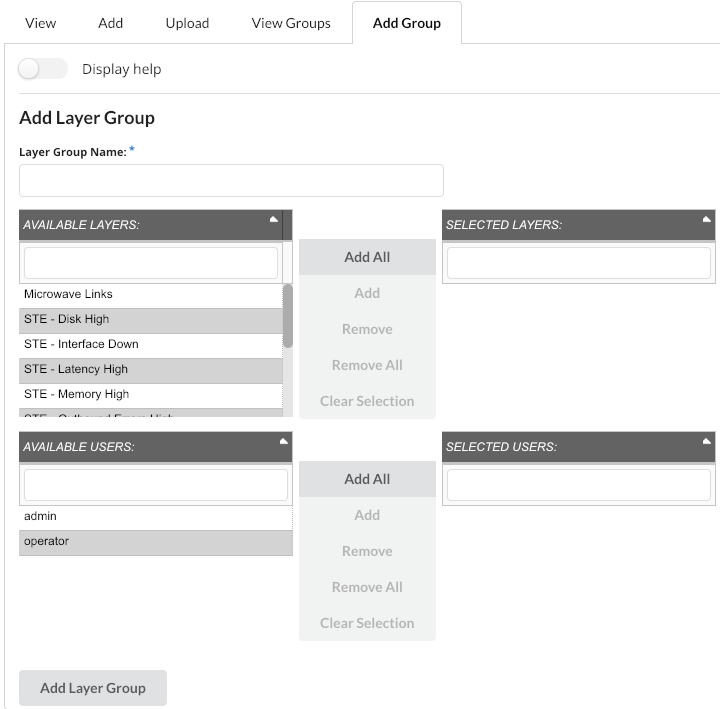
Description of illustration layer-group-form.png
This tab allows you to add in a single layer group. The only mandatory field is Name. Click Add Layer Group after fields are filled out to create a layer group. For more information on how to interact with this form see Adding a Group.