Custom Dimensions
A custom dimension is created in the database and populated using the pattern illustrated in the figure below.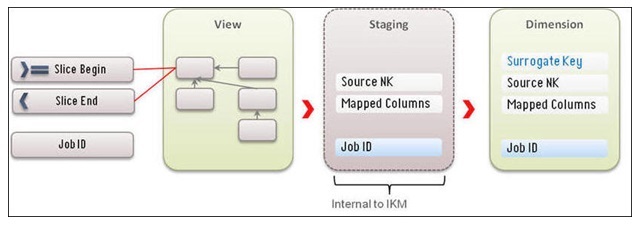
This section provides the steps required to create a custom dimension and load data into it.
Note: The following steps are explained using the Arrears table (CM_D_ARREARS) from Customer Care and Billing as an example.
Creating Dimension Table
This section describes the procedure to create a Type-II slowly changing dimension. The dimension should have a primary key. In this example, it is the surrogate key column and a sequence is used to generate the values for this key. A Type II dimension should have a unique key comprising a column from source, the data source indicator, effective start timestamp, and effective end timestamp.
To create a dimension table:
1. Connect to the database using SQL Developer.
2. Run the script below to create the dimension table in the target schema:
create table dwadm.cm_d_arrears_uddx1
(
arrears_uddx1_key number(10)
,uddx1_cd varchar2(30)
,attribute1 varchar2(60)
,attribute2 varchar2(60)
,attribute3 varchar2(60)
,attribute4 varchar2(60)
,attribute5 varchar2(60)
,data_source_ind number(6)
,eff_start_dttm date
,eff_end_dttm date
,job_nbr numeric (15)
,update_dttm date
,primary key (arrears_uddx1_key)
);
3. Run the script below to create the unique composite key for the Type II dimension:
create unique index dwadm.cm_d_arrears_uddx1_uk
on dwadm.cm_d_arrears_uddx1(uddx1_cd
,eff_start_dttm
,eff_end_dttm
,data_source_ind);
4. Create the sequence used to generate the surrogate key values.
create sequence dwadm.cm_d_arrears_uddx1_seq
start with 1
increment by 1;
5. Insert a row for the default 0 key record to handle nulls in the dimension foreign keys.
insert into dwadm.cm_d_arrears_uddx1
(
arrears_uddx1_key
,uddx1_cd
,attribute1
,attribute2
,attribute3
,attribute4
,attribute5
,data_source_ind
,eff_start_dttm
,eff_end_dttm
,job_nbr
,update_dttm
)
values
(0
,'***'
,'***'
,'***'
,'***'
,'***'
,'***'
,0
,to_date('01/01/2000','mm/dd/yyyy')
,to_date('01/01/4000','mm/dd/yyyy')
,0
,sysdate);
commit;
6. Insert a row for the default -99 key record for automatic reprocessing of Late Arriving Dimensions:
insert into dwadm.cm_d_arrears_uddx1
(
arrears_uddx1_key
,uddx1_cd
,attribute1
,attribute2
,attribute3
,attribute4
,attribute5
,data_source_ind
,eff_start_dttm
,eff_end_dttm
,job_nbr
,update_dttm
)
values
(-99
,'N/A'
,'N/A'
,'N/A'
,'N/A'
,'N/A'
,'N/A'
,-99
,to_date('01/01/2000','mm/dd/yyyy')
,to_date('01/01/4000','mm/dd/yyyy')
,-99
,sysdate);
commit;
Importing Dimension into Model
After the custom dimension is created in the database, import the dimension in the custom model folder created for customization.
1. Login to the Oracle Data Integrator client.
2. On the Designer tab, navigate to the Models section in ODI.
3. Navigate to the User Customization folder, and then to the folder with the product name for which the customization is done.
In this example, it is ‘CCB’.
4. Right-click on the product folder and select New Model.
The New Model window opens.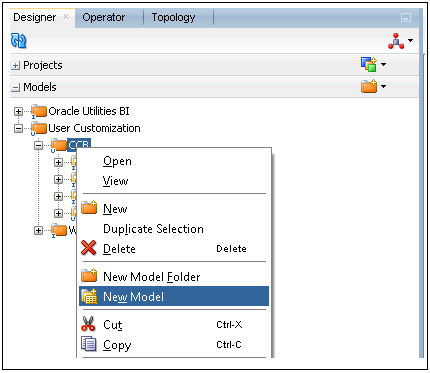
5. In the Name field, enter Dimension.
6. Specify the code.
7. Select the Technology as “Oracle” and Logical Schema as “Target”.
8. Click Save to save the model.
9. Right-click and open the dimension model.
10. Navigate to the Reverse Engineer tab.
11. In the Types of objects to reverse-engineer section, select Table.
12. Enter CM_D_ARREARS_UDDX1 in the Mask field.
13. Clear the Characters to Remove from Table Alias field.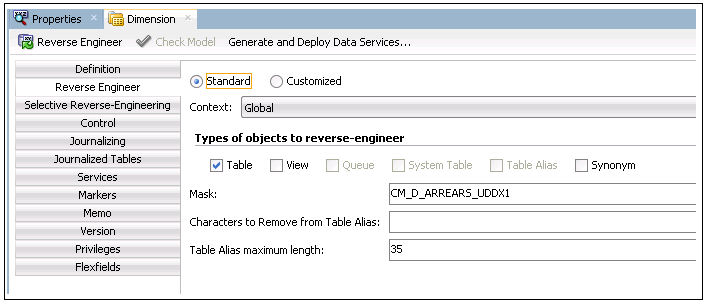
14. Click Reverse Engineer. The dimension table is reversed in the model.
Once the dimension has been imported into the model, set its properties.
15. Expand the Dimension model and double-click it to open the editor window.
16. In the Definition tab, from the OLAP Type drop-down list, select Slowly Changing Dimension. 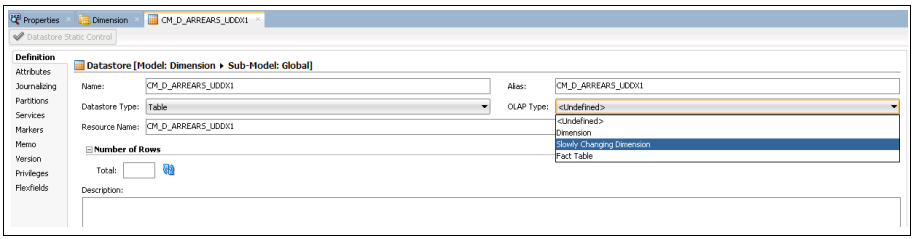
17. Save the changes and navigate to the Attributes section of the data store.
Change the SCD behavior for all columns.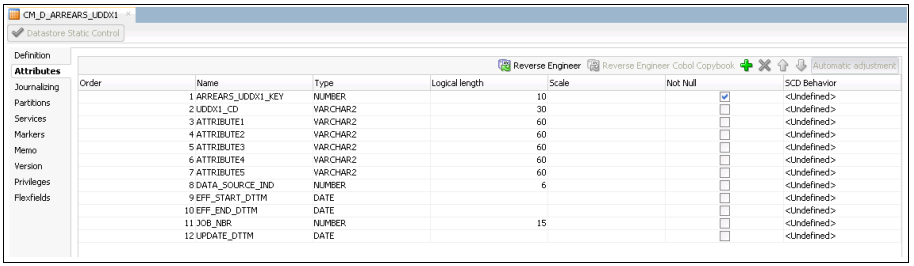
18. For each of the attributes, set the SCD Behavior as shown below:
Attribute | SCD Behavior |
|---|---|
ARREARS_UDDX1_KEY | Surrogate Key |
UDDX1_CD | Natural Key |
DATA_SOURCE_IND | Natural Key |
EFF_START_DTTM | Starting Timestamp |
EFF_END_DTTM | Ending Timestamp |
ATTRIBUTE1 | Add Row on Change |
ATTRIBUTE2 | Add Row on Change |
ATTRIBUTE3 | Add Row on Change |
ATTRIBUTE4 | Add Row on Change |
ATTRIBUTE5 | Add Row on Change |
JOB_NBR | Overwrite On Change |
UPDATE_DTTM | Overwrite On Change |
The figure below illustrates the Attributes section. 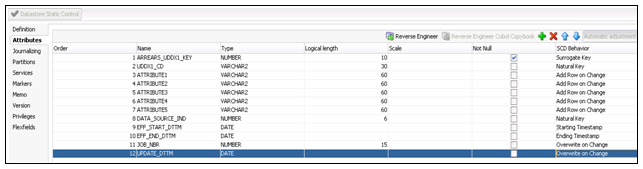
Importing Replicated Table into Replication Model
To import the replicated table into model:
1. Login to Oracle Data Integrator client.
2. On the Designer tab, navigate to the Models section in ODI.
3. Navigate to the User Customization folder, and then to the folder with the product name which is customized.
4. Right-click the product folder and select New Model. The New Model window opens.
5. In the Name field, enter “Replication”.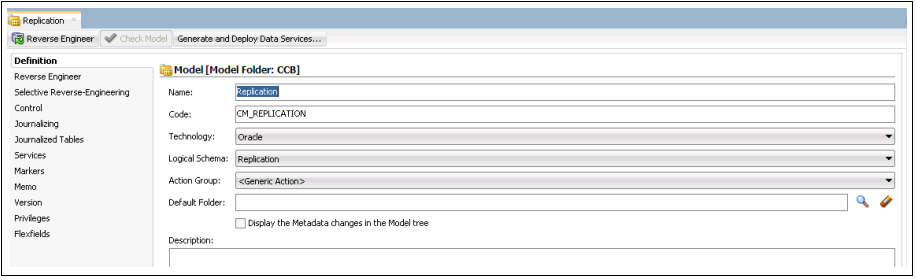
6. Click the Reverse Engineer tab and select “CCB7” in the Context field. Enter “%CI_ACCT_CHAR” in the Mask field.
7. Save the model and click Reverse Engineer.
The reverse engineering action is executed.
Creating Replication Key View in Dimension Model
A key view is created for the dimension so that the incremental data for the fact can be filtered based on the key view. The key view should comprise the natural key of the dimension and the JRN_SLICING_TS column that stores the JRN_SLICING_TS column values from the driving tables that are used to create the view.
To create a replication key view in model for the dimension:
1. Login to the Oracle Data Integrator client.
2. Navigate to Models > User Customizations, and then navigate to the relevant product folder.
Example: CCB
3. Right-click the Replication model and select New Datastore.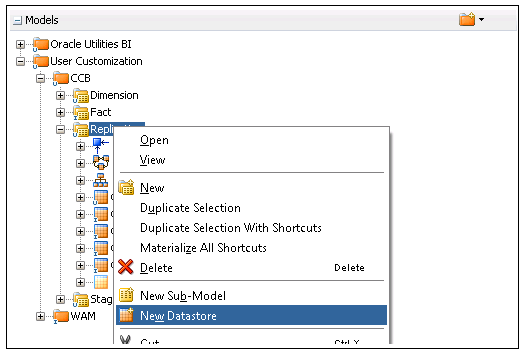
4. On the Definition tab, enter the name of the key view as CM_D_ARREARS_UDDX1_KVW.
The naming convention of the view is “CM_” prefixed to entity name and suffixed by “_KVW”.
5. In the Resource Name field, enter the same name of the key view as in step 4.
6. Navigate to the Attributes tab.
7. Click on ‘+’ on the right-hand corner and add the columns in the datastore.
The natural key of the dimension has to be present in the view. In addition to this, the JRN_SLICING_TS column has to be added.
8. Save and close the datastore.
Creating Mapping for Key Views in Dimension Model
The key view for the dimension has to be generated in the Replication schema.
To create a mapping to generate a view for the key columns:
1. On the Oracle Data Integrator client, navigate to User Customizations, and then to the relevant product folder.
Example: CCB
2. Create a new folder named Replication and expand it.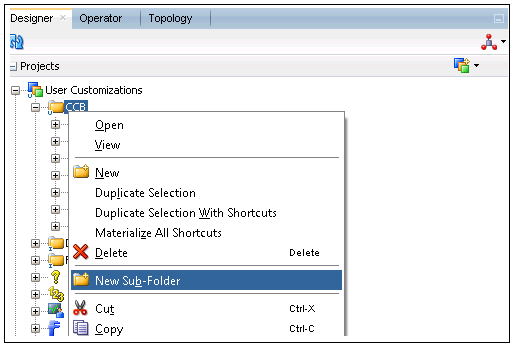
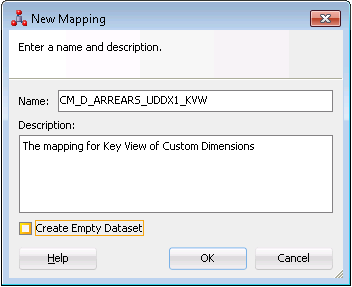
3. Right-click on the mapping and select New Mapping.
4. In the New Mapping window, enter “CM_D_ARREARS_UDDX1_KVW” as the name and uncheck the Create Empty Dataset option.
5. Navigate to the Logical tab of the mapping editor.
6. On the Logical tab, navigate to Models > User Customizations > Replication.
7. Drag the CM_D_ARREARS_UDDX1_KVW target replication key view and CI_ACCT_CHAR from the model and drop in the Logical Design pane.
8. Click the target view datastore.
9. Map the target view columns from the dragged source table.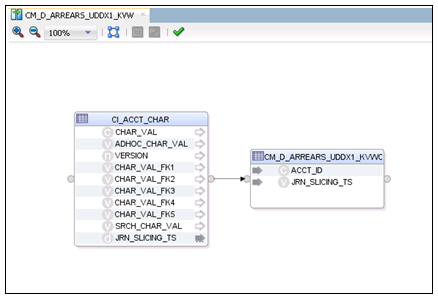
10. If there are multiple driving tables, add new data flows in the mapping for every driving table using the SET component.
A primary driving table should be identified and should always be the first dataset. For subsequent data sets include the filter JRN_UPDATE_DTTM > to_date(#B1_EXTRACT_START_DTTM,’YYYYMMDD’).
11. Map the relevant column in the datasets for all the driving tables to target view.
12. Navigate to the Physical Design tab and set the Context in the Properties window.
13. Click the target datastore in the Physical Design pane.
14. In the Integrated Knowledge Module section, select IKM as “IKM BI View Generation”.

15. Click Save to save the mapping.
16. Generate a scenario for the mapping and execute the scenario in the context.
Creating Loading Views in Dimension Model
The loading view is created on top of the source replication tables. The view comprises all columns that are used to populate the dimension table and IND_UPDATE and UPDATE_DTTM columns.
To create a loading view in the dimension table:
1. On the Oracle Data Integrator client, navigate to Models > User Customizations, and then navigate to the relevant product folder.
Example: CCB
2. Right-click the replication model and select New Datastore.
3. On the Definition tab, enter ‘CM_D_ARREARS_UDDX1_VW’ as the name of the loading view.
The naming convention of the view is “CM_” prefixed to the entity name and suffixed by “_VW”.
4. Specify the same view name again in the Resource Name field.
5. Navigate to Attributes tab.
6. Click ‘+’ on the right corner and add columns in the datastore.
Add all columns that are required to populate the dimension table.
7. In addition to the above columns, add “IND_UPDATE” column with “CHAR(1)” as the data type.
Add “UPDATE_DTTM” with “DATE” as the data type.
.
8. Save and close the datastore.
Creating Mapping for Loading Views
To create a mapping to generate the view used as source for the new dimension:
1. On the Oracle Data Integrator client, navigate to User Customization > <product name> > Replication.
CCB is used as an example in this procedure.
2. Right-click the mapping and select New Mapping.
3. In the New Mapping window, enter “CM_D_ARREARS_UDDX1_VW” in the Name field and provide a description.
4. Navigate to Model > User Customization > CCB > Replication.
5. Drag the CI_ACCT_CHAR table into the Logical Design pane.
6. In the Property Inspector, change the alias name to PRIM.
7. Similarly, drag the CI_ACCT_CHAR table again into the Logical Design pane. In the property inspector, change the alias name to ACDP.
8. From the Component palette, drag the Join component and place it in the Logical Design pane.
9. Join the two source tables to the Join component.
10. Edit the Join Condition in the Properties window to add the join condition.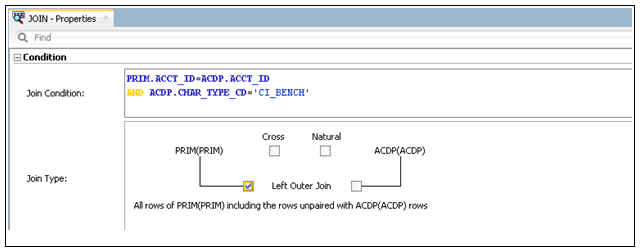
11. Select the Left Outer Join and Use Ordered Join Syntax check boxes.
12. Navigate to Models > Framework> Metadata and expand the model to reveal the tables.
13. Select and drag B1_PROD_INSTANCE into the source section of the mapping editor.
14. In the Property Inspector, change the alias to “INST”.
15. Drag another Join component from the Component palette and join the output of JOIN1 and B1_INST in this new join component.
16. Click the join created. In the Property Inspector, enter the following condition:
INST.CONTEXT_CD = '<%=odiRef.getContext("CTX_CODE")%>'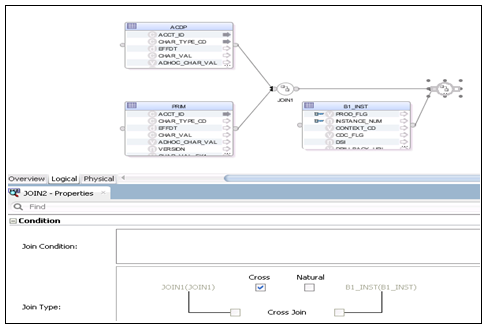
17. Select the columns ACCT_ID from table with alias “PRIM” and map it to the UDDX1_CD column of the target view.
18. Map the IND_UPDATE to the JRN_FLAG column from the PRIM alias.
19. Map the DATA_SOURCE_IND from the Global Variable B1_DATA_SOURCE_IND.
20. Map the other columns as shown.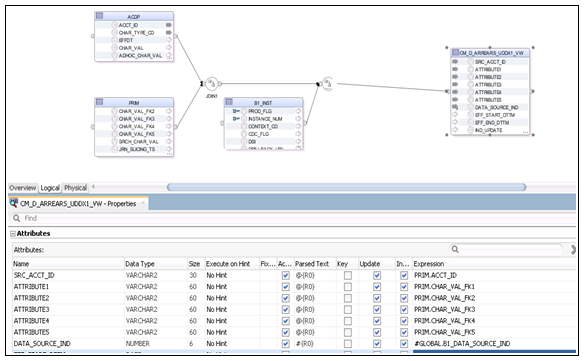
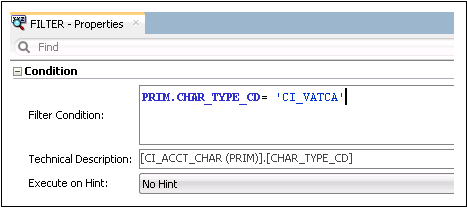
21. Select the CHAR_TYPE_CD column from the table with alias “PRIM” and drag it out of the table. A new filter is created.
22. In the Property Inspector, enter the condition = 'CI_VATCA'.
23. Click EFF_START_DTTM and enter the following expression into the property inspector.
GREATEST(PRIM.EFFDT,NVL(ACDP.EFFDT,PRIM.EFFDT))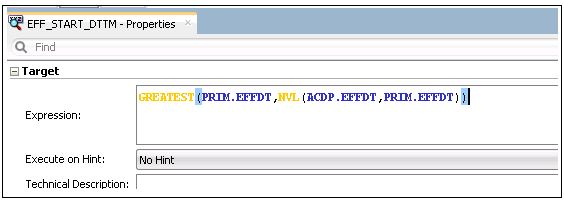
24. Click EFF_END_DTTM and replace the expression with the below:
LEAST(PRIM.EFF_END_DTTM,NVL(ACDP.EFF_END_DTTM,PRIM.EFF_END_DTTM))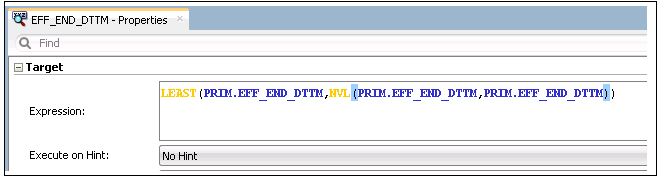
25. Select and drag the CONTEXT_CD column from INST alias to create a filter on it.
26. In the Property Inspector, enter the following condition:
INST.CONTEXT_CD = '<%=odiRef.getContext("CTX_CODE")%>'
27. Navigate to Physical Design tab and set the Context in the Properties window.
28. Select the target view. In the Integration Knowledge Module section, select “IKM BI View Generator” from the drop-down menu.
For the VW_JOIN_MODE option, enter “RECURSIVE_JOINS”.
29. Save the changes and click Execution.
30. Select CCB7 for Context and click OK.
31. On the Operator tab and expand Date > Today to view the status of the execution.
A mapping to generate the view used as source for the new dimension is created.
Creating Package for Loading Views
To create a package for the new dimension:
1. On the Oracle Data Integrator client, navigate to Designer > User Customization > <product_name> > Replication > Package.
In this example, ‘CCB’ is used as the product.
2. Right-click and select New Package.
3. In the New Package window, enter ‘CM_PKG_D_ARREARS_UDDX1_VW’.
4. Click the Diagram tab at the bottom of the editor.
From the Global Objects section, drag B1_DATA_SOURCE_IND into the editor. Drag and drop the CM_D_ARREARS_UDDX1_VW mapping into the editor and connect them.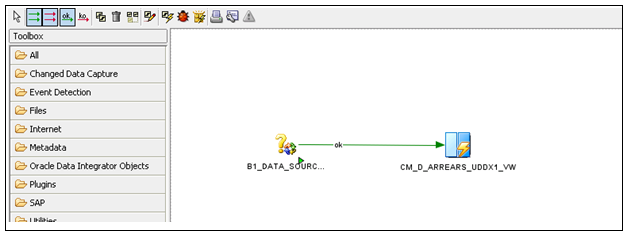
5. Click Save to save the changes and close the package editor.
6. Navigate to the packages folder and expand it. The new package is displayed.
7. Right-click the package and select Generate Scenario.
8. Enter the scenario name and then click OK.
A package for the new dimension is created.
Creating Staging Table in the Dimension Model
The definition of the staging table structure is under the Staging folder. The staging table structure is similar to the target table structure with the addition of a few columns. It should include IND_UPDATE in addition to the columns used in the mapping.
To create a staging table in the dimension model:
1. On the Oracle Data Integrator client, navigate to Models > User Customization.
2. Right-click and click New DataStore to create a new model.
3. Enter “Staging” in the Name field and then specify the code.
4. Select “Oracle” from the Technology and “Target” from the Logical Schema drop-down lists.
5. Click Save to save the model.
6. Navigate to User Customization > <product name> > Staging.
CCB is used as an example.
7. Right-click Staging and select New Datastore.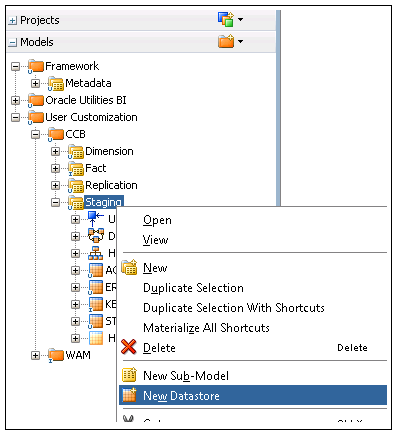
8. On the Definition tab, enter “STG_CM_D_ARREARS_UDDX1” as the name of the staging table.
The naming convention of the staging table is “STG_” prefixed to the entity name.
9. Enter “STG_#GLOBAL.B1_JOB_ID” in the Resource Name field.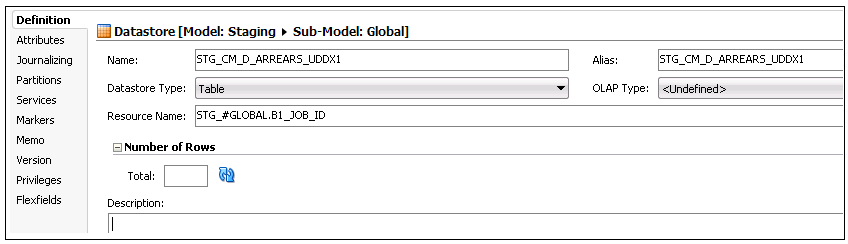
The resource name should include the job ID variable so that the staging table is created with job execution number during run time so that there are no performance issues.
10. Navigate to the Attributes tab.
11. Click ‘+’ to add columns to the datastore.
The columns in the dimensions should be present in the staging table. In addition to the above columns, add IND_UPDATE. The data type for IND_UPDATE should be “CHAR(1)”.

12. Click Save to save the datastore.
13. On the Flexfields tab, unselect the Default check box.
14. Enter “STG” in the Value column for the B1 Object Type record.
15. Enter the entity name (dimension name: CM_D_ARREARS_UDDX1) in the Value column for the B1 Target Entity Name record.
16. Click Save to save the datastore.
A staging table in the dimension model is created.
Creating Mapping in Dimension Model
To create a mapping to load data from the source view into the new dimension:
1. Create the following metadata entry.
Note: Create the metadata entry before creating the mapping.
INSERT INTO MDADM.B1_OBJECT_MAP
( OBJECT_MAP_ID
, PROD_FLG
, SOURCE_OBJECT_NAME
, TARGET_OBJECT_NAME
, SEQ
, UPD_DTTM
, UPD_USER
, OWNER_FLG
, OBJECT_TYPE_FLG)
VALUES ( mdadm.b1_object_map_seq.nextval
, 'CCB'
, 'CM_D_ARREARS_UDDX1_VW'
, 'CM_D_ARREARS_UDDX1'
, '1'
, sysdate
, 'CM'
, 'CM'
, 'PRVW')
Commit;
2. On the Oracle Data Integrator client, navigate to User Customization > <product name> > Dimension.
Example: CCB
3. Right-click and select New Mapping.
4. In the New Mapping window, enter “CM_D_ARREARS_UDDX1” as Name and provide an appropriate description.
5. Unselect the Create Empty Dataset check box.
6. Navigate to Models > User Customization > <product name>> Dimension.
7. Expand the model and drag the dimension into the Logical Design pane.
8. Navigate to Models > User Customization > <product name> >Replication.
9. Expand the model and drag CM_D_ARREARS_UDDX1_VW (the loading view) and CM_D_ARREARS_UDDX1_KVW (the key view) into the Logical Design pane.
10. Navigate to Model > Framework > Metadata.
11. Drag the B1_JOB_EXEC table to the Logical Design pane.
12. Drag the FILTER operator from the Component palette and map the output of B1_JOB_EXEC to the filter component.
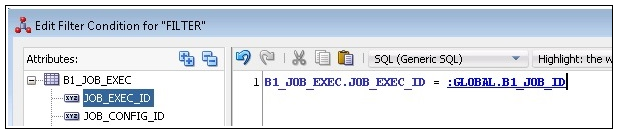
13. Add the filter condition mentioned below:
B1_JOB_EXEC.JOB_EXEC_ID = :GLOBAL.B1_JOB_ID
14. Drag the Join component from the Component palette and join B1_JOB_EXEC with the CM_D_ARREARS_UDDX1_KVW key view.
This join filters the incremental records only for that slicing period. Name the join as JOIN1.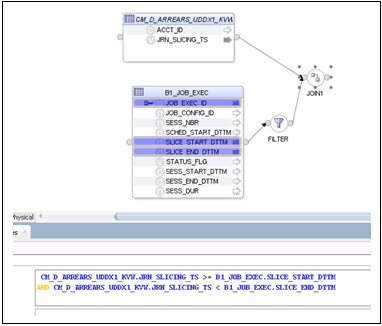
15. Drag another Join component from the Component palette. Join CM_D_ARREARS_UDDX1_VW (the loading view) with the output join JOIN1 (from step 14) on the ACCT_ID column. 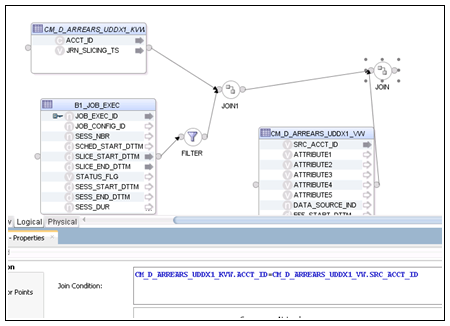
16. Navigate to Models > User Customization > CCB > Dimension. Drag and drop the CM_D_ARREARS_UDDX1 target table on the Logical Design pane.
17. Click the ARREARS_UDDX1_KEY column in the target datastore. In the Property Inspector, enter the following code:
<%=odiRef.getInfo("DEST_SCHEMA")%>.CM_D_ARREARS_UDDX1_SEQ.NEXTVAL
18. Select the JOB_NBR column. In the Property Inspector, enter “#GLOBAL.B1_JOB_ID”.
19. Select the UPDATE_DTTM column. In the Property Inspector, enter “SYSDATE”.
20. Map the other columns from the loading view as appropriate.
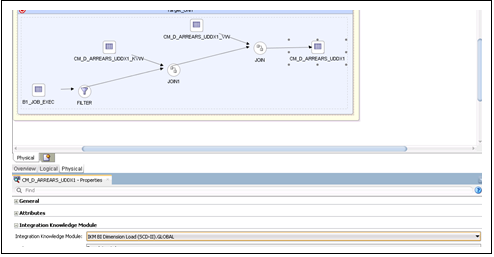
21. On the Physical Design tab, click the target dimension table.
22. In the Properties window set the context.
23. Navigate to the Integration Knowledge Module section and select IKM BI Dimension Load (SCD – II).GLOBAL as the KM for mapping.
24. Click Save to save the changes.
A mapping to load data from the source view into the new dimension is created.
Creating Package in Dimension Model
To create a package for the new dimension:
1. On the Oracle Data Integration client, navigate to Designer > User Customizations > <product name> > Dimension > Packages.
Example: CCB
2. Right-click Packages and select New Package.
3. In the New Package window, enter “CM_PKG_CD_ARREARS_UDDX1” as the package name.
4. Click the Diagram tab at the bottom of the editor.
5. From the Global Objects section, drag the B1_JOB_ID and B1_HIGH_DATE variables into the editor.
Change the data type for B1_JOB_ID to Declare Variable and that for B1_HIGH_DATE to Refresh Variable. 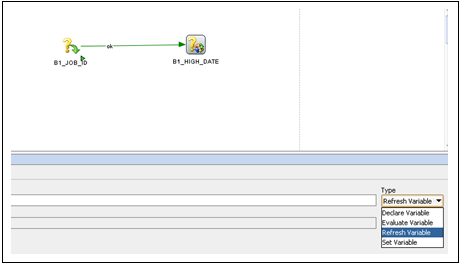
6. Drag and drop the CM_D_ARREARS_UDDX1 mapping into the editor and connect them
7. Click Save to save the changes and close the package editor window.
8. Navigate to the packages folder and expand it. The new package is displayed.
9. Right-click and select Generate scenario.
10. Enter the scenario name and click OK.
11. In the Scenario Variables window, select the startup variables. Unselect the Startup Parameter checkbox for B1_HIGH_DATE (it is a refresh variable) and click OK.
12. Expand the package. Under Scenarios, the new scenario generated is displayed.
Configuring Entities in Dimension Model
To configure a new entity for a custom dimension:
1. Login to the Oracle Utilities Analytics Warehouse Administration user mapping.
2. On the ETL Configuration tab, click Target Entity. 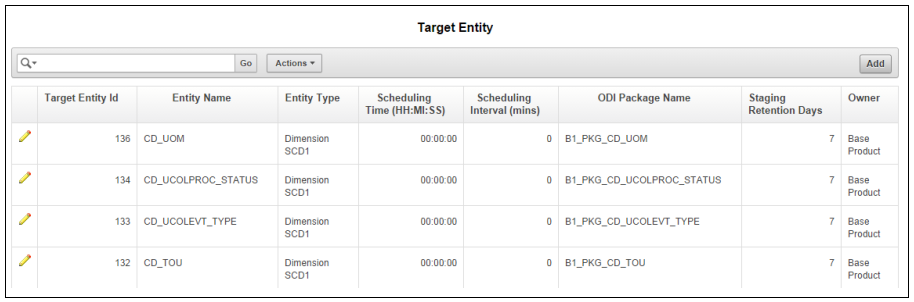
3. Click Add. The Maintain Target Entity page is displayed where you can set up the job details.
4. Enter the appropriate values for the dimension.
Configuring Jobs in Dimension Model
To configure a job for the custom dimension:
1. Login to Oracle Utilities Analytics Warehouse Administration user mapping.
2. On the ETL Configuration tab, click Job Configuration.
3. Click Add. The Maintain Job Configuration page is displayed where you can set up the job details.
4. Select “Customer Care and Billing” from the Source Product drop-down list.
5. Select ‘1’ from the Instance Number drop-down list.
6. Click the Search icon for the Target Entity field.
In the search window, enter “CM_D_ARREARS_UDDX1” and click Go. 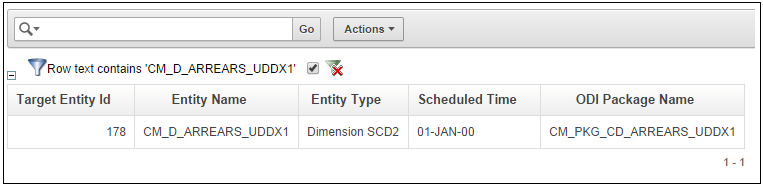
7. Click the Target Entity ID value.
The ID is populated on the Maintain Job Configuration page.
8. Set the Slice Start Date/Time as ‘01-Jan-2000’ or the extract date to which the source instance is configured.
9. Click Add to create the job configuration entry. The job can be enabled while saving the new entry.
Monitoring Job Execution
After the job is configured for customization and activated, use the Oracle Utilities Analytics Warehouse Administration or SQL Developer to monitor the job execution.
To monitor the job execution from Oracle Utilities Analytics Warehouse Administration:
1. Login to Oracle Utilities Analytics Warehouse Administration.
2. On the ETL Job Execution tab, enter “CM_D_ARREARS_UDDX1”.
3. Click Go to filter the data. The execution details are displayed.
Sort by the session end date to view the latest execution details.
Validating the Data Loaded
To validate that data is loaded into the custom dimension:
1. Connect to the database using SQL Developer.
2. Use the query below to view the data in the dimension:
select *
from dwadm. CM_D_ARREARS_UDDX1;
from dwadm. CM_D_ARREARS_UDDX1;
3. Compare the data in the dimension with the data in the base view using the below query:
select *
from ccb1rep.cm_d_arrears_uddx1_vw;