Post-Installation Checklist
After running the installation scripts, follow these steps to complete the installation:
1. Verify that all the JDBC resources were created. Refer to Verifying JDBC Configuration for the instructions.
2. Verify that the csf-keys are generated. Refer to Verifying the csf-Key for the instructions.
3. Review the logs under $MW_HOME/user_projects/domains/soa_domain/servers/<managed-server-name>/logs to check for deployment errors.
4. Verify that all the composites in Enterprise Manager are deployed. Refer to Verifying Composites in Enterprise Manager for the steps.
5. Configure the Oracle Utilities Customer Care and Billing Key Store Certificate. Refer to Configuring the Oracle Utilities Customer Care and Billing Key Store Certificate for more details.
6. Verify that the user messaging service is active. Refer to Verifying the User Messaging Service List for more details.
Verifying JDBC Configuration
To verify the JDBC configuration:
1. Navigate to Home > Deployments.
2. Verify that DbAdapter_CCBEBS.rar is deployed, and is in the “Active” state.
3. Verify the connection factory details to make sure the connection-factory location matches with that defined in the JCA files. Follow these steps:
a. Click DbAdapter_CCBEBS on the Deployments table.
b. On the Configuration tab, click Outbound Connection Pools.
c. Expand javax.resource.cci.ConnectionFactory to check the following connection factory instances.
• eis/DB/CCBEBS-CCBDS
• eis/DB/CCBEBS-EBSDS
• eis/DB/CCBEBS-SOADS
4. Make sure the database details are as required:
a. On the left pane, navigate to Services > Data Sources.
b. Click the CCBEBS-CCBDS data source to check the JNDI Name: jdbc/CCBEBS-CCBDS.
c. Click the CCBEBS-EBSDS data source to check the JNDI Name: jdbc/CCBEBS-EBSDS.
d. Click the CCBEBS-SOADS data source to check the JNDI Name: jdbc/CCBEBS-SOADS.
5. Click Connection Pool to check the URL and properties.
6. Click Monitoring > Testing, select the target server, and then click Test Data Source.
7. Verify that the data source has been configured successfully.
Verifying Composites in Enterprise Manager
Verify that the CCB-EBS partition was created with all the composites deployed.
To verify the composites in Enterprise Manager:
1. Login to the Enterprise Manager.
2. Expand SOA> soa-infra > CCB-EBS partition.
3. Verify that all composites are deployed and are in the “Active” state.
Below is the list of composites:
• CCBCancellationWebService
• CCBToEBSAPBPELProcess
• CCBToEBSAPProcedureCall
• CCBToEBSAPRequestScheduler
• CCBToEBSGLBPELProcess
• CCBToEBSGLRequestScheduler
• EBSToCCBAPDataBPELProcess
• EBSToCCBAPDataRequestScheduler
• ErrorhandlingProcess
• GetCCBAPData
• GetCCBGLData
• MailNotification
• UpdateCCBAPAdjReqTable
• UpdateCCBAPControlTable
• UpdateCCBGLControlTable
Verifying the csf-Key
To verify that the csf-key is created successfully:
1. Login to the Enterprise Manager console.
2. Navigate to WebLogic_Domain > soa_domain.
3. Right-click soa_domain, and then select Security > Credentials.
4. Expand the oracle.wsm.security map.
5. Verify that the CCBEBS_CCB key is available.
Configuring the Oracle Utilities Customer Care and Billing Key Store Certificate
To import and configure the Oracle Utilities Customer Care and Billing certificate:
1. Export the certificate and make sure it is available on the server to add it to the key store.
The certificate import and export operations support four file formats. Choose the format that meets your specific requirements.
If the Base64-encoded X.509 format is chosen, it supports the storage of a single certificate. It does not support the storage of private key or certification path.
Example: /tmp/ccbcert.cer
2. Create a “CCBEBSIntegration.jks” keystore to import the certificates.
Linux:
keytool -genkey -keystore $MW_HOME/wlserver/server/lib/ CCBEBSIntegration.jks -storepass <keystore password>
Windows:
keytool -genkey -keystore %MW_HOME%\wlserver\server\lib\CCBEBSIntegration.jks -storepass <keystore password>
3. Import the certificates into the trust store created in step 2.
Linux:
keytool -import -file /tmp/ccbcert.cer -alias RootCA -keystore $MW_HOME/wlserver/server/lib/CCBEBSIntegration.jks -storepass <keystore password>
Windows:
keytool -import -file c:\ccbcert.cer -alias RootCA -keystore %MW_HOME%\wlserver\server\lib\CCBEBSIntegration.jks -storepass <keystore password>
4. Verify that the certificate is added to the store using the following command.
Linux:
keytool -list -v -keystore $MW_HOME/wlserver/server/lib/ CCBEBSIntegration.jks
Windows:
keytool -list -v -keystore %MW_HOME%\wlserver\server\lib\CCBEBSIntegration.jks
Note: When prompted for a password, enter <password>.
5. Edit the setDomainEnv.cmd for Windows or setDomainEnv.sh file for Linux and replace the existing javax.net.ssl.trustStore property. It is located at ${MW_HOME}/user_projects/domains/<domain_name>/bin)
6. Search for -Djavax.net.ssl.trustStore in the file and replace it with Djavax.net.ssl.trustStore=${MW_HOME}/wlserver/server/lib/CCBEBSIntegration.jks - Djavax.net.ssl.trustStorePassword=<keystore password>
7. In the WebLogic console, navigate to Home > Servers > [managed server] > Keystores and configure the details there.
8. Click Lock & Edit to change the keystore details.
9. Click Change and then select Custom Identity and Java Standard Trust from the drop-down list.
10. Enter the following values in the respective fields:
• Custom Identity Keystore: /Oracle/Middleware/Oracle_Home/wlserver/server/lib/ CCBEBSIntegration.jks
• Custom Identity Keystore Type: jks
• Custom Identity Keystore Passphrase: <keystore password>
Example: welcome1
• Confirm Custom Identity Keystore Passphrase: <keystore password>
Example: welcome1
11. Click Activate Changes to release the configuration and bounce the managed server to bring the changes into effect.
Note: In a clustered environment, managed servers should have their own keystore configured.
If the services in Oracle Utilities Customer Care and Billing are SSL enabled, import the Oracle Utilities Customer Care and Billing certificates into the WebLogic Managed server to enable secure communication between the integration layer and Oracle Utilities Customer Care and Billing.
Restart the server before using the system to ensure all the processes are activated as some of the artifacts used by the processes require restart of admin and managed servers after the complete installation.
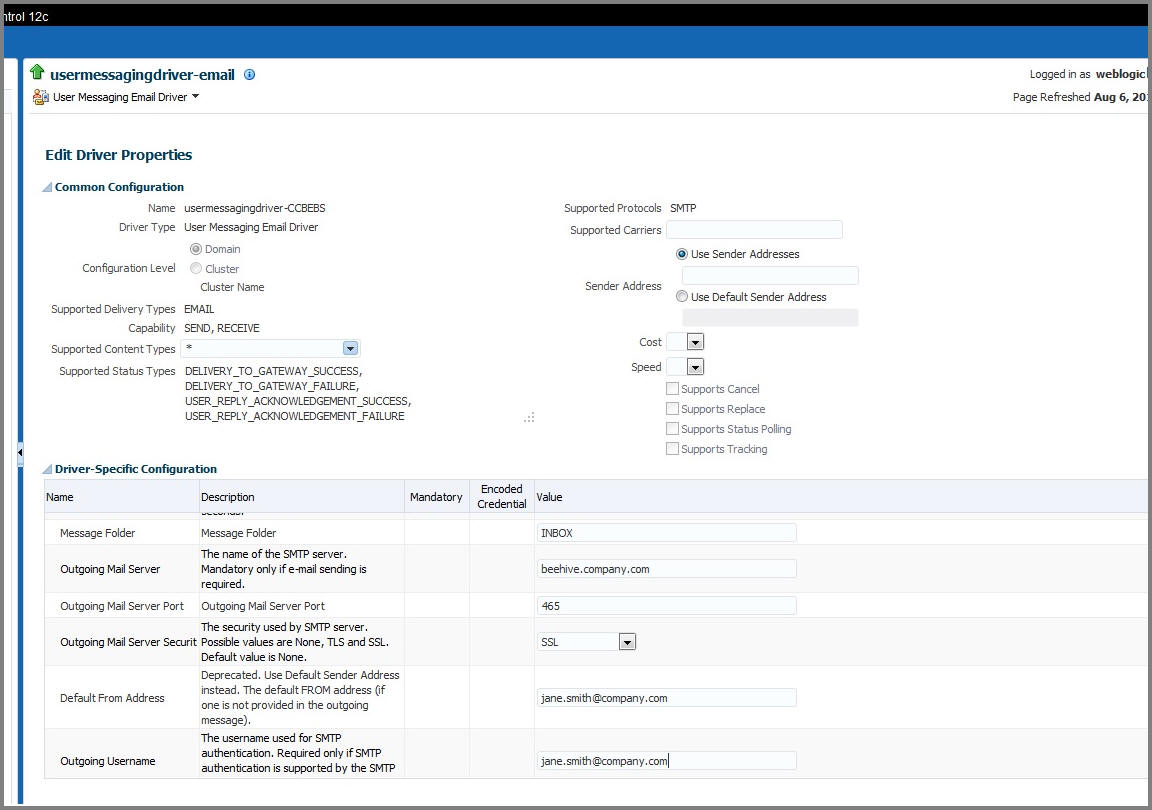
Verifying the User Messaging Service List
To verify the user messaging service list:
1. In the WebLogic Administration console, navigate to Deployments.
2. Verify that the usermessagingdriver-email email driver is Active.
If not, click usermessagingdriver-email > Targets > <managed server>. Then, select Yes and click Activate Changes.
Example: soa_server1
3. In the WebLogic Enterprise Manager console, navigate to soa-infra [managed server].
4. Right-click the soa-infra [managed server] node, select SOA Administration, and then select Workflow Properties.
5. Verify that the Notification Mode under Workflow Properties is set to “Email”.
6. Navigate to the User Messaging Service node and select the “usermessagingserver [managed server]” entry.
Example: usermessagingserver (soa_server1)
Notice that the email driver is already enabled.
7. Click Configure Driver to check the e-mail driver properties and view the specific configuration details as shown in the figure below.