Post-Installation Checklist
After running the installation scripts, you must complete the following tasks to finalize the installation:
1. Review the logs under $MW_HOME/user_projects/domains/soa_domain/servers/<managed_server>/logs to check for deployment errors.
2. Verify that all JDBC resources were created. Refer to Verifying JDBC Configuration for instructions.
3. Verify that all the composites in the Enterprise Manager are deployed. Refer to Verifying Composites in Enterprise Manager for instructions.
4. Verify that the user messaging service is active. Refer to Verifying the User Messaging Service List for instructions.
5. Verify that the security policies are attached. Refer to Verifying the Attached Policies from Enterprise Manager.
Verifying JDBC Configuration
To verify the JDBC configuration:
1. Open the WebLogic Admin console.
2. Navigate Home > Deployments.
3. Verify that DBAdapter_CCBNMS.rar is deployed and is in the “Active” state.
4. Verify the connection factory details to ensure the connection-factory location matches with that defined in the JCA files.
a. Click the DBAdapter_CCBNMS link in the Deployments table.
b. Click the Configuration tab and then click Outbound Connection Pools.
c. Expand javax.resource.cci.ConnectionFactory to check eis/DB/CCB-NMSErrorHandling, eis/DB/NMS connection factory instance.
5. Verify that the database details are correct for the following data sources.
Error Handling Data Source:
a. On the left pane, click the Services > Data Sources.
b. Click the CCB-NMSEHDS data source link to verify that the JNDI Name is jdbc/CCB-NMSEHDS.
c. Click the Connection Pool subtab to check the URL and Properties.
d. Click Monitoring, click Testing, select the target server, and then click Test Data Source.
Verify that the data source has been configured successfully.
6. Test the datasource for correct configurations.
a. Click the Monitoring tab, and then click the Testing tab.
b. Select the target server (SOA Managed server), and then click Test Data Source.
Verify that the data source has been configured successfully.
JMS Configuration Checklist
Verification of JMS Server
To verify that CCBNMSFJS JMS Server is created:
1. On the left pane, select Services > Messaging > JMS Servers.
2. Check CCBNMSFJS server exists.
Verification of JMS Persistent Store
Verify whether the CCBNMSFileStore Persistent Store is created:
1. On the left pane, select Services > Persistent Store and check if CCBNMSFileStore exists.
2. Click CCBNMSFileStore and verify that the JMSFileStorePath is correct and the directory exists with this name with write permission.
Directory: Product_Home/CCB-NMS
Synchrounous Write Policy: Direct-Write
Verification of JMS Module
Verify whether the CCBNMSFJM JMS module and destinations are created:
1. On the left pane, select Services > Messaging > JMS Modules.
2. Click the CCBNMSFJM JMS module to verify that the following queues are created and are associated to the correct Subdeployment and target (CCBNMSFJS JMS server).
• OUCCBCustomerDataSyncRequest
• OUCCBCustomerDataSyncRequestError
• OUCCBCustomerDataSyncResponse
• OUCCBCustomerDataSyncResponseError
c. Make sure all the queues are populated with the server option assigned to it and target server mapped.
JMS Queues Details
1. On the left pane, select Services > Messaging > JMS Modules > CCBNMSFJM > OUCCBCUstomerDataSyncRequest or any other queue.
2. Select the Monitoring tab.
3. Verify that the screen appears exactly as below.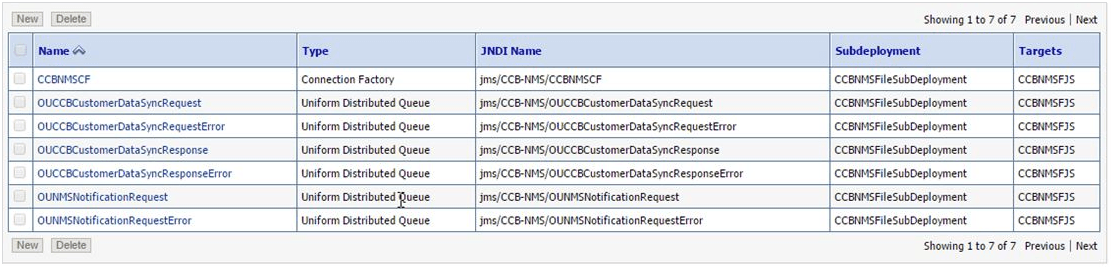
If the JMSMODULENAME!JMSQUEUENAME row is not present in the Destinations table, there were problems with the installation.
JMS Error Queue Assignment
There are two destination queues and another two corresponding error queues associated for the destination queues. Here CCBNMSCustomerDataSyncRequest is the regular destination queue and CCBNMSCustomerDataSyncRequestError is the corresponding error queue.
Perform the following steps:
1. On the left pane, select Services > Messaging > JMS Modules > CCBNMSFJM > OUCCBCustomerDataSyncRequest.
2. Check for the RedeliveryLimit set to ‘0’, ExpirationPolicy to ‘Redirect’ and Error Destination to corresponding ‘Error Queue’.
3. Select the Delivery Failure option with the redirect and ErrorQueue assigned in it.
JMS Adapter Outbound Connection Pool
Complete the following steps:
1. On the left pane, select Deployments > JMS Adapter > Configuration tab.
2. Verify eis/wls/OUCCBNMSQueue JMS Adapter Outbound Connection Pool is created.
3. In the Outbound Connection Pool Configuration table, expand oracle.tip.adapter.jms.IJmsConnectionFactory and verify for the presence of eis/wls/OUCCBNMSQueue connection pool instance. 
Verifying Composites in Enterprise Manager
To verify that all composites are deployed and in the active state:
1. Verify the CCB-NMS partition was created with all the composites are deployed.
2. Login to the Enterprise Manager.
3. On the left pane, expand SOA > soa-infra > CCB-NMS partition and check all the below composites are deployed, and are in the active state.
• ErrorHandling [1.0]
• ErrorHandlingHumanIntervention [1.0]
• ErrorProcessingDetail [1.0]
• ErrorProcessingMaster [1.0]
• OUCCBNMSSyncReqJMSWriteSvc [1.0]
• OUCCBOUNMSCustomerSyncEBF [1.0]
• OUCCBNMSSyncRespJMSReadSvc [1.0]
• OUCCBOUNMSJobHistoryQueryEBF [1.0]
• OUCCBOUNMSPlannedOutagesQueryEBF [1.0]
• OUCCBOUNMSTroubleCallInterfaceEBF [1.0]
• OUCCBOUNMSTroubleCallsQueryEBF [1.0]
• PurgeIntegrationErrorStore [1.0]
• UpdateIntegrationErrorLookupTable [1.0]
Verifying the User Messaging Service List
To verify the user messaging service list:
1. In the WebLogic Administration console, navigate to Deployments.
2. Verify that the usermessagingdriver-email email driver is Active.
3. If not, navigate to usermessagingdriver-email > Targets <managed server>. Example: soa_server1
Select Yes and click Activate Changes.
4. In the WebLogic Enterprise Manager console, navigate to soa-infra [managed server].
5. Right-click the soa-infra [managed server] node, select SOA Administration, and then select Workflow Properties.
6. Verify that the Notification Mode under Workflow Properties is set to Email.
7. Navigate to the User Messaging Service node, and select the usermessagingserver [managed server] entry.
Example: usermessagingserver (soa_server1)
Notice that the e-mail driver is already enabled.
Verify that the name is set to usermessagingdriver-CCBNMS, Driver Type is set to e-mail and Configuration Level is set to “Domain”.
8. Click Configure Driver to check the e-mail driver properties and view the specific configuration details as shown in the figure below.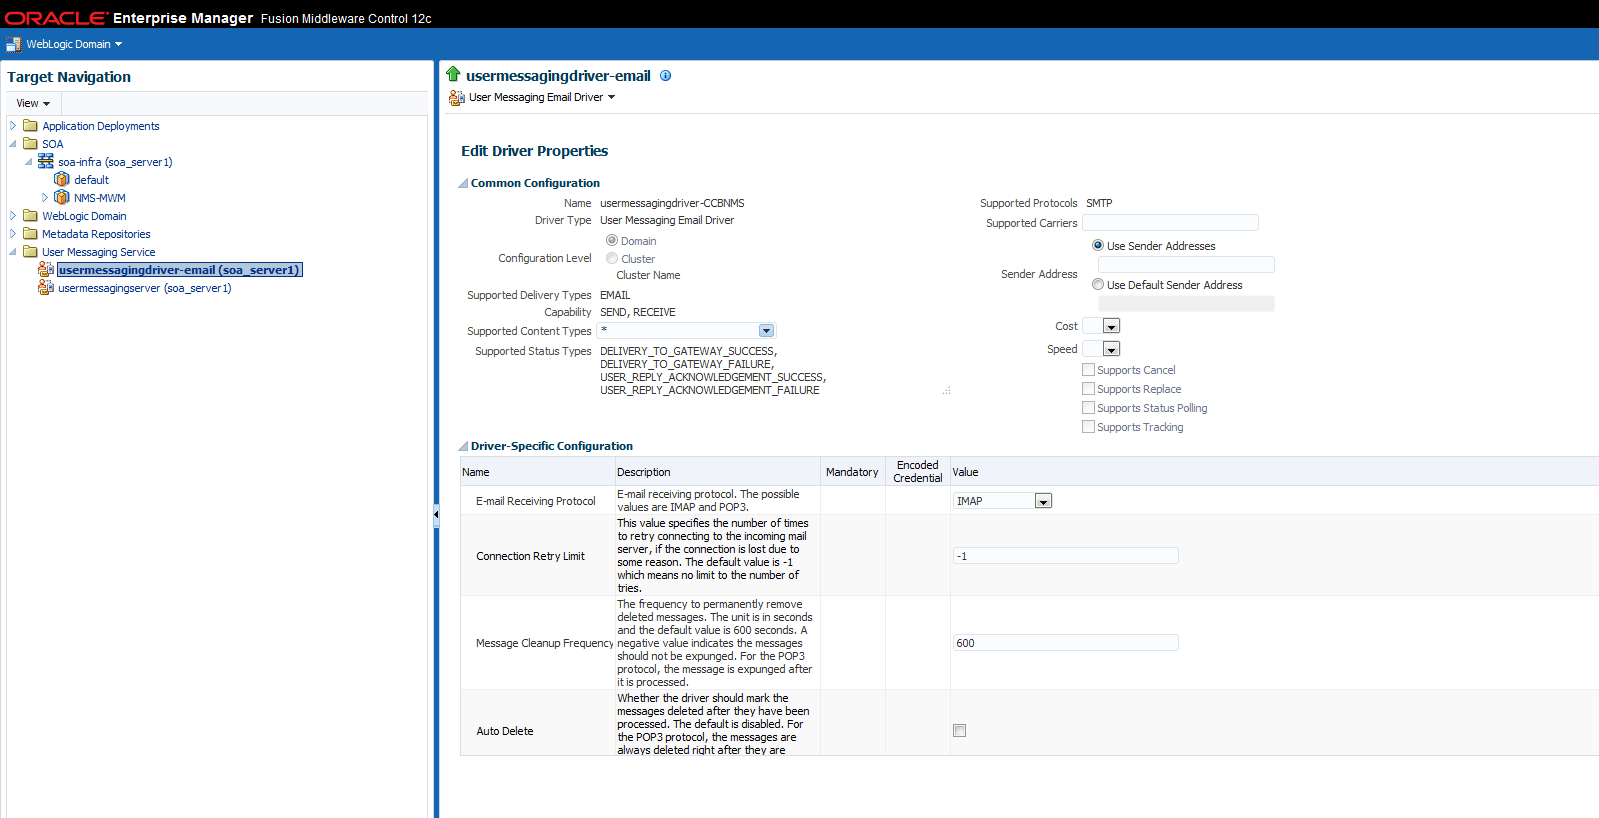
Verifying the Attached Policies from Enterprise Manager
To verify the policies attached to the web services that each BPEL process is using:
1. Login to Enterprise Manager.
2. Expand SOA > soa-infra > CCB-NMS partition.
Example: Select OUCCBNMSSyncRespJMSReadSvc, scroll down to the Services and References section in the Dashboard tab.
3. Click on the service and select the Policies tab.
4. Verify that the web service reference is calling a CCB web service and is linked to a appropriate client policy.
5. Verify that the service policy is attached where appropriate.
6. Repeat this process for other Composites randomly to verify that the appropriate policies are attached as mentioned in the Installation Properties file.
Refer to the Security Policies section for more information.