Oracle HCM Cloud Configuration for Employee
This section focuses on importing the files that are part of the package and configuring them in the Oracle Human Capital Management Cloud environment for the integration to run successfully. Make sure to follow the same sequence for successful configuration.
Importing the extract definition includes the following:
Creating a Profile
A user profile is a set of changeable options that affect the way Oracle applications appear and how they function. Oracle applications use a set of user profile options that are common to all the applications. In addition, each module has its own unique set of user profile options.
For Employee Integration extract definition, create the following profile:
Managing Profile Options
1. Navigate to Setup and Maintenance > Search > Manage Profile Options.
2. Click the add button (+) to create a profile.
(HCM_WACS_JOB_RATE_ANNUAL_HRS_PRF)
Profile Option Code: HCM_WACS_JOB_RATE_ANNUAL_HRS_PRF
Profile Display Name: “HCM: WACS Job Rate Annual Hours”
Application: Fast Formula
Module: Global Human Resources
Description: Global Human Resources
*Start Date: 1/1/51
3. Click Save.
4. Select the record under Search Results: Profile Options
5. Enable the levels as shown in the figure below. 
6. Click Save and Close.
Managing Administrator Profile Values
1. Navigate to Setup and Maintenance > Search > Manage Administrator Profile Values and search for the “HCM_WACS_JOB_RATE_ANNUAL_HRS_PRF” profile.
2. Select the record under Search Results: Profile Options.
3. Click the add button (+) in the Profile Values section. Add the annual hours value.
4. Select Site in the Profile Level drop-down list. Profile Value indicates the number of working hours in an Organization Year. 
This profile value is used to calculate the salary annual rate. The figure shows the default value 2080; it is the number of working hours in a year. Note that the hours vary based on the working days in an organization (to be used as per business case).
Value Sets
1. Login to the system with appropriate user or role.
2. Navigate to Setup and Maintenance > Search > Manage Value Sets for Global Human Resources.
3. Search for Manage Value Sets for Global Human Resources (Workforce Structures).
4. Enter the details as in the table below.
a. To create a Manager Type with the following values:
HCM_WACS_MANAGER_TYPE_VS
HCM: WACS Manager/Supervisor Type
*Value Set Name | HCM_WACS_MANAGER_TYPE_VS |
Description | HCM: WACS Manager/Supervisor Type |
* Module | Global Human Resources |
Validation Type | Table |
Value Data Type | Character |
*FROM Clause | fnd_lookup_values |
*Value Column Name | ookup_code |
Description Column Name | Meaning |
ID Column Name | lookup_code |
WHERE Clause | lookup_type='PER_SUPERVISOR_TYPE' AND language =SYS_CONTEXT('USERENV', 'LANG') AND lookup_code='LINE_MANAGER' AND Enabled_flag='Y' |


b. To create the Annual Rate Value Sets:
a. Login to the system with the appropriate user or role.
b. Navigate to Setup and Maintenance > Search.
c. Search for “Manage Value Sets for Global Human Resources” (Workforce Structures).
c. Enter the following details for the value set.
HCM_WACS_GET_PROFILE_JOB_ANNUAL_HRS_VS
Note: Annual Rate Value Set is based on “HCM_WACS_JOB_RATE_ANNUAL_HRS_PRF”.
*Value Set Name | HCM_WACS_GET_PROFILE_JOB_ANNUAL_HRS_VS |
Description | HCM: WACS Get profile Job Annual Hours |
*Module | Global Human Resources |
Validation Type | Table |
Value Data Type | Number |
*FROM Clause | (SELECT TO_NUMBER(FND_PROFILE.VALUE('HCM_WACS_JOB_RATE_ANNUAL_HRS_PRF')) RATE FROM DUAL) |
*Value Column Name | RATE |
Description Column Name | |
ID Column Name | RATE |
WHERE Clause |

d. Click Save and Close.
HCM_WACS_JOB_SET_VS
1. Create a new value set.
2. Enter the following details for the value set.
3. Search for Setup and maintenance > Search > Manage Value Sets for Global Human Resources (Workforce Structures).
4. Create a new value set and provide the details as below.
*Value Set Name | HCM_WACS_JOB_SET_VS |
Description | HCM: WACS Job Set Name |
* Module | Application Core Else: Global Human Resources |
Validation Type | Table |
Value Data Type | Character |
*FROM Clause | fnd_setid_sets_vl |
*Value Column Name | set_code |
Description Column Name | set_name |
ID Column Name | set_id |
WHERE Clause |

HCM_WACS_LEGISLATIVE_GROUP_VS
1. Create a new value set.
2. Enter details for the value set.
3. Navigate to Setup and maintenance > Search > Manage Value Sets for Global Human Resources (Workforce Structures).
4. Create new value set and provide the details as below.
*Value Set Name | HCM_WACS_LEGISLATIVE_GROUP_VS |
Description | HCM: WACS LEGISLATIVE GROUP Names |
* Module | Global Human Resources |
Validation Type | Table |
Value Data Type | Character |
*FROM Clause | (SELECT DISTINCT legislation_code FROM per_legislative_data_groups_vl) |
*Value Column Name | legislation_code |
Description Column Name | legislation_code |
ID Column Name | legislation_code |
WHERE Clause |

Extract Upload
Make sure to upload the extract after all the configuration are done for all the Employee/Craft/Absence sections.
Important! Verify that Profile, Value sets and Fast formula are uploaded before running the extract upload process.
To extract the upload:
1. Login with the HCM/Data Exchange user role.
2. Navigate to My Client Groups and click Data Exchange.
3. Click Extract Definitions.
4. Select Upload and click Browse.
5. Upload the extract file “HCM_EMP_WACS”. The file is available in the package.
6. Compile the extract. After successful compilation, click Validate.
7. Save the extract.
8. Click the edit icon (a pencil) to query the extract.
9. Navigate to Advanced and click Extract execution Tree on the left navigation pane. When the status is green, validate it. Save and close.
10. Click the extract definition.
11. Enter a definition to lock the extract. After successful lock, save and close.
To verify the Run page:
1. Review all the values and mandatory fields.
Note: The lookup values are also displayed in the Parameters section. The Legal Entity is not attached to smart LOV.
2. To refine the extract, search for the extract and navigate to Parameters > Edit.
3. Click Legal Entity. Search and add the Legal Entity “LegalEmployerPVO” Smart LOV. 
4. Navigate to the Submit Extracts page and verify that the respective fields are populated with the appropriate values. 
5. On the Submit Extract Instance page, verify that the Manager Type, Legal Entity and Annual Rate fields, under the Criteria section, are populated with values in accordance with the configuration.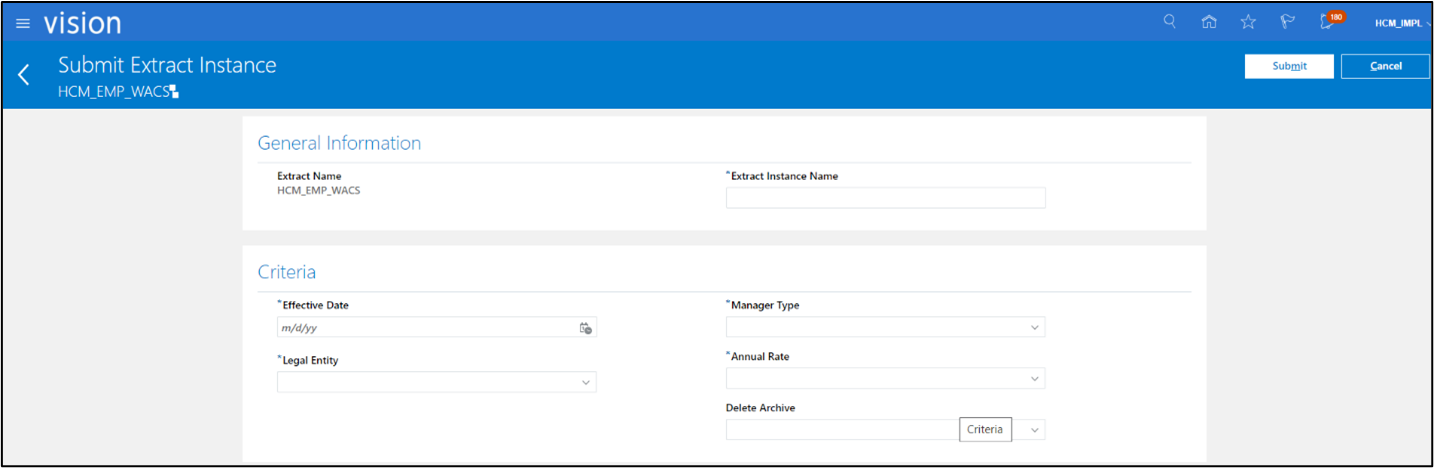
Note: If the Legal Entity, Manager Type and Annual Rate fields are empty, verify that the account accessing the data extract has privileges to perform extract configuration and submit extract definitions.
After the report is submitted, report extract is available in UCM for the Oracle Integration Cloud process.