Procurement Configuration for Vendor and Vendor Locations
This section focuses on importing the files that come as a part of the package and configuring them in the Oracle BICC environment for the integration to run successfully. Make sure to follow the package upload procedure in the same sequence for successful configuration.
The section focuses on the following:
Introduction
The Oracle BI Cloud Connector (BICC) is used to extract data from Oracle Fusion Procurement Cloud and for storing it in shared resources, like Oracle Universal Content Management (UCM) Server or cloud storage in the CSV format..")
Design Details
In this Vendor extract run, bulk and incremental job run design/mapping is based on the “FscmTopModelAM.PrcPozPublicViewAM.SupplierSitePVO” view object.
The bulk and incremental job definition should have the same number of columns. Oracle Integration Cloud integration will fail if there is any mismatch in the columns. The following table lists all columns and the respective properties:
Column Name | Data Type | Size | Include | Incremental Key |
|---|---|---|---|---|
SupplierSiteCreationDate | TIMESTAMP | 0 | Yes | No |
SupplierSiteDefaultPaySiteId | NUMERIC | 8 | Yes | No |
SupplierSiteEmailAddress | VARCHAR | 2000 | Yes | No |
SupplierSiteFobLookupCode | VARCHAR | 25 | Yes | No |
SupplierSiteInactiveDate | DATE | 0 | Yes | No |
SupplierSiteInvoiceCurrencyCode | VARCHAR | 15 | Yes | No |
SupplierSiteLastUpdateDate | TIMESTAMP | 0 | Yes | Yes |
SupplierSitePayGroupLookupCode | VARCHAR | 25 | Yes | No |
SupplierSitePayOnCode | VARCHAR | 25 | Yes | No |
SupplierSitePaySiteFlag | VARCHAR | 1 | Yes | No |
SupplierSitePaymentCurrencyCode | VARCHAR | 15 | Yes | No |
SupplierSitePurchasingSiteFlag | VARCHAR | 1 | Yes | No |
SupplierSiteSupplierNotifMethod | VARCHAR | 25 | Yes | No |
SupplierSiteTermsDateBasis | VARCHAR | 25 | Yes | No |
SupplierSiteTermsId | NUMERIC | 8 | Yes | No |
SupplierSiteVendorId | NUMERIC | 8 | Yes | No |
SupplierSiteVendorSiteCode | VARCHAR | 15 | Yes | No |
SupplierSiteVendorSiteCodeAlt | VARCHAR | 320 | Yes | No |
VendorSiteId | NUMERIC | 8 | Yes | No |
LocationAddress1 | VARCHAR | 240 | Yes | No |
LocationAddress2 | VARCHAR | 240 | Yes | No |
LocationAddress3 | VARCHAR | 240 | Yes | No |
LocationAddress4 | VARCHAR | 240 | Yes | No |
LocationBuilding | VARCHAR | 240 | Yes | No |
LocationCity | VARCHAR | 60 | Yes | No |
LocationCountry | VARCHAR | 2 | Yes | No |
LocationCounty | VARCHAR | 60 | Yes | No |
LocationFloorNumber | VARCHAR | 40 | Yes | No |
LocationPostalCode | VARCHAR | 60 | Yes | No |
LocationProvince | VARCHAR | 60 | Yes | No |
LocationState | VARCHAR | 60 | Yes | No |
LocationStatusFlag | VARCHAR | 1 | Yes | No |
BusinessUnitId | NUMERIC | 8 | Yes | No |
BULegalEntityId | VARCHAR | 150 | Yes | No |
BUPrimaryLedgerId | VARCHAR | 150 | Yes | No |
BUShortCode | VARCHAR | 150 | Yes | No |
SupplierAllowAwtFlag | VARCHAR | 1 | Yes | No |
SupplierAutoTaxCalcFlag | VARCHAR | 1 | Yes | No |
SupplierCorporateWebsite | VARCHAR | 150 | Yes | No |
SupplierEndDateActive | DATE | 0 | Yes | No |
SupplierLastUpdateDate | TIMESTAMP | 0 | Yes | Yes |
SupplierMinOrderAmount | NUMERIC | 8 | Yes | No |
SupplierSegment1 | VARCHAR | 30 | Yes | No |
SupplierVendorId | NUMERIC | 8 | Yes | No |
SupplierSitePayOnUseFlag | VARCHAR | 1 | Yes | No |
SupplierSiteStatus | VARCHAR | 255 | Yes | No |
SuppPartyPartyName | VARCHAR | 360 | Yes | No |
SupplierSiteCreationDateOnly | DATE | 0 | Yes | No |
Pre-requisites
The following are the pre-requisites to import files that come as part of the package:
• Oracle BICC should be available for the Vendor and Vendor Location job design/extract/schedule.
• Oracle Integration Cloud should be available for the integration activities.
• Oracle Utilities Work and Asset Cloud Service system should be up and running for the interface and validating the Vendor data.
• Oracle Utilities Work and Asset Cloud Service team should have other tools/reports to validate the interfaced data.
Installing/Uploading a Package
To import job definitions in the target BICC application in Oracle Fusion Procurement Cloud:
1. Navigate to the package and copy the following zip files to the local directory:
Vendor Bulk zip file: Vendor_BULK_exportCustomization_Ver1.0.zip
Vendor Incremental zip file: Vendor_INCR_exportCustomization_Ver1.0.zip
If any changes are made to the existing file, a new version is created for that file.
2. Login to the Oracle Fusion Procurement Cloud BICC application using the BIADMIN/<password>.
https://FA OHS Host:FA OHS Port/biacm (or)
https://<Fusion cloud application URL>/biacm
Example: https://Fusion cloud application URL.com:443/biacm
3. Check the port when accessing the URL to run the report from BICC.
4. Create a new user “BIADMIN” (if not available) with following roles:
• ORA_ASM_APPLICATION_IMPLEMENTATION_ADMIN_ABSTRACT
• OBIA_EXTRACTTRANSFORMLOAD_RWD
• ORA_ASM_APPLICATION_IMPLEMENTATION_CONSULTANT_JOB
• ORA_ASM_APPLICATION_IMPLEMENTATION_MANAGER_JOB
• BICC_UCM_CONTENT_ADMIN
• RCS_SCM_EXTRACT_TRANSFORM_LOAD_DUTY
• OBIA_EXTRACT_TRANSFORM_LOAD_DUTY
5. Upload the bulk and incremental zip files.
a. Login to Oracle Business Intelligence Cloud Connector Console.
b. From the tool bar on the right pane, click the Task List icon.
c. Click Import Modification.
d. On the Import Modification window, click Browse to navigate to the source folder and select the zip file.
e. Click Import.
6. From the tool bar on the right pane, click the Manage Jobs icon to verify if the jobs are uploaded successfully.
7. Change the Business Unit (BU) Name in the Oracle Business Intelligence Cloud Connector Console filter as per the Oracle Fusion Procurement Cloud setup name.
8. Navigate to Manage Offering and Data Stores > Data Stores > Edit Data Store Details.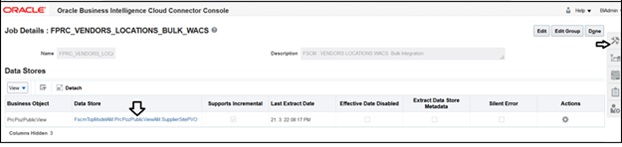

9. Edit the data store filter details.
10. Click Save to complete the updates.
Note: If content cannot be loaded directly, use the csv files in the package to copy the content to the Data Store setting and select the columns manually.
Important! If the steps mentioned above generate an error, perform the steps below.
1. Follow the steps 1 to 5 mentioned above.
2. On the right pane, select Manage Jobs.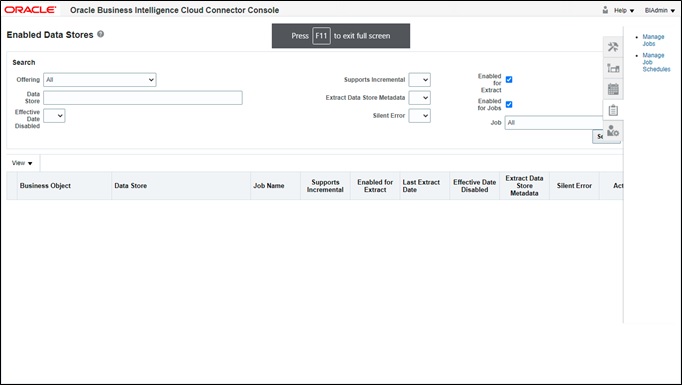
3. Click + to create a new job.
4. Enter the following details:
• Name: FPRC_VENDORS_LOCATIONS_BULK_WACS
• Description: FSCM : VENDORS LOCATIONS WACS Bulk Integration
5. Select the business object shown in the figure below. Click Save.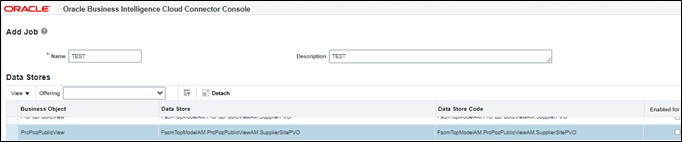
6. After the business object is saved, datastore is displayed.
7. Click the job.
8. Click the datastore.
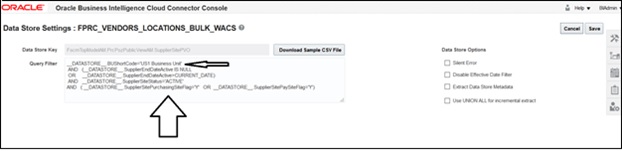
9. On the datastore, click Edit Data Store Details.
10. Enter the query in the Query filter.
For Bulk
__DATASTORE__.BUShortCode='US1 Business Unit'
AND (__DATASTORE__.SupplierEndDateActive IS NULL
OR __DATASTORE__.SupplierEndDateActive>CURRENT_DATE)
AND __DATASTORE__.SupplierSiteStatus='ACTIVE'
AND ( __DATASTORE__.SupplierSitePurchasingSiteFlag='Y' OR __DATASTORE__.SupplierSitePaySiteFlag='Y')
For Incremental Update
__DATASTORE__.BUShortCode='US1 Business Unit'
AND (__DATASTORE__.SupplierSitePurchasingSiteFlag='Y' OR __DATASTORE__.SupplierSitePaySiteFlag='Y')
AND (__DATASTORE__.SupplierEndDateActive IS NULL
OR __DATASTORE__.SupplierEndDateActive>=CURRENT_DATE
Note: Replace the BU with the actual business BU.
11. Click Done.
12. On the main screen, click Select Columns.
13. Include the necessary columns and click Save.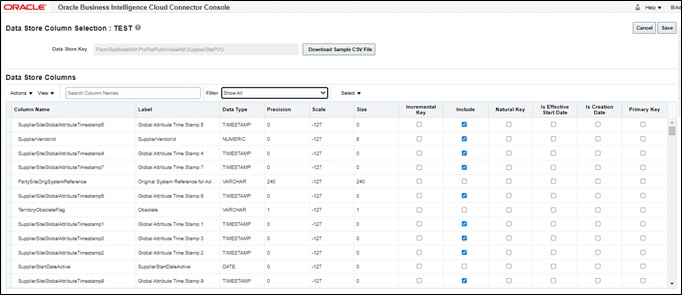
14. Mark “VendorSiteId” as Primary Key.
15. Mark the columns shown in the figure below as Incremental Key.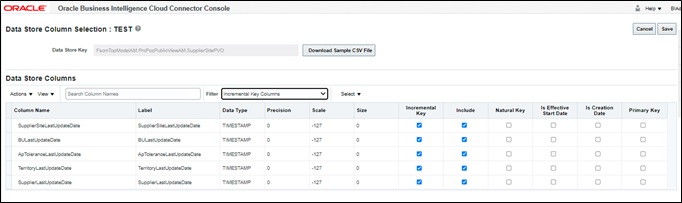
16. Click Save.
To use the package to create an extract manually (two separate extracts created for Bulk/Incremental), download the package. The package has four files:
• Use C.JOB.csv to fetch Name and Description.
• Use C_JOB_DATA_STORE_CUST_COL_REL.csv to identify columns to mark include in the "select column". Add the above primary and incremental with the column.
• Use C_JOB_DATA_STORE_REL.csv to get the datastore.
• Use C_JOB_DATA_STORE_RUNTIME.csv to get the query to be updated in datastore.
BICC Tool Setup
To set up the BICC tool:
1. Navigate to Manage Offerings and Data Stores > Actions > Extract Preferences.
2. Verify the prune time. Set the Prune Time in Minutes to zero to reflect the changes immediately.
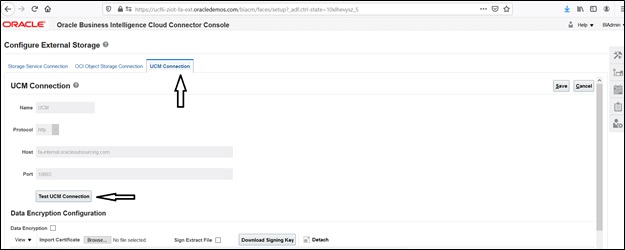
3. From the tool bar on the right pane, click Configure External Storage and make sure the UCM Connection setup is existing.
Running the Extract Job
To run the Extract job:
1. From the toolbar on the right pane, click Manage Job Schedules, and then click Add.
2. Click Manage Job Schedules.
3. Enter the Job Name, External Storage, Job Type, and Job Name. Click Save.
Note: The status should be “Succeeded”.
4. Login to UCM and search for the extracted files.
https://<Fusion application URL>/cs
a. Enter “OBIA.*” in the Security Group field and search.
b. Click the respective ID and download the file. You will be able to see the CSV file as per the Vendor extract mapping file in the BICC.