Forms and Plugins
Plugins are used to make changes to screen and data, based on their type and status of target and parent object. Plug-ins in Oracle Field Service perform actions not found in the standard solution. They appear as selectable links on the application. They open a new window, tab, or frame in a browser where an external HTML5 application is executed.
For more information on the Oracle Field Service plugin framework, refer to latest Oracle Field Service documentation at:
Each plugin contains a JavaScript file that has the main business logic required for functionality of the plugin. The data required for each plugin is available through the properties that are added for the plugin. XML data obtained through properties is parsed and appropriate XSL is applied to it to render each UI.
During setup, some of the plugins require you to assign a value to their predefined secure parameters. These secure parameters are used in the corresponding JavaScript to complete the task assigned.
Following are the plugins and forms that needs to be present or imported:
Incidents Plugin
Incidents plugin is used to show calls or incidents logged into Oracle Utilities Network Management System for an event. If there is an outage, the customer can call support who may log the call against an incident using Web Call Entry interface. This update will trigger an outbound from Oracle Utilities Network Management System to Oracle Field Service with the updated call details. On the Oracle Field Service side, crew can visit the activity associated with the event and view all calls logged against it.
To import the Incidents plugin:
1. Log in to Oracle Field Service with valid credentials.
2. Click the options menu icon on the Home page.
3. Navigate to Configuration > Displays > Forms and Plugins.
4. Click Import > Plugins from the drop-down list.
5. Select, or drag and drop, the XML file NMS_OFSC_Incidents_Plugin.xml to set the Incidents plugin provided with accelerator package.
6. Click Continue. Oracle Field Service validates the plugin. The number of valid items should be 1.
7. Click Apply. Make sure the Number of imported is 1 and the Number of not imported is 0.
8. Find and click the Incidents plugin to make sure the Available Properties tab is populated with all available properties if any.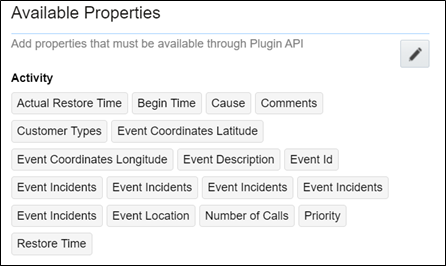
Restoration Data Plugin
This plugin will be used by crew to capture periodic restoration information after the activity assigned to the crew is started in Oracle Field Service. Once the restoration is complete, crew can capture the same with completion timestamp and send it across to Oracle Utilities Network Management System. Information updated by this plugin also causes Oracle Utilities Network Management System to send an outbound message back to Oracle Field Service with updated information.
To import the Restoration Data plugin:
1. Repeat steps 1 to 5 from the Incidents Plugin section.
2. Click Import Plugins to import the Restoration Data plugin provided in the package.
3. Find and click the Restoration Data plugin to make sure the Available Properties tab is populated with the following properties: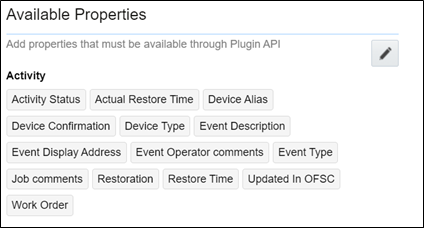
4. Click the edit icon to set a value for the secure parameter ert_min_threshold_minute.
5. Enter the value and click Modify.
Note: This value should be the minimum number of minutes that it takes for the activity to be restored.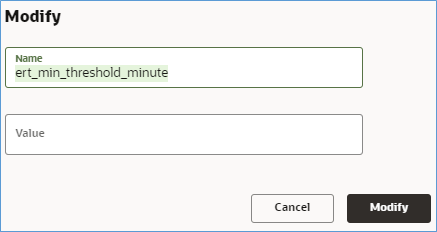
Attachments Plugin
This plugin is used to upload and show attachments uploaded either from Oracle Field Service or Oracle Utilities Network Management System. Oracle Utilities Network Management System activity may contain attachments originated from two different sources. Attachments can be uploaded to an Activity in Oracle Field Service, or they can be uploaded into an event in Oracle Utilities Network Management System. In both scenarios, attachments can be viewed in the Activity Details page in Oracle Field Service.
To import the plugin:
1. Repeat steps 1 to 5 from the Incidents Plugin section.
2. Click Import Plugins to import the Attachments NMS plugin provided in the package.
3. Find and click on the Attachments NMS plugin to make sure the Available Properties tab is populated with the following properties: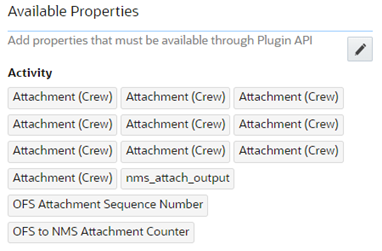
Note: There are no secure parameters in this plugin.
Pickup Order Plugin
This plugin creates a follow-up work order from within Oracle Field Service, so the crew can initiate an activity in relation to another one.
Note: The related activity will be linked to the same event as the initiating activity. Crew has an option to create this follow-up order either before or after the activity is started.
To import the plugin:
1. Repeat steps 1 to 5 from the Incidents Plugin section.
2. Click Import Plugins to import the NMS Pickup Order plugin provided in the package.
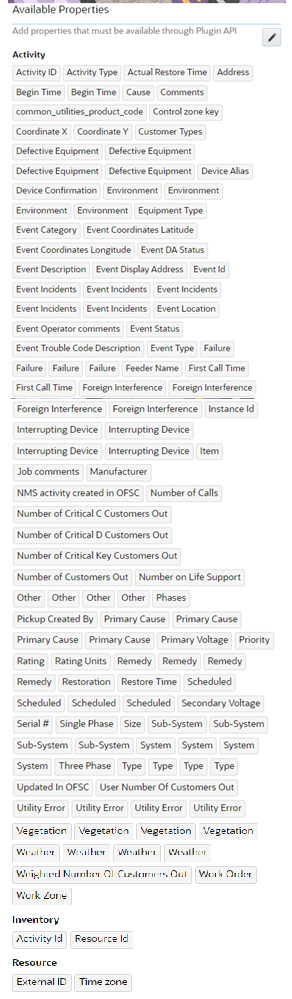
3. Find and click the Pick Up NMS plugin to make sure the Available Properties tab is populated with the properties as shown in the image below.
Note: In addition to seeded properties, this plugin uses dynamically generated properties in the respective environment. Dynamic properties are generated for the Event Details and Failed Equipment forms. For these two forms, the fields vary based on the Oracle Utilities Network Management System environmental setup and corresponding properties are created by Oracle Integration Cloud sync flow. These properties need to be manually added by implementers in the PickUpNMS plugin configuration after they are created in Oracle Field Service.
4. Add a value for each one of the secure parameters.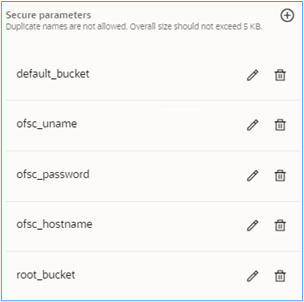
Note: See the table below for details.
Parameter | Description |
|---|---|
default_bucket | OFSC bucket to which this new activity will be assigned |
ofsc_uname | Username or ClientID to access the hostname APIs, this can be found on the administration Configuration-Subsystems-Applications screen using the information from the active REST/SOAP application |
ofsc_password | Password or Client Secret in above mentioned screen |
ofsc_hostname | Full hostname of the OFSC application in this form as in https://{ofsc_hostname}/ for example: cloudInstance1.oracle.com |
root_bucket | Root bucket of the OFSC |
OMA Damage Assessment Plugin
This plugin is used to navigate from OFS to OMA to the Task details tab of a particular NMS event. Damage Assessment report can then be entered in OMA along with any attachments if needed. This plugin also provides configuration to navigate from OMA back to OFS Activity screen.
To import the plugin:
1. Log in to Oracle Field Service with valid credentials.
2. Click the options menu icon on the Home page.
3. Navigate to Configuration > Displays > Forms and Plugins.
4. Click Import > Plugins from the drop-down list.
5. Select or drag and drop the XML file NMS_OFSC_OMA_DamageAssessment_Plugin.xml to select the Damage Assessment plugin provided with accelerator package. Click Continue. Oracle Field Service validates the plugin and the number of valid items should be 1.
6. Click Apply. Make sure the Number of imported is 1 and the Number of not imported is 0.
7. Find and select the OMA Damage Assessment plugin. The plugin is configured for Android, iPad, iPhone, and iPod user-agents string mask. The Launch application URL is configured to an OMA mobile application deep link. The URL includes an "id" parameter which accepts "nms_event_id" as its value to identify the event in OMA. The URL is also configured with a return URL to an OFS mobile deep link, which redirects to an OFS activity screen. The OFS activity id (aid) is passed as part of the OFS return URL parameter.
8. To return to the OFS activity screen from OMA, update with the OFS instance in use the URL section ofscinstance.test.etadirect.com in the pattern for the uxreturnurl defined in the Launch application URL: uxreturnurl=com.oracle.ofsc://ofscinstance.test.etadirect.com/mobility/#screen=activity_by_id&activity_id={aid}
OMA Switching Plugin
This plugin is used to navigate from OFS to OMA to the Switching details tab of a particular NMS event. OMA opens the first switching sheet associated with the passed NMS event_id. This plugin also provides configuration to navigate from OMA back to OFS Activity screen.
To import the plugin:
1. Log in to Oracle Field Service with valid credentials.
2. Click the options menu icon on the Home page.
3. Navigate to Configuration > Displays > Forms and Plugins.
4. Click Import > Plugins from the drop-down list.
5. Select or drag and drop the XML file NMS_OFSC_OMA_Switching_Plugin.xml to select the OMA Switching plugin provided with accelerator package. Click Continue. Oracle Field Service validates the plugin and the number of valid items should be 1.
6. Click Apply. Make sure Number of imported is set to 1 and Number of not imported to 0.
7. Find and select the OMA Switching plugin. The plugin is configured for Android, iPad, iPhone, and iPod user-agents string mask. The Launch application URL is configured to an OMA mobile application deep link. The URL includes an "event_id" parameter which accepts "nms_event_id" as its value to identify the event in OMA. The URL is also configured with a return URL to an OFS mobile deep link, which redirects to an OFS activity screen. The OFS activity id (aid) is passed as part of the OFS return URL parameter.
8. To return to the OFS activity screen from OMA, update with the OFS instance in use the URL section ofscinstance.test.etadirect.com in the pattern for the uxreturnurl defined in the Launch application URL: uxreturnurl=com.oracle.ofsc://ofscinstance.test.etadirect.com/mobility/#screen=activity_by_id&activity_id={aid}
OMA Unrelated Work
This plugin is used to navigate from OFS to OMA to the Map details tab of a particular NMS event. Unrelated work can then be entered in OMA. This plugin also provides configuration to navigate from OMA back to OFS Activity screen.
To import the plugin:
1. Log in to Oracle Field Service with valid credentials.
2. Click the options menu icon on the Home page.
3. Navigate to Configuration > Displays > Forms and Plugins.
4. Click Import > Plugins from the drop-down list.
5. Select or drag and drop the XML file NMS_OFSC_OMA_UnrelatedWork_Plugin.xml to select the Damage Assessment plugin provided with accelerator package. Click Continue. Oracle Field Service validates the plugin and the number of valid items should be 1.
6. Click Apply. Make sure the Number of imported is 1 and the Number of not imported is 0.
7. Find and select the OMA Damage Assessment plugin. The plugin is configured for Android, iPad, iPhone, and iPod user-agents string mask. The Launch application URL is configured to an OMA mobile application deep link. The URL includes "lat" and "long" parameters, which accept "nms_event_latitude" and "nms_event_longitude" as values to identify the location on the map in OMA. The URL also accepts a message in the "msg" parameter, and it is also configured with a return URL to an OFS mobile deep link, which redirects to an OFS activity screen. The OFS activity id (aid) is passed as part of the OFS return URL parameter.
8. To return to the OFS activity screen from OMA, update with the OFS instance in use the URL section ofscinstance.test.etadirect.com in the pattern for the uxreturnurl defined in the Launch application URL: uxreturnurl=com.oracle.ofsc://ofscinstance.test.etadirect.com/mobility/#screen=activity_by_id&activity_id={aid}
Note: The value for the "msg" parameter can also be updated with the message required.
Failed Equipment Form
The Failed Equipment form is used by Crew to enter the failed equipment details after an activity is started. It is a synchronous call and data is synchronized with Oracle Utilities Network Management System at runtime.
1. Log in to Oracle Field Service with valid credentials.
2. Click the options menu icon on the Home page.
3. Navigate to Configuration > Displays > Forms & Plugins.
4. If the form does not exist, click Add Form. Else, go to step 6.
5. Enter the details as shown in the following image. Click OK.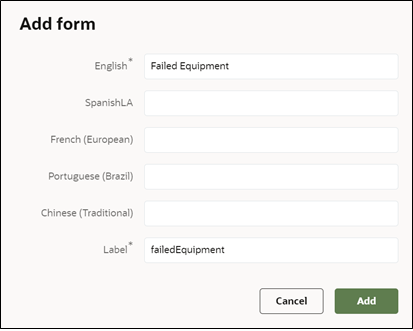
6. Navigate to the form and click the icon showing three vertical dots. Select Import Content in the menu.
7. Select or drop the Failed Equipment Json file from the accelerator package provided.
8. Click Import.
Oracle Field Service validates the form and imports in the same step. Make sure the values for Number of errors, warnings, and notices are 0 and “Form content was imported/saved”.
Event Details Form
This form is used by Crew to enter the event details after the activity is started.
To create an event details form:
1. Repeat steps 1 to 4 from the Failed Equipment Form section.
2. Enter the details as shown below. Click Add.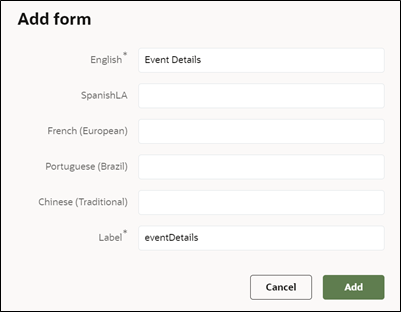
3. After creating the form, click the icon with three vertical dots and then click Import Content in the menu.
4. Drag and drop the Event Details Json file.
5. Click Import.
Oracle Field Service validates the form and imports in the same step. Make sure the values for Number of errors, warnings, and notices are 0 and “Form content was imported/saved”.