Oracle ERP Product Hub Configuration Overview
Certain configurations are required in Product Management Cloud for the integration to run.
As part of a strategic enhancement to improve functionality between Oracle products, integration between different platforms is required to ease implementation.
• Customers using Oracle ERP Product Hub and planning to implement Oracle Utilities Work and Asset Cloud Service will have readily available integration to manage items in Oracle ERP Product Hub through this integration.
• Real-time incremental updates to Oracle Utilities Work and Asset Cloud Service from Oracle ERP Product Hub to make sure the information between these systems is in synchronization.
• Helps customers to jump-start their implementation using this integration and in quick deployment.
This section focuses on the following:
Managing Item Rule Set
Rules define integrity constraints on the attributes of items and structures. You can define integrity constraints on operational, as well as on user-defined attributes. Integrity constraints can implement business rules and are created through the rules framework.
Example: The minimum speed must be less than maximum speed. This could be a rule.
Each attribute is referenced by its business entity and attribute group name followed by the attribute name.
Example:
[Item].[Physical Attributes].[Unit Volume]
In this example:
• [Item] indicates that it is an item attribute
• [Physical Attributes] is the display name of the attribute group
• [Unit Volume] is the display name of the attribute
To manage an item rule set:
1. Navigate to Setup and Maintenance > Product Hub > Item > Manage Item Rule Set.
2. Click Add and enter the following details:
• Display Name: WACS_ITEM_STATUS
• Composite: No
• Association Type: Attribute Group
• Association Name: Main
• Validation Condition: [Item].[Main].[Item Status] == “Active”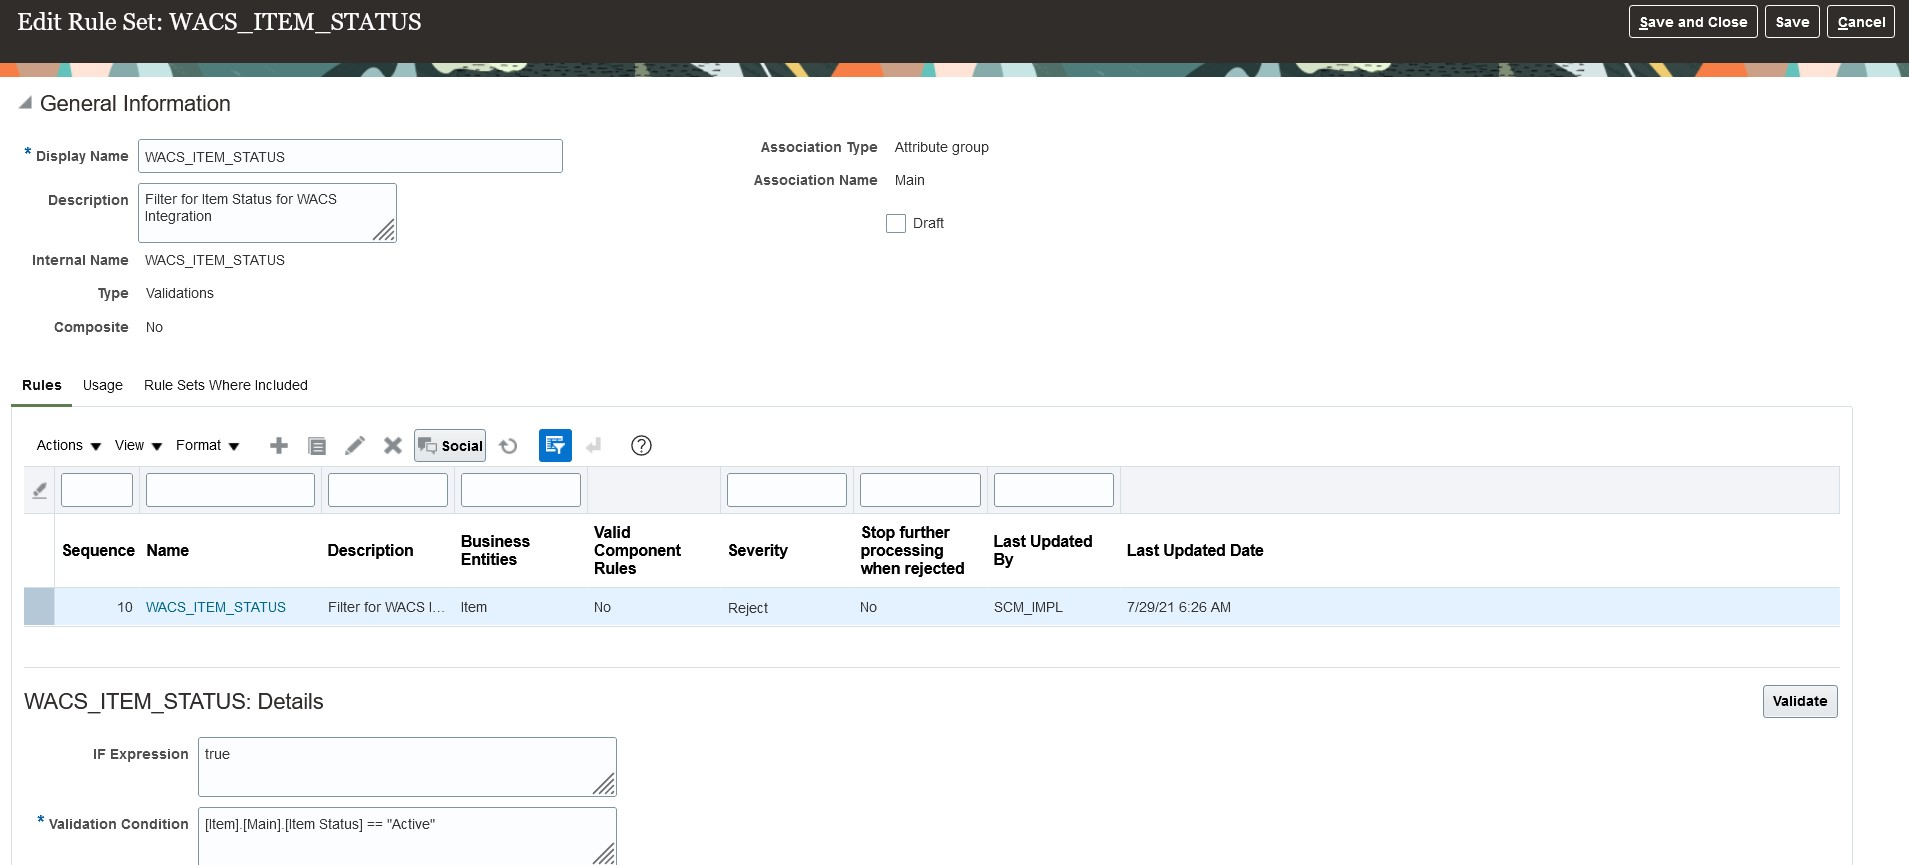
Managing Trading Community Source System
Oracle Product Management Cloud offers functionality to extract an item through publication for integration. Define the target application that sends an extract to the source system.
This setup helps to communicate systems outside the cloud. Filters are setup in configuration to extract items based on the business requirement.
Defining the Spoke System
To define a spoke system:
1. Login to the system.
2. Navigate to My Enterprise > Setup and Maintenance > Product Management > Product Spoke System.
3. Open Manage Trading Community Source System.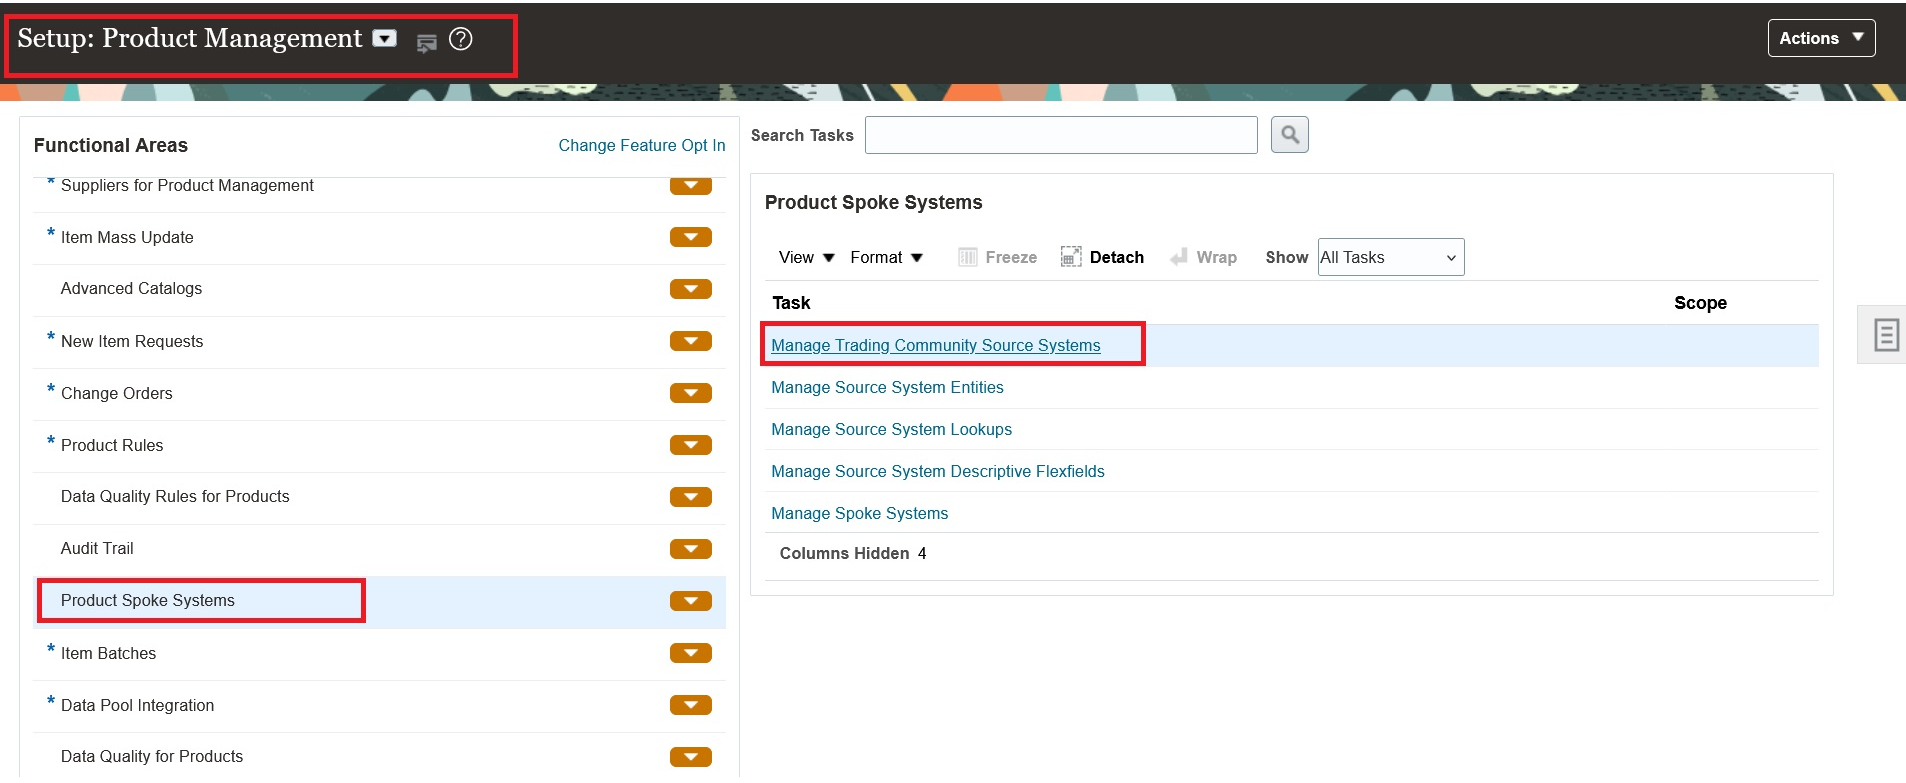
4. Create a Manage Trading Community Source.
5. Open Manage Spoke System.
6. Setup the publication. Add the following:
• Attributed
• Association: Supplier Site Organization
• Item Category Assignment
• Enable “Include system attributes”
• Validation rule
For instructions to create a validation rule, refer to the Oracle Supply Chain Management Cloud documentation at: https://docs.oracle.com/en/cloud/saas/supply-chain-and-manufacturing/24a/index.html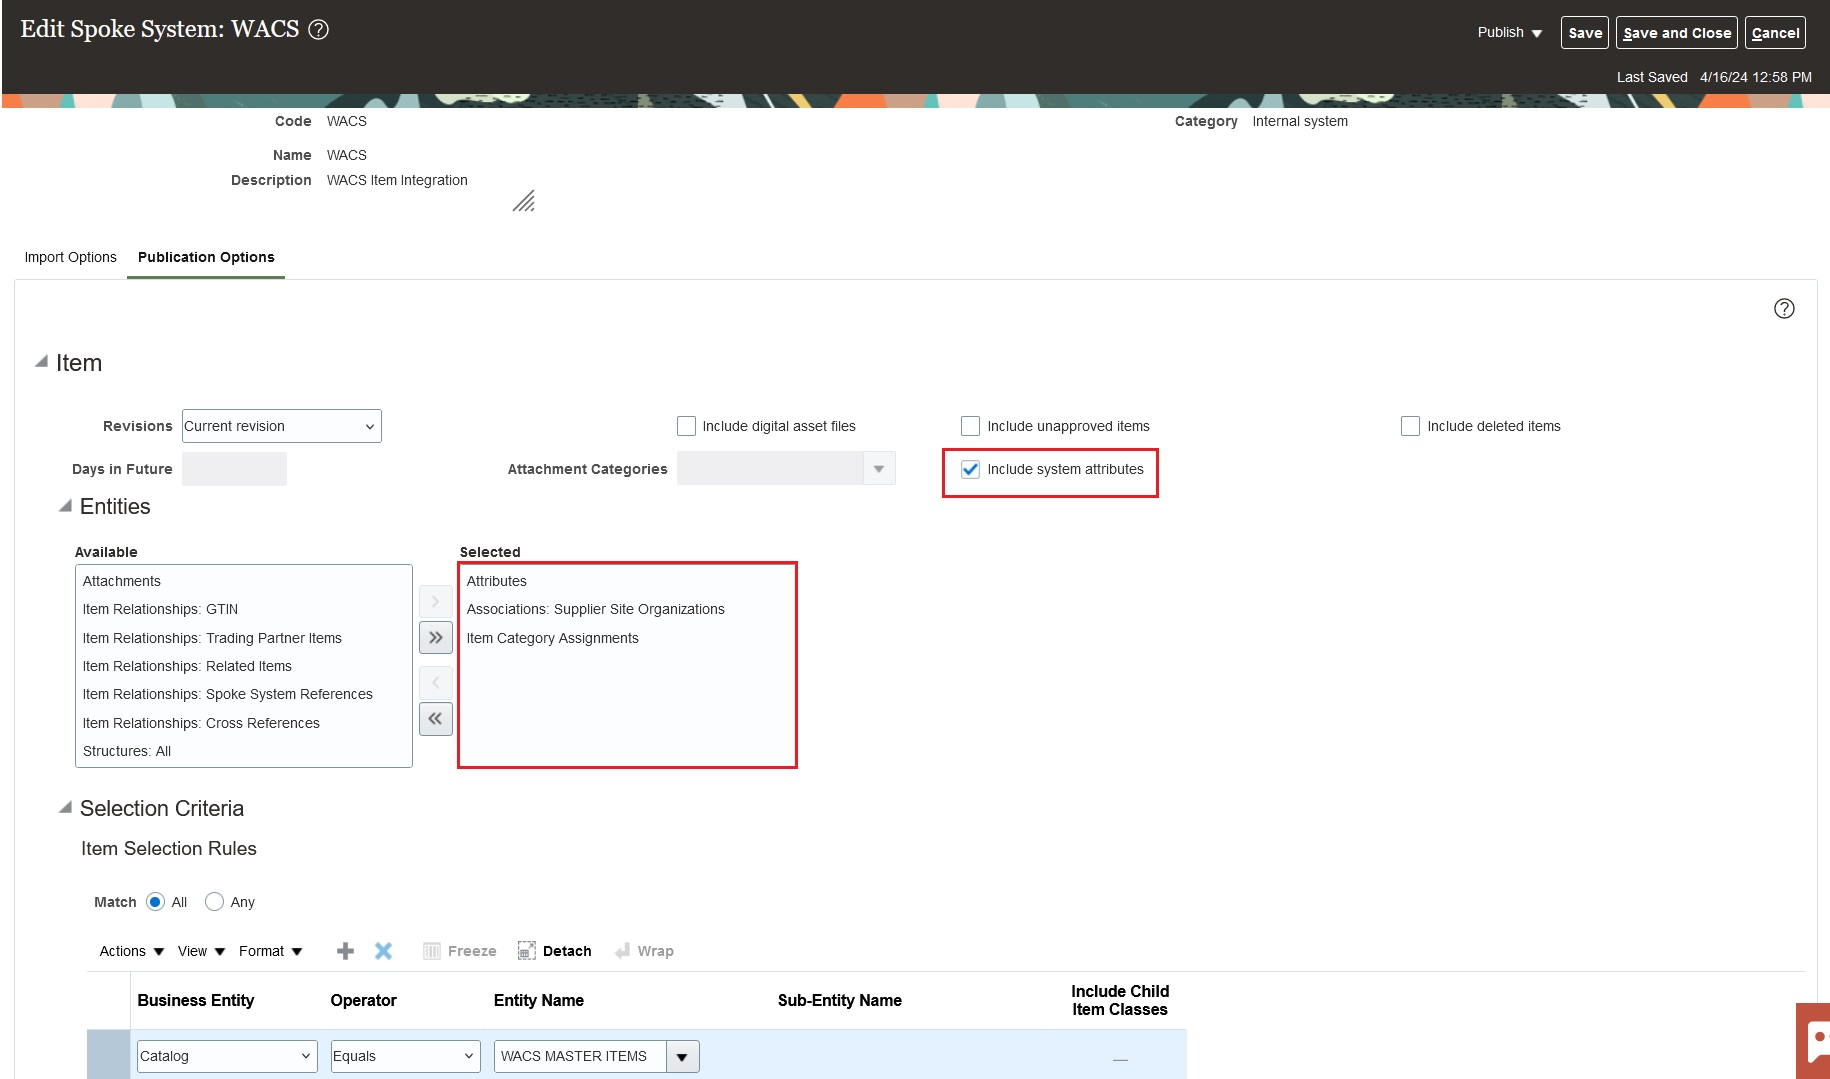
7. Add the filter for WACS MASTER ITEM. Select the respective filters for bulk upload.
8. Publish the file. It is sent to the Universal Content Server.
For more information refer to Oracle Supply Chain Management Cloud documentation at: https://docs.oracle.com/en/cloud/saas/supply-chain-and-manufacturing/24a/index.html
Defining File Size of the Extract
As of this release, Oracle Integration Cloud accepts file sizes that are less than 10MB. To make sure that the publication size is less than 10MB, limit the number of items in each extract file.
To define the file size of an extract:
1. Navigate to Setup and Maintenance > Product Hub > Item > Manage Advance Item Profile.
2. Update the profile options.
EGI_PUBLICATION_ITEMS_PER_PAYLOAD= 250
Profile Option Code | Profile Option Name | Purpose |
|---|---|---|
EGI_PUBLICATION_ITEMS_PER_ PAYLOAD SET SIZE TO 250 | Number of Items per Payload for Publication | Number of items in each XML file. This profile option determines the number of items to be used per payload in the publication process. The predefined value is 500 MB. |
EGI_PUBLICATION_NUMBER_OF_PAYLOADS | Number of Parallel Payloads for Publication | Number of scheduled subprocess that gets launched in the extraction process. This profile option determines the number of parallel payloads to be used in the publication process. The predefined value is 100. |
EGP_PUBLICATION_SIZE_OF_ZIP_FILE | Size of the Publication Payload File in Megabytes | This profile option controls the overall size of the payload zip file. The payload zip file can contain more than one XML file for the item object. This profile option lets you chunk large publication jobs into multiple XML files. This profile option controls the overall size of the payload zip file. |
Creating a Catalog/Category
A catalog is a collection of categories used to classify items, such as:
• Organizing the categories into a hierarchy that represents a taxonomy.
• Creating new categories only in the context of a catalog.
• Adding existing categories to one or more catalogs, either from another catalog or as shared categories from a source catalog.
• Controlling the assignment of items and categories in the catalog by controlling the catalog content.
Example: Set the value of the Catalog Content field on the Edit Catalog page to items at all levels, allowing items to be assigned to any level within the category hierarchy, not only to the leaf levels.
This section focuses on the following:
• Catalog
• Category
Catalog
A catalog is a collection of categories that are organized to define a classification of items. The top most level of a catalog is the catalog root. All categories for the first level in the category hierarchy are associated with the catalog root through the catalog category association component.
Category
A category is a component of a catalog that represents a set of items. A category can be associated to a catalog through the catalog category association. Both the shared category and the native category are associated thorough the catalog category association.
Catalog Category Association
Catalog category association represents the relationship between a catalog and a category, or a parent category and a child category. Each catalog category association represents one relationship between the catalog and a category or one relationship between a parent category and a child category.
Item Category Assignment
Item category assignment represents the assignment of the item to a category in a catalog. Each item category assignment represents the relationship between a category and an item.
1. Login to the system.
2. Navigate to Product Management > Product Information Management > Manage Functional Area Catalogs.
3. Click Add to add catalog and category.
Catalog Name: WACS MASTER ITEM
Category Name: WACS
Description: WACS Item Transfer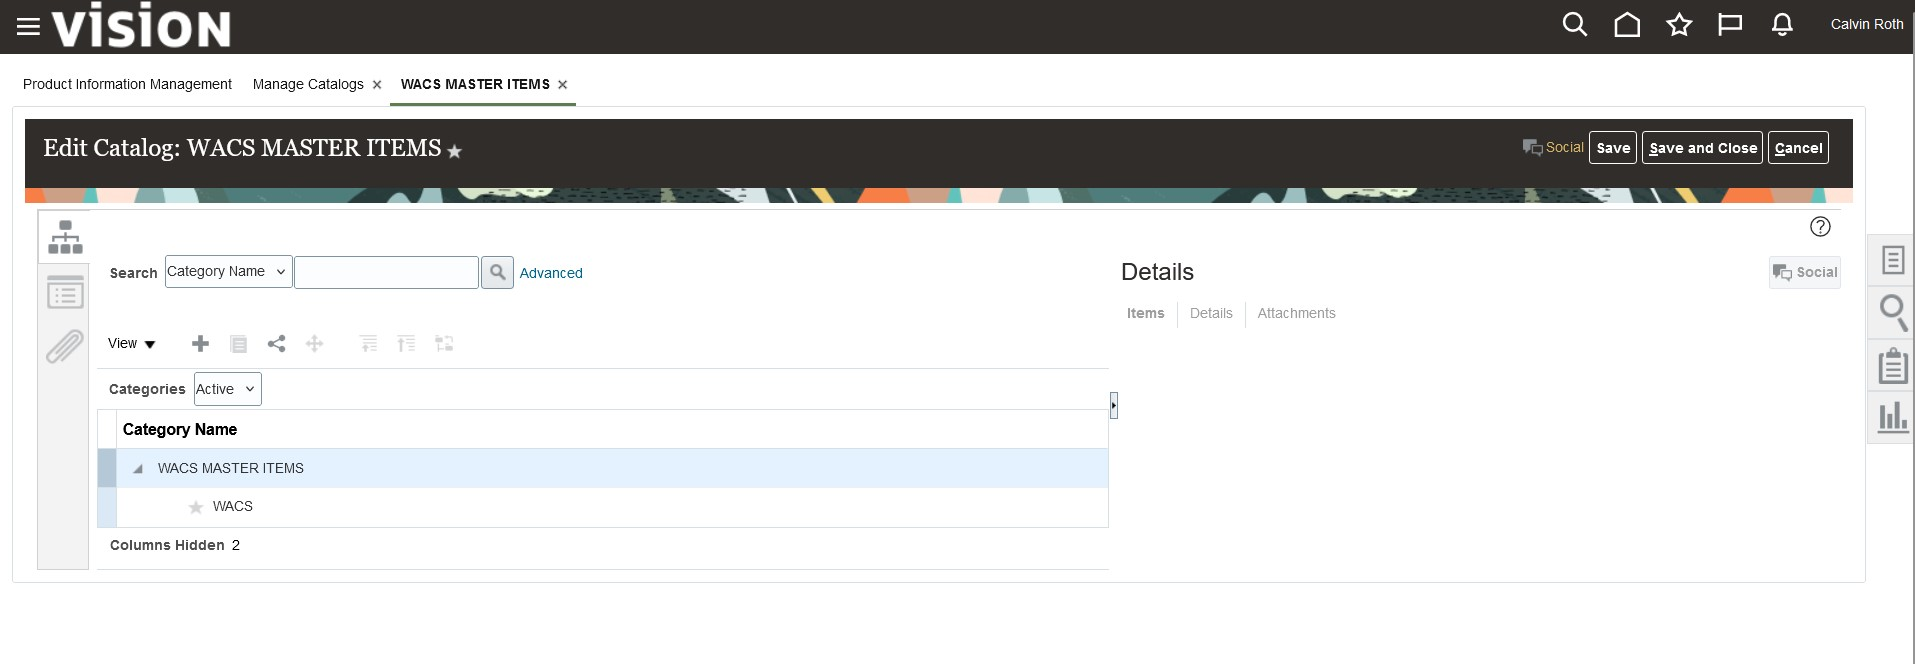
To add a catalog to multiple categories:
1. Browse all items from Product Management Information that are required to synchronize with Oracle Utilities Work and Asset Management.
2. After identifying the items, create the Item Import FBDI using the template at: 2. https://docs.oracle.com/en/cloud/saas/supply-chain-and-manufacturing/24a/oefsc/index.html#item-3116
3. Download the Item Categories Import Control file.
The spreadsheet should include the same columns and they should be in the same order as in the template. The value in the first column is always the interface table name.
4. After extracting the data into the temporary spreadsheet, cut and paste the data into the relevant sheets provided in the template.
5. For ID columns, develop a mapping between existing values and Oracle Fusion values. Use the implementation pages in the Setup and Maintenance work area to extract the identifier. For columns where the Setup and Maintenance work area should be used to get the Oracle Fusion values, the comments in the column header of the spreadsheet mentions the task name to navigate to in the Setup and Maintenance work area.
Importing the Data
After successfully loading the data, submit the Item Import process to import the data into the application tables to create items and their child entities.
To submit the Item Import process:
1. Navigate to the Manage Item Batches task in the Product Information Management work area.
2. Make sure that the appropriate Batch Options are set for the batch.
3. Navigate to the Scheduled Processes task.
4. Click Schedule New Process and select Item Import Process.
5. Enter the value for Batch ID and submit the process.
6. Monitor the process in the Search Results section.
7. If the Item Import Process ends in error or warning, review the log file for details.
Rectifying the Errors
To correct the import errors:
1. Click the Manage Item Batches task in the Product Information Management work area.
2. Search for the batch for which the Item Import process is run.
3. Click the batch name to navigate to batch details.
4. Review the errors for each item.
5. Select the item rows that are in error and click Manage in Spreadsheet to export item data to the spreadsheet.
6. Once all the rows are rectified, click Upload to resubmit the process and then submit the Item Import process.
7. Repeat the submission and error correction steps in this section until all rows are imported successfully and the items, along with their child entities, are created.