Add the Account 360 Sub-View to Redwood Sales Account Details Page
You can use VB Studio to add the Account 360 template to the SubviewContainerLayout of the Redwood Sales Account Details page (accounts-detail).
This task is required if your implementation meets both of the following criteria:
-
You are implementing CX for Utilities Sales.
-
You have customized or extended the Redwood Sales Account Details page. If you are using the out-of-the-box version of this page, Account 360 is available as a sub-view without completing these steps.
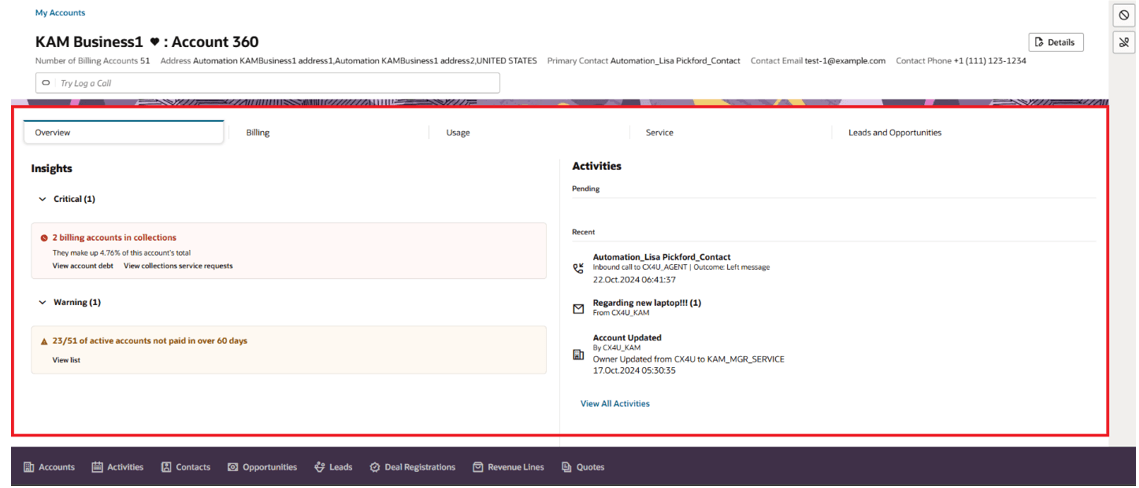
This image shows the Account 360 sub-view displayed within the Redwood Sales Account Details page:
Figure 11-1 Redwood Sales Account 360

The following task explains how to add this template in the SubviewContainerLayout.
This example assumes that the reader is familiar with Redwood Sales account data and understands how to use Visual Builder. For additional information, see:
-
Using Account 360 in the Using CX for Utilities Sales Guide
-
The Visual Builder Library in the Oracle Help Center
-
Customizing Dynamic Containers in the Extending Oracle Cloud Applications with Visual Builder Studio Guide
Adding the Template to the SubviewContainerLayout
-
Log into CX for Utilities Sales as an administrator.
-
Click the menu at the top right of the page and select Edit Page in Visual Builder Studio.
-
Select your workspace and click Select. Note that you can also create a new workspace if needed.
-
In the App UIs panel, expand Customer Experience CX, then expand Sales, then cx-sales, then accounts, and then select account-detail.
-
Select the Page Designer sub-tab, then select Subview Container Layout from the Components panel.
-
Duplicate the required layout or select a duplicated layout (if it exists) based on the use case.
-
Click the JSON sub-tab and search for SubviewContainerLayout.
-
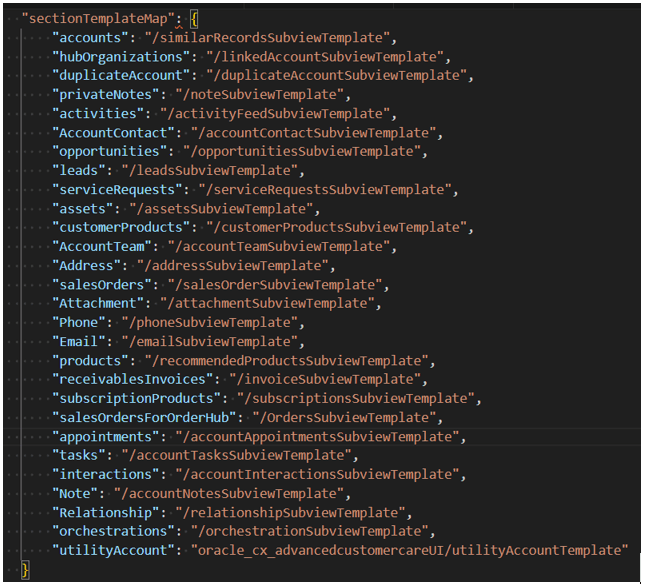
In the sectionTemplateMap of the duplicated layout, add the following:
"utilityAccount": "oracle_cx_advancedcustomercareUI/utilityAccountTemplate" -
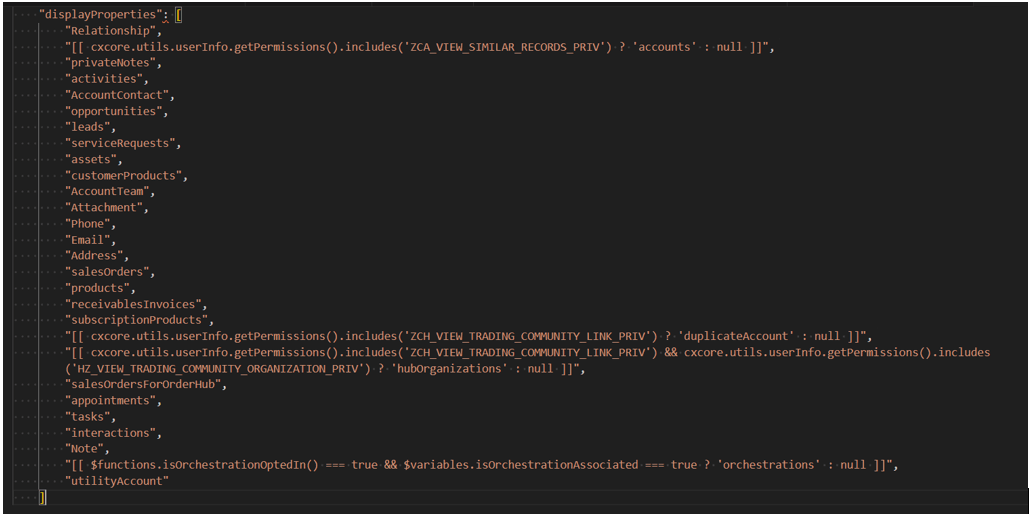
In the displayProperties add:
"utilityAccount" - To provide the subview name, select the Variables sub-tab and then select subviewLabel from the Constants.
- Specify the default value as:
{"utilityAccount":"[[ $translations.app['account360']]]"} - Click the JSON sub-tab and add the following code at the end:
"translations": { "app": { "path": "faResourceBundle/nls/oracle.apps.crm.verticals.contactCenter.resource" } } -
Preview your changes to verify that they look as you expected. This will launch a new tab with the accounts-detail. Validate that Accounts 360 subview is loaded.
-
When your changes are ready for use, complete the steps to publish your changes to your production environment.
The following images show the full list of displayProperties and sectionTemplateMap:
Figure 11-2 Redwood Sales Properties

Figure 11-3 Redwood Sales Properties (Continued)

Parent topic: Configure the Redwood Sales Interface