Inbound Web Services Configuration
Oracle Utilities Application Framework applications support the ability to implement product Web Services within the JEE Web Application Server instead of being accessible from the XML Application Integration (XAI) servlet. This has several advantages:
• Inbound Web Services can utilize the clustering and high availability features of the JEE Web Application Server directly.
• Individual Inbound Web Services can be monitored from the JEE Web Application Server directly. If Oracle Enterprise Manager is used, performance and diagnostic metrics on individual Inbound Web Services can be collected and analyzed for service level tracking and general monitoring.
• Individual Inbound Web Services can be secured using the WS-Policy support available in the JEE Web Application Server directly. Customer using Oracle WebLogic Server can also utilize the inbuilt Oracle Web Services Manager within Oracle WebLogic to add access rules to individual Web Services.
Note: It is required to use Inbound Web Services instead of XML Application Integration as the XAI Servlet has been deprecated.
Enabling Inbound Web Services
By default, for backward compatibility, the Inbound Web Services feature is disabled. To use the feature it must be enabled and a few features enabled to use the deployment facilities provided by this capability. All these steps must be executed by the relevant administrator user as indicated in the individual steps.
Note: These steps, unless otherwise indicated, are performed once per environment.
Enable Inbound Web Services Feature
Note: Customers using the application’s native installation should ensure that the WEB_WLS_SVRNAME is set to the name of the server or cluster used for the environment.
The first step is to enable the feature in the environment configuration file (ENVIRON.INI - Environment Configuration File) to use additional facilities:
• Using the product administrator user on the machines where the product is installed, execute the configureEnv.sh –a command after executing the splenviron.sh utility –e <environmentname> where <environmentname> is the name of the installation environment to enable the feature upon. See configureEnv – Set up Environment Settings and splenviron – Set Environment Variables for details.
Change the option Enable Web Services Functionality on option 50 to true. Save the change using the P option.
Execute the initialSetup.sh command to apply the changes to the infrastructure and generate the necessary build files for Inbound Web Services. See initialSetup – Maintain Configuration Settings for details.
Set Credentials For Inbound Web Services
Note: Failure to perform this task may cause the deployment of Inbound Web Services to fail.
To deploy the Inbound Web Services seamlessly it is necessary to create an administration credential file so that the build and deployment utilities and online deployment facility for developers can access the domain.
To create this credential file the following commands must be executed:
• Using the product administrator user on the machines where the product is installed, execute the splenviron.sh utility –e <environmentname> where <environmentname> is the name of the installation environment to enable the feature upon. See splenviron – Set Environment Variables for details.
Execute the following command:
$JAVA_HOME/bin/java -classpath $WL_HOME/server/lib/weblogic.jar weblogic.Admin -username <username> -password <password> STOREUSERCONFIG -userconfigfile $SPLEBASE/etc/.wlsuserconfig -userkeyfile $SPLEBASE/etc/.wlsuserkey
Where <username> is an Administration password for the domain and <password> is the password for that user. For example, these values can correspond to WEB_WLSYSUSER and WEB_WLSYSPASS (in plain text).
Note: If the password for this user is changed at anytime, this step must be repeated for the facility to continue to operate.
Enable USER_LOCK Facility
To prevent multiple parallel deployments, the USER_LOCK feature of the database must be enabled on the product user. The following commands must be executed:
• Log into the database using SQL Developer or SQL Plus the SYS or SYSTEM user.
• Execute the following command:
@?/rdms/admin/userlock.sql
@?/rdms/admin/userlock.sql
Note: ? corresponds to ORACLE_HOME.
• Grant access to the product user using the following command:
grant execute on USER_LOCK to <user>;
where <user> is the DBUSER and BATCH_DBUSER from the ENVIRON.INI. See DBUSER - Online Database User and BATCH_DBUSER - Batch User for details.
Note: BATCH_DBUSER is used for command line deployment.
Inbound Web Services Configuration Files
The location of the Inbound Web Service is as follows: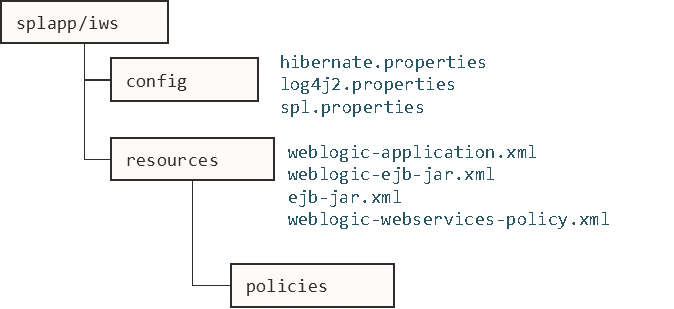

The following configuration files apply to the Inbound Web Service:
File | Contents |
|---|---|
Database connectivity for Inbound Web Services | |
Logging configuration | |
Inbound Web Service specific configurations | |
WebLogic extensions. | |
WebLogic extensions for Inbound Web Services | |
Authentication policies applicable for IWS |
Inbound Web Services Concepts
The Inbound Web Services deploys a web archive (WebServices.ear or name set by IWSWAR - Name of Inbound Web Services WAR) containing the components of the inbound Web Services using the following structures: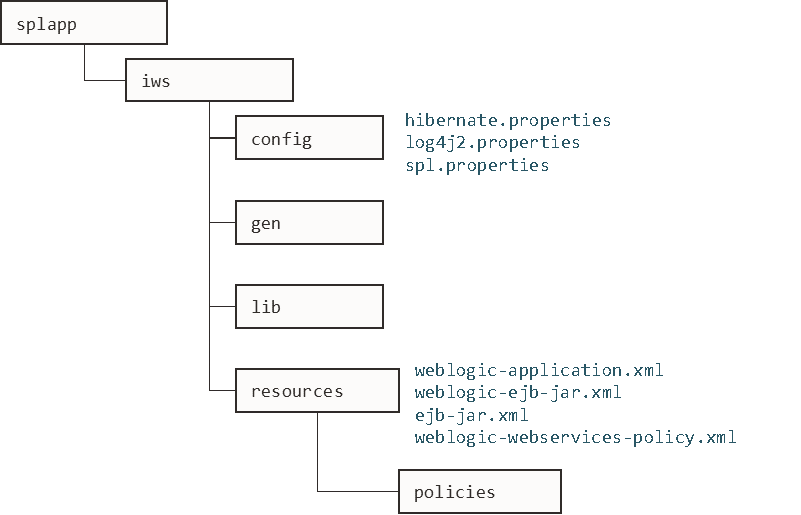

Structure | Contents |
|---|---|
config | |
gen | Location of files generated by iwsdeploy - Inbound Web Services Deployment. |
lib | Java Libraries. |
resources | Inbound Web Services Configuration, custom policy, XSL and XSD files. |
policies | Configuration files defining security policies for Inbound Web Services |
The Inbound Web Services was designed to fit within the same concepts as the Web Application Server/Business Application Services. The main differences are:
• The Webservices.ear file (or name set by IWSWAR - Name of Inbound Web Services WAR) is located in the $SPLEBASE/splapp/iws/gen directory and is deployed automatically using iwsdeploy.sh or the online deployment facility.
Note: Customers using native installation can optionally manually deploy the war file, if desired.
• Database connectivity is configured in the Inbound Web Services and included in the build file.
Inbound Web Services Configuration Process
Note: This section only covers the configuration and deployment of the physical Web Service resources. It does not cover the definition of Inbound Web Services within the application. Refer to the Migrating XAI to IWS (Doc Id: 1644914.1) available from My Oracle Support for a discussion of Inbound Web Services.
Note: For this feature to operate, at least one Inbound Web Service should be defined for the build process to execute. If no Inbound Web Services are defined prior to the deployment, then the build process will fail.
To configure the Inbound Web Services during the installation process and post-installation then the following process should be used: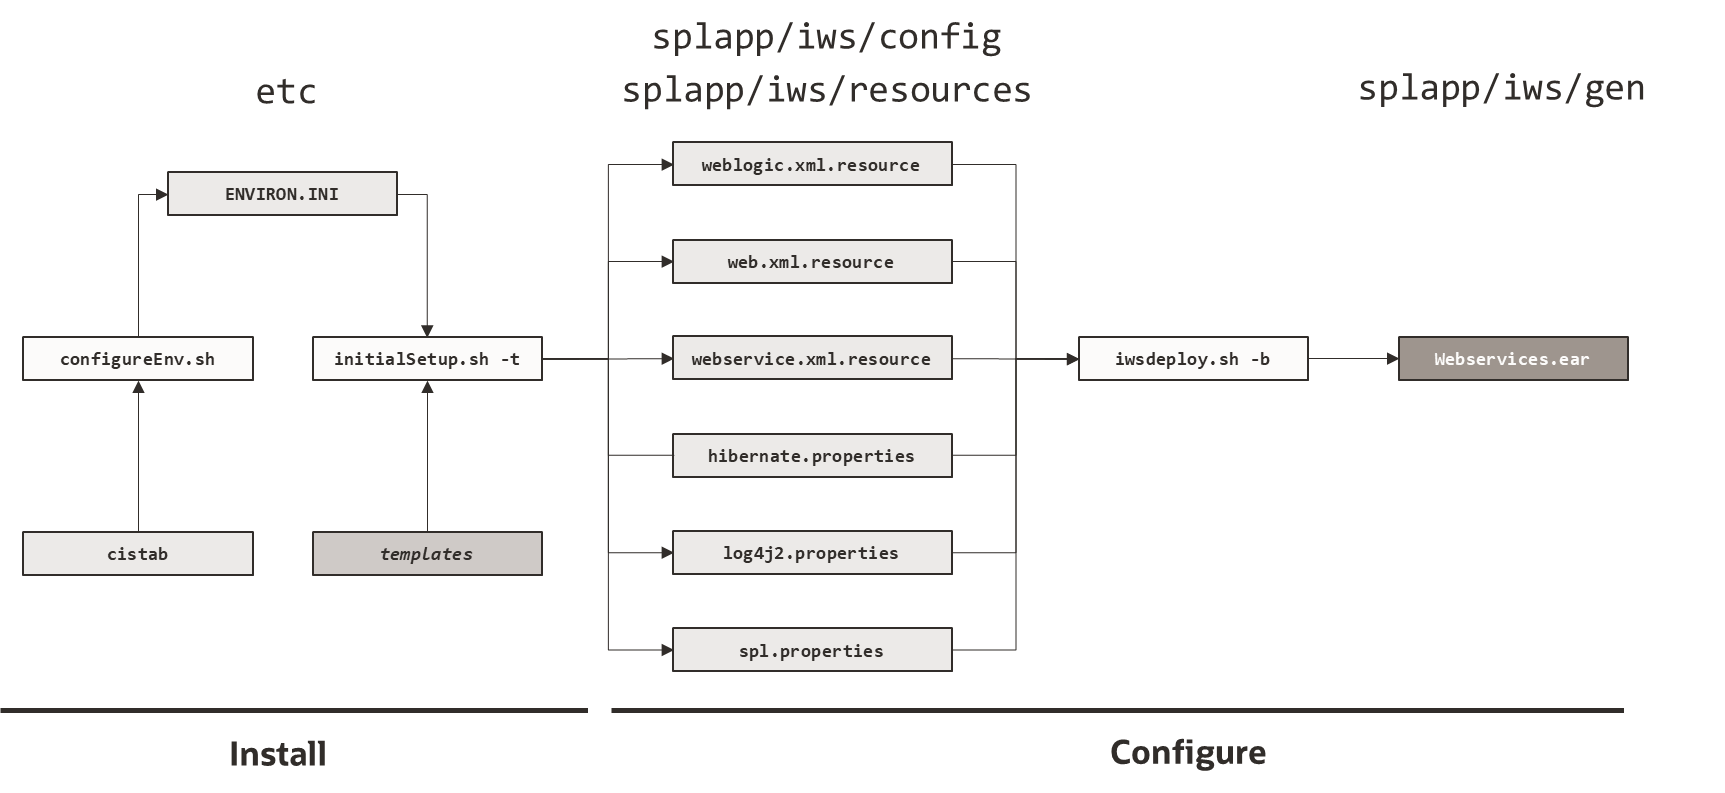

• The configureEnv utility is used during installation time and can be used post implementation to set parameters in the ENVIRON.INI. If any parameters are derived or set from the ENVIRON.INI (see the Source column in the relevant section) then the configureEnv utility should be used to maintain them. See configureEnv – Set up Environment Settings for details.
Note: The configureEnv utility should be used to make ANY changes to the ENVIRON.INI. Manual changes to this configuration file are not recommended.
• After the ENVIRON.INI has been set or altered, the settings must be reflected in the relevant configuration files used by the Inbound Web Services by running the initialSetup.sh -t. See initialSetup – Maintain Configuration Settings for details.
• The utility uses the templates from the templates directory to create substituted copies of these files in a standard location:
Configuration File | Destination |
|---|---|
Inbound Web Services | |
Template: spl.properties.iws.template | Database connectivity for Inbound Web Services |
Template: log4j2.properties.iws.template | Logging configuration |
Template: hibernate.properties.iws.template | Inbound Web Service specific configurations |
Template: web.xml.resource.iws.template | WebLogic extensions. |
Template: webservices.xml.resource.iws.template | WebLogic extensions for Inbound Web Services |
Template: weblogic.xml.iws.template | Authentication policies applicable for IWS |
• At this point you may perform manual changes to the above files to parameters not implemented in the ENVIRON.INI.
Note: Any manual changes are overwritten after running the initialSetup utility unless the change is reflected in the appropriate template (see initialSetup – Maintain Configuration Settings and Implementing Custom Templates for more information). Backups should be made of any changes and then manually reapplied to reinstate all manual changes.
• To reflect configuration changes into the product the iwsdeploy utility, must be executed (see iwsdeploy - Inbound Web Services Deployment). This will build the necessary Websevices.ear (or the value specified in IWSWAR setting) and to be deployed into Oracle WebLogic. This step is optional if configuration overrides are in use.
Note: For customers who want to use manual deployment methods, use the iwsdeploy.sh -b option to prevent autodeploy. See iwsdeploy - Inbound Web Services Deployment for details.
At this point, the product web services are ready for deployment into the JEE Web application server.
Inbound Web Services Deployment Process
After the build of the Inbound Web Services EAR is complete (as outlined in Inbound Web Services Configuration Process the final step to implement your application is to deploy the product within the JEE web application server.
There are three methods of deploying the product within the JEE web application server:
• Use the deployment utilities provided on the console of the JEE web application server. The EAR files is available under $SPLEBASE/splapp/iws/gen can be manually deployed using the console. Refer to the Installation Guide for specific platform instructions and the administration guide for the JEE Web application server.
• Use the deployment utilities provided on the command line of the JEE Web application server. The EAR files is available under $SPLEBASE/splapp/iws/gen can be manually deployed using the JEE Web application server vendor supplied deployment command line utilities. Refer to the Installation Guide for specific platform instructions and the administration guide for the JEE Web application server.
• Use the iwsdeploy utility for command line access for deployment. See iwsdeploy - Inbound Web Services Deployment for details.
• Use the Inbound Web Services online transaction.
Several specific utilities from Oracle WebLogic are provided with Oracle Utilities Application Framework applications to deploy the web application to the domain.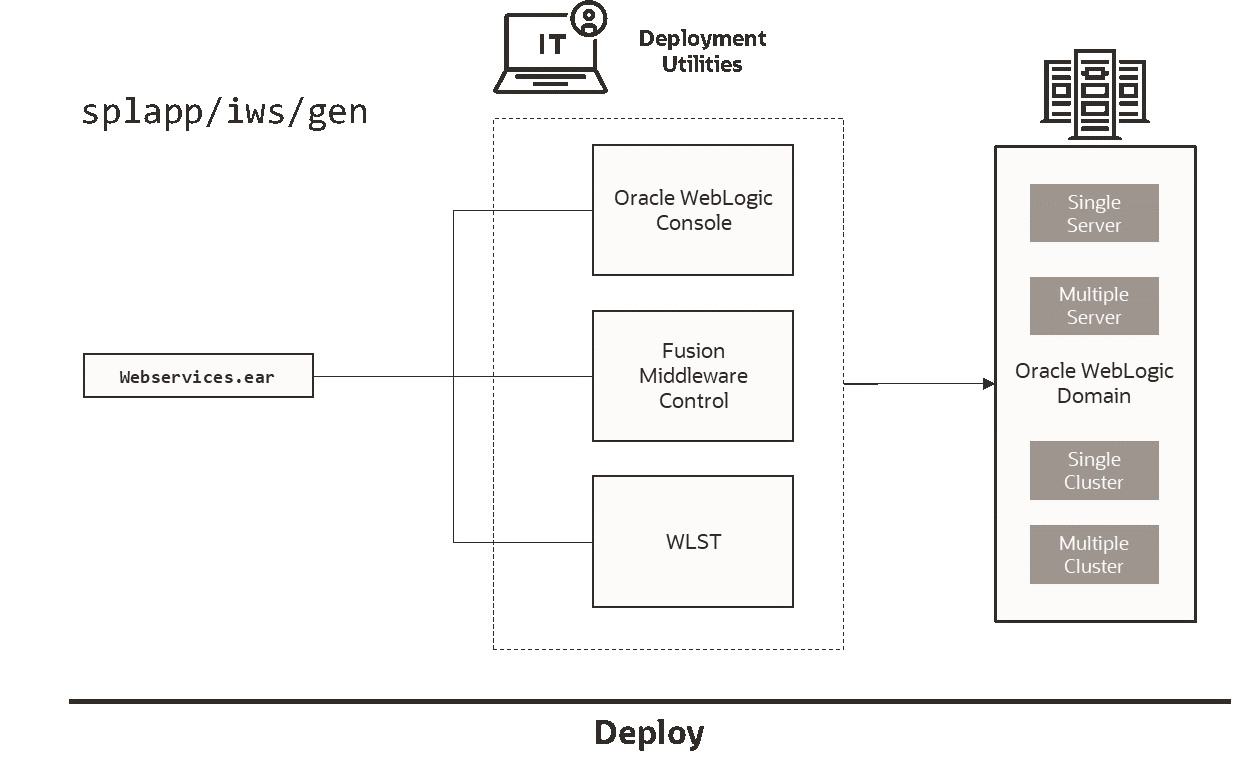

Quick Reference Guide for Inbound Web Services Configuration
Use the following Quick Reference Guides to identify which process should be used to make configuration changes to the IWS component:
• If the change is to any setting contained in the ENVIRON.INI for the IWS then you must run the following utilities in the order indicated:
1. Execute the configureEnv utility to reflect the parameter change in the ENVIRON.INI. See configureEnv – Set up Environment Settings for details.
2. Execute the initialSetup utility (with the –t option) to rebuild the configuration files using the ENVIRON.INI and provided template files. This will reset the configuration to the contents of the base template files or custom template (if used). See initialSetup – Maintain Configuration Settings and Implementing Custom Templates for more information.
3. Any configuration changes that are overridden by templates (base or custom template) must be manually reapplied (if necessary). See Implementing Custom Templates for details.
4. Execute the initialSetup utility (with the –w option) to implement the configuration files in the product IWS files. This step is not necessary of you are using configuration overrides. See initialSetup – Maintain Configuration Settings and Implementing Custom Templates for more information.
5. Execute the iwsdeploy utility to build and deploy. See iwsdeploy - Inbound Web Services Deployment for details.
• If the change is to any setting not contained in the ENVIRON.INI for the IWS but is in the configuration files for the IWS then you must run the following utilities in the order indicated:
1. Make any manual changes to the relevant configuration files.
Execute the initialSetup, with the -w option, utility to implement the configuration files in the product IWS files. See initialSetup – Maintain Configuration Settings for details.
Inbound Web Services Deployment Utilities
After the configuration of the Inbound Web Services is complete (as outlined in Inbound Web Services Configuration Process) the final step to implement your application is to deploy the product within Oracle WebLogic.
There are three methods of deploying the Inbound Web Services component within the JEE Web application server:
• An Inbound Web Services Deployment facility available from the product online. This is accessible from the Admin, I, Inbound Web Services Deployment menu item. This is suitable for development environments only. For example: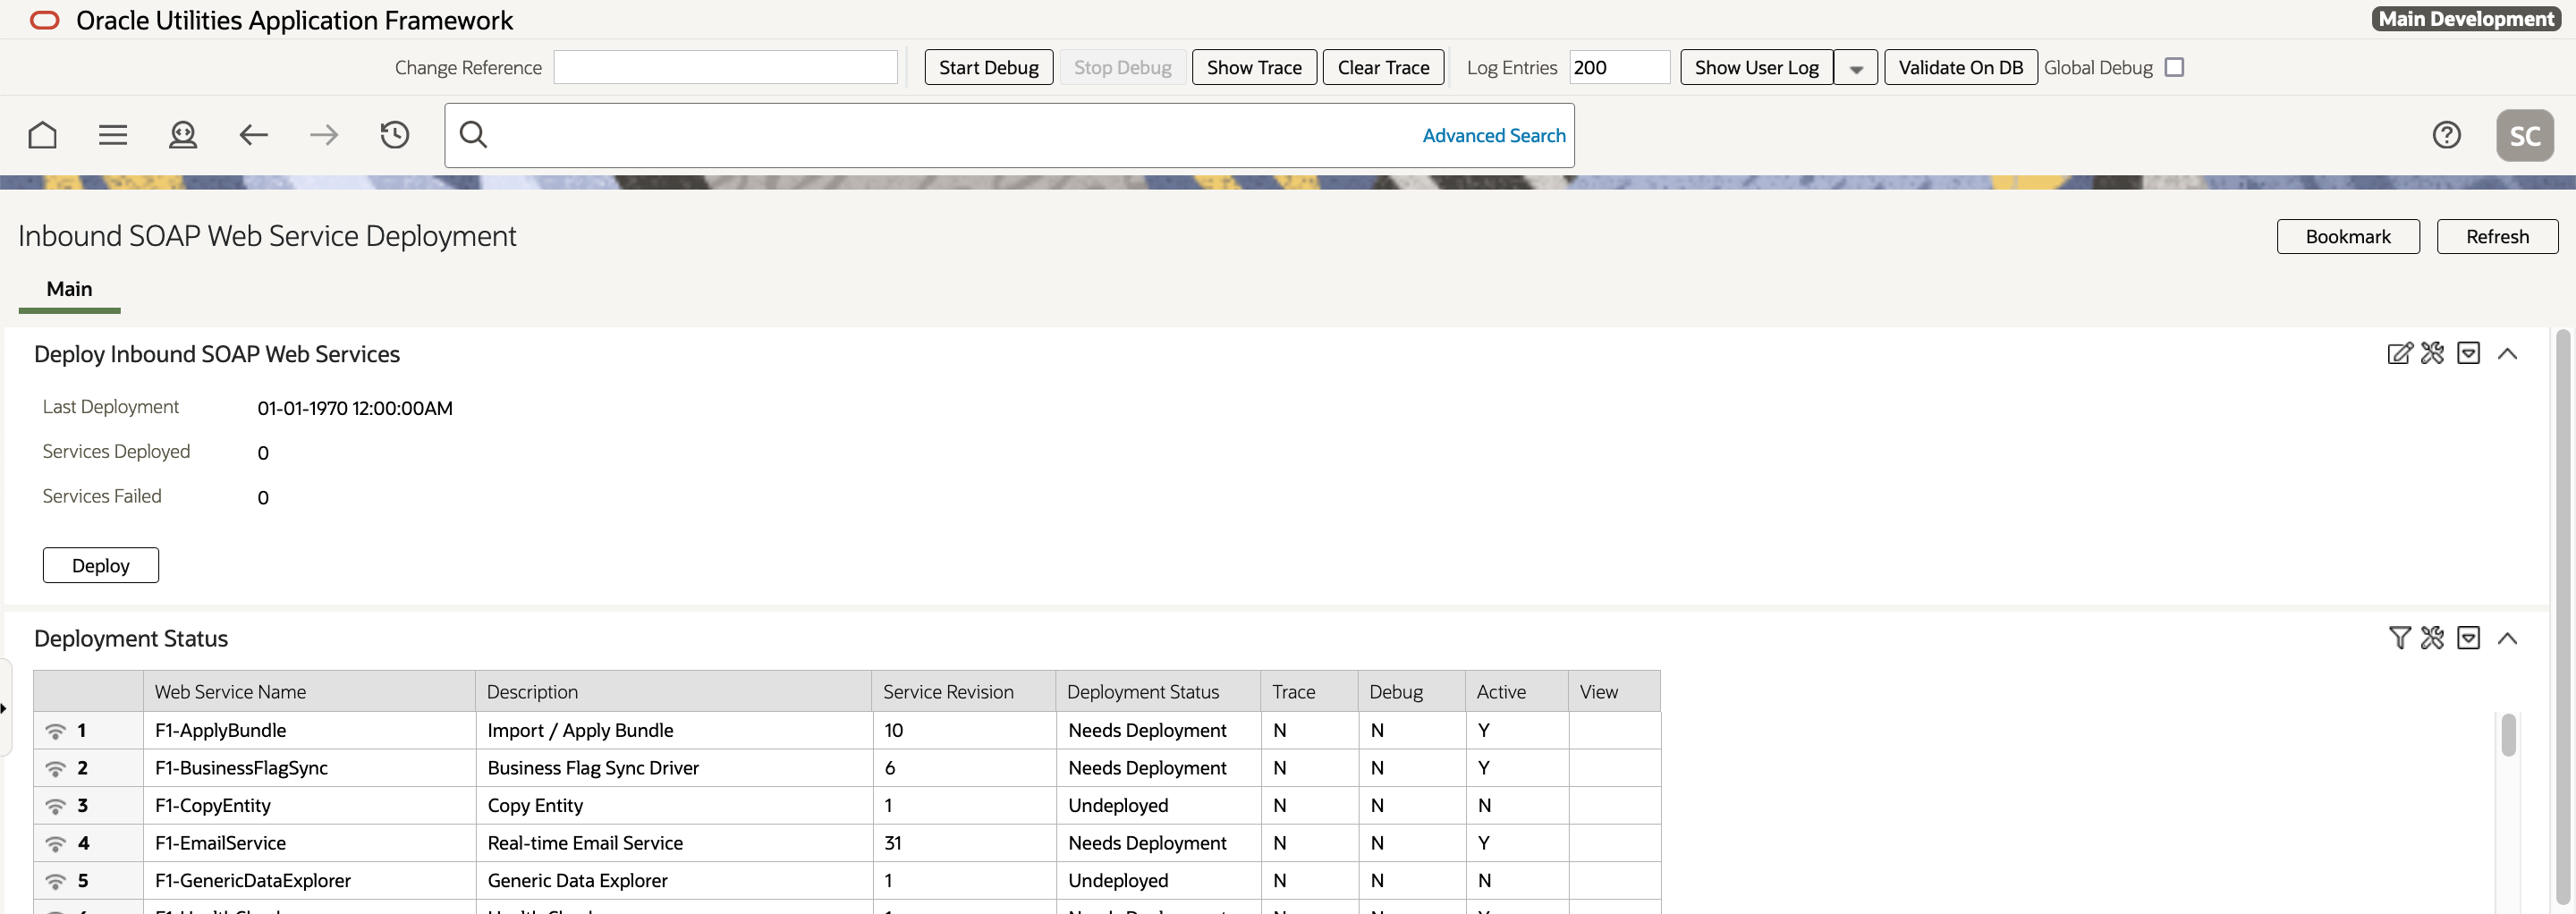

• Use the iwsdeploy utility to trigger a deployment from the command line. See iwsdeploy - Inbound Web Services Deployment for details.
• Execute the iwsdeploy utility but manually deploy the Web Services EAR file to the server(s) or cluster using the Oracle WebLogic console or deployment utilities. See iwsdeploy - Inbound Web Services Deployment for details.