Understanding the Main Page - Full Operations User Type
The primary page for performing work is made up of four tabs, which are described in the following sections:
Understanding the Tasks Tab
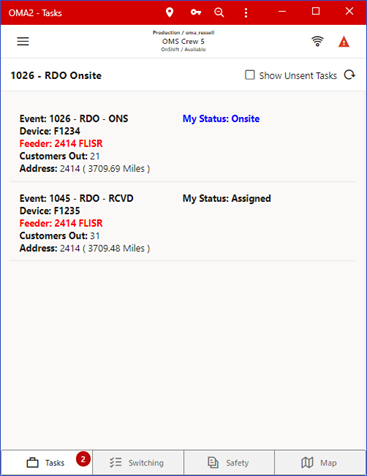
The Tasks tab provides a listing of any events that you are assigned to. The general event details are listed in a row that expands to reveal available actions when selected.

The Show Unsent Tasks check box will allow you to show or hide tasks that have been assigned to your crew but not sent to your device. This is possible if NMS has the Two-Step Crew Assignment rule enabled.
Tap on a task to display a list of relevant actions.
Depending on the state of your task (for example, Assigned, En Route, Onsite), you may have the following options.
• A Show in Map icon ( ), when tapped, will open the map panel and focus the map on the task.
• A Get Directions icon ( ), when tapped, will open the devices native navigation app to assist you in driving to the task location.
• An En Route icon( ), when tapped, will flag that you are en route to the event.
• An On Site icon ( ), when tapped, will flag that you are on site for the event.
• An Assign or Suspend icon ( ), when tapped, will change your status back to Assigned or Suspended for the event.
• A Reject Task icon ( ), when tapped, will remove the task from your list of Tasks.
• A Read icon ( ), when tapped, will transition the event to the Crew Read (CRD) state.
• A Send to Crew icon ( ), when tapped, will send the event to your crew.
• An Event Info icon ( ), when tapped, will open the Event Info page and allow you to review and update the event. See Understanding the Event Details Page - Full Operations User Type on page 26-27 for more information.
• A Damage Reports icon ( ), when tapped, will open a new panel with a list of damage reports associated with the event and allow you to open them.
• A Work Queue icon ( ), when tapped, will open Select Work Queues dialog box, which allows you to assign the task to the selected work queues. You may also enter an optional comment.
• A Real Outage icon ( ), when tapped, will confirm the probable outage as a real outage and will open the device in the model.
• A Confirm Outages icon ( ), when tapped, will open a panel with a list of customers associated with the outage and allow you to mark them as confirmed service outages or confirmed secondary outages.
• A More selection icon () allows you to create a switching sheet as a copy of an existing template sheet identified by a Template ID (see Understanding the Template ID Field on page 11-19).
Note: The switching sheet copy options are configuration dependent and based on the templates saved by an Administration user.
Understanding the Switching Tab - Full Operations User Type
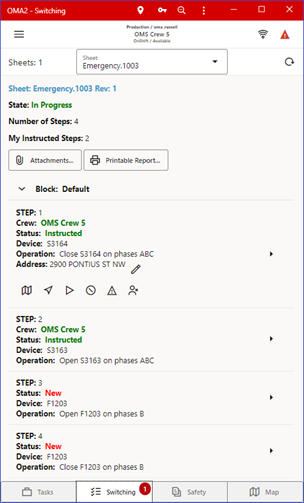
The Switching tab provides a drop-down list that allows you to select from any switching sheets that are assigned to the crew. The pane below the drop‑down list displays the switching sheet name, its state (New, Issued, instructed, and so on), and the number of instructed steps. The Switching tab also includes a number of sheets in the upper left-hand corner. This same number can be found on the Switching tab.

Buttons
• The Switch Sheet Report icon ( ), when tapped, will bring up the Switching Sheet Report Options panel, allowing you to select the content of the Switching Sheet report to generate and to initiate the report generation. After the server generates the report, it will be brought up in the device's native PDF file viewing application.
• The Attachments icon ( ), when tapped, will bring up the Switching Sheet Attachments panel. It will display any existing switching sheet attachments, which you may open and view with a device application. You also may add attachments using the following options.
• A camera icon ( ), when tapped, will bring up the device camera application and allow you to take a photo and attach it to the switching sheet.
• A Search icon ( ), when tapped, will bring up a file selection panel and allow you to attach a file.
• The Complete Switching Sheet icon ( ) will appear if you have permission to complete switching sheets and all the steps of the switching sheet are in a terminal state.