Using the Alarm Displays
The Web Workspace Tools menu’s Alarm Displays sub‑menu provides options to view current alarms (Alarms... option), assets in abnormal states (Abnormal Assets... option), alarm history (Alarm History... option), andasset operation history (Device Operations History... option). In systems with a Flex SCADA license, another sub-menu option is available to view a list of alarm shelve events (Alarm Shelving... option); see Understanding Alarm Shelving for information.
Understanding the Alarms List
To display active alarms, select Alarms... from the Web Workspace Tools menu. The Alarms (Main) tab will open.
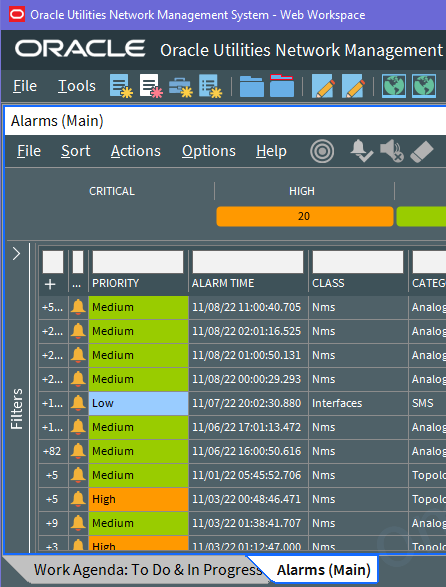
The Alarms tool lists active alarms in your system. The types of alarms will depend on what Oracle Utilities Network Management System applications and integrations are implemented. The Oracle Utilities Network Management System can be configured to handle how the Alarms tool behaves, such as whether the tool stays open or rises to the top of other windows when you get receive a new alarm. These options are set (by an Administrative User) using the Configuration Assistant's Event Management Rules tab (see Using the Event Management Rules Tab).
• To keep the Alarms tool open, it is possible to prevent the main alarm list from being closed by setting the NMSAlarmsAllowMainAlarmListClosure SRS rule to no.
• To add further visibility to new alarms, the main alarm list can be configured to automatically receive focus when a new unacknowledged alarm is raised. This can be achieved using the NMSAlarmsDisplayUponNewUnackAlarm SRS rule
The Alarms tool has three main components:
Alarms Tool Menus and Toolbar
File Menu
Menu Option | Description | Toolbar Icon |
|---|---|---|
Toggle Dockable Window | Changes a standalone window to a pane that may be moved or docked in another window or frame. See Understanding Docked Panes and Standalone Window Tools for more information on dockable and standalone windows. | -- |
Exit | Closes the window. | -- |
Sort Menu
The table below describes the options available on the Sort menu.
Menu Option | Description | Toolbar Icon |
|---|---|---|
Sort Dialog... | Opens the Sort Dialog, allowing you to create, modify, apply, and save user-defined sorts. See Using the Sort Dialog Box. | -- |
Default | Applies the default sort. | -- |
Priority | Sort by alarm priority. | -- |
View Menu
The table below describes the options available on the View menu.
Menu Option | Description | Toolbar Icon |
|---|---|---|
Alarm Shelving... | Opens the Alarm Shelving tool. Available if Flex SCADA is license and enabled. | -- |
Nuisance Alarms... | Opens the Nuisance Alarm list. Available if Flex SCADA is license and enabled. | -- |
Actions Menu
Menu Option | Description | Toolbar Icon |
|---|---|---|
View... | Focuses the Viewer on the asset associated with the alarm. | |
Acknowledge | Acknowledges the selected alarms. | |
Acknowledge Page | Acknowledges visible alarms. | |
Silence | Silences the selected alarms. | |
Clear | Clears the selected alarms. | |
Silence All Alarms... | Silences all alarms. | |
Freeze Alarm Display | This option allows you to freeze the display so new alarms will not be added to the visible display. Available if Flex SCADA is license and enabled. | -- |
Unfreeze Alarm Display | When the display is frozen, this option will allow new alarms to be added to the active alarms list. Available if Flex SCADA is license and enabled. | -- |
Shelve | Displays a sub‑menu that allows you to pick from the following: • Shelve (One Shot): Sets the selected alarms to be nuisance alarms, removes them from the active alarm list, and places them in the Nuisance Alarm List. The next time the alarm is generated, the alarm is automatically removed from the Nuisance Alarm List, and is returned to the active Alarms list. • Shelve (Continuous): Sets the selected alarms to be nuisance alarms, removes them from the active Alarms list, and places them in the Nuisance Alarm List. The alarm and all future occurrences of the alarm remain in the Nuisance Alarm List until you manually return them to the active Alarms list. | |
Disable Alarm Sounds | Silences the selected alarms. | |
Enable Alarm Sounds | Re-enables alarm sounds. | |
Disable Alarm Sounds for a Specific Duration | Opens a field next that allows you to select a duration for silencing alarms. |
Options Menu
Menu Option | Description | Toolbar Icon |
|---|---|---|
Show All Zones | Display alarms for all zones. | -- |
Show Milliseconds | Toggles the display of time down to milliseconds. | -- |
Help Menu
Menu Option | Description | Toolbar Icon |
|---|---|---|
Help | Opens the online help content. | -- |
Alarm Priority Pane
The Alarms priority pane shows the count of alarms by priority and allows you to filter the Alarms table by selecting or deselecting priorities.
Alarms Table
The Alarms table displays alarm data in rows.
Note: Like other data tables, the Alarms table shows certain columns by default, but you may select the columns to view using standard table functions. See Working with Tables for more information.
• The Child Count (+) column contains the count of the number of child alarms associated with the alarm, if applicable. See Viewing Child Alarms for information.
• The Unacknowledged column contains a bell icon () if the alarm is unacknowledged.
• The Priority column contains the priority associated with the alarm. The priority field's background is filled with the priority's associated color while the alarm is not acknowledged.
• The Alarm Time column contains the time the alarm was generated in the field. For a SCADA alarm, this is the timestamp supplied by the RTU.
• The Class column contains the alarm class associated with the alarm. The alarm classes group alarm types. For example, in the NMS product configuration, alarms generated by an NMS Advanced Distribution Management System application would be in the DMS class.
• The Category column contains the alarm category associated with the alarm. Categories are child groupings of Class. For example, an alarm generated by Fault Location Analysis, would be in the category FLA.
• The Attribute column contains the type of SCADA measurement or System alarm. An ellipsis in the Attribute cell indicates that there is more information available; if you hover over the cell, a tooltip will display all of the unique attributes.
• The Alarm Message column contains the alarm text, which are preconfigured for the alarm class/category. An ellipsis at the beginning of the alarm message indicates that there is more information available; if you hover over the cell, a tooltip will display all of the unique messages. The lines in the tooltip are the unique messages from the alarm and its child alarms. For example, if there are three child alarms and each have unique messages, the tooltip will contain four lines.
•
Note: Other columns are available. See Understanding Column Display Options for information on showing and hiding columns.
Alarms Filters Applied
The Filters Applied pane provides a tree view of the alarm classes and categories. You can deselect nodes in the tree to hide those types of alarms. If you deselect a class, all alarms associated with the class (and its child categories) will be filtered from the table.
The Main Alarm Window
The first alarm window invoked in the Web Workspace is deemed to be the main alarm window. The main alarm window is distinguished from other alarm windows in its title with the text '(Main)'.
Several rules define the behavior of the main alarm window:
• NMS Alarm Allow Main Alarm List Closure: This rule defines whether or not the main alarm window can be closed by the operator.
• NMS Alarms Display Upon New Unack Alarm: This rule defines the behavior of the main alarm window when a new unacknowledged alarm appears in the alarm display. If set to yes then the main alarm window will be raised to the front of your display if it is hidden behind another window when a new unacknowledged alarm appears in the alarm list.
Working with Alarms
Viewing Child Alarms
When the Child Count (+ column) cell contains a number, the alarm has associated child alarms. To view child alarms, click the cell and the child alarms will be displayed in the Child Alarms table. To close the Child Alarms table view, click the close button ().
Note: While viewing child alarms, a new unacknowledged alarm will be indicated with banner text above the Child Alarms for Alarm heading to attract your attention. The banner text will be something like the following.
****** New Unacknowledged Alarms ******
Acknowledging Alarms
To acknowledge an alarm, complete these steps:
1. Select the row of the alarm you want to acknowledge.
2. Click the Acknowledge button ().
Silencing Alarms
To silence an alarm, complete these steps:
1. Select the row of the alarm you want to silence.
2. Click the Silence button ().
• The audio notification for the alarm becomes silent.
• The alarm is still not acknowledged.
Note: To turn audio notifications on or off, select or deselect Audio Enabled, respectively, from the User menu's User Interface Settings submenu. The audio for the entire system (all alarms) will toggle on or off. See Understanding the Web Workspace User Menu for more information.
Disabling Audible Alerts for a Specified Duration
To temporarily disable alarm audible alerts, complete these steps:
1. Click the Disable Alarm Sounds for a Specified Duration button (). Alarm audible alerts will be disabled and a duration text field will be displayed to the right of the button.
2. Enter a silencing duration in the text field.
3. To accept your entered duration, click the Accept button ().
• Alarm audible alerts will be disabled for the specified duration.
• A text notification will appear on the toolbar stating that alarm audible alerts are disabled and provide the time when that the duration will end.
4. To cancel the duration, click the cancel button () to revert.
• Alarm audible alerts are re-enabled.
Canceling Disabled Audible Alerts
To cancel an active disabled alarm audible alerts duration, complete these steps:
1. Click the cancel duration button ().
• The disabled comment on the toolbar disappears.
• Alarm audible alerts are re-enabled.
Clearing Alarms from the List
To remove an alarm, complete these steps:
1. Select the row of the alarm you want to clear.
2. Click the Clear button (). The alarm disappears from the list.
Note: You can remove multiple alarms by selecting multiple rows before you click the Clear button ().
Limiting the Number of Active Alarms in the Alarms List
When the Network Management System is not the primary alarm management system (that is, where alarms are managed in a separate system), an SRS Rule (NMS Alarms Max Active Alarms), is available; it can be used to restrict the number of active alarms in the Alarms List.
Note: This rule must not be enabled when NMS is acting as the primary alarm management system because this would represent a safety issue.
The rule restricts the number of alarms in the Alarms List. If the alarms exceed this number, then the older alarms will be automatically cleared and removed from the active alarms. This rule is only enabled if it has a non-zero value; the default value for this rule is zero so it is disabled by default.
When the rule is enabled, the total number of active alarms, the maximum number allowed, and the percentage are displayed in the top right of the Alarms List. In addition, when this rule is enabled, alarm grouping is disabled.
If this rule is enabled, it is recommended that the behavior of alarms (as defined with the Alarm Definition tab in the Configuration Assistant's Configuration tab) be set to the following values to keep the number of active alarms naturally to a minimum:
• Standing = No
• Ack Outstanding = Yes
Freezing Alarms from the Alarms List
To freeze an alarm, complete these steps:
1. Select the alarm row(s) that you want to freeze.
2. Right click and then select Freeze Alarms from the context menu. The Frozen Alarms tab will open listing the frozen alarms. See Understanding Frozen Alarms for more information.
Understanding Frozen Alarms
The Frozen Alarms list, which is available when Flex SCADA is licensed and enabled, displays the alarms that were set to frozen from an active Alarms list (see Freezing Alarms from the Alarms List for information). The alarms in this list will not be updated by operator or system actions until they are removed from this list.
Frozen Alarm List Menus and Toolbar
File Menu
Menu Option | Description | Toolbar Icon |
|---|---|---|
Toggle Dockable Window | Changes a standalone window to a pane that may be moved or docked in another window or frame. See Understanding Docked Panes and Standalone Window Tools for more information on dockable and standalone windows. | -- |
Exit | Closes the window. | -- |
Sort Menu
The table below describes the options available on the Sort menu.
Menu Option | Description | Toolbar Icon |
|---|---|---|
Sort Dialog... | Opens the Sort Dialog, allowing you to create, modify, apply, and save user-defined sorts. See Using the Sort Dialog Box. | -- |
Default | Applies the default sort. | -- |
Priority | Sort by alarm priority. | -- |
Actions Menu
Menu Option | Description | Toolbar Icon |
|---|---|---|
View... | Focuses the Viewer on the asset associated with the alarm. | |
Acknowledge and Unfreeze | Acknowledges the selected alarms and remove from the Frozen Alarms list. See Acknowledging Alarms for more information. | |
Clear and Unfreeze | Clears the selected alarms and remove it from the Frozen Alarms list. See Clearing Alarms from the List for more information. | |
Unfreeze | Remove the selected alarm from the Freeze Alarm List. | -- |
Options Menu
Menu Option | Description | Toolbar Icon |
|---|---|---|
Show All Zones | Display alarms for all zones. | -- |
Show Milliseconds | Toggles the display of time down to milliseconds. | -- |
Help Menu
Menu Option | Description | Toolbar Icon |
|---|---|---|
Help | Opens the online help content. | -- |
Understanding the Frozen Alarms Table
The Frozen Alarms table displays the following information.
• The Unacknowledged column contains a bell icon () if the alarm is unacknowledged.
• The Priority column contains the priority associated with the alarm. The priority field's background is filled with the priority's associated color while the alarm is not acknowledged.
• The Alarm Time column contains the time the alarm was generated in the field. For a SCADA alarm, this is the timestamp supplied by the RTU.
• The Class column contains the alarm class associated with the alarm. The alarm classes group alarm types. For example, in the NMS product configuration, alarms generated by an NMS Advanced Distribution Management System application would be in the DMS class.
• The Category column contains the alarm category associated with the alarm. Categories are child groupings of Class. For example, an alarm generated by Fault Location Analysis, would be in the category FLA.
• The Lift Station associated with the alarm.
• The Pressure Zone associated with the alarm.
• The Asset associated with the alarm.
• The Attribute column contains the type of SCADA measurement or System alarm. An ellipsis in an Attribute cell indicates that there is more information available; if you hover over the cell, a tooltip will display all of the unique attributes.
• The Alarm Message column contains the alarm text, which are preconfigured for the alarm class/category. An ellipsis at the beginning of the alarm message indicates that there is more information available; if you hover over the cell, a tooltip will display all of the unique messages. The lines in the tooltip are the unique messages from the alarm and its child alarms. For example, if there are three child alarms and each have unique messages, the tooltip will contain four lines.
Note: Other columns are available. See Understanding Column Display Options for information on showing and hiding columns.
Understanding the Abnormal Assets List
Abnormal Assets displays all assets that are not in their nominal state. For example, if a valve that is nominally closed is currently open, it will display in the Abnormal Asset Summary. If a SCADA system is integrated with Oracle Utilities Network Management System, any assets that are reported by a SCADA point as being in an off-nominal state will also display. This will also display any main breaks.
To access the Abnormal Asset Summary, select Alarms and Assets Lists and then Abnormal Asset Summary… from the Web Workspace Tools menu.
The Abnormal Assets List displays the following fields:
• The Alarm Time column contains the date and time when the abnormal condition occurred.
• The Lift Station column contains the name of the lift station that serves the abnormal asset.
• The Pressure Zone column contains the name of the pressure zone that serves the abnormal asset.
• The Asset column contains the name of the abnormal asset.
• The Attribute column contains information about the abnormal condition. For example,
• The Alarm Message column contains a description of the operation that caused the abnormal state.
•
Understanding the Alarm History List
The Alarm History list shows all alarms that have been generated over a selected period of time. The Alarm History list does not condense related alarms so every alarm will be displayed as a row in the table. In addition, operator initiated actions in response to an alarm will be displayed in the Alarm History, but will not be displayed in the Alarms list since an operator does not need to be notified of their own actions.
• The Unacknowledged column contains a bell icon () if the alarm is unacknowledged.
• The Priority column contains the priority associated with the alarm. The priority field's background is filled with the priority's associated color while the alarm is not acknowledged.
• The Alarm Time column contains the time the alarm was generated in the field.
• The Class column contains the alarm class associated with the alarm.
• The Category column contains the alarm category associated with the alarm.
• The Attribute column contains the type of SCADA measurement or System alarm.
• The Alarm Message column contains the alarm text, which are preconfigured for the alarm class/category.
•
Note: Other columns are available. See Understanding Column Display Options for information on showing and hiding columns.
Understanding Alarm History Global Filters
The Alarm History provides four global filters.
• In the Last Day: Filters the alarm history on alarms generated in the last day.
• In the Last Hour: Filters the alarm history on alarms generated in the last hour. This view is opened by default by selecting Alarm History... from the Alarms Displays submenu of the Web Workspace Tools menu.
• In the Last Week: Filters the alarm history on alarms generated in the last week.
• Operation History: Filters the alarm history on device operation alarms generated in the last week. This view is opened by default by selecting Device Operations History... from the Alarms Displays submenu of the Web Workspace Tools menu.
Understanding Alarm Shelving
Note: Alarm Shelving is an optional feature under the Flex SCADA license.
Under different scenarios, the alarm display may have many more alarms displayed than typical. For example, under storm conditions or when instructed to reduce voltage by a transmission operator, a larger number of alarms around limits or reduced voltage may be raised. While expected, these additional alarms may obscure more serious alarms that indicate issues within the system. Alarm Shelving allows you to temporarily suppress different classes/types of alarms, and enable you to concentrate on higher priority issues.
To display the Alarm Shelving Event list select Alarm Shelving… from the Web Workspace Tools menu or the Alarm Lists View menu.
Alarm Shelving Events Menus and Toolbar
File Menu
Menu Option | Description | Toolbar Icon |
|---|---|---|
Toggle Dockable Window | Changes a standalone window to a pane that may be moved or docked in another window or frame. See Understanding Docked Panes and Standalone Window Tools for more information on dockable and standalone windows. | -- |
Exit | Closes the window. | -- |
Actions Menu
Menu Option | Description | Toolbar Icon |
|---|---|---|
Create Event... | Opens the Create Shelving Event dialog box to allow a new shelving event to be created. See Understanding the Create Shelving Event Dialog Box for more information. | |
Extend Event... | Opens the Extend Shelving Event dialog box to allow you to extend the duration of a current shelving event. See Understanding the Extend Shelving Event Dialog Box for more information. | |
Unshelve Event | Cancels the selected shelving event and returns all shelved alarms associated with the event back to the Alarm List. | |
View Executions... | Opens the Alarm Shelve Group Executions tab that provides an audit of who created the event and who extended the duration of the event. See Understanding the Alarm Shelve Group Executions Tab for more information. | -- |
The Alarm Shelving Events Table
The Alarm Shelving Events table displays shelving events in rows.
• Zone Name: The name of the zone that the shelving is applied to, or Global if the event is covering all zones.
• Group Name: The name of the shelving group associated with the event.
• Start Time: The time the shelving event was created.
• End Time: The current end time of the shelving event. Once this time is reached the system will automatically end the shelving event and unshelve the alarms.
• Shelve User: The operator who created the shelving event.
• Reason: The current reason for shelving the alarms.
• Comment: The current operator comment.
• Extend Time: The last time the event duration was extended.
• Extend Count: The number of times the event has been extended.
• Extend User: The operator who last extended the event duration.
Understanding the Create Shelving Event Dialog Box
The Create Shelving Event dialog box provides a wizard for creating a new shelving event.
Buttons
• Back: Move the wizard to the previous step.
• Next: Move the wizard to the next step.
• OK: Create the event and close the dialog box.
• Cancel: Cancel the Create Event action and close the dialog box.
• Help…: Opens the online help content for the dialog box.
Wizard Steps
The wizard is made up of four steps.
1. Select Zone: Allows you to select the zone coverage for the event. There are two options are available:
• All zones: The event will cover all zones.
• Selected zones: The event will cover selected zones. Selecting this option displays a hierarchical zone tree. Select a zone in the tree to continue.
2. Select Shelving Group: Select the shelving group from the drop‑down list.
3. Duration, Reason, and Comment:
• Duration: Select the duration for the event from the drop‑down list.
• Reason: Select the reason for the event from the drop‑down list.
• Comment: Enter an operator comment for the event in the text field. Note: The comment may be mandatory if the shelving group is configured to require mandatory comments.
4. Summary: A summary of the choices made to create the shelving group:
• Zone Name
• Shelving Group
• Duration
• Reason
• Comment
Understanding the Extend Shelving Event Dialog Box
The Extend Shelving Event dialog box allows you to extend the duration of a selected shelving event. The dialog box contains the following fields:
• Duration: Select the new duration for the event from the drop‑down list.
• Comment: Enter an operator comment for the event in the text field.
• Reason: Select the reason for extending the event from the drop‑down list.
Buttons
• OK: Extend the event and close the dialog box.
• Cancel: Cancel the Extend Event action and close the dialog box.
• Help…: Opens the online help content for the dialog box.
Understanding the Alarm Shelve Group Executions Tab
The Alarm Shelve Group Executions tab displays a list of executions for the selected event. An execution exists for the creation of the event and one additional execution is present for each extension of the duration.
The Execution table displays an execution per row:
• Reason: The reason for the execution.
• Start Time: The start time of this execution.
• End Time: The end time of this execution.
• Comment: The comment associated with the execution.
• Extend User: The name of the operator who created or extended the event.
Understanding Nuisance Alarms
Note: Nuisance Alarms is an optional feature under the Flex SCADA license.
The Nuisance Alarm List displays a list of alarms that can be defined into two categories:
• Long Standing: An alarm that remains in the Alarms List for a long period of time; for example a tripped open alarm for a switch that is now under maintenance and will remain open for the foreseeable future.
• Repeat Alarms: An alarm that repeatedly occurs over time; for example a poorly configured analog limit alarm that continues to move between limit bands.
You can now select an alarm in the Alarms List or Alarm History and select to shelve it to the Nuisance Alarm List.
The alarm can be shelved to the Nuisance Alarm List in one of two ways:
• One Shot: The alarm is removed from the Alarm List and moved to the Nuisance Alarm List and stays there until the next occurrence of the alarm at which point the latest occurrence is moved back to the Alarms List. This is typically applied to long standing alarms.
• Continuous: The alarm is removed from the Alarms List and moved to the Nuisance Alarm List. Any new occurrence of the alarm will be displayed in the Nuisance Alarm List until you elect to unshelve the alarm and return it to the Alarm List.
To display the Nuisance Alarm List, select Nuisance Alarms… from either the Alarms List or Alarm History View menus.
Nuisance Alarm List Menus and Toolbar
File Menu
Menu Option | Description | Toolbar Icon |
|---|---|---|
Toggle Dockable Window | Changes a standalone window to a pane that may be moved or docked in another window or frame. See Understanding Docked Panes and Standalone Window Tools for more information on dockable and standalone windows. | -- |
Exit | Closes the window. | -- |
Sort Menu
The table below describes the options available on the Sort menu.
Menu Option | Description | Toolbar Icon |
|---|---|---|
Sort Dialog... | Opens the Sort Dialog, allowing you to create, modify, apply, and save user-defined sorts. See Using the Sort Dialog Box. | -- |
Default | Applies the default sort. | -- |
Priority | Sort by alarm priority. | -- |
Actions Menu
Menu Option | Description | Toolbar Icon |
|---|---|---|
View... | Focuses the Viewer on the asset associated with the alarm. | |
Unshelve | Remove the selected alarm from the Nuisance Alarm List and return it to the active Alarms List. | -- |
Options Menu
Menu Option | Description | Toolbar Icon |
|---|---|---|
Show All Zones | Display alarms for all zones. | -- |
Show Milliseconds | Toggles the display of time down to milliseconds. | -- |
Help Menu
Menu Option | Description | Toolbar Icon |
|---|---|---|
Nuisance Alarm List Help | Opens the online help content. | -- |
The Nuisance Alarm List Table
• The Unacknowledged column contains a bell icon () if the alarm is unacknowledged.
• The Priority column contains the priority associated with the alarm. The priority field's background is filled with the priority's associated color while the alarm is not acknowledged.
• The Alarm Time column contains the time the alarm was generated in the field. For a SCADA alarm, this is the timestamp supplied by the RTU.
• The Class column contains the alarm class associated with the alarm. The alarm classes group alarm types. For example, in the NMS product configuration, alarms generated by an NMS Advanced Distribution Management System application would be in the DMS class.
• The Category column contains the alarm category associated with the alarm. Categories are child groupings of Class. For example, an alarm generated by
• Fault Location Analysis, would be in the category FLA.
• The Substation associated with the alarm.
• The Feeder associated with the alarm.
• The Device associated with the alarm.
• The Attribute column contains the type of SCADA measurement or System alarm. An ellipsis in the Attribute cell indicates that there is more information available; if you hover over the cell, a tooltip will display all of the unique attributes.
• The Alarm Message column contains the alarm text, which are preconfigured for the alarm class/category. An ellipsis at the beginning of the alarm message indicates that there is more information available; if you hover over the cell, a tooltip will display all of the unique messages. The lines in the tooltip are the unique messages from the alarm and its child alarms. For example, if there are three child alarms and each have unique messages, the tooltip will contain four lines.
• The Phases column contains the phases applicable to the alarm.
• The Phases Present column contains the device's phases whether involved in the alarm condition or not.
Note: Other columns are available. See Understanding Column Display Options for information on showing and hiding columns.