Working with Tables
Selecting and Deselecting Rows
Many tables in Oracle Utilities Network Management System applications and tools allow multiple rows to be selected for a subsequent action, such as acknowledging new events in the Work Agenda.
Selecting a Single Row
To select a row, click anywhere in the row; the row will change to the selected highlight color.
Selecting Contiguous Rows
To select contiguous rows, click the first row, press Shift, and then click the last row to select the anchors and all rows in between.
Selecting Noncontiguous Rows
To select noncontiguous rows, select the first row, press Ctrl, and then click each additional row.
Deselecting Rows
To deselect a row, press Ctrl and then click any cell in the row. The highlight color will be removed. Note that the cell may have a highlighted border, but it is not in a selected state.
Understanding Column Display Options
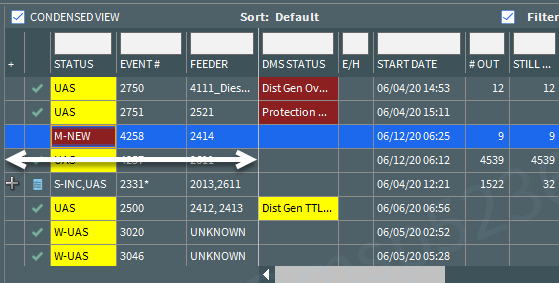
Tables may have the option to hide/unhide columns and to unlock columns that are set to be shown even when scrolling to the right. For example, in the image below, the first five columns are locked, and the horizontal scroll bar starts in the next column.

Displaying Columns
Table columns can be hidden or unhidden by right-clicking the table header and selecting Select Columns... from the context menu. The dialog box displays all columns and you may show or hide columns by selecting or deselecting the check box, respectively.
Unlocking and Locking Columns
Locked table columns may be unlocked by right-clicking the table header and selecting Unlock Columns from the context menu. To lock columns, right-click the table header of the column you want to be the rightmost locked columns.
Exporting and Copying Table Data
Table data can be exported as a CSV file or copied to the clipboard to paste in another application. These options are grouped in the File menu's Export submenu in tools that have table data.
Export Menu Options
• Copy (Default Action): Selecting this option or pressing Ctrl+C copies the data using the default copy action, and opens a panel below the visible table data that allows you to modify the copy setting for the current copy or change the default copy action.
The panel contains radio buttons to select a copy action and has a check‑box that allows you to change the default copy action for your current session.
Note: The default copy action will be selected when the panel opens.
• Cell: Copies the currently selected cell. If multiple rows are selected, it will return the cell for each selected row.
• Column: Copies the entire column (without column headers).
• Rows: Copies the selected rows.
• All Rows: Copies all rows (without column headers).
• Rows+Headers: Copies the selected rows including the column headers.
• All Rows+Headers: Copies the entire table including headers.
• Make Default: Selecting this check‑box before selecting one of the copy action radio buttons will change the default copy action for the table for future copies during the current session.
Notes:
• If you select a radio button prior to selecting the check‑box, the panel will close. Your desired default copy action can be saved as part of user preferences (see Saving and Restoring Workspace Preferences).
• The copy actions are also available directly from the Export menu in options following Copy (Default Action).
• Export Table...: Opens the Export Table dialog box, which allows you to save the table data to a comma separated value (csv) file.
Understanding Table Cell Tooltips
If a table cell’s content is truncated, you may hover your mouse over the cell to see the full value.