Understanding the Event Details Page - Full Operations User Type
The Edit Event Page may be comprised of up to six tabs, depending on the event type. This section includes the following topics.
Understanding the Event Info Tab

The Event Info tab will contain the following editable options:
• A Non-Outage Event check box, if selected, sets the event to a non-outage.
• An Estimated Restoration Time field to edit the ERT.
• An Actual Restoration Time field to edit the restoration time.
• An Enter New Event Note Here field to add an event note.
• Show Related Events icon () will identify the number of related events and, when tapped, will display a panel of the related events and allow you to edit one of them.
• A Save icon ( ) to save the changes.
) to save the changes.• A Complete icon ( ) to save the changes and complete the event.
) to save the changes and complete the event.• A Refresh icon ( ) to reload the page with the latest data. The refresh icon turns red if there are available updates that have not been displayed.Related Events Panel
) to reload the page with the latest data. The refresh icon turns red if there are available updates that have not been displayed.Related Events PanelRelated Events Panel
The related events panel will list details about events that are related to the event being edited. Use the edit icon ( ) to switch the editing event.
) to switch the editing event.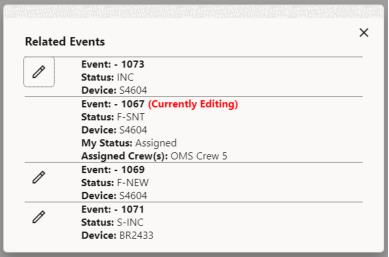
Understanding the Calls Tab
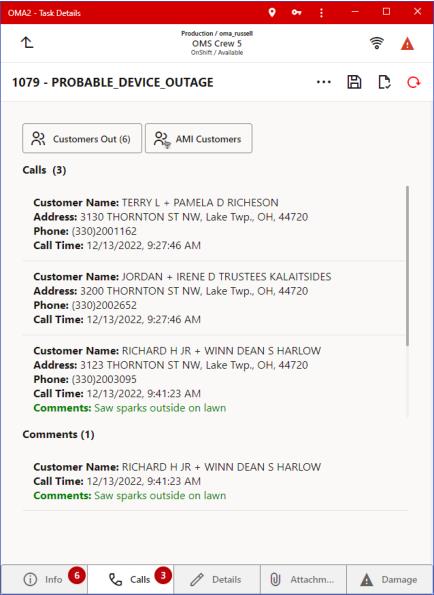
The Calls tab lists calls for the outage or non-outage event. This contains the following options for the selected row.
•  : Focus the Map on the customer or customer’s supply point.
: Focus the Map on the customer or customer’s supply point.•  : Get directions to the customer's supply point using the device's native navigation app to assist you in driving to the call location.
: Get directions to the customer's supply point using the device's native navigation app to assist you in driving to the call location.•  : View a list of the customers affected by this event.
: View a list of the customers affected by this event.•  : View a list of the smart meters customers affected by this event.
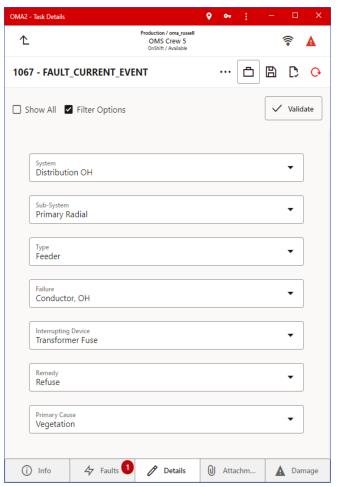
: View a list of the smart meters customers affected by this event.Understanding the Faults Tab

The Faults tab lists probable fault locations for the fault event. For the selected row you can.
• Focus the Map  on the fault location.
on the fault location.• Get directions  to the fault location, using the device’s native navigation app to assist you in driving to the fault location.
to the fault location, using the device’s native navigation app to assist you in driving to the fault location.• Mark the fault location as confirmed  or incorrect
  , depending on the status of the fault location.
or incorrect , depending on the status of the fault location.• View a list of the customers  affected by this event.
affected by this event.• View a list of the smart meters customers  affected by this event
affected by this eventUnderstanding the Details Tab
The Details tab allows you to enter completion details for the event and, optionally, complete the event. When you tap the Complete icon ( ), the system will verify that you have all of the completion requirements satisfied before submitting to the server; if you are missing required data, the Details page will highlight any fields that are missing data.
), the system will verify that you have all of the completion requirements satisfied before submitting to the server; if you are missing required data, the Details page will highlight any fields that are missing data.Understanding the Damage Tab
The Damage page contains list of damage assessments for the event.
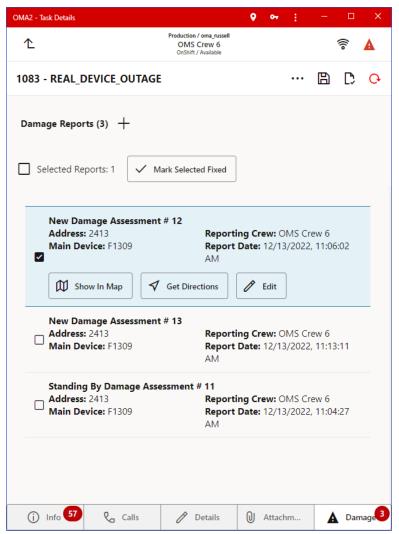
Each damage assessment is displayed as a card containing the following information:
• Damage assessment state and identifier; for example, in the screen capture above, the state is 'Assessed' and the identifier is 'Damage Assessment #1'.
• Address: The address where the damage is.
• Main Device: The main damaged device.
• Report Date: The damage assessment date and time.
Each card can contain several buttons for the available actions (some buttons can be hidden if the action is not applicable):
• Show in Map () switches to Map tab and focuses map on the damage assessment location.
) switches to Map tab and focuses map on the damage assessment location.• Navigate () opens damage assessment location in external mapping application (for example, Google Maps).
) opens damage assessment location in external mapping application (for example, Google Maps).• Edit () opens Damage Assessment page for this damage assessment.
• The Add Damage Assessment button () allows you to enter new damage assessment for the event.
Editing Damage Assessments
The Damage Assessment page allows you to create, edit, and view damage assessments.
The page header contains damage assessment identifier and buttons to save () and reload () damage assessments from the Network Management System server.
The Damage Assessment page provides five tabs which allow you to access different damage assessment details; Info, Crews, Assets, Attachments, and Map.
Using the Damage Assessment Info Tab
The Info tab contains general damage assessment information.
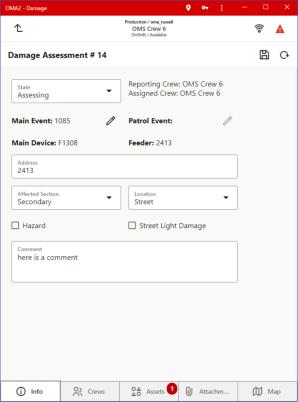
The Damage Assessment Info tab provides the following information:
• State: Allows you to select the state of the Damage Assessment (Assessed, Standing By, Obsolete, and Fixed).
• Reporting Crew: The name of the crew that reported the damage.
• Assigned Crew: The name of the crew that is assigned to perform the damage assessment.
• Main Event: The event associated with the main damaged asset. Tap the edit button to open the Event Details page (if it is assigned to you).
• Patrol Event: The patrol event associated with this damage assessment. Tap the edit button to open the patrol event (if it is assigned to you).
• Main Device: The main damaged device.
• Address: Allows you to enter the address where the damage is.
• Feeder: The feeder where damage is located.
• Affected Section: Allows you to select the affected section of the electrical network.
• Location: Allows you to select the damage location.
• Hazard: Allows you to select whether damage is hazardous.
• Street Light Damage: Allows you to select whether street light damage has occurred.
• Comment: Allows you to enter comments.
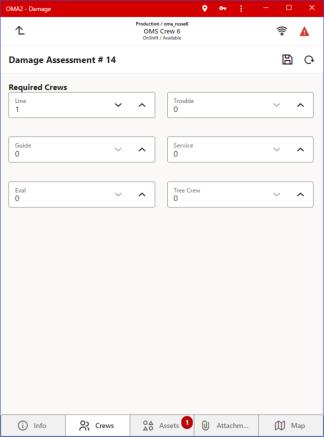
Using the Crews Tab
The Damage Assessment Crews tab allows you to identify the type and number of crews needed to repair the damage.
Using the Assets Tab
The Damage Assessment Assets tab allows you to view, modify, add, and delete assets that are part of the damage assessment. Each damage assessment contains one main damaged asset. It can be identified by underscored text (typically it is the first listed asset).

Each damaged asset is displayed as a cards that contains the following information:
• Event #: The event associated with the asset.
• Asset Type: The damaged asset type.
• Device: The damaged device (only for modeled asset).
• Affected Phases: The affected phases.
• Status: The asset status (Open, Closed, N/A).
• Condition: The asset condition.
• Size: The asset size (for example, pole length or fuse rating).
• Quantity: The number of damaged assets (always 1 for modeled assets).
• Repair Time: The repair time in hours and minutes.
• Truck Accessible: Whether the asset location is truck accessible.
Each card can contain several buttons for the available actions (some buttons can be hidden is action in not applicable):
• Map () switches to Map tab and focuses map on the damaged asset location.
) switches to Map tab and focuses map on the damaged asset location.• Navigate () opens damaged asset location in external mapping application (for example, Google Maps)
) opens damaged asset location in external mapping application (for example, Google Maps)• Edit () opens Damaged Asset dialog
) opens Damaged Asset dialog• Delete ( ) marks asset for deletion. Assets marked for deletion are crossed out
) marks asset for deletion. Assets marked for deletion are crossed out• Make Main Asset ( ) makes asset the main damaged asset for the damage assessment
) makes asset the main damaged asset for the damage assessment• The Add Map Selected Features button () switches to the Map, and allows you to select an object on the Map as a damaged asset.
• Asset Type: Allows you to select the damaged asset’s type, such as
• Transformer.
• Status: Allows you to select whether the device is Open or Closed, if applicable.
• Condition: Allows you to select from a list of possible conditions applicable to the device (for example, Damaged, Down, and so on).
• Phases Affected: Allows you to select the phases affected by the damage, if applicable.
• Size: Allows you to enter the asset size. The meaning of size differs depending on the asset type. For example, for a pole, size can be length of the pole in feet, for a fuse, it can be rated current in amps, and so forth.
• Quantity: Allows you to enter the number of instances of the damaged asset.
• Truck Accessible: Toggle button allows you to indicate whether the damage location is truck-accessible.
• Create Separate Event: Toggle button allows you to create a separate event for this damaged asset.
• Repair Time: Allows you to enter the time needed to repair the damaged asset.
• Latitude/Longitude: Allows you to set the damaged asset location from your current location or the last selected location.
• Comments: Allows you to enter a comment with other information about the damaged asset.
• The Add Map Selected Features button ( ) allows you to add objects selected on the map as damaged assets. To do this, navigate to the Map tab, select one or more objects on the map, navigate back to the Assets tab, and then tap the Add assets selected on the map button.
) allows you to add objects selected on the map as damaged assets. To do this, navigate to the Map tab, select one or more objects on the map, navigate back to the Assets tab, and then tap the Add assets selected on the map button.Using the Attachments Tab
The Attachments tab allows you to view, add, and delete attachments to the damage assessment. There are two types of attachments: file attachments and link attachments (contain URL of attachment stored elsewhere).
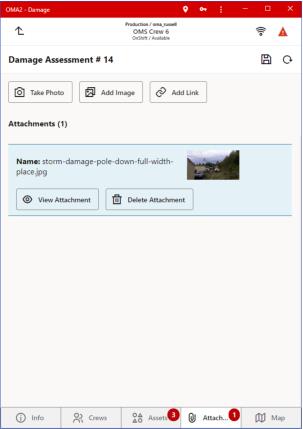
Each attachment is displayed as a cards that contains the following information:
• Name: Attachment name.
• URL: Attachment URL (only for link attachments).
• Description: Attachment description.
For image attachments thumbnail is displayed on the right side of the card.
Each card contains the following buttons:
• View (  ) opens the attachment. Link attachments are opened in web browser and file attachments are opened in the application associated with the file type
) opens the attachment. Link attachments are opened in web browser and file attachments are opened in the application associated with the file type• Delete ( ) marks attachment for deletion. Attachments marked for deletion are crossed out
) marks attachment for deletion. Attachments marked for deletion are crossed out• The Take Picture button ( ) allows you to take a picture using mobile device built-in camera and add it as an attachment.
) allows you to take a picture using mobile device built-in camera and add it as an attachment.• The Add Image button (  ) allows you to select a file from mobile device picture gallery and add it as an attachment.
) allows you to select a file from mobile device picture gallery and add it as an attachment.• The Add Link (  ) button opens the New Link dialog which allows you to add new link attachment.
) button opens the New Link dialog which allows you to add new link attachment.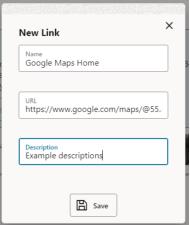
Using the Map Tab
The Damage Assessments Map tab is a convenient way to navigate to the Map page.