Managing Outage Events
Managing outage events requires interaction between the Events list, Crews list, Event Details, and the Map. The rest of this section explains these tools and provides procedures for performing actions in the Flex Operations client. All of the actions may be performed in the NMS Web Workspace with Switching client and have been described in detail in the relevant chapters (Managing Events with Web Trouble Management, Managing Crews with Web Trouble Management, and Web Switching Management). The focus of this chapter is on taking advantage of the unique features that Flex Operations offers.
Working with the Events and Crews Tool
Events and Crews are displayed together (in a tab view) because of their close association when managing outages.
Note: You can change the relative height of the Events and Crews panes by dragging the separator bar up or down.
The columns in the Events pane and in the Crews pane are the same as the Web Workspace Work Agenda and Crew Actions List View, respectively.
• Common outage management procedures are documented in Chapter 3, Managing Events with Web Trouble Management.
Viewing Events and Crews
The Events and Crews tab is displayed by default, but may be closed. If you want to open it again, select Events and Crews from the Tool Selector ( ). Events, such as outages, are displayed in the Events pane; crews are displayed in your Crews pane.
Notes:
• You only see events and crews in control zones that you have subscribed to.
• Right-click an event row to see the actions available for the event.
• Double-click an event row to view its Event Details page.
Understanding Common Events and Crews Page Controls
Icons in the Events and Crews panes' title bars allow you to control the position and display of the panes.

1. Pop Out: Pop the Events and Crews tab out to a separate browser tab/window.
2. Side‑By‑Side Orientation: rearranges the Events and Crews panes to be side‑by‑side. Once the panes are side‑by‑side, the icon will change to a square divided horizontally to indicate that you may switch the pane orientation to Events on top of Crews.
3. Minimize Pane: Click to minimize the pane to its title bar, which will maximize the other pane. When a pane is minimized, you can display it temporarily by clicking the title bar. The button will change to a Restore button ( ); click the Restore button to restore the pane to its previous layout.
 ); click the Restore button to restore the pane to its previous layout.
4. Maximize Pane: Click to maximize the pane, which will minimize the other pane. Alternatively, you can double-click the title bar to maximize it. The button will change to a Restore button ( ); click the Restore button to restore the pane to its previous layout.
 ); click the Restore button to restore the pane to its previous layout.
5. Close Events and Crews Tab ( ): Click to close the pane.
 ): Click to close the pane.
Note: These pane controls are also available when viewing a safety document associated with a switching sheet.
Viewing Event Notifications
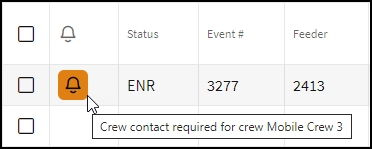
In the Events List, the Notifications column displays an icon ( ) whenever a new notification related to the event is generated. You may perform the following actions with notifications.
• Mouse over the icon to see the notification text. If more than one notification is associated with the event, each message is displayed on a new line in the tooltip.

• Clear the notification by right clicking on the row and selecting Clear Notifications.
• Click the Notification button ( ), which is to the right of the Actions menu, to filter on all events in the current filtered view that have uncleared notifications.
Working with the Events Condensed View
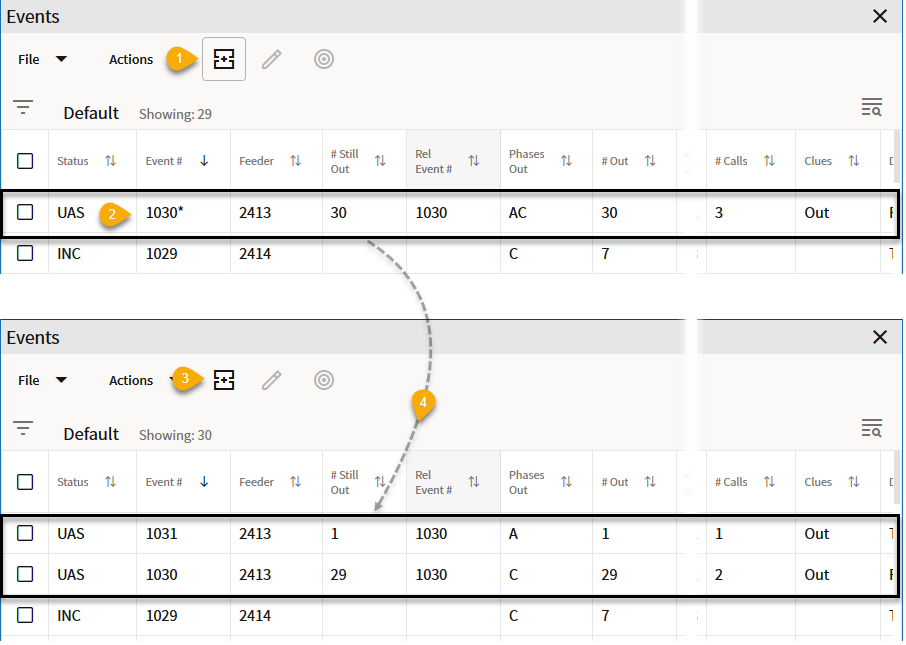
The Condensed View shows only the lead event among related events. The lead event is displayed with an asterisk (*) following the Event #. Condensed View is activated by clicking the Condensed View icon ( ). Once Condensed View has been enabled, the icon is displayed inside a box.
In the following example, two events have been related. In the upper half, the Condensed View is enabled (1), only the lead event is shown, and it has an asterisk next to its Event # (2). After the Condensed View is toggled off (bottom half), the icon changes to the unselected Condensed View (3), and both events are displayed separately.
In the Condensed View, the lead event summarizes the conditions in all grouped and/or related events. For example, Phases Out shows that both the A and C phases are out, but once the related events are shown individually, you can see that Event 1030 is for a C phase outage, while Event 1031 is an A phase outage.

For more information on grouping and relating events, see Understanding Event Grouping.
View an Outage Event on the Map
To view the location of an outage event on the Map, select an event then click the Focus button ( ). The Map displays as a new tab in your browser, but, if desired, you can detach it and display side-by-side with your Events and Crews tool.
When enabled, the Map’s Selection panel provides the actions available on a selected device.
Note: For information on using the Flex Operations Map see the Working with the Map.
Filtering the Crews List
The Crews pane provides filter criteria that you may select to define crews to display. The filter criteria are arranged in groups. Click on each group to display and select the combination of filter criteria you require:
• Zones
• Zone Filtering Enabled: When selected, only displays Crews in the zones you are subscribed to. Deselect this option to display Crews for all zones.
• Include Crews from Parent Zones: When selected, includes Crews in zones higher up the Zone hierarchy. (This option is only available when Zone Filtering Enabled is selected.
• Event Zone Filtering: Only enabled when Zone Filtering is Enabled, displays crews based on the currently selected event(s) in the Event List:
• Off: Does not filter the Crew List based on the currently selected event(s)
• Region: Filters the Crew List based on the region(s) for the currently selected event(s).
• Branch: Filters the Crew List based on the branch(es) for the currently selected event(s).
• Other levels in the hierarchy may be available.
• Crew Type
• Show Crews Matching Event Work Queues - when selected, filters the Crew Type based on the selected events' Work Queue(s).
• Shift Status
• Filter on a combination of Shift Status(es).
• Event Status
• Filter on a combination of Event Status(es).
Note that as you apply Crew filter options, the filters are summarized in the Filter breadcrumb above the table heading row:

When you hover your mouse over the breadcrumbs, the filter criteria will be highlighted and a selector will allow you to remove that criteria by deselecting.
Assign a Crew to an Event
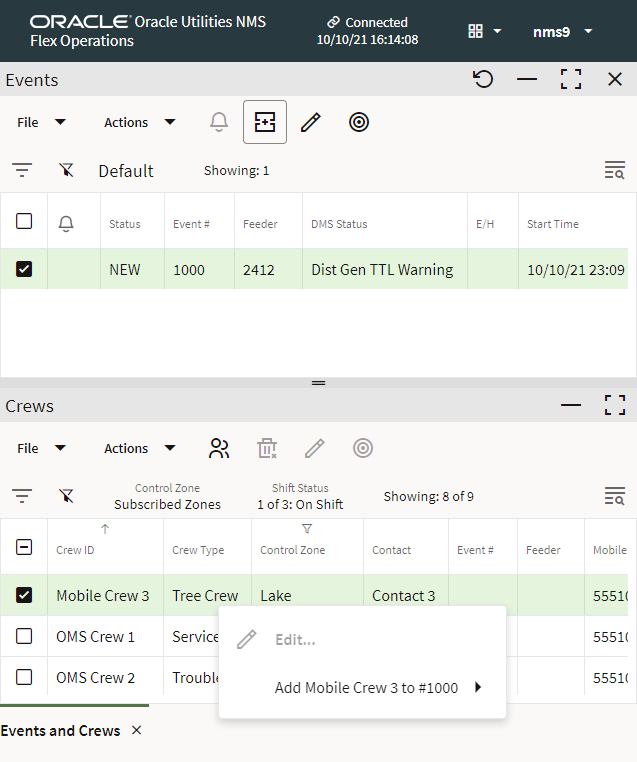
Crew Assignment is managed in the Events and Crews tool.
1. Select an unassigned event in the Event pane.
2. Select a crew in the Crews pane.
3. Right-click the crew row, and select the option to assign the crew to the event.

Progressing Crew Status
After a crew is assigned to an event, you can record crew status updates:
• Right-click the crew or the event row and click En Route ( ) to mark the selected Crew as En Route.
 ) to mark the selected Crew as En Route.
• Right-click the crew or the event row and click Onsite ( ) to mark the selected crew as onsite
 ) to mark the selected crew as onsite
Other Crew Status updates include:
• Suspend: Marks the crew as Suspended.
• Off Site: Marks the crew as off site.
•  Availability...: Allows you to mark the crew as available or unavailable.
 Availability...: Allows you to mark the crew as available or unavailable.
• Release from all Events: Released the selected crew from all events. This option is only enabled when a single crew is selected.
•  Release: Removes the crew from the selected event.
 Release: Removes the crew from the selected event.
Confirming an Outage Event
When the crew arrives onsite, they can confirm the outage device. The system predicts the location of the outage based on customer calls, but sometimes the prediction is incorrect.
When the Prediction is Correct
To confirm the outage from the Events and Crews tool's Events table, do the following:
1. Select the event.
2. Right-click and select Confirm Outages... from the Confirm/Restore Outage context menu option.
3. In the Confirm Outages dialog box, confirm whether it was a service outage or secondary outage.
To confirm the outage at the predicted location on the Map, do the following:
1. Select the device in the Map.
2. In the Map’s Selection panel, choose Open from the Operate menu.
3. In the Operate Device dialog box, view the conditions, and then click the Open [device] button.
Upon opening the device, the event status changes from Predicted to Real/Confirmed.
When the Operated Device is Upstream from the Predicted Device
To confirm a predicted outage is further upstream, you can move the prediction upstream either from the Map or the Event List.
To Repredict Upstream from the Event List
1. Click on the Event and choose Repredict Upstream. This extends the predicted extent of the outage to the next protection device upstream.
To Repredict Upstream from the Map
1. Click on the currently predicted device, and then, from the Map's Selection List, select the device you clicked on.
2. Select Repredict and then select Repredict Upstream. This extends the predicted extent of the outage to the next protection device upstream.
Another option is to navigate the Map to the outage device, and operate that device. Any predicted outages downstream of the device will be subsumed into the confirmed outage you create.