Using Call Entry
The Flex Operations Call Entry tool allows authorized users to enter call information to create events. The Call Entry tool's primary user type is the Flex Call Taker. Logging in as the Flex Call Taker user type displays the Call Entry page and provides Map access from the Tool selector.
Notes:
• The Call Entry tool is also available in the Flex Operations Tool selector for Flex Full Operations plus Switching and Flex Full Operations users.
• Call Entry provides the functionality of the legacy Web Call Entry application in the Flex Operations framework. See Web Call Entry for additional details on call entry functionality.
The main Call Entry page is comprised of two main panels and their sub-components.
1. Search
2. Request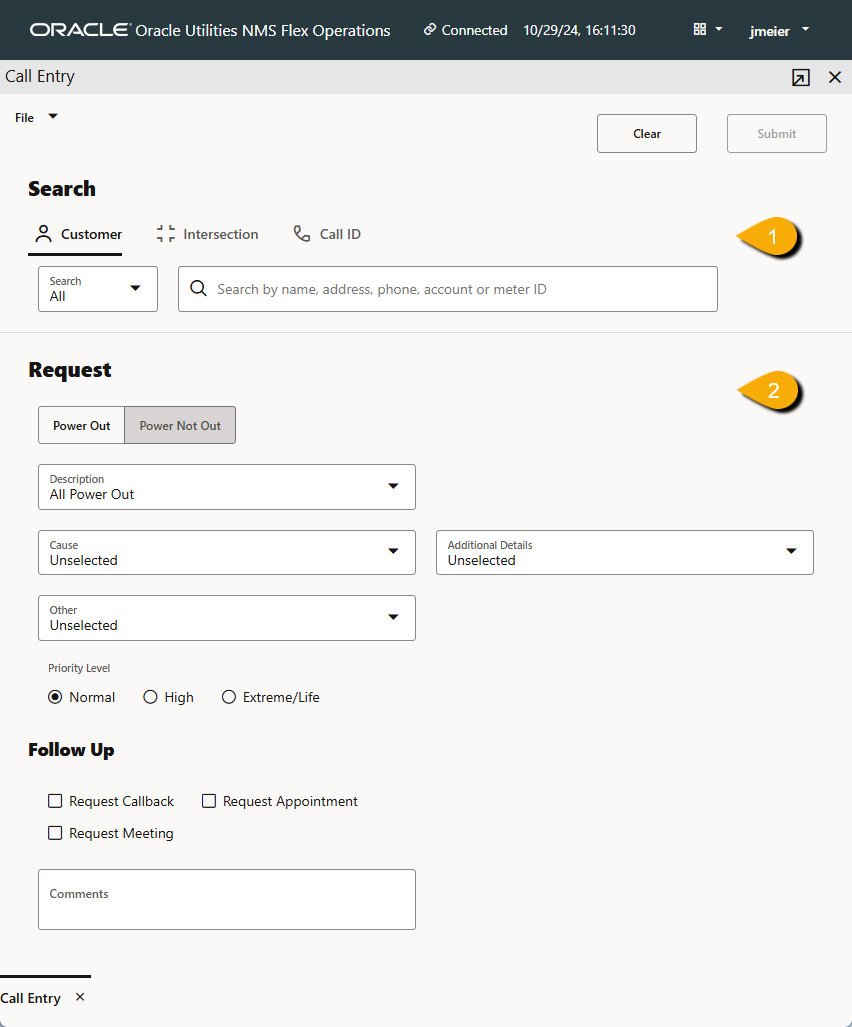
Using Search
Search contains three search by options.
1. Customer: Allows you to search by customer data such as name, address, account number, and meter ID.
2. Intersection: Allows you to search by street name or intersection by listing the two streets separated by an ampersand (&).
3. Call ID: Allows you to search by a submitted call's ID.
Notes:
• You need to add at least four characters for the search suggestion to be populated.
• In the Customer, Intersection, and Call ID searches, if multiple possible values are returned, you will see a minimum of one to a maximum of 100 entries by default. For Customer and Intersection searches, the first suggestion will always be Submit Fuzzy Call (see Entering a Fuzzy Call for more information).
• If you select Submit Fuzzy Call, a Create Fuzzy Call dialog box opens that allows you to enter the information needed to create the fuzzy call.
Working with Customer Search Results
Once you've selected a customer from the search results, the page will refresh with a Selected Customer section. It provides top level information about the customer and allows you to view more customer information by clicking the View Customer Details button to open the Customer Details Drawer (see Viewing Customer Call and Event History for details on the drawer).
If the selected customer has one or more active events, the Call Entry page will update with an Events pane that lists the event(s) and allows you to view additional event information in an Event ID Drawer.
Working with Intersection Search Results
Once you've selected a intersection from the search results, the page will refresh with a Selected Intersection section. It provides top level information about the intersection and allows you to view more customer information by clicking the View Customer Details button to open the Customer Details Drawer (see Viewing Customer Call and Event History for details on the drawer).
If the selected intersection has one or more active events, the Call Entry page will update with an Events pane that lists the event(s) and allows you to view additional event information in an Event ID Drawer.
Searching by Call ID
The results from a search by Call ID shows the Call ID, the customer name, status, and date. When you select the results, a Call ID drawer opens with call details. From the drawer, you may update/add a comment, cancel the call (if available for the call as per call status), and Duplicate & Create New Call.
Understanding the Call Entry Request
The Request section contains drop‑down lists that allow you to enter clues and other data about the event. The selections available are configured to meet your company's criteria; for example, whether individual service is completely or partially or if the area is out.
The Follow Up section allows you to set whether the caller wish to have a callback, appointment, or meeting for the event. You can also add comments.

Submitting a Call
Once the search criteria has been found and any Request section data has been added, you can submit the call by clicking the Submit button.
Resetting Call Entry
If you wish to reset the form to its state prior to searching and/or adding Request information, you can click the Clear button.