Command Line Utilities
Oracle Utilities Smart Grid Gateway includes several command scripts to aid with its configuration and operation. This section provides information about these utilities.
bedit - Batch Edit
Note: The splenviron.sh utility must be executed before this utility can be used. See splenviron – Set Environment Variables for details.
Note: This facility is only available if Enable Batch Edit is set to true in the installation.
To simplify the configuration of batch a new administration facility has been introduced. The bedit.sh is provided to guide the administrator through the cluster, threadpool and submitter configuration process using templates.
Command Usage:
bedit.sh [-h] [[-g] [-t arg] [-b arg|-e arg|-l arg|-c|-s|-w] [file]] | [-A]
Where:
-h | Shows command usage. |
--h | Shows extended help. |
-g | Generates configuration from the template and exits immediately. The configuration file name may be specified explicitly or implicitly as described under Mutually Exclusive Arguments below. |
-t arg | Template to use. Examples: wka for Well-Known-Addresses; mc for Multicast; ss for Single Server. This is optional. The default is determined from be.prefs, be.properties or be.default.properties, in that order. |
Mutually Exclusive Arguments:
-b arg | Configures batch code specific properties files. Maintains job.<arg>.properties files. |
-e arg | Configures general submitter mode properties files. Supports THIN and LOCAL execution mode. Maintains submitbatch.<arg>.properties files. |
-l arg | Configures threadpool label specific properties files. Maintains threadpoolworker.<arg>.properties files. |
-c | Configures the cluster configuration. Shortcut name for tangosol-coherence-override.xml |
-s | Configures the base submitter configuration. Shortcut name for submitbatch.properties. |
-w | Configures the base threadpoolworker configuration. Shortcut name for threadpoolworker.properties. |
file | The properties file to edit. This must be a valid batch properties or Coherence XML configuration override file. May be used instead of the shortcut forms above and must be the last argument if specified. |
Exclusive Argument:
-A | Generates ALL the base configuration files and exit. Combines -c, -w and -s option. Option -A must be the only option if specified. |
Examples:
bedit threadpoolworker.properties
bedit -t wka -c
bedit -c -l cache
bedit -t wka -c
bedit -c -l cache
Note: For more information about bedit.sh, refer to the Configuring Batch Using Bedit section of this guide.
buildJavadocsIndex.sh - Builds Appviewer java docs
Note: The splenviron.sh utility must be executed before this utility can be used. See splenviron – Set Environment Variables for details.
Note: This utility is only used for development environments where javadocs must be generated for other developers to use and appViewer is installed and deployed.
Note: This utility only works on custom java classes where source is provided with the customization installation and after the customizations have been installed.
The build AppViewer javadocs utility, buildJavadocsIndex, creates the javadocs for any custom java code for use for development. The utility does the following:
• After the custom java code has been installed using the SDK utilities, the utility generates the javadoc using the associated JDK.
• The utility optionally adds the generated to the javadoc to the product javadoc already installed in appViewer.
• Optionally regenerates the SPLWeb EAR file to update the appViewer.
• If running in embedded mode, the server needs to be restarted to reflect the change. If running in native mode the EAR file deployment needs to be updated.
Command Usage:
buildJavadocsIndex.sh [-h] [-n]
Where:
blank | Generates javadocs and update SPLWeb EAR file. |
-h | Shows usage. |
-n | Generates javadocs but skip EAR update. |
configureEnv – Set up Environment Settings
Note: The splenviron.sh utility must be executed before this utility can be used. See splenviron – Set Environment Variables for details.
Note: This utility can be used by both embedded and native mode customers. In native mode, some settings need to be specific values to support the native mode. Refer to the Installation Guide for further instructions on the use for the different modes.
The configureEnv.sh utility is an interactive method for configuring an environment on the system stored in the etc/ENVIRON.INI. This configuration script sets up important parameters used by other scripts within the system. Normally this script is executed without parameters and the current environment (that is, the environment that you are currently attached to) is configured.
Command Usage:
configureEnv.sh ([-a]|[-g]) [-i] [-h]
Where:
blank | Configures basic configuration options. |
-a | Configures advanced configuration options. |
-c | Calculates variables only through silent mode. This refreshes ENVIRON.INI from individual changes. |
-g | Configures all configuration options (basic and advanced). |
-h | Shows usage. |
-i | Configures Installation options (used for initial installation) |
Refer to ENVIRON.INI - Environment Configuration File for more information on the output of this command.
Note: If an unauthorized user attempts to execute this command, the following error message is shown: Can't open …./configure.log for output
createDBStandalone.sh - Creates Database Patches
Note: The splenviron.sh utility must be executed before this utility can be used. See splenviron – Set Environment Variables for details.
Note: This utility is used for patching only. Refer to the patch documentation for more information.
The createDBStandalone.sh utility, assembles all the needed components to allow database patches to be applied from a remote server. This utility creates the jar file named db_patch_standalone.jar containing the following:
• Relevant files in the bin directory needed for the patch.
• Relevant libraries needed for the patch.
• Relevant configuration files needed for the patch.
Command Usage:
createDBStandalone.sh [-h] [-l <location>]
Where:
blank | Performs complete extraction in default location $SPLEBASE/tools/dbstandalone. |
-h | Shows usage. |
-l <location> | Outputs jar file to the location <location>. If you do not specify a location then it will default to the blank action. |
extractCMSourceUNIX.sh - Migrate Code Across Upgrades
Note: The splenviron.sh utility must be executed before this utility can be used. See splenviron – Set Environment Variables for details.
Note: This utility is only used for extracting development source from one environment to another. This is used for initial migration from Oracle Utilities Application Framework V2.x to Oracle Utilities Application Framework V4.x.
Note: This utility only works on custom Java classes where source is provided with the customization installation and after the customizations have been installed.
When migrating from Oracle Utilities Application Framework Version 2.x to Oracle Utilities Application Framework Version 4.x, this utility extracts the source that was retained in the upgrade and reorganizes it to conform to the newer structures used in Oracle Utilities Application Framework Version 4.x. This is used as an initial load only and does not need to be executed again once the reorganization is complete.
The utility does the following:
• Existing code customizations are extracted to a central location.
• The code customization are reorganized into the Oracle Utilities Application Framework Version 4.x format.
The applyCM utility provided with the Oracle Utilities SDK can then be used to install the customizations on an initial environment as outlined in the Software Configuration Management Series (Doc Id: 560401.1) available from My Oracle Support.
Command Usage:
extractCMSourceUNIX.sh -v version -t target [-e ] [-l lang] [-h]
Where:
-h | Shows usage. |
-v version | Version identifier for custom build. This is the build number that is used for CMVERSION.TXT. This parameter is required. |
-t target | Directory location for files to be housed. applyCM will be run against this location in future steps. This parameter is required. |
-e | Includes any custom AppViewer and/or Help content. This parameter is optional. |
-l lang | Specific language code to extract for Help content. If blank, all languages are extracted. This parameter is optional. |
genappvieweritems – generate AppViewer
Note: The splenviron.sh utility must be executed before this utility can be used. See splenviron – Set Environment Variables for details.
Note: This utility should only be executed if AppViewer is used in your environment (if the value of Deploy Application Viewer Module is set to true).
Note: AppViewer has been announced as deprecated and will be removed in a future release to be replaced with a native inline viewer.
If the environment is used for reference or development, then it may be necessary to regenerate the appViewer component from the metadata. A utility is if runs a number of provided background processes to regenerate the appViewer from the current environment.
Command Usage:
genappvieweritems.sh [-j] <job> [-Dshv]
Where:
-h | Shows usage. |
blank | Executes all extract jobs. |
-v | Displays Version. |
-j <job> | Executes specific <job> from the following list: |
F1-AVALG - Generate XML file(s) for Algorithm data. F1-AVMO - Generate XML file(s) for Maintenance Object data. F1-AVTBL - Generate XML file(s) for Table data. F1-AVTD - Generate XML file(s) for To Do Types XML. F1-AVBT - Generate XML file(s) for Batch Control Types XML. | |
-s | Silent Mode (logs only). |
-D | Debug Mode enabled (development use only). |
Samples:
$ genappvieweritems.sh
…
Application Viewer is delivered with the system including xml services. This script will extend Application Viewer capabilities on site by generating additional items.
The following programs will be ran
F1-AVALG Generate XML file(s) for Algorithm data
F1-AVMO Generate XML file(s) for Maintenance Object data
F1-AVTBL Generate XML file(s) for Table data
F1-AVTD Generate XML file(s) for To Do Types XML
F1-AVBT Generate XML file(s) for Batch Control Types XML
The Application EAR file will also be re-created if required.
Proceed (Y/N)?
…
Calling F1-AVALG
program F1-AVALG got a 0 response code
Calling F1AVMO
program F1-AVMO got a 0 response code
Calling F1-AVTBL
program F1-AVTBL got a 0 response code
Calling F1AVTD
program F1-AVTD got a 0 response code
Calling F1-AVABT
program F1-AVABT got a 0 response code
If you received a non response code 0 above, you should consult the logfiles.
Note: For platforms that use WAR/EAR files, the genappvieweritems utility will automatically rebuild the WAR/EAR files ready for deployment (deployment will need to be performed if WEB_ISAPPVIEWER is set to true).
This generates the HTML files to be included in the appViewer application. This will only generate the necessary files from the current environment. To deploy the appViewer, the relevant option of initialSetup command must be executed to deploy rebuild the WAR file and redeploy the application.
Note: The following error message will appears in case an unauthorized user attempts to execute this command: ERROR: Could not create a backup of log file.
initialSetup – Maintain Configuration Settings
Note: The initialSetup.sh script replaces the gen*.sh script provided with previous releases of the Oracle Utilities Application Framework.
Note: The splenviron.sh utility must be executed before this utility can be used. See splenviron – Set Environment Variables for details.
Warning: This command will reset all configuration files to template settings. Any direct customization to configuration files will be lost. Backup configuration files prior to running this script. If changes are necessary for your site then use user exits (see User Exit Include Files) or custom templates (see Implementing Custom Templates) to retain settings across executions of initialSetup.sh.
During the installation and configuration process several configuration files used by the components of the architecture are built to be used by the various components of the architecture. The utility takes the ENVIRON.INI settings see (ENVIRON.INI - Environment Configuration File) and using a set of provided templates (located in the etc directory), builds the necessary configuration files for the product components.
This utility has three functions:
• Build/Rebuild the configuration files from templates.
• Build/Rebuild the WAR/EAR files used by the product.
• For customers using native mode, manual redeployment is necessary.
• Build/Rebuild the keystore files.
This concept is shown in the diagram below: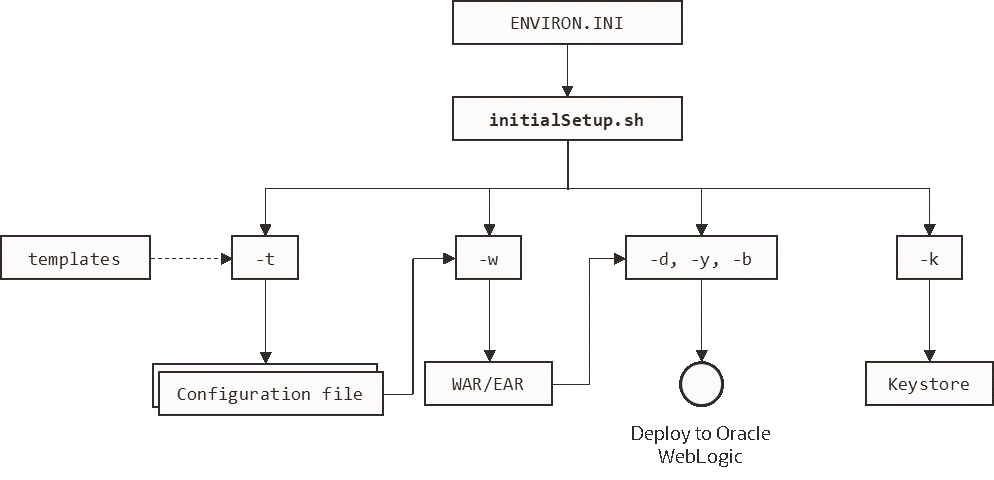
initialSetup Command Structure
While this utility is used at installation time and configuration to reflect configuration settings in Oracle Utilities Smart Grid Gateway, it can also be used to reset the configuration files to the original settings as well as reflect changes to configuration files.
Command Usage:
initialSetup.sh [-h] [-t] [-w] [-d] [-b] [-y] [-v] [-k] [-f] [-s]
Where:
blank | Process Templates, Build WAR/EAR files and Deploy to JEE Web Application Server in one process. |
-h | Shows the usage. |
-t | Processes templates only. |
-w | Builds WAR/EAR files only. |
-v | Displays the version. |
-s | Imports Key Store from external location (KS_IMPORT_KEYSTORE_FOLDER). |
-k | Generates Key store. |
-f | Forces Task, skipping any warnings (used for silent installs only). |
Examples:
$ initialSetup.sh
100207.02:37:33 <info> Template generation step.
100207.02:37:43 <info> FW template generation step.
100207.02:37:43 <info> Create war file for SPLApp.war.
100207.02:38:14 <info> Create war file for XAIApp.war.
100207.02:38:26 <info> Create war file for appViewer.war.
100207.02:38:26 <info> Create war file for rest.war.
100207.02:41:11 <info> FINISHED INITIAL INSTALL SETUP at Thu Aug 7 02:41:11 EST 2009
100207.02:41:11 <info> See file /spl/TRAINING/logs/system/initialSetup.sh.log for details
Note: If an unauthorized user attempts to execute this command the following error message is shown: ERROR: Could not create a backup of log file.
installSFGroup.sh - Install Software Patches
Note: The splenviron.sh utility must be executed before this utility can be used. See splenviron – Set Environment Variables for details.
Note: This utility is in the tools/bin directory of the software installation.
Note: This utility does not handle prerequisities unless used with the PatchDeployUtility (see PatchDeployUtility.sh - Create and Deploy Patch Rollups).
Note: This utility only does software installation. Database installation is handled by ouafDatabasePatch (see ouafDatabasePatch.sh - Install Database Patches).
The installSFgroup utility installs a single or group of software fixes that have been downloaded.
Command Usage:
installSFgroup.sh -f InputFile -d InputDir -p product -v version -e splenviron -r splebase -l logfile
Where:
-f InputFile | Fills path of list of single fixes to install. This can be generated from PatchDeployUtility (see PatchDeployUtility.sh - Create and Deploy Patch Rollups), included in a service pack, included in a fix or manually created. |
-d InputDir | Location of single fixes downloaded from My Oracle Support. These must be unzipped. |
-p product | Product Name for patch file (this is the prefix of the file) (optional). |
-v version | Version number of files (optional). |
-e splenviron | Environment Name to apply fixes to. Defaults to current SPLENVIRON environment variable if not specified. |
-r splebase | Root location of software for environment. Must match value in /etc/cistab (see cistab - Global Configuration Files). Defaults to current SPLEBASE environment variable if not specified. |
-l logile | Name of log file to output. Defaults to install.log if not specified. |
invokeDBUpdatePatch.sh - Regenerates passwords in Installation Options
Note: The splenviron.sh utility must be executed before this utility can be used. See splenviron – Set Environment Variables for details.
The invokeDBUpdatePatch.sh utility, updates the Installation options that use encryption for key updates.
It is recommended to refer to the Keystore Configuration (Doc ID 2014161.1) reference paper for details of how and when to use this utility.
iwsdeploy - Inbound Web Services Deployment
Note: The splenviron.sh utility must be executed before this utility can be used. See splenviron – Set Environment Variables for details.
The Inbound Web Services deployment utility, iwsdeploy.sh, creates the Web Services EAR file and deploys that EAR file to the servers. The process does the following:
• Extracts the Inbound Web Services that are new or changed as indicated on the deployment record (Needs Redeployment status).
• For each Web Service generates several artifacts required by the Web Application Server to define and execute the Web Service.
• Builds the components into an EAR file called Webservices.ear located in the $SPLEBASE/splapp/iws/gen directory.
• Deploys the EAR file to the container configured.
It also is possible to perform this activity using the Inbound Web Services Deployment online function. It is recommended that in non-production both methods are available but in production iwsdeploy.sh utility is used.
The iwsdeploy.sh utility does not have any options at the present time.
Command Usage: iwsdeploy.sh
jmxbatchclient.sh – JMX batch command line
Note: The splenviron.sh utility must be executed before this utility can be used. See splenviron – Set Environment Variables for details.
Note: For more examples of usage of this command refer to the Batch Best Practices (Doc Id: 836362.1) available from My Oracle Support.
Note: This facility will only operate if the BATCH_RMI_PORT is populated.
While the JMX client interface provided allows real time information to be displayed in a JMX browser, if a JMX browser is not used then the JMX interface may be interfaced using a command line utility. This utility is useful to allow third party products (such as batch schedulers) or other systems to control and monitor the state of the system.
This JMX batch command line allows the following to be performed:
• Identify what thread pools are defined in a threadpoolworker.
• See what active batch processes or threads are currently running.
• Be able to cancel a thread or a batch process.
• Gracefully shutdown a threadpoolworker.
• The command line utility is in the following format:
To execute the command line, the administrator must:
• Log on to the machine running Oracle Utilities Smart Grid Gateway (any tier where the product software exists).
• Attach to the environment using the splenviron.sh command. This sets the appropriate environment settings for the script.
• Execute the JMX Batch command line utility:
jmxbatchclient.sh –j [URL] [options]
Where [options] are:
-c | Specifies that active threads should be canceled. Can be used with –f option to cancel only batch processes matching the regular expression provided. Note: Canceled threads are marked with the date, time, userid and IP address of the user who initiated the cancel command. |
-d | Displays the details of the currently active threads. |
-f | If a large number of threads are currently active, a filter can be supplied to only display or cancel threads that match the regex based pattern. For example the threadpool be filtered to show only the BAT1 with the option: -f .*BAT1.* as follows: jmxbatchclient.sh -j service:jmx:rmi:///jndi/rmi://myserver:9999/oracle/ouaf/batchConnector -f .*BAT1.* would yield: Options: -j service:jmx:rmi:///jndi/rmi://myserver:9999/oracle/ouaf/batchConnector -f .*BAT1.* Connecting to service:jmx:rmi:///jndi/rmi://myserver:9999/oracle/ouaf/batchConnector ActiveGridNode threadPools=[MYSERVER:5, LOCAL_THREAD_POOL:b9835d11f15fd71b:681ba91d:1200151a3c8:-8000:0, SCHEDULER_DAEMON_THREAD_POOL:1] BatchThread_ZZQABAT1_1_of_1.31 |
-h | Display the available options and their descriptions. |
-j | JMX URL to perform the action against (Required). This should match the spl.runtime.management.connector.url.default property specified in the threadpoolworker.properties. |
-k | Specifying this option will result in the cancellation of all currently running threads and the stoppage of the threadpoolworker process. Note: Active threads within a canceled threadpoolworker are marked with the date, time, userid and IP address of the user who initiated the kill command. |
-l | By default, all logging information is displayed and logged using log4j2. Supplying this option will result in only select information being displayed to the system output. |
-s | Display the summary of the currently active threads is a listing format. |
-t <wait> | Amount of time, in ms, to wait as expressed in <wait> for active jobs to cancel. |
-z | Display the cache details. Must be used in conjunction with -j option. |
ouafDatabasePatch.sh - Install Database Patches
Note: The splenviron.sh utility must be executed before this utility can be used. See splenviron – Set Environment Variables for details.
Note: For more information about patching refer to the Software Configuration Management Series (Doc Id: 560401.1) available from My Oracle Support.
The ouafDatabasePatch allows database patches to be installed from the command line or through the Application Management Pack for Oracle Utilities. This utility is a companion to installSFGroup (see installSFGroup.sh - Install Software Patches) which installs the software component of patches.
Command Usage:
ouafDatabasePatch.sh [-h] [-u] [-v] [-x] [-t toolsdir] [-p ouafparms]
Where:
-h | Shows usage for patch. |
-u | Shows usage of command. |
-v | Displays version of patch. |
-x | Database Password for applying patch. |
-b | Location of tools bin directory. |
-p | Additional parameters passed to utility (in accordance with patch documentation). This must be the last parameter on the command line. This is primarily used by the Application Management Pack for Oracle Utilities. |
PatchDeployUtility.sh - Create and Deploy Patch Rollups
Note: The splenviron.sh utility must be executed before this utility can be used. See splenviron – Set Environment Variables for details.
Note: For more information about patching refer to the Software Configuration Management Series (Doc Id: 560401.1) available from My Oracle Support.
The PatchDeployUtility allows prerequisite product software and database patches to be analyzed, downloaded and applied in a single installation. This utility can be used from the command line or through the Application Management Pack for Oracle Utilities.
There are three phases for the utility to execute:
• Report Mode - Generate a patch dependency list for a particular patch.
• Download Mode - Download the patches not already downloaded from the Report mode list.
• Rollup Mode - Create a single installer to install all the patches in the patch dependency list in one install.
Note: This utility does not install the patches. They must be installed using the installSFgroup and ouafDatabasePatch utilities.
Command Usage:
PatchDeployUtility.sh -f patchfile -m mode -l missingfile -d dir -r dir -n missingfile
Where:
-f patchfile | The full path and file name to the patchdependency.txt file of the patch to use as a reference point. This parameter is used by the REPORT mode only and is required for that mode. |
-m mode | Mode. Supported values: REPORT, DOWNLOAD or ROLLUP. |
-l missingfile | Full path and file name for output for REPORT mode. This file will contain the list of fixes that have not been downloaded. This parameter is used by the REPORT mode only and is required for that mode. |
-d dir | Full path to location where any missing patches will be downloaded to when using the DOWNLOAD mode. This is also used by the ROLLUP mode as a source directory. |
-r dir | Fills to location where the rollup files will be generated. This is the location used by the installSFGroup (see installSFGroup.sh - Install Software Patches) and ouafDatabasePatch (see ouafDatabasePatch.sh - Install Database Patches)utilities will be executed from. This parameter is by the ROLLUP mode only and is required for that mode. |
-n missingfile | Full patch and file name of the missing patches generated by the REPORT mode. This parameter is used by DOWNLOAD and ROLLUP modes. |
For example:
PatchDeployUtility.sh -f /scratch/mypatches/fix10001/data/etc/patchdependency.txt -m REPORT -l /scratch/patches/missing.txt
PatchDeployUtility.sh -n /scratch/patches/missing.txt -m DOWNLOAD -d /scratch/mypatches
PatchDeployUtility.sh -n /scratch/patches/missing.txt -m ROLLUP -d /scratch/mypatches -r /scratch/myrollups
showjavaproc.sh - Show java processes
Note: The splenviron.sh utility must be executed before this utility can be used. See splenviron – Set Environment Variables for details.
Note: This utility is mainly useful for embedded installations. It can be used for native installations but the environment name will not be rendered.
The showjavaproc.sh utility lists the process ids for the WebLogic servers installed on the machine.
Command Usage:
showjavaproc.sh [-e envname] [-q]
Where:
blank | Finds all of the WebLogic servers running on the machine. |
-e envname | Filters the output by environment name. If it is found then output a 1 return code. |
-q | Do not put output on screen. Useful for custom scripting. |
For example:
showjavaproc.sh -e MYENVIRON || echo "Weblogic Java Process is running"
showjavaproc.sh -e MYENVIRON && echo "Weblogic Java Process is NOT running"
splenviron – Set Environment Variables
Note: On the Linux/UNIX environment this utility creates a subshell upon completion.
The splenviron.sh utility initializes a defined set of environment variables and paths for an environment. This script must be run before any other script or utility is run within the environment.
Command Usage:
splenviron.sh -e <environment> [-c <command>] [-q] [-h]
Where:
-e <environment> | <environment> is the environment id as installed in the cistab file. |
-c <command> | Runs <command> after running splenviron.sh. Command must be enclosed in double quotes (""). Default is shell (for example: ksh). |
-q | Quiet Mode. Do not show output from command. Any output from the –c command will be shown. |
-h | Shows usage. |
Samples:
splenviron.sh –e DEMO
splenviron –e DEV
splenviron.sh –e DEMO –c "cat file.lst"
The splenviron.sh utility is executed whenever an environment needs to be initialized. One of the options to this script allows system administrators to optionally include the execution of an additional command as part of the environment initialization. This enables the system administrator to more finely tune the environment shell so they can change such settings as TimeZone, PATH or environment variables.
Extending the splenviron Command
If your implementation needs to add environment variables (or modify existing variables) for a third-party product you may wish to integrate with that product. For example, you might want to add some custom Java classes from a component that you want to use with the product.
When you run the splenviron.sh utility it sets the environment variables for the environment. These are standard variables as well as any required for operation of the product. For example, there are variables that can be used in utilities so they can be used across environments.
These environment variables can be extended (or added to) using one of the following options:
• Change to ALL environments on machine - If your integration is common across all environments then you can set or alter environment variables using the following technique:
• Create a script in a central location on the machine that sets or alters the appropriate environment variables. Ensure that the product administrator user ID has read/execute access to the location and the script.
• Set the CMENV environment variable with the location and name of the script to execute prior to running the splenviron.sh utility (for example, in your logon profile).
• When the splenviron.sh utility is run it will detect the script specified in the CMENV environment variable and execute the script to set or alter the environment variables.
• Change to a specific environment on machine - If your integration is specific to an environment (or different for each environment, for example if you have a development as well as a test copy of the third party product) then you can set or alter environment variables using the following technique:
• Create a script called cmenv.sh in scripts subdirectory of the environment (usually $SPLEBASE/scripts). Ensure the permissions are set appropriately for the product administration account to execute the script.
• When the splenviron.sh utility is run it will detect the cmenv.sh script and execute the script to set or alter the environment variables at the end of the splenviron.sh utility.
• Combination of both previously outlined options – It is possible to combine the techniques in a combination which can mean you can have maximum flexibility. If you follow the instruction of both techniques, then the following will happen in the following order:
• When the splenviron.sh utility is run it will detect the script specified in the CMENV environment variable and execute the script to set or alter the environment variables.
• If there is a cmenv.sh script in the scripts subdirectory of the environment, it will execute the script to set or alter the environment variables. This may override, add or alter environment variables already set.
In using this override technique, remember:
• If you alter any pre-existing environment variables, then ensure your changes are not going to circumvent product requirements. For example, do not alter paths used by the product.
• If you add files or directories to library variables or CLASSPATH ensure your changes are suffixed at the end of the variable. This is especially important for java classes as classes you use may conflict with product supplied ones; adding them at the end of the CLASSPATH will minimize the effects of conflicts.
• Do not remove any environment variables used by the product.
starttpw.sh - Start Threadpoolworker
Note: The splenviron.sh utility must be executed before this utility can be used. See splenviron – Set Environment Variables for details.
Note: This utility is useful for developers.
This utility is a wrapper utility that calls the threadpoolworker script for use in command line batch submitters or from the command line.
Command Usage:
starttpw.sh [-h] [-Q] [threadpoolworker options]
Where:
blank | Runs the [threadpoolworker options] in the background (nohup). |
-h | Shows usage. |
-Q | Runs the [threadpoolworker options] in the foreground. |
submitjob.sh - Submit Batch Threads
Note: The splenviron.sh utility must be executed before this utility can be used. See splenviron – Set Environment Variables for details.
Note: For more examples of usage of this command refer to the Batch Best Practices (Doc Id: 836362.1) available from My Oracle Support.
Note: This utility is not available in Oracle Utilities SaaS Cloud implementations. The Oracle Utilities SaaS Cloud includes a REST based interface that serves as an alternative.
Note: Using this facility will not record Submission Method or Submission User as it directly integrates with the Batch Architecture and does not use the Batch Daemon.
The following options can be specified when executing utility submitjob.sh:
Command Usage:
submitjob.sh [-B][-b][-c][-d][-e][-f][-g][-h][-i][-J][-l][-L][-m] [-n] [-p][-P][-Q][-R][-r][-s][-t][-u][-x][-X]
Where the command line options are:
-b <batch code> | Batch code of the batch process to submit. When submitting a batch process, a batch code is always required. Either this option or –P may be specified, not both. If this option is specified, submitjob will use the supplied batch code to look for a default properties file for that batch code (for example: VAL-SA.properties or VAL-SA.properties.xml as discussed above) and use those properties if found. |
-c <thread count> | Concurrent number of threads in which to run the process. |
-d <date> | Process / business date. Format is YYYY-MM-DD |
-e < THIN|CLUSTERED> | Execution mode for this submission. If execution mode THIN is selected, the JVM will create a full application context and run the batch process inside the JVM – that is, it will not be submitted to a thread pool for a worker JVM to pick up and run. This is analogous to running the batch process using the existing SPLBATCH.sh utility. THIN mode is for development purposes only. If CLUSTERED is selected, the batch process will be submitted to run in the specified distributed thread pool (option –p). It is also possible to have the submitter JVM be a worker JVM and run the batch process (like THIN mode, but in parallel threads). See option –L. |
-f <record count> | Record commits frequency count. |
-g <four Y|N switches> | Positional tracing switches: • Program entry • Program exit • SQL statements • General program debugging info For example, NNYN will trace all SQL statements. Value of NNNN disables all tracing. |
-h | Shows help information. Displays the available options and their descriptions. The information is not logged. |
-i <RMI port number> | Port number of RMI Registry to start and/or reference. If specified with -R, this number will be used only to substitute applicable URL {port} references. This option will not add any new RMI/JMX properties - it can only be used to override existing ones. See note below. |
-J | Do not start JMX connector. This option disables JMX monitoring for this JVM. As far as submitjob is concerned, options –i, -R and –J are only applicable to batch processes submitted in THIN mode, or CLUSTERED mode to the LOCAL thread pool. For each property prefixed by spl.runtime.management.connector.url that is defined with the default set of properties (for example: in the submitbatch.properties file), the framework will start a JMX Connector for the specified URL. This activates JMX monitoring inside the worker node so that a client JMX console can be used to monitor and manage active threads. If this option is specified, the framework will not start any JMX connectors. |
-l <ENG|FRA|etc.> | Language code. Relevant language pack must be installed. |
-L | Submit this batch to the LOCAL thread pool (this JVM). Only applicable for CLUSTERED mode. If specified, any default thread pool property is ignored. This option and -p are mutually exclusive. By specifying option –L, the batch process is submitted to the LOCAL thread pool that every submitter JVM offers by default. This option is only applicable in a CLUSTERED mode execution (-e). This is like submitting the batch process in THIN mode (that is, a worker JVM is not needed to run the batch process), except thread pool LOCAL can run multiple batch threads concurrently. For example, the following command will run batch process VAL-SA inside this submitter JVM (LOCAL thread pool) in 8 threads concurrently: submitjob.sh –b VAL-SA –c 8 –L –e CLUSTERED |
-n <email address> | Send a notification email when a batch process has ended to <email address>. See Sending Emails at the Conclusion of Batch Processes for more information. |
-p <threadpool name> | Distributed thread pool in which to run the batch process. This option and -L are mutually exclusive. |
-P | Issue console prompts for the standard batch process parameters. When submitting a batch process, a batch code is always required. Either this option or –b may be specified, not both. If –P is specified, the submitter JVM will prompt for the batch code and other run parameters. If a batch-specific properties file exists for the batch code entered at the prompt, it will NOT be used; the only defaults in effect would be the ones specified in submitbatch.properties. |
-Q | Preview of the properties that would be in use for the run without running the application. Specify other options along with this option to show how they would override or substitute the default properties. The information is not logged. |
-R | Do not start a local RMI registry. As far as submitjob is concerned, options –i, -R and –J are only applicable to batch processes submitted in THIN mode, or CLUSTERED mode to the LOCAL thread pool. If property spl.runtime.management.rmi.port is defined as a default property (for example: in the submitbatch.properties file), the batch framework will attempt to start an RMI registry on the given port number. This option can be used to suppress the automatic RMI registry startup. It may be required if an externally started RMI registry is already running. Note that if this option is used, the RMI port number supplied through the –i option is only used for substitution in the JMX Connector URLs. |
-r <run number> | Runs the number of batch process to rerun. |
-s <space name> | Space name for hard partition of workers. Default is MAIN. Used for development only. |
-t <thread number> | Number of individual threads for this submission. Specify 0 to automatically submit all threads. |
-u <user id> | Application user id used for batch process |
-x <name=value,name=value,...> | name=value pairs of INDIVIDUAL soft parameters expected by the batch program. Value portion may be enclosed in quotes. These parameters will be merged with any existing (defaulted) soft parameters. This option and -X are mutually exclusive. |
-X <name=value,name=value,...> | name=value pairs of ALL soft parameters expected by the batch program. Value portion may be enclosed in quotes. These parameters will replace all existing (defaulted) soft parameters. This option and -x are mutually exclusive. |
-z <jvmoptions> | Java options to use for submitter. |
This utility returns two return codes: Zero (0) - The job or thread was successful. Non-Zero - The job or thread was NOT successful. | |
threadpoolworker.sh - Manage Threadpools
Note: The splenviron.sh utility must be executed before this utility can be used. See splenviron – Set Environment Variables for details.
Note: For more examples of usage of this command refer to the Batch Best Practices (Doc Id: 836362.1) available from My Oracle Support.
The following options can be specified when executing script threadpoolworker.
Command Usage:
threadpoolworker.sh [-d] [-e][-h][-i][-J][-p][-Q][-R][-s]
Where command line options are:
-d <Y|N> | Whether the node is acting as a scheduler daemon. Specify N for No and Y for Yes. If you are already using a scheduler daemon in the online system or are not using online submission, then set this to N. Default is N. |
-e < THIN| CLUSTERED> | Execution mode for this threadpool. If CLUSTERED is the threadpool will join the cluster specified in the threadpoolworker.properties file. |
-h | Shows command line help. Lists the available options and their descriptions. It is formatted for a 121-column width display. The information is not logged. |
-i <RMI Port> | Overrides port number for JMX. If specified with -R, this number will be used only to substitute applicable URL {port} references. This option will not add any new RMI/JMX properties - it can only be used to override existing ones. This option specifies the port number to: Use this command when the framework starts an RMI Registry and Substitute in all JMX Connector URL {port} references. |
-J | Do not start JMX monitoring. For each property prefixed by spl.runtime.management.connector.url that is defined with the default set of properties (for example: in the threadpoolworker.properties file), the framework will start a JMX Connector for the specified URL. This activates JMX monitoring inside the worker node so that a client JMX console can be used to monitor and manage active threads. If this option is specified, the framework will not start any JMX connectors. |
-l2 <READ_ONLY|READ_WRITE|OFF> | Enables or disables batch caching. Default: READ_WRITE, OFF and READ_ONLY are reserved for specific processes. The value of OFF is used for selected utilities such as Content Migration Assistant and deployment utilities. |
-p <name=value,name=value,…> | Thread pools offered by this worker node. Consists of one or more name=value pairs, where "name" is the name of the pool and "value" the number of threads offered in the pool. For example, DEFAULT=5,ONLINE=3 |
-Q | Preview of the properties that would be active for this run. Used for testing. Preview of the properties that would be in use for the run without running the application. Specify other options along with this option to show how they would merge with, override or substitute the default properties. The information is not logged. |
-R | Do not start a local RMI registry. If property spl.runtime.management.rmi.port is defined as a default property (for example: in the threadpoolworker.properties file), the batch framework will attempt to start an RMI registry on the given port number. This option can be used to suppress the automatic RMI registry startup. It may be required if an externally started RMI registry is already running. Note: If this option is used, the RMI port number supplied through the –i option is only used for substitution in the JMX Connector URLs. |
-s <space name> | Space name for "hard partition" of workers. Default is MAIN. Reserved for internal use only. |
-sf <file-path> | Generates or appends command to a script. Reserved for system use. |
-s1 <line to add to script> | Adds line to script reference. Reserved for system use. |
-z <jvm options> | Adds or override JVM options for threadpool. |
When threadpoolworker.sh is invoked, the command-line options will alter its default configuration. The default configuration options come from either internal system defaults or the threadpoolworker.properties file described above.
The properties are overridden in the following order:
1. The threadpoolworker.properties supersedes the internal system defaults.
2. The command-line options supersede the defaults in threadpoolworker.properties and the internal system defaults.
Example:
Assuming we have the above set of properties in threadpoolworker.properties and script threadpoolworker.sh is invoked as follows:
threadpoolworker.sh –d Y
This will replace the default "daemon" property to "N" (that is false) so that the properties now look as follows:
com.splwg.grid.distThreadPool.threads.DEFAULT=5
com.splwg.grid.distThreadPool.threads.LOCAL=0
com.splwg.batch.scheduler.daemon=false
spl.runtime.management.rmi.port=9999
spl.runtime.management.connector.url.default=service:jmx:rmi:///jndi/rmi://{host}:{port}/oracle/ouaf/batchConnector