Administration Tab
The Administration tab in the Oracle Utilities Testing Accelerator application allows users with Administrator role to perform the following actions:
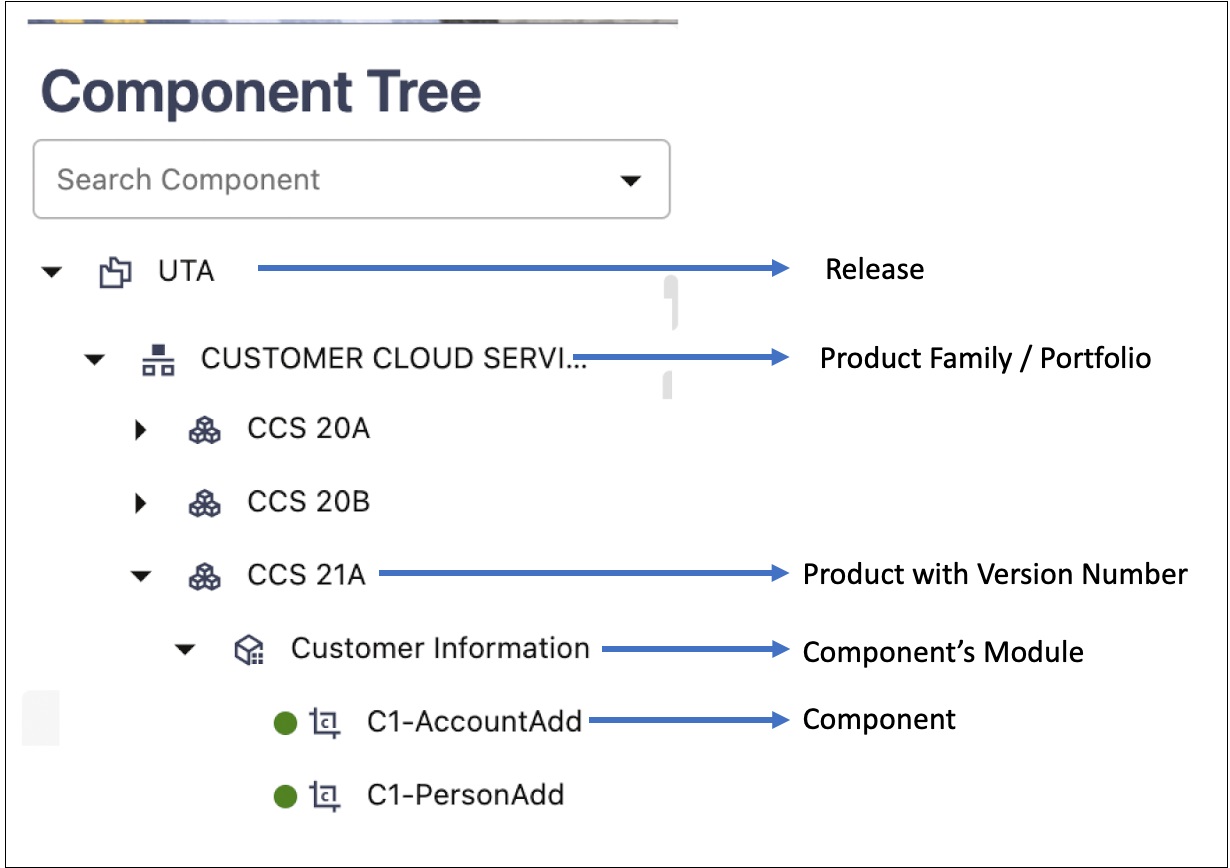
The following diagram shows the organization of components and flows as per hierarchy in the Oracle Utilities Testing Accelerator application. 

Note: Though flows are also organized under modules, flow modules are different from component modules and should be managed separately.
Managing Products
A product represents an Oracle Utilities application. A product contains one or more modules.
For example: CCB
Creating a Product
To create a new product:
1. On the Administration tab, click Products in the left pane.
2. In the Create Product window, enter the product name and its description.
3. Click Save.
Alternatively, you can create a new product:
1. On the Components (or Flows) tab, expand the Component (or Flow) tree.
2. Select and right-click the portfolio under which the product has to be created. From the Context menu, click Create Product.
3. Enter the new product name and its description.
4. Click Save.
Updating a Product
Note that you can only edit a custom product.
To update an existing product:
1. On the Components (or Flows) tab, expand the Component (or Flow) tree.
2. Select and right-click the product name to be updated. From the Context menu, click Update Product.
3. Enter the modified description and click Update.
Deleting a Product
Though this is an admin function, a product can be deleted via the component or flow tree structure only. Only an administrator can exercise the delete option.
It is always a best practice to export all the custom flows and components from a product hierarchy before deleting the product as a whole. Deleting a product removes all the flows and components under the product hierarchy permanently. Appropriate caution should be exercised while using this feature.
To delete an existing product:
1. On the Components tab, expand the Component tree.
2. Select and right-click the product name to be deleted.
3. From the Context menu, click Delete Product.
Note: If a product (example: Oracle Utilities Customer Care and Billing V2.7.0.3.0) includes flows that use components from another product (example: Oracle Utilities Meter Data Management V2.3.0.1.0), to delete the Oracle Utilities Meter Data Management product, the flows in the first product (Oracle Utilities Customer Care and Billing V2.7.0.3.0) that use the components from the second product should be deleted first.
Managing Modules
A module represents an Oracle Utilities application functional area for the components. Example: Billing in CCS
Note: Modules created through the Administration section only apply to the component tree hierarchy. Flow modules should be created and managed through the flow hierarchy tree structure.
Creating a Module
To create a new module:
1. On the Administration tab, click Modules in the left pane.
2. In the Create Module window, enter the module name and its description.
3. Click Save.
Alternatively, you can create a module.
1. On the Components (or Flows) tab, expand the Component (or Flow) tree.
2. Select and right-click the product under which the module has to be created.
3. From the Context menu, click Create Module.
4. Enter the new module name and its description.
5. Click Save.
Updating a Module
Note that you can only edit a custom module.
To update an existing module:
1. On the Components (or Flows) tab, expand the Component (or Flow) tree.
2. Select and right-click the module name to be updated.
3. From the Context menu, click Update Module.
4. Enter the modified description and click Update.
Deleting a Module
Note that you can only delete an empty module.
To delete an existing module:
1. On the Components tab, expand the Component tree.
2. Select and right-click the module name to be deleted.
3. From the Context menu, click Delete Module (context menu option only appears if the module is empty).
Purging Flow Run Data
When the flow run logs and flow run history entries accumulate over time, it may impact the performance/usability. An administrator can decide to purge some of the existing flow run data for maintenance purposes. The flow run can be purged by specifying the cut-off date for purging entries; the data older than the specified date will be purged.
• Flow Run Logs: Allows purging of all the flow run log files that meet the specified criteria.
• Flow Run History: Allows purging of flow run history that helps in keeping the Flow Run History page more manageable.
Purging Notification Data
An administrator can decide to purge some of the existing notifications for maintenance purposes. The notifications can be purged by specifying the cut-off date for purging entries; the data older than the specified date will be purged.
• Notifications: Allows purging of all the notifications that meet the specified criteria.
Custom Content Upgrade
Oracle Utilities cloud service's/application's version specific Oracle Utilities Testing Accelerator test components are released with each of the Oracle Utilities cloud service major version updates, such as 20B, 20C, etc. The custom content upgrade process allows custom flows to be automatically upgraded to the latest component pack version that correspond to the latest version of Oracle Utilities cloud service/application.
Example: Flows may have been built using components from Oracle Utilities Customer Cloud Service 20A version. When a new version say Oracle Utilities Customer Cloud Service 20B is released, a corresponding set of components for 20B are also released as part of UTA. Using the CM Content Upgrade option in the administration, flows can be automatically upgraded to use the components from the latest 20B version instead of components from 20A version.
This ensures that the flows are using the components that correspond to the latest release of Oracle Utilities cloud services.
The CM Content Upgrade process checks to see if there are any structural changes in each of the components between old and newer versions of the product pack. If any changes are found, the flows using the updated components are automatically highlighted, so you can review (updated test data if required) and clear the highlight marker for each flow. If required, the highlight marker can be cleared at once for all the flows directly at the module or product level.
Running the CM Content Upgrade Process
To upgrade an existing set of flows:
1. Select a Release Name.
2. Select the Product Family under which the flows exist.
3. From the From Product field select the product version under which the flows exit.
4. From the To Product field select the product version to which the flows should be upgraded.
5. If only a subset of flows have to be upgraded, provide a “Tag” corresponding to these flows (the tag that has been specified in the flows header). “%” can also be used.
6. If the destination product version already has a set of flows, these can either be overwritten during the upgrade or skipped from being upgraded. It applies only to the flows in the destination product that have the same name as the flows from the source product. Select either “Override” or “Skip” based on the requirement.
7. Click Upgrade.
The upgrade process should run to completion with appropriate messages displayed.
When you upgrade the custom test flows to a newer version of a product pack using the CM Content Upgrade feature in Oracle Utilities Testing Accelerator, flows using components that have been updated between the older and the newer version will automatically be highlighted with a marker. This ensures that you have clear visibility into the impact of changes in the application being tested on the automated test flows.
8. Click the About section on the top-right corner of the application and select Clear Cache to clear the cache after the upgrade process is complete.
Note:
• For a flow to be picked up by the upgrade process, the flow header should have a tag specified.
• If a custom component has been created and used in the flows being upgraded, the upgrade process checks for the custom component name to start with “CM”. If the name doesn't start with CM, the upgrade process copies the custom component across and prefixes “CM” to the component name. All references to this component in flows will be updated accordingly to remain intact. This ensures that the flow works fine. But, if the name starts with “CM”, the upgrade process simply copies the custom component across from the source to the destination product.
• The test data defined in the flows in the source product will remain intact in the destination product flows.
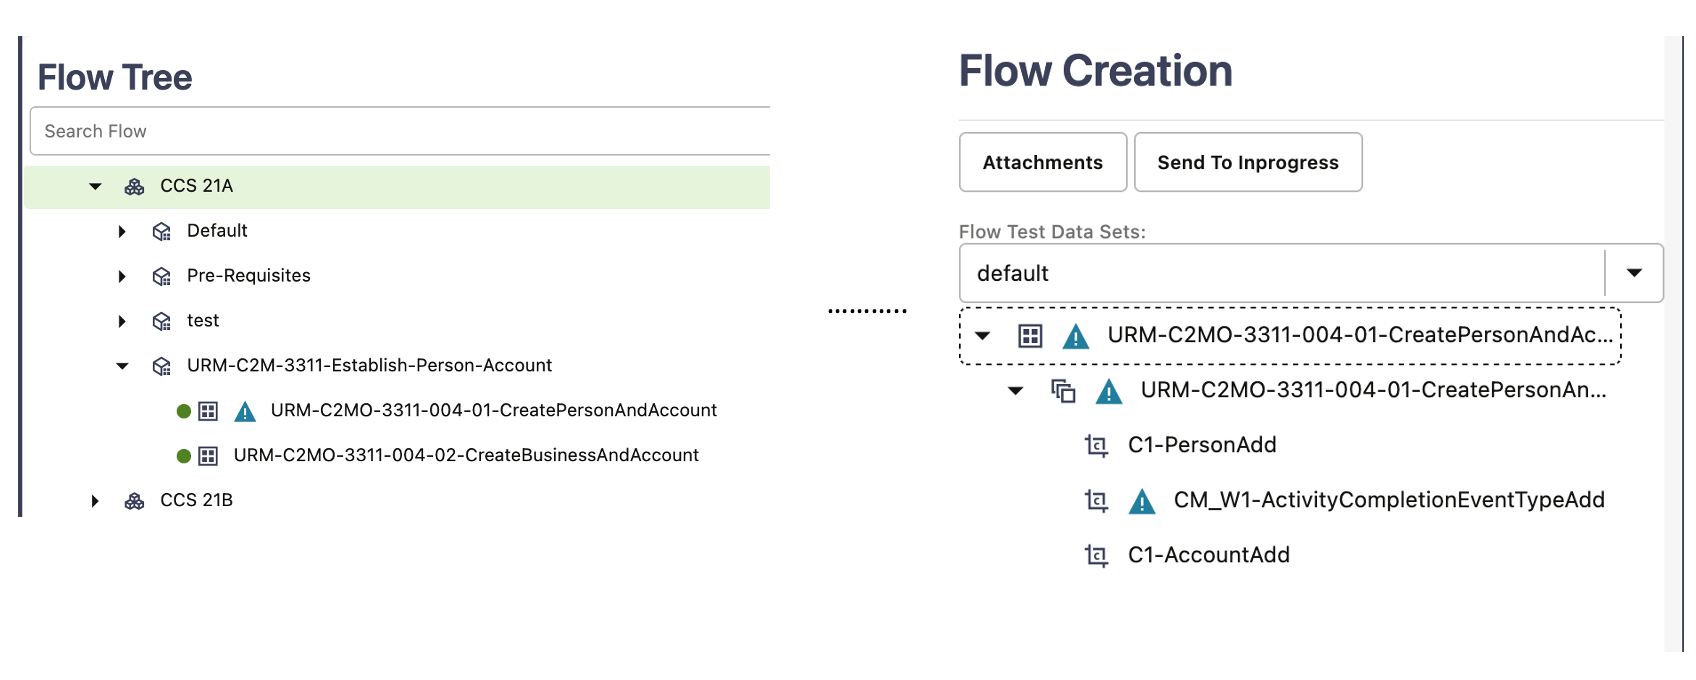
The following figure shows the flows marked with the highlight marker as part of the CM Content Upgrade process. 

Clearing the Highlight Markers
The CM Content Upgrade process checks to see if there are any changes in the component between the current/older and a newer version of the product pack and highlights a Flow with a marker, if any component used in the flow has changed in its structure. The feature also highlights the component in the flow which caused the flow to be highlighted. This enables you to quickly identify and update the test data in the flows that may have been impacted because of the upgrade, without having to run the flows first. Navigate to each of the highlighted flows, review it, update test data if necessary.
After updating the test data, clear the highlight marker. Right-click the flow and select Clear Highlight to clear the highlight marker. Alternately, the highlight marker can be cleared for multiple flows at once at the module or product level. Right-click the module/product in the flow tree in the leftmost frame and select Clear Highlighted Flows. Clearing the highlight marker at the product or the module level clears the marker for all the flows under the corresponding module/product.
Note: For a flow to be picked up by the upgrade process, the flow header should have a tag specified.
• If a custom component is created and used in the flows being upgraded, the upgrade process checks for the custom component name to start with “CM”. If the name doesn't start with CM, the upgrade process copies the custom component across and prefixes “CM” to the component name. All references to this component in flows will be updated accordingly so that the flow remains intact. If the name starts with “CM”, the upgrade process simply copies the custom component across from the source to the destination product.
• The test data defined in the flows in the source product will remain intact in the destination product flows.
Running the CM Content Upgrade Process for Integration Flows
Integration flows are developed using components from two or more Oracle Utilities Testing Accelerator product packs belonging to different Oracle Utilities Enterprise applications.
Triggering the CM Content Upgrade process is the same for both the integration flows and non-integration flows. To upgrade an existing set of flows, follow the steps in the Running the CM Content Upgrade Process section.
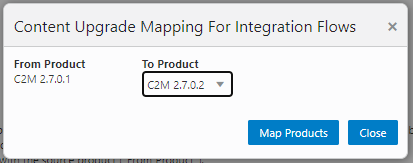
After step 7, during the initiation phase, the CM Content Upgrade process checks to see if any of the flows being upgraded use components from two or more product packs. If it finds such a flow/flows, it determines them as integration flows. The CM Content Upgrade process will then prompt to select the “from” and “to” product pack versions for each of the source product from which components have been used in the flow.
The following figure shows the mapping option for upgrading integration flows. 

After selecting the appropriate “from” and “to” product versions, click Map Products. The CM Upgrade process upgrades the flows by mapping the components appropriately between various product packs.
The flows being upgraded will still be created under the To Product specified in the main screen of the CM Content Upgrade process (before step 7 of the process). The upgrade mapping for integration flows only defines the component mapping to be done for integration flows.
Example: If one or more flows are created in CCS 21B and they use components from WACS 21B along with CCS 21B components, then during the course of the CM content upgrade process, the product mapping screen will be displayed with the source product as WACS 21B and the destination product containing a list of available product packs in UTA, such as WACS 21B/WACS 21C, etc. To proceed with the upgrade, the appropriate destination product needs to be selected. If WACS 21C is selected as the destination product for WACS 21B components, in this example, then the upgrade process will upgrade the flows from CCS 21B to CCS 21C and will also upgrade all the WACS 21B components being used in the upgraded CCS 21C flows to WACS 21C.