Creating Web Service Based Components
You can create web service based components in either of the following ways:
• Using the Component Generation Tool feature in Oracle Utilities Testing Accelerator
For detailed instructions about the Component Generation Tool, refer to the Component Generation Tool section in Chapter 9: Development Accelerator Tools.
• Create the component manually
This section focuses on the following:
Creating a Component
To create a web service based component manually:
1. Navigate to the component tree where the component has to be created.
2. Right-click the feature (release/product/module) in the component tree.
Note: Create a new feature folder if it is not found in the delivered tree structure. 
3. Select Create Component.
Note: The component name must be prefixed with ‘CM’ and the Tags field should have a CM tag for every component. The tagging enables porting the custom components to latest Oracle Utilities Testing Accelerator release.
4. Enter the component name in the Component field.
Note: For information about extending components, refer to the Copying Components section.
5. Select Web Service in the ComponentType drop-down list.
6. Enter a description in the Description field.
7. Click Attach Code to add the metadata. The Component window is displayed.
8. Create component definitions.
9. Click Save & Unlock to save and create the component.
Creating a Component Definition
A component consists of several component definition lines. Each component definition line comprises a keyword, object, display name, attribute values, default data, function name, and output parameters.
The following list describes each entity in a component definition:
• Keyword: Defines the action to be performed by the component line. Example: WS-SETVARIABLEFROM RESPONSE, WS-VALIDATE, etc
• Object: The name of the function library whose functions may be used for defining a component.
• Display Name: Description of the component line that is made visible to the user while entering test data against the component line in a flow.
• Attribute Values: The xpath of the component's element as defined in the Oracle Utilities Enterprise application.
• Default Data: The default data that may be used while providing test data for a component in a flow.
• Function Name: The name of the function that is used as a plugin to perform actions such as generating randomized test data or performing validation on web service response values.
• Output Parameters: If a function returns an output, the output can be stored in a variable which is defined against the Output Parameters field. This variable can be used across components in a flow to pass test data from one component to another.
• Tooltip: The information presented as a tool tip during the flow creation.
The following figure shows the Component page with the available component definitions.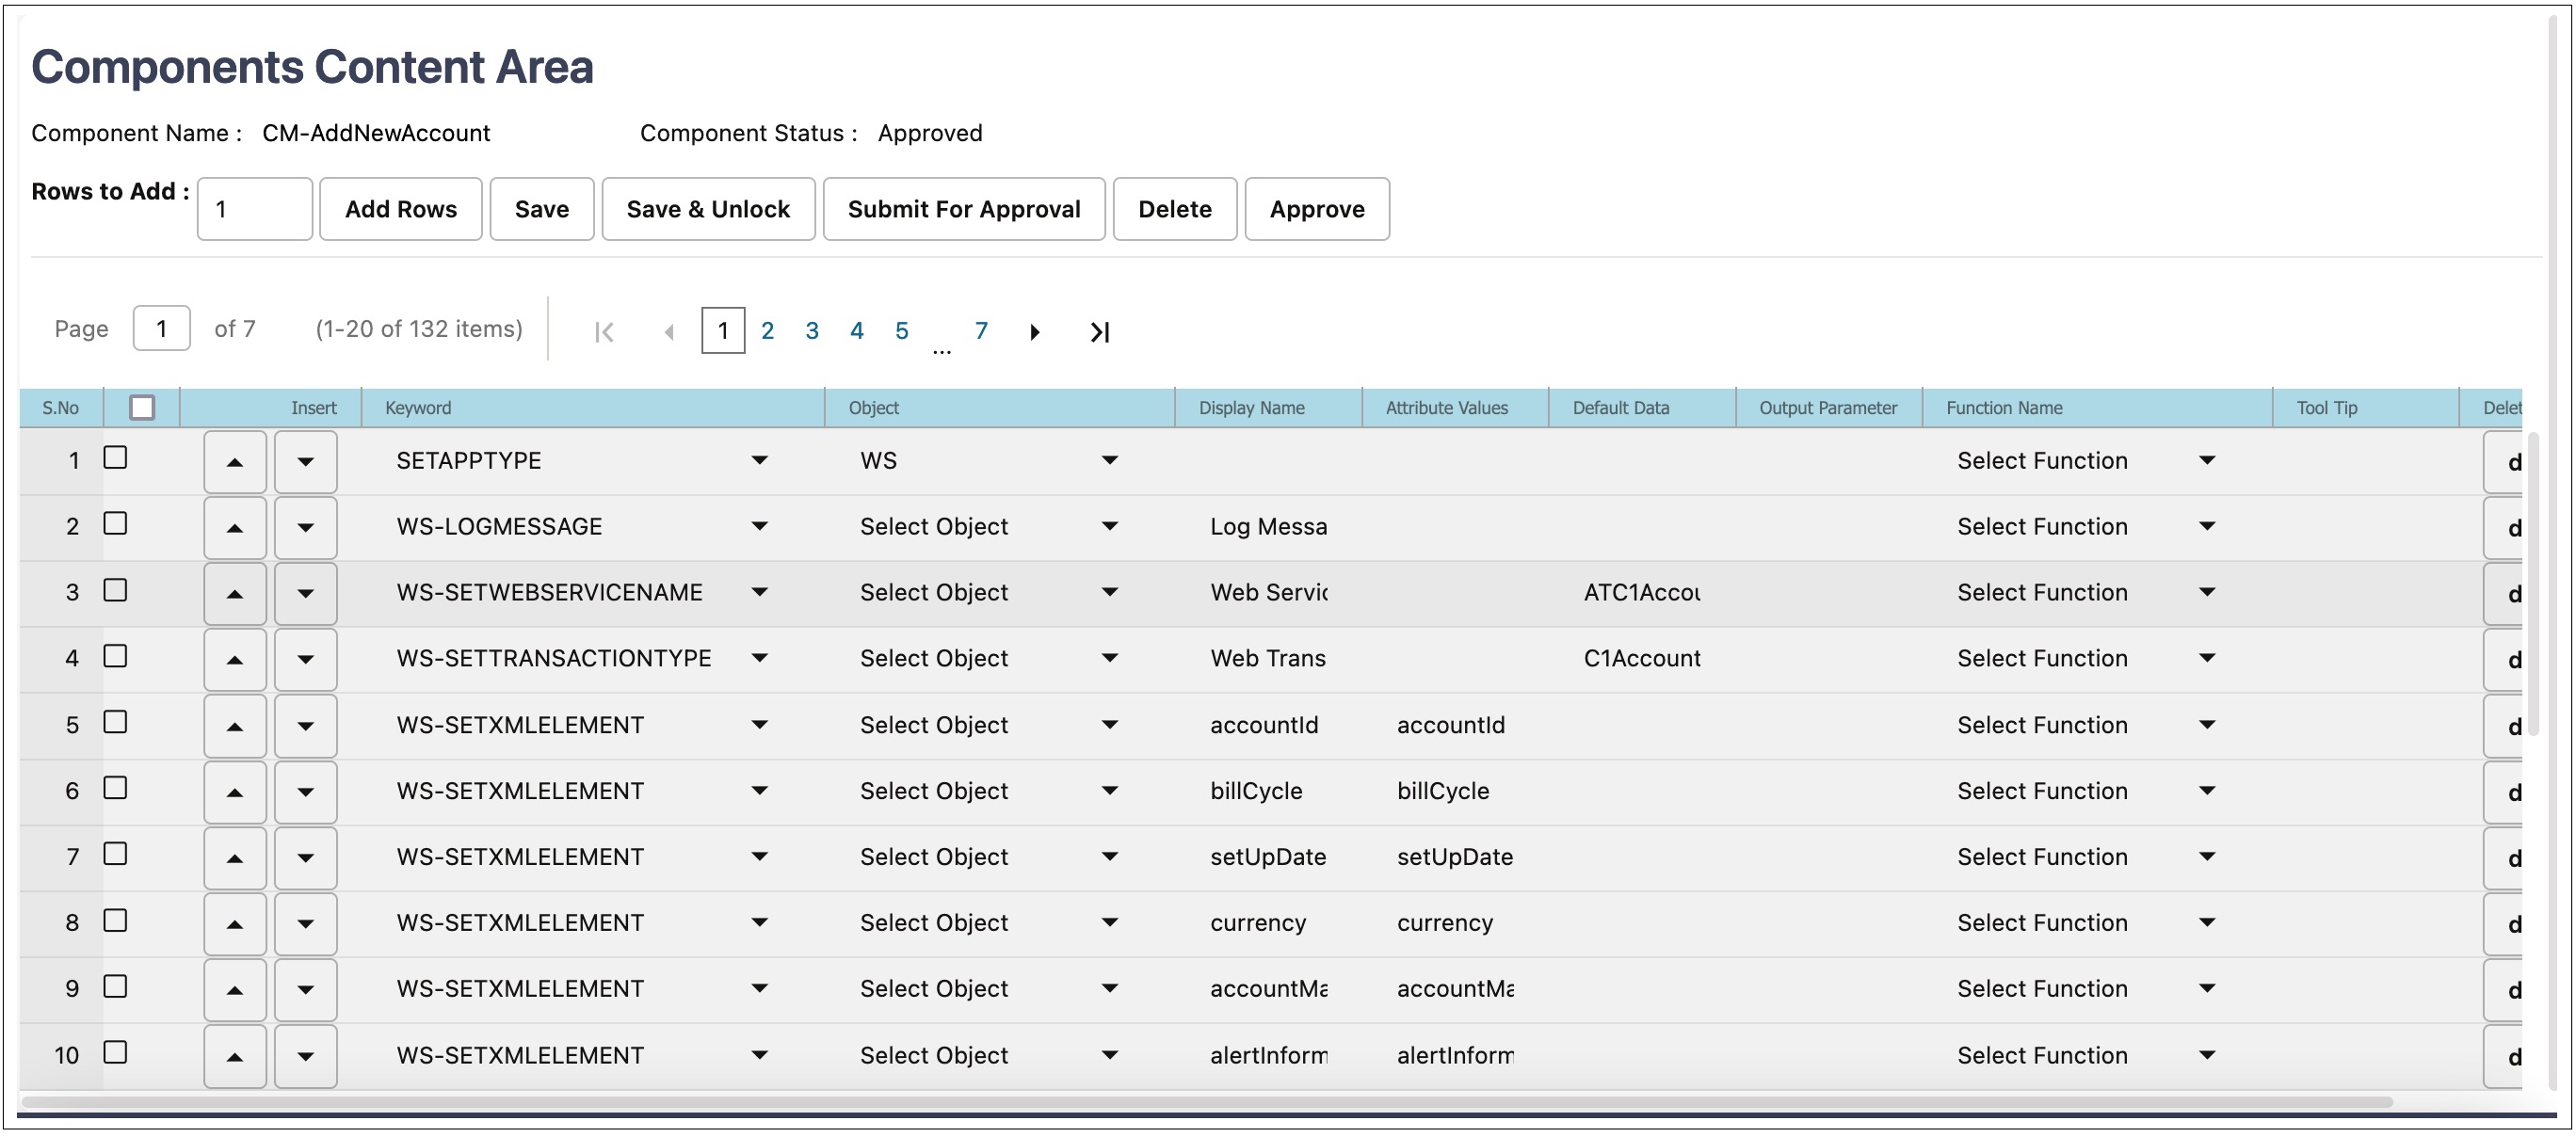
Add the required component definition lines using the Keyword drop-down list to define the web services based component.
For a list of keywords used to define the web service based components, refer to Appendix A: Web Service Component Keywords.
The following example shows different component lines created for the CM-MobileWorker component.
1. Select SETAPPTYPE in the Keyword drop-down list to define the component type.
2. Select WS in the Object drop-down list to denote that it is a web service based component.
3. Select the WS-SETWEBSERVICENAME keyword to allow for the web service name to be set for this component in a flow.
4. Select the WS-SETTRANSACTIONTYPE keyword to allow for the transaction type of the web service call to be set for this component, in a flow.
Note: The final script of a component is web service call to create, update, and delete.
5. Select the WS-LOGMESSAGE keyword to log comments in component step as part of a flow run. This helps in better understanding of the Flow run results in which the component is used.
6. Select the WS-SETXMLELEMENT keyword to allow test data to be set against a specific element of request XML.
Consider the CM-Account component in Oracle Utilities Customer Cloud Service. This component maps to the C1-Account business object. It includes elements, such as:
<accountId/>
<billCycle/>
<billCycle/>
7. Select the WS-SETXMLLISTELEMENT keyword to allow multiple sets of test data to be set against the list element of request XML. The list element is ‘skills’.
Note: The schema of a web service/business object/business service can be complex (the schema has group elements which in turn may have group elements within them).
For instructions about how to handle such scenarios, refer to the Handling the List Elements section.
Defining Default Data at Component Level
In Oracle Utilities Testing Accelerator some of the test data can be maintained at component level for quick and easy use at the flow level.
In each component definition line the “Default Data” column is available to hold the default test data. Using this field, default test data can be populated in the component. While using a component with default data in a flow, the default data can easily be selected into the test data field by selecting from the drop down option available for each of the test data entry fields on the Flow Test Data window.
Even after the default data is populated in the flow test data, data elements in the test data entry page can still be edited, if required. This helps to build the flow faster for cases where administration and master test data are pre-determined.
Setting Up Operation Name for a Web Service
An operation name determines the action to be taken while running a web service request. This is dictated by the operation name of the web service in Oracle Utilities Application Framework based applications. The value for the WS-SETTRANSACTIONTYPE keyword is specified while adding the test data for the flow. If designed so, the same component can be used to add record, update record, or delete record operations.
Using Runtime Variables in Components
In some cases, few elements from the component run’s response may have to be passed as inputs to another component’s request XML. This can be achieved using the “Moving Data Between Components without Using Global Variables” feature. Or another option is to store the output of first component in the global variable by using the FUNCTIONCALL keyword along with the appropriate function in the provided function library.
An example would be the library rSVALIDATELIB and the function getElementValue. This function requires Xpath of the response element whose value is to be stored. It should be specified in the Attribute Values column. The global variable which holds this value in the script is defined in the Output Parameter column. This method of passing data between components allows for a single global variable to be used as input in multiple component's test data, where ever it is applicable.
file: prefix - csv file
Any test data value containing “.csv” filename as value should be prefixed with “file:” to allow Oracle Utilities Testing Accelerator to process it correctly. For example: If a component contains an attribute name inputFile for which “InputData.csv” is the value, ensure to prefix the filename with “file:”. The value of “inputFile” should be “file:InputData.csv”.
Using Function Libraries
This section explains how to use the function libraries shipped with this Oracle Utilities Testing Accelerator release and create new help libraries.
Function libraries shipped with Oracle Utilities Testing Accelerator can be accessed in the Component window using the FUNCTIONCALL key word and specifying the library name in the Object column and the function name in the Function Name column. Define the variable name in the Output Parameters field to store the return value of the function.
Function parameters can be provided while entering test data for the component in a flow. For more details, refer to Chapter 6: Creating Test Flows.
For a list of libraries and functions available in Oracle Utilities Testing Accelerator, refer to Chapter 10: Function Library Reference.
Resolving the Repeating Elements in Response XML
If the response XML has repeating elements, the value embedded within the repeating elements is retrieved as follows:
<ContactDetails>
<Phone> 123-456-7890 </Phone>
<Phone>234-567-8901 </Phone>
<email> joe@oracle.com </email>
</ContactDetails>
1. If building a custom component, you can use the WS-SETVARIABLEFROMRESPONSE keyword to retrieve the response of the web service invocation into the global variable. gVar1 is defined in the Output Parameter column.
The keyword resolves all occurrences of the Phone element and stores all values in the gVar1 variable separated by comma. gVar1 will be set to “123-456-7890,234-567-8901”.
Or, you can use the FUNCTIONCALL keyword and use appropriate functions from the base delivered function libraries, such as coreResponseUtillib library.
2. If trying to retrieve a value from the response XML for a component in a flow, in the post validations sections, use the FUNCTIONCALL keyword to call the appropriate function available in the coreResponseUtillib libraries.
For more information, refer to the Chapter 10: Function Library Reference.
Adding Validations
The different ways in which you can add validations are:
• Using the FUNCTIONCALL keyword
To validate the response, use the FUNCTIONCALL keyword to validate the content; in particular, the Xpath of response XML.
Select the wSVALIDATELIB function library from the Object drop-down list. Select the function to be called from the Function Name drop-down list.
For a complete reference of the validation function library, refer to Chapter 10: Function Library Reference.
• Using flow-level validations
Validations can be added before and after a component step in a flow. The same flow can be reused with different or no validations before (pre-level validations) and after (post-level validations). The pre-validations can be used to determine if that component step needs to be run or skipped as part of the flow run, while the post validations can be used for validating the component step results.
Flow-Level Validations
Note that this feature is available only for web service based components.
Apart from being able to define validations at the component level, you can also define validations at a flow level as follows:
1. Navigate to the component in the flow.
2. Right-click and select Edit Test Data from the context menu.
3. On the Test Data page, click Pre Validations or Post Validations to specify validations that need to be performed either before sending the request or after the response is received from a Utilities application.
Note: In addition to adding validations in the pre-validations section, function calls can be made to generate (randomization) test data and stored in variables. These variables can then be used to set test data against component elements.
The post validation section can be used to add functions that retrieve and store any values from the response that can be used further down the flow, as test data in other components.
Refer to the Adding Test Data in a Flow section in Chapter 6: Creating Test Flows for more information.
Logging and Reporting
Oracle Utilities Testing Accelerator provides the following types of logging and reporting:
• Test run log file: The test run logs are created and separate logs are generated for each flow and can be viewed using the View Logs button on the run results page in the workbench.
• Summary report in HTML format: You can access and view the summary report of the flow run by clicking Summary in the flow run results page. It comprises the following:
• Test run durations
• Test step run summary and details
• Test data validation summary
• Result (Pass/Fail)
• Email report in HTML format: The summary report can be automatically sent as an email to a specified list of email ids, which can be defined in the user configuration set or the flow configuration set. If no email IDs are provided in the configuration, the email is not sent. This applies to both flows and flow set run.
Handling the List Elements
The list elements of a schema should be defined using the keyword WS-SETXMLLISTELEMENT.
Consider the following partial schema. Note that the node usageDetails has a usagePeriods list element which in turn has another list element serviceQty and other non-list nodes (leaf nodes) (such as startDateTime, standardStartDateTime, endDateTime, etc.,). The list node serviceQty has non-list nodes such as seq, UOM, TOU, etc.
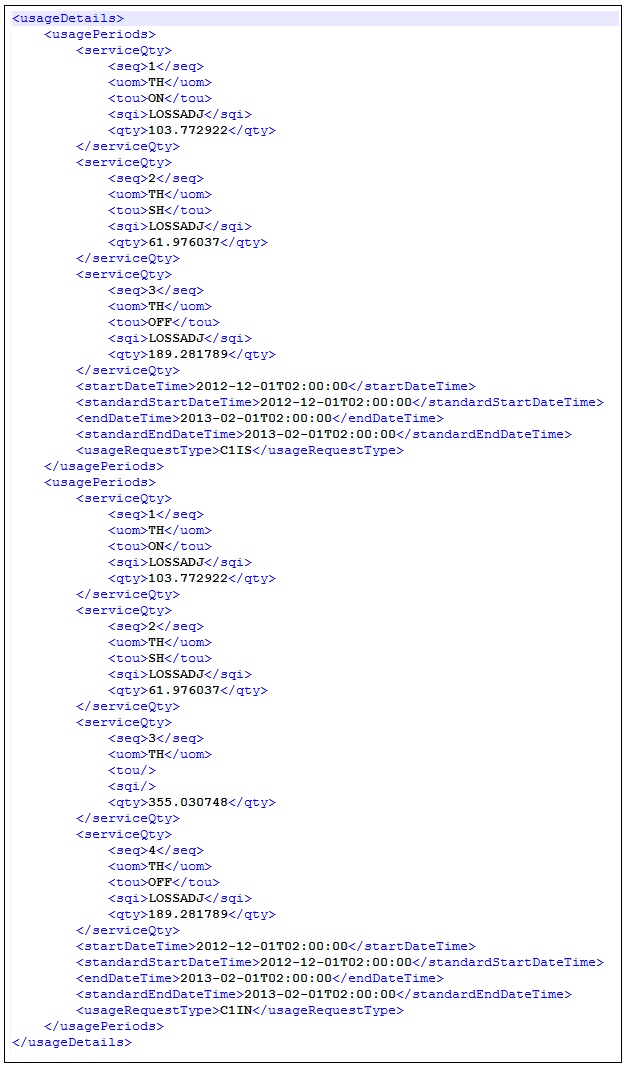
To define this schema in the component, consider the non-list nodes and enter a row for each of them, with the keyword as WS-SETXMLLISTELEMENT and Attribute value as the full xpath of the element, making sure to enter the appropriate Display names. 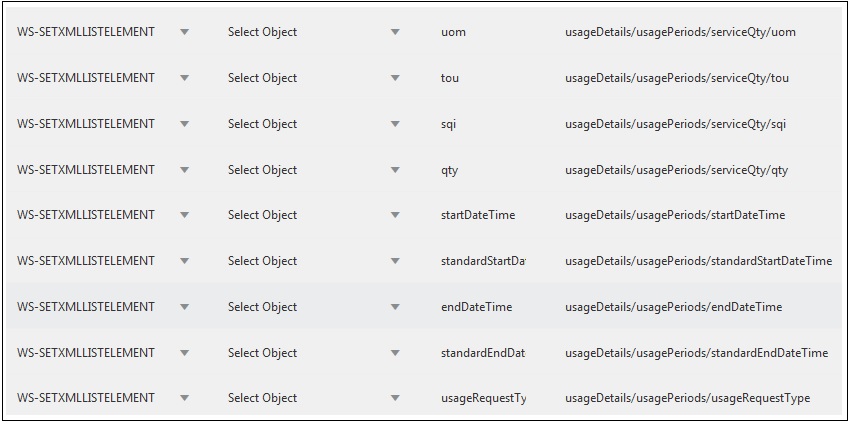
Note: If any of the list nodes repeat (serviceQty occurrs thrice inside usagePeriods, which in turn occurrs twice in usageDetais), do not define the elements multiple times in the component definition. The number of occurrences can be controlled in the test data (as defined in the Providing Test Data section).
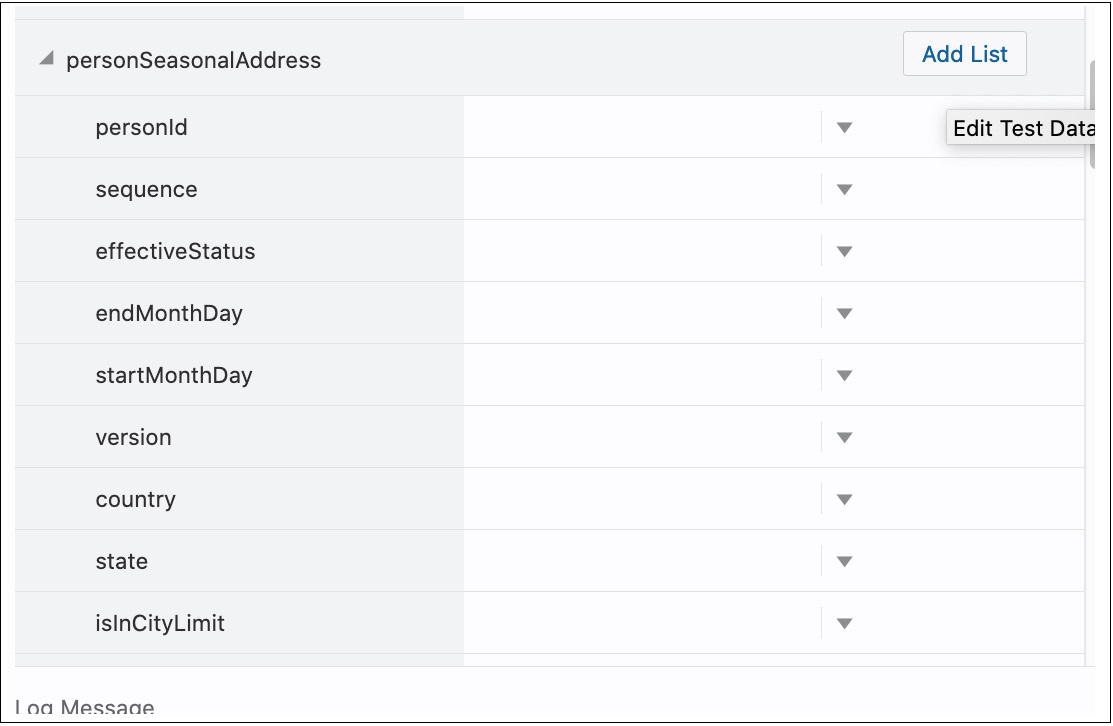
Providing Test Data
On the test data page, each of the list nodes (usageDetails, usagePeriods and serviceQty for example) has an Add List button next to them under the Action column and are expandable. Expand the list node to view the children of that particular node.
Example: Expand usageDetails to view usagePeriods, and expand usagePeriods to view serviceQty, startDateTime, standardStartDateTime, etc.
Initially only one instance exists for all the list nodes. To add more nodes, click Add List next to the desired element under the Action column.
Example: To have two instances of usagePeriods inside usageDetails, click Add List next to usagePeriods. There will be two usagePeriods nodes inside usageDetials, each of which will have the same content.
To view three serviceQty nodes in the first usagePeriods node and four in the second one:
1. Expand the first usagePeriods and add three serviceQty nodes.
2. Expand the second usagePeriods and add four serviceQty nodes.
The complete structure of the final schema is ready. You can add data to all the leaf nodes.