- Accounts User Guide
- Configurations
- Business Process
- Create Business Process
1.5.1 Create Business Process
This topic describes the systematic instructions to create a business process.
- From Home screen, under Menu, click Corporate DDA. The Corporate DDA pane displays.
- Under Corporate DDA, click Configurations.The Configurations pane displays.
- Under Configurations, select Business Process and click Create. The Create screen displays.
- Alternatively, you can search the configuration via Menu Item Search field. Specify the configuration name Business Process and select Corporate DDA-->Configurations-->Business Process-->Create.The Create screen displays.
Figure 1-20 Create Business Process Basic Details
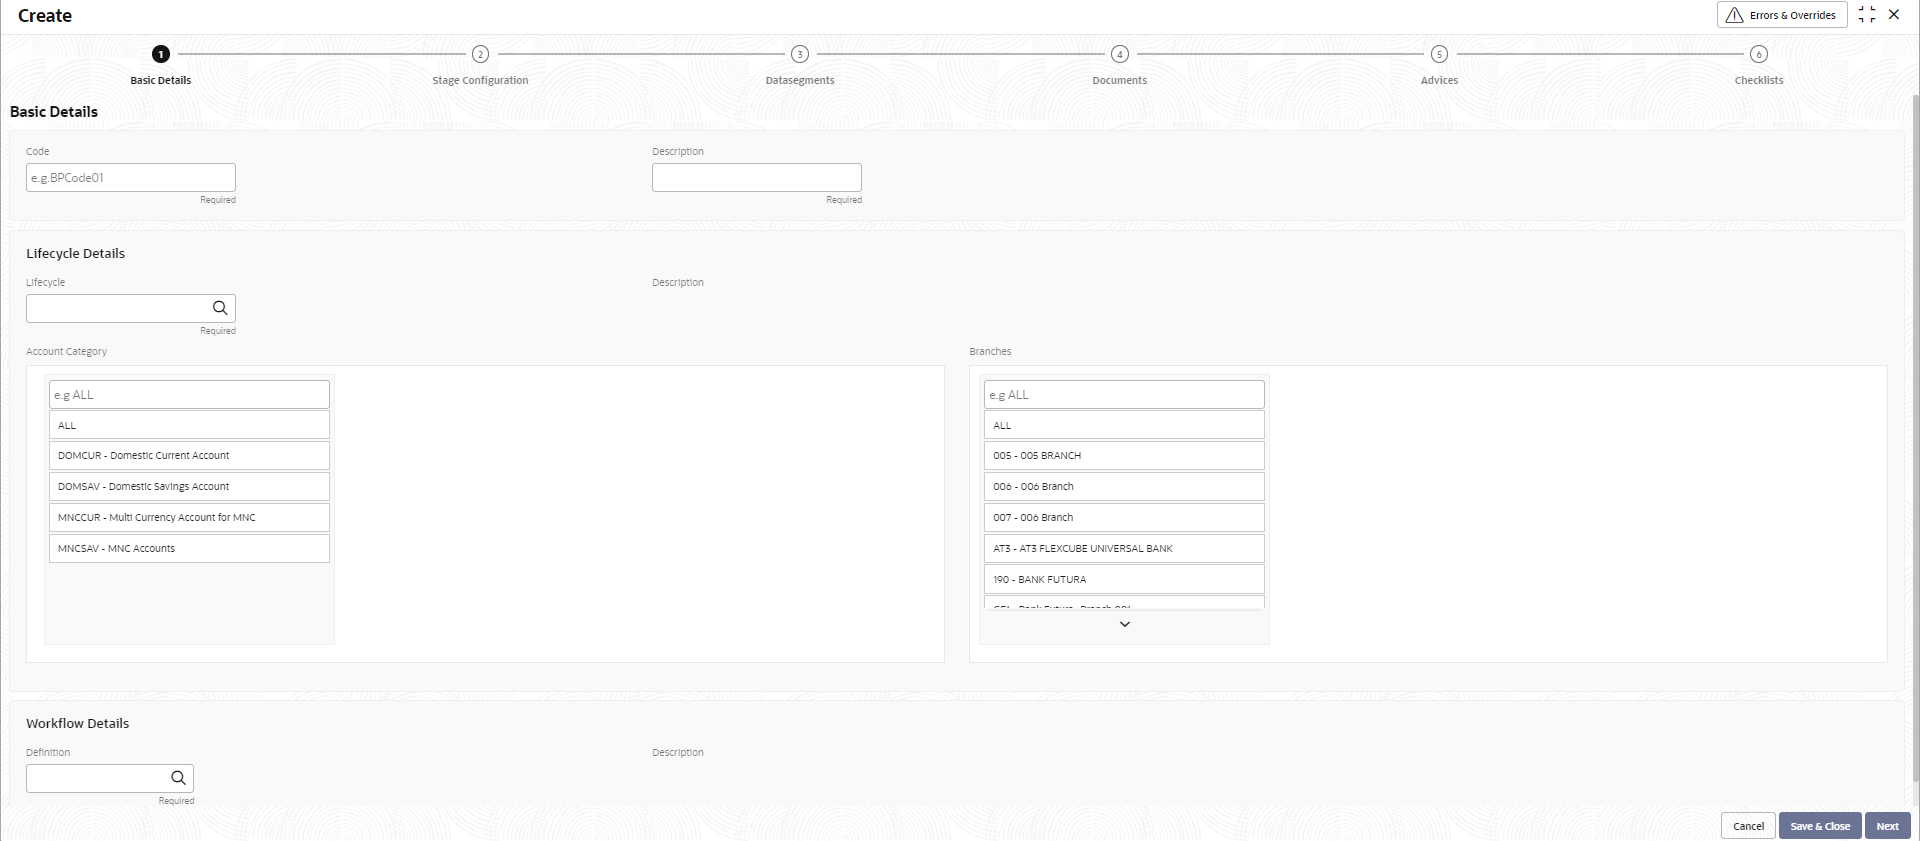
- Specify the fields on Basic Details screen.
For more information on fields, refer to the field description table below.
Table 1-24 Basic Details - Field Description
Field Description Code Specify the business process code of the account to be maintained. - Business Product Code - Specify the business product code.
Note:
The length of business product code is 6 characters. Alphanumeric and alphabets should be in capital. - Business Product Name - Specify the business product name.
Description Specify the description for the business process. Lifecycle Details Lifecycle Click the search icon in the field to open the Lifecycle window. Select from the list, click to add the code. Description Displays the description of the selected lifecycle. Account Category Click Add to add any account category from the list. Branches Click Add to add branches from the list. Workflow Details Definition Click the search icon in the field to open the Definition window. Select from the list, click to add the definition. Description Specify the description of the selected definition. This field is auto-populated. - Business Product Code - Specify the business product code.
- After specifying, click Next.The Stage Configuration tab displays.
Figure 1-21 Create Business Process Stage Configuration
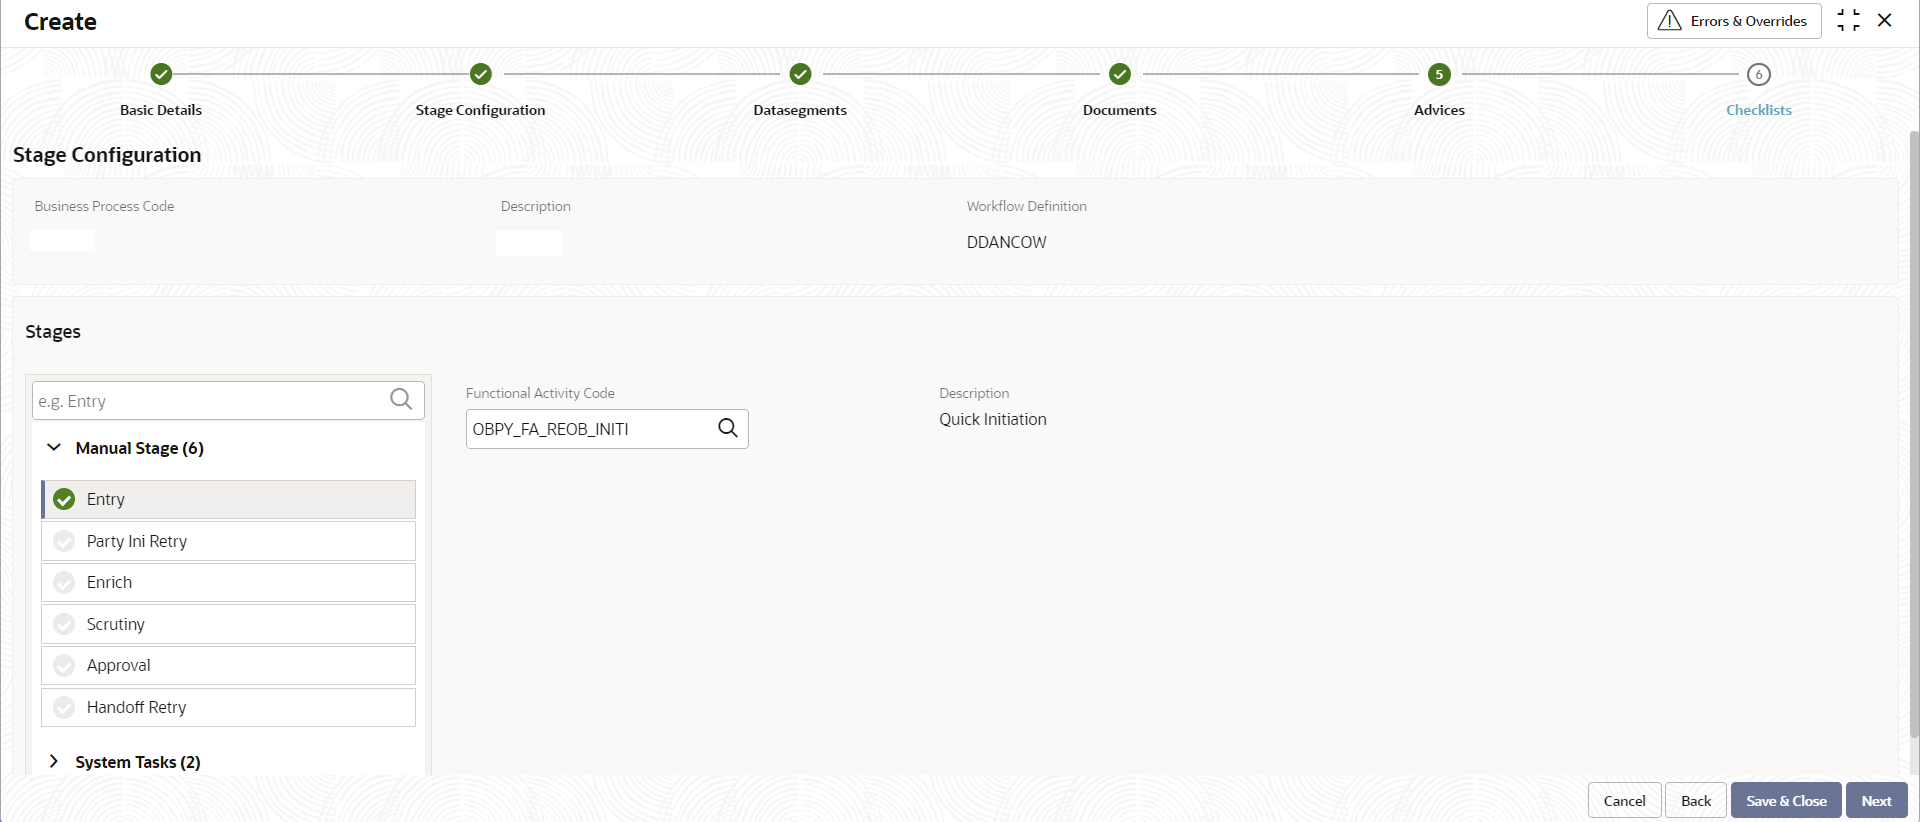
- Specify the fields on the Stage Configuration tab.
For more information on fields, refer to the field description table below.
Table 1-25 Stage Configuration - Field Description
Field Description Business Process Code This field is auto populated from the Basic Details screen. Description This field is auto populated from the Basic Details screen. Workflow Definition This field is auto populated from the Basic Details screen. Stages – The list of stages defined for a process code is displayed here. This configuration allows to configure the below elements for each of the stages of the Product Origination workflow: - Data Segments
- Documents
- Advices
- Checklists
Manual Stage Specify and configure the manual stages. Click and select each stage and configure the Functional Activity Codes.
System Tasks Specify the system tasks. Click and select each task and configure the Service Endpoint.
Description This field is auto populated. - After specifying, click Next.The Datasegments tab displays. A Datasegment, as the name suggests is an individual block of data. Bringing in data segments allows to break down a huge process into smaller units, which are easier to update, maintain and process. Business Process consists of such several data segments that makes up the stage. Business Process Definition enables the user to perform the following:
- Add 'n' number of data segments to each stage.
- Set the data segment as mandatory or non-mandatory.
- Set the data segment as editable or non-editable.
- Control the sequence order of the data segments.
- Select the stage.
Figure 1-22 Create Business Process Datasegments
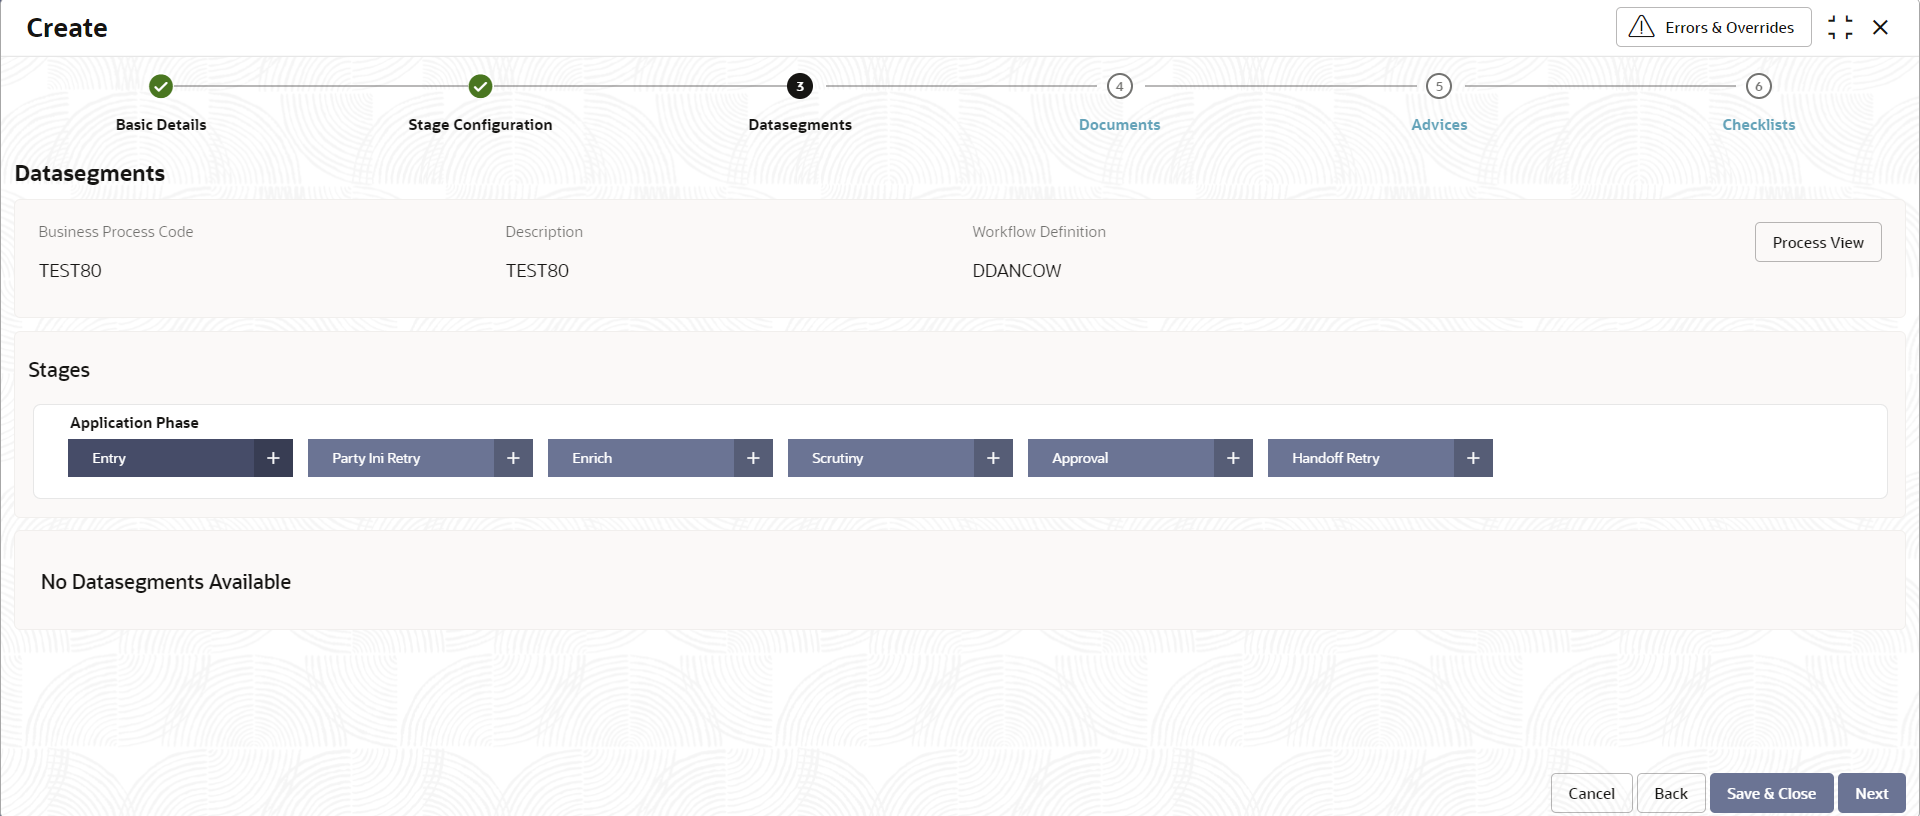
- Specify the fields on the Datasegments tab.
For more information on fields, refer to the field description table below.
Table 1-26 Datasegments - Field Description
Field Description Business Process Code This field is auto populated from the Basic Details screen. Description This field is auto populated from the Basic Details screen. Workflow Definition This field is auto populated from the Basic Details screen. Stages Application Phase Specify and configure each stage in this section. Click the plus sign (+) to open the Add Datasegments window and select from the list to configure for each phase. The list of data segments in Account Creation is as follows –
- Account Address
- Account Basic Details
- Account Features
- Account MIS
- Account Preferences
- Account Signatory
- Account Status
- Approval
- Back Office Errors
- Cheque Book
- GL Reporting Details
- Interest Details
- Legal Block
- Limits
- Multi Currency Account
- New Customer Onboarding
- Statement Preferences
- Stop Payments
- Transaction Journal Entry
- Under Settings, configure the data segment by defining it as mandatory / non-mandatory or editable / non-editable for that stage.
- Under Preview Datasegment, view and edit the information related to that data segment as shown below.
- Under Account Group, groups appear as configured.
- Under Branch Codes, codes appear as configured.
- After specifying, click Next.The Documents tab displays.
Figure 1-23 Create Business Process Documents
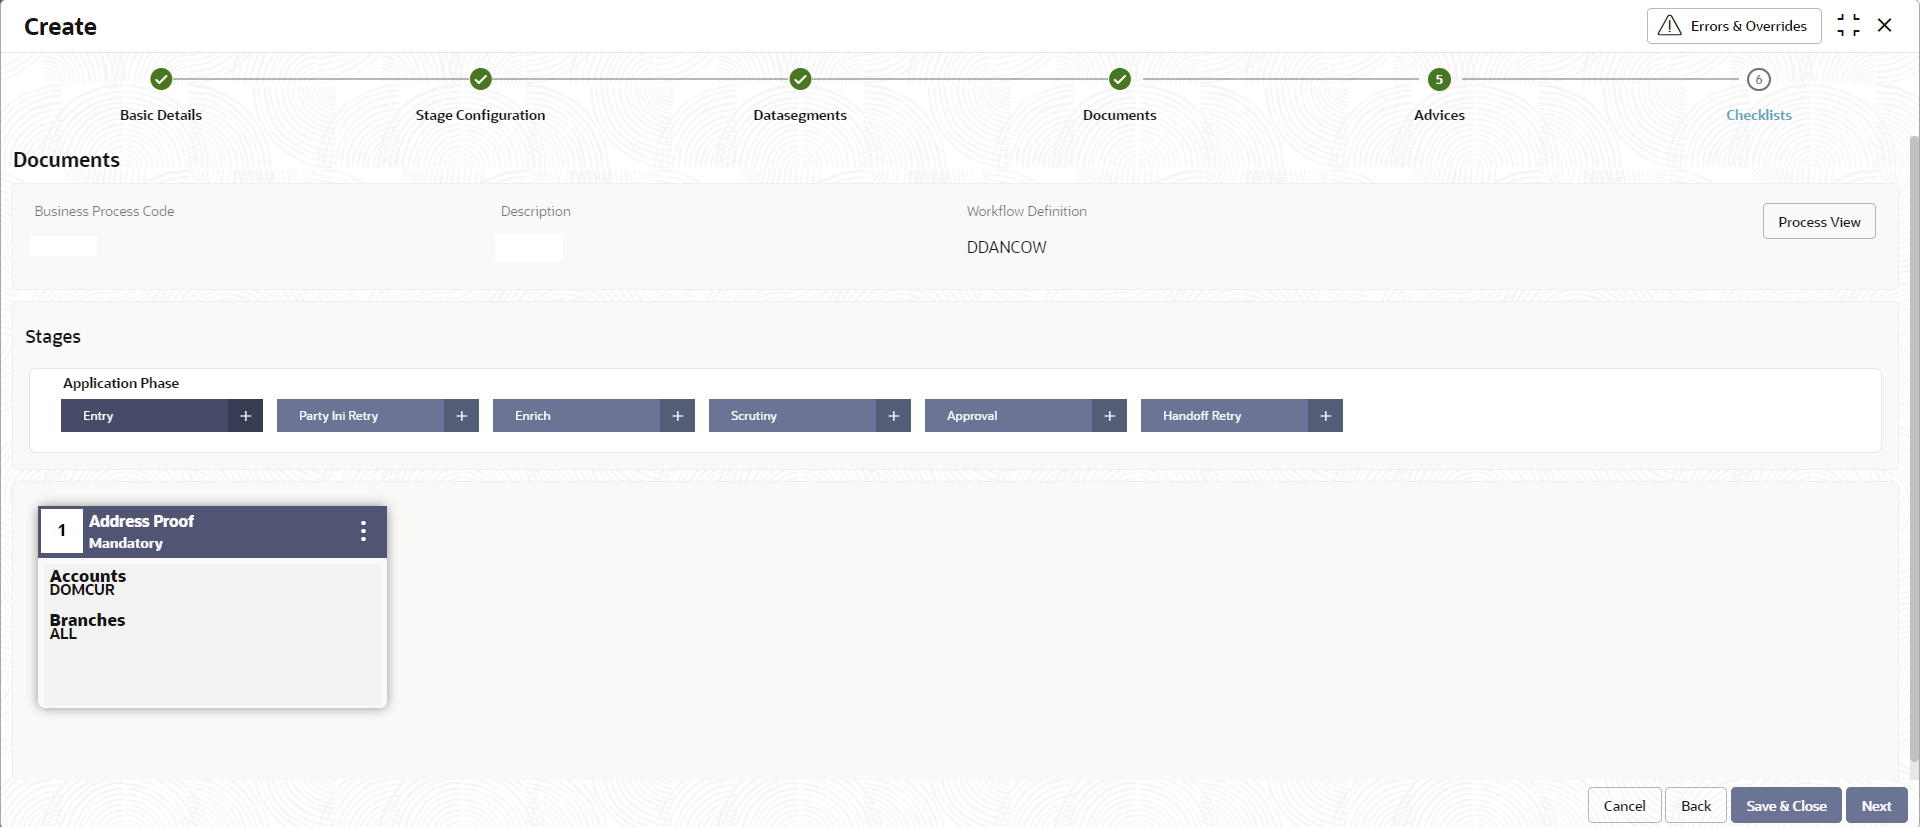
- Specify the fields on the Documents tab. Select the stage and click Document tab to define the specific documentation requirement for different stages.
For more information on fields, refer to the field description table below.
Table 1-27 Documents - Field Description
Field Description Business Process Code This field is auto populated from the Basic Details screen. Description This field is auto populated from the Basic Details screen. Workflow Definition This field is auto populated from the Basic Details screen. Stages Application Phase Specify and configure each stage in this section. Click the plus sign (+) to open the Link Documents window and select from the list to configure for each phase. - Under Settings, define it as mandatory / non mandatory for that stage.
- Under Account Group, configure the account groups for that stage.
- Under Branch Codes, edit from the list of branches.
- After specifying, click Next.The Advices tab displays.
Figure 1-24 Create Business Process Advices
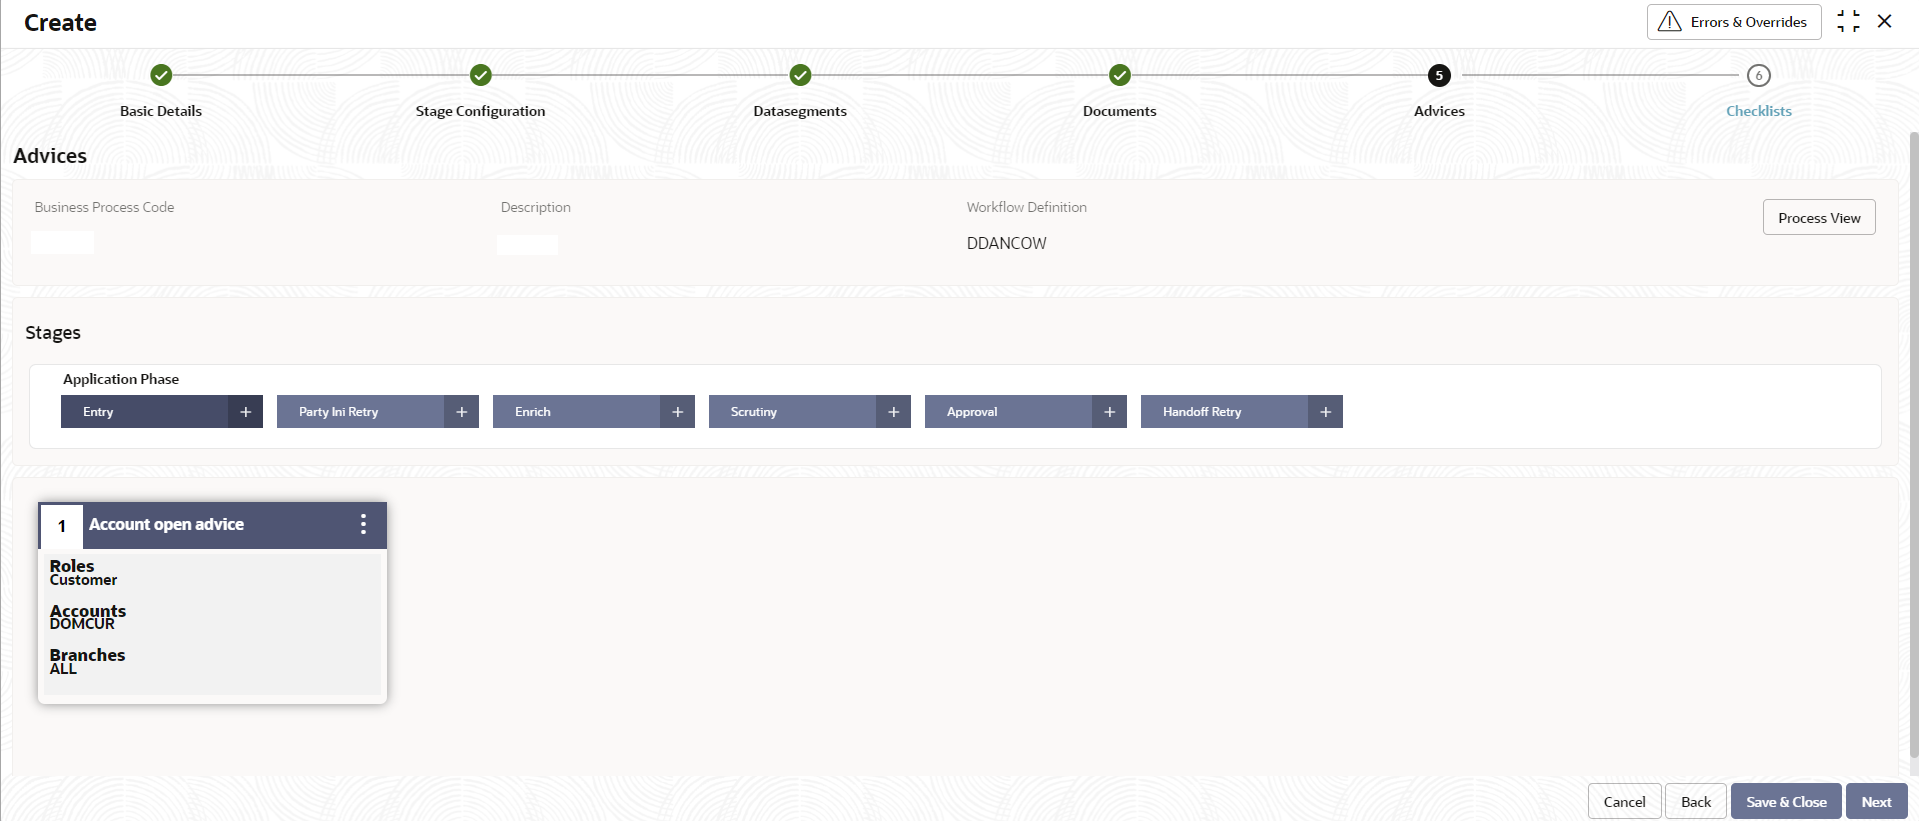
- Select the stage and specify the fields on Advices tab. Advices are official letter of notices detailing an action taken or to be taken on a stated date by the bank.
For more information on fields, refer to the field description table below.
Table 1-28 Advices - Field Description
Field Description Business Process Code This field is auto populated from the Basic Details screen. Description This field is auto populated from the Basic Details screen. Workflow Definition This field is auto populated from the Basic Details screen. Stages Application Phase Specify and configure each stage in this section. Click the plus sign (+) to open the Link Advices window and select from the list to configure for each phase. - Under Settings, define it as intra advices or not and you can also assign the role for that advice, for example, Customer as shown below.
- Under Account Group, configure the account groups for that stage.
- Under Branch Codes, edit from the list of branches.
- After specifying, click Next.The Checklists tab displays.
Figure 1-25 Create Business Process Checklists
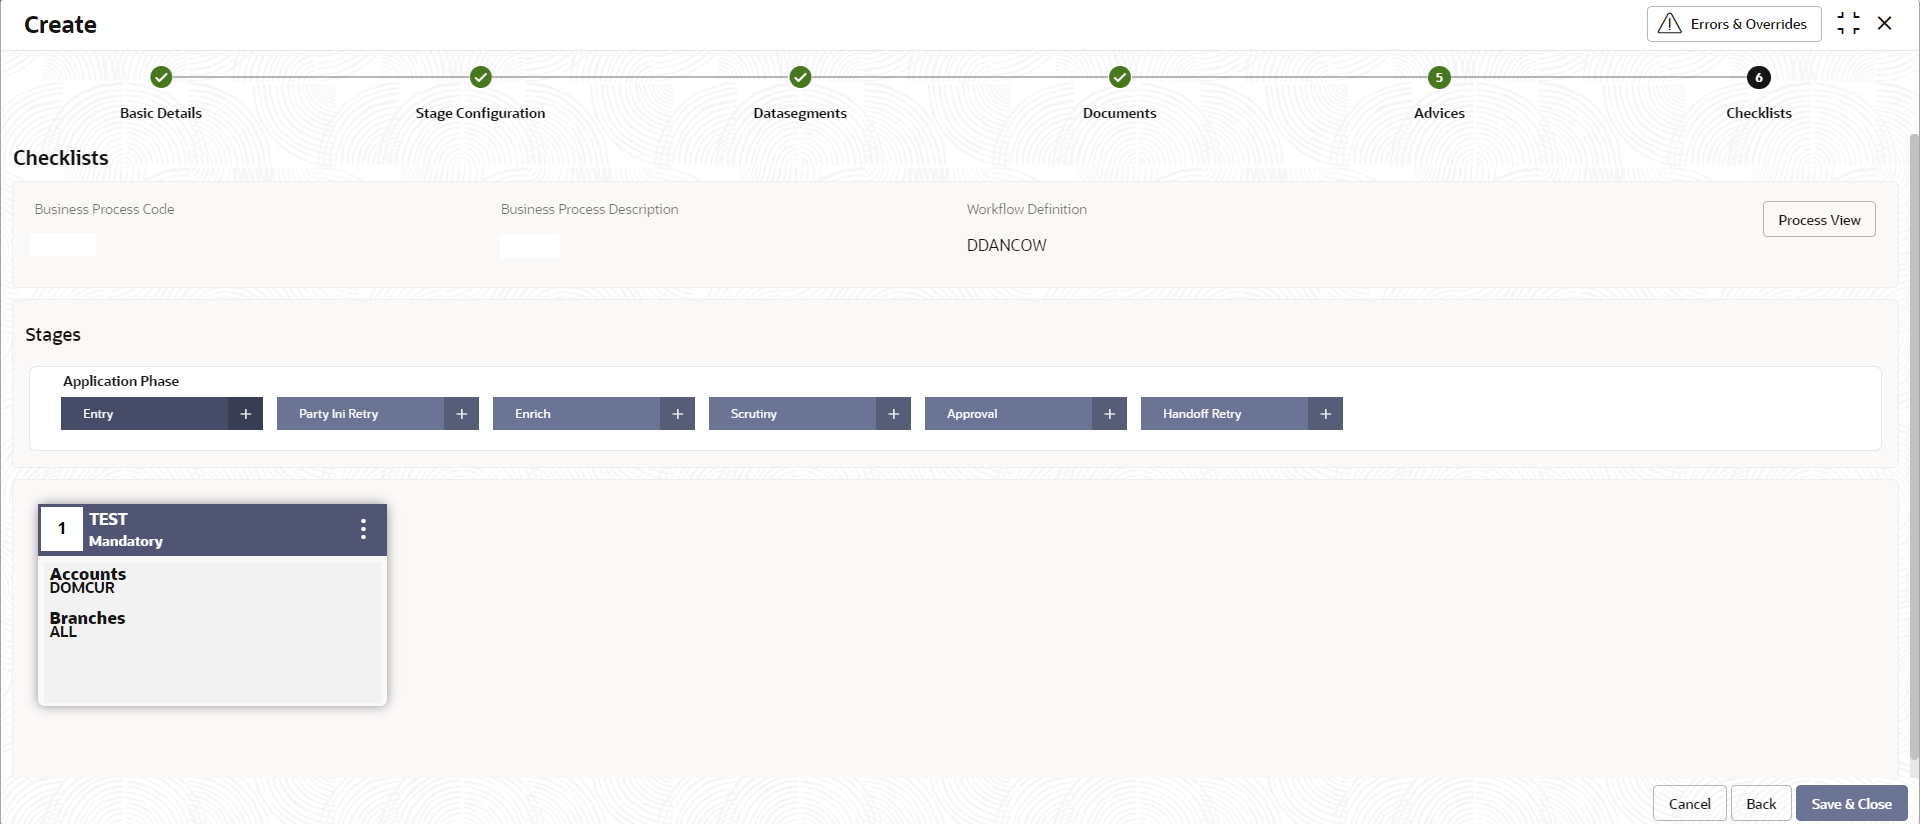
- Select the stage and specify the fields on the Checklists tab. The checklists are distinct and lists the mandatory checkpoints by the bank to its users to adhere to during the origination processes.
For more information on fields, refer to the field description table below.
Table 1-29 Checklists - Field Description
Field Description Business Process Code This field is auto populated from the Basic Details screen. Description This field is auto populated from the Basic Details screen. Workflow Definition This field is auto populated from the Basic Details screen. Stages Application Phase Specify and configure each stage in this section. Click the plus sign (+) to open the Add Checklists window and add to the list to configure checklists for each phase. - Enter any name in the field and click Add.
- Under Settings, define it as mandatory / non mandatory.
- Under Account Group, configure the account groups for that stage.
- Under Branch Codes, edit from the list of branches.
- Enter any name in the field and click Add.
- Click Save & Close to complete steps or click Cancel to exit without saving.At this point, the status of business process is unauthorized. User with supervisor access has to approve the business process. Once approved, status of the business process changes from unauthorized to authorized and is activated for usage in other processes.
- Also, click Process View to view the Business Process flowchart.
Parent topic: Business Process