- Nostro Reconciliation User Guide
- Nostro Account Services
- Create Nostro Account
3.1 Create Nostro Account
Create a Nostro account by following the instructions provided in this topic.
- Search and Initiate an existing customer.
- In the left navigation panel, click Nostro Account
Services. Under Nostro Account
Services click Account
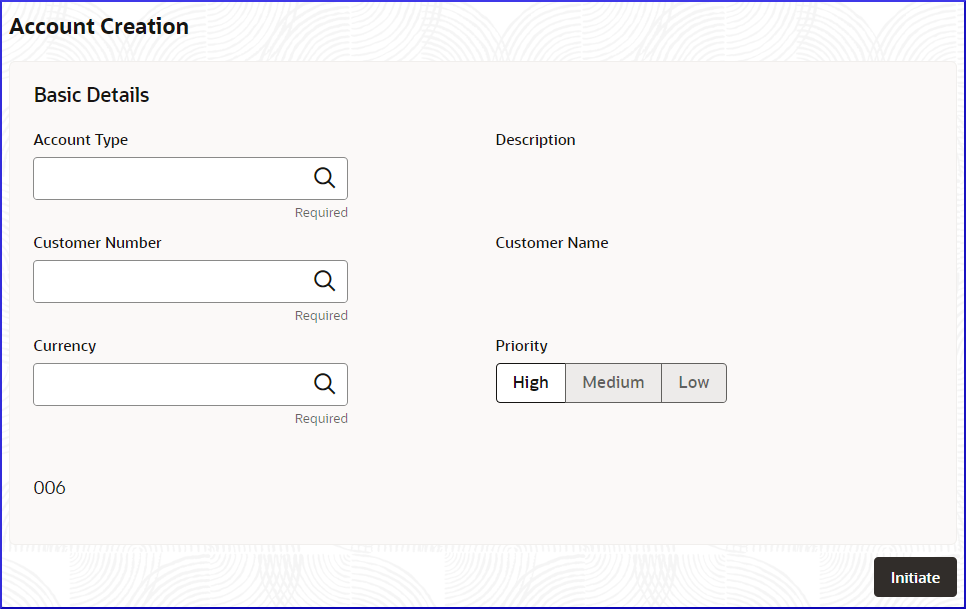
Creation.The Account Creation page displays the Basic Details screen.
Figure 3-1 Nostro Account Services - Account Creation
- Specify the details on the Account Creation
page.
Table 3-1 Field Description table - Basic Details - Account Creation
Field Description Account Type Specify the account type for the Nostro account. Description Describe the Nostro account type. This fiekd is auto-populated. Customer Number Specify the customer number for whom the account is to be created. Customer Name The name of the specified customer number is auto-populated. Currency Specify the currency of the Nostro account. Priority Specify the account creation priority from the following: - High
- Medium
- Low
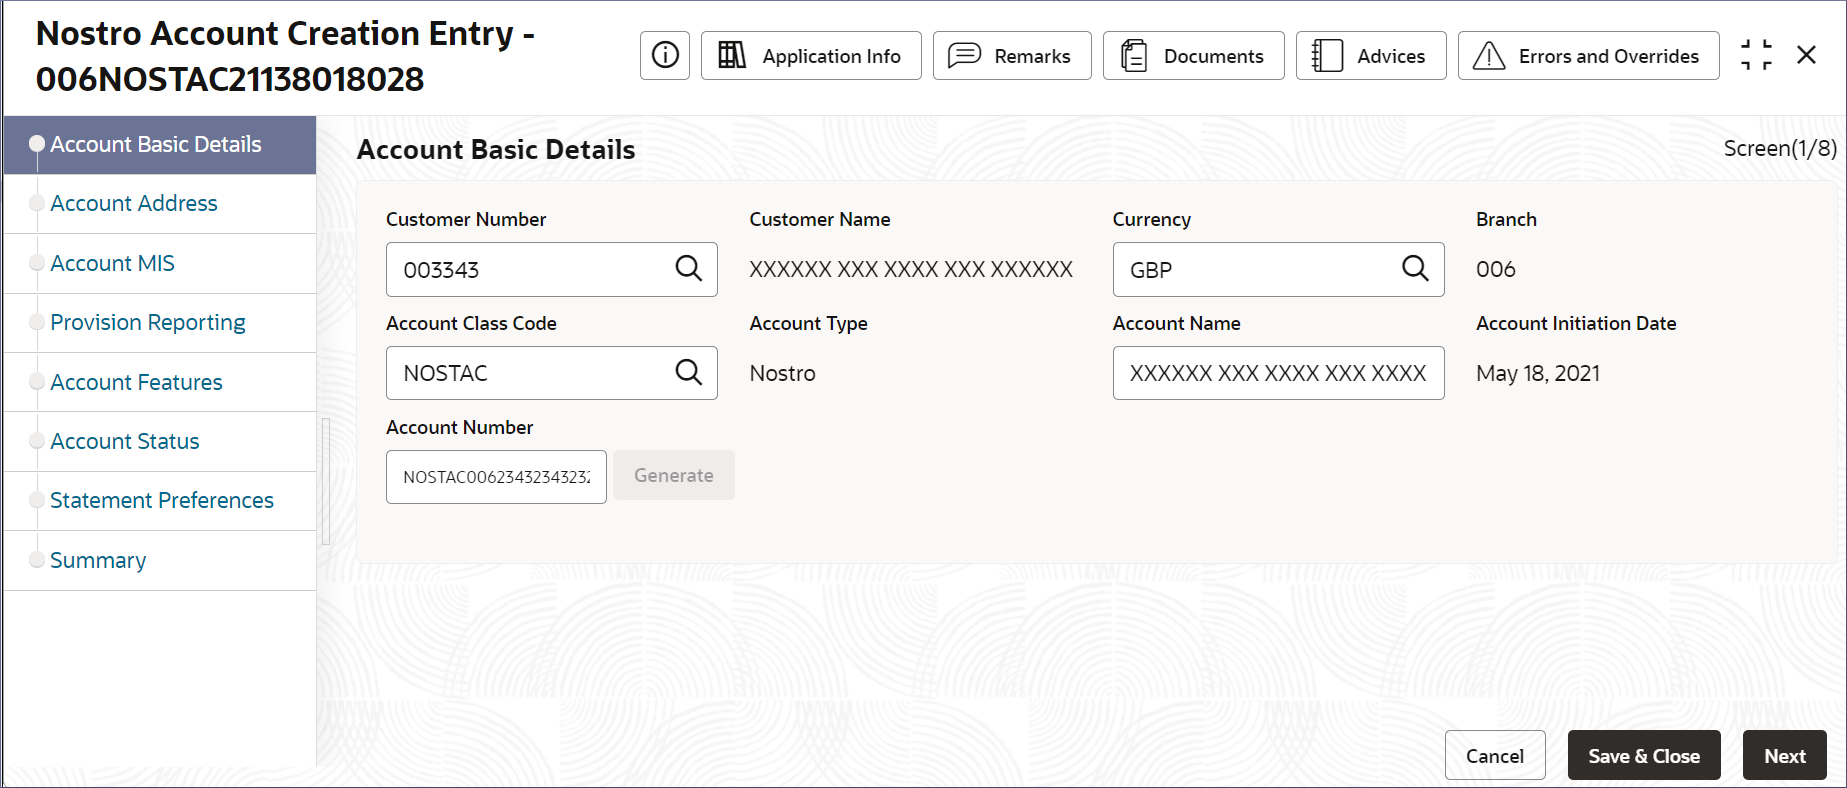
- Click Initiate.The Nostro Account Creation Entry - <Application Number> page displays the Account Basic Details page.
Figure 3-2 Nostro Account Creation - Basic Details page
Tip:
Make a note of the Application Number. This is needed to identify the task at the entry, enrich, and approval stages in the matching process, in the Free Tasks page.Note:
The account creation entry stage involves manually capturing the required details in the following data entry screens.- Account Basic Details
- Account Address
- Account MIS
- Provision Resporting (GL Reporting)
- Account Features
- Account Status
- Statement Preferences
- Summary
- In the left navigation panel, click Nostro Account
Services. Under Nostro Account
Services click Account
Creation.
- Provide the Account Details to create the Nostro Account.
- Specify the Account Class Code for the Nostro account, in the
Account Basic Details page.
Note:
Most of the account details are auto-populated based on the account class chosen. - Click Generate.The Generate Account Number dialog displays.
Note:
The columns masked by L represent the account class, the columns masked by b represent the branch code, and the columns masked by n represent the number to be provided. Together they represent a unique Nostro account number. - Double click the first column masked by n.
The cells becomes editable.
- Enter the first digit of the number and press tab to move to the next cell. Similarly, populate all the cells.
- Press Verify.
The number is verified and if it is valid, returns to the Account Basic Details page and the Account Number field is populated with the generated account number.
- Click Next.The Account Address page displays.
- Specify the Account Class Code for the Nostro account, in the
Account Basic Details page.
- Provide the details on the Account Address page.
- To use an existing CIF Address, expand and selected a Defaulted CIF Address and click Use Address.
- To add a new address, Click +.
Note:
Add as many addresses as needed.The Add Address dialog displays. - Specify the Address Type.Select the required address type from the following:
- HOA - Head Office Address
- ROA - Registered Office Address
- BOA - Branch Office Address
- COA - Communication Address
- Provide the address details described in the following table:
Table 3-2 Field Description
Field Description Language Specify the language of the address details. Department Specify the department which identifies a division of a large organization or building. Sub Department Specify the sub-division of a large organization or building. Street Name Specify the street or thoroughfare name. Building Name Specify the building name. Building Number Specify the building number. Floor Specify the floor or storey within a building. Post Box Specify the numbered box in a post office, assigned to a person or organization, where letters are kept until called for. Room Specify the room number in the building. Post Code Specify the code consisting of a group of letters and/or numbers that is added to a postal Address to assist the sorting of mail. Town Name Specify the name of a built-up area, with defined boundaries, and a local government. Town Location Name Specify the specific Location name within the town. District Name Specify a subdivision within a country sub-division. Country Sub Division Specify a subdivision of a country such as state, region, county. Country Specify the nation with its own government. - Click the Mobile tab and in the Media Address field specify the mobile number.
- Click the Swift tab and in the Media Address field specify the BIC (Bank Identifier Code). An 8-11 character code that identifies the country, city, bank, and branch.
- Click the Email tab and in the Media Address field specify the email address.
- Click the Fax tab and in the Media Address field specify the Fax number.
- Click Add.
The account address row is added to the Account Address dialog.
- To add more addresses, repeat the above steps.
- Click Next.The Account MIS page displays.
- Provide the Account MIS details.
- Specify the fields described in the following table.
Table 3-3 Field Description table
Field Description MIS Group Specify the MIS group to associate with the Account Class. Description Describes the MIS group specified. This field is auto-populated. MIS Class Code Specify the MIS Class Code from the applicable MIS Classes in the MIS Group. Class Description Describes the MIS Class. This field is auto-populated. - Click Next.The Provision Reporting page displays.
- Specify the fields described in the following table.
- Provide the details on the Provision Resporting page.
- To propagate the Reporting GL, set the toggle button to On.
- To edit a reporting line, click the hamburger icon on the top right of Reporting line tile.
- Select Edit.
- Specify the general ledger to use for credits in the Credit GL field.
- Specify the general ledger to use for debits in the Debit GL field.
- Click Save.
The Reporting Lines are updated in the GL Reporting Details page.
- Click Next.The Account Features page displays.
- Specify the details on the Account Features page.
- Specify the field described in the following table.
Table 3-4 Field Description
Field Description IBAN Required Toggle it On to enable IBAN for the account class. - Click Next.The Account Status page displays.
- Specify the field described in the following table.
- Specify the details on the Account Status page.
- Specify the fields described in the following table.
Table 3-5 Field Description
Field Description No Debits Toggle it On to prevent debit transaction. No Credits Toggle it On to prevent credit transaction. Dormant Toggle it On to move this account to a dormant state. Frozen Toggle it On to freeze the account. Current Status Shows the current regulatory state of the account. Status Since Shows the date from which the regulatory status is active. - Click Next.The Statement Preferences page displays.
- Specify the fields described in the following table.
- Provide the details on the Statement Preferences
page.
- Specify the fields described in the following table.
Table 3-6 Field Description
Field Description Display IBAN on Advices Toggle the switch On to display IBAN on advices. Exclude Same Day Reversal From Statement Toggle the switch On to exclude same day reversal transactions from the account statement. Account Statement Parameters Provide the details for the following account types: - Primary Account
- Secondary Account
- Tertiary Account
Statement Type Select one of the following: - None
- Detailed
- Summary
Cycle Specify the frequency of the statement generated. Click the Calendar icon and specify one of the following: - Daily: Statements are generated every day.
- Weekly: Select the day of the week to generate the weekly statement.
- Fortnightly: Select the day of the week to generate the fortnightly statement.
- Monthly: Select the day of the month to generate the monthly statement.
Statement Format Specify the format of the statement generated. SWIFT Required Toggle the Swift Required field to On to generate statements in the SWIFT format. This field is available only when Statement Type is Summary or Detailed. Swift message Type Specify the SWIFT message type to generate. The list displays the SWIFT message type from the Type of Service. This field is available only when SWIFT Required is Yes. - Click Next.The Summary Screen displays the data entry screens populated for the account entry.
- Specify the fields described in the following table.
- Verify that all the data entry tiles have a checkmark on the bottom right. If a tile has an X mark, open the tile and update the data entry screen.
- Click Submit.
This creates a Nostro Account Creation Entry task and starts the Stage Movement Submission process for the Account Creation Entry stage. The Stage Movement Submission dialog displays the Overrides present on this stage.
- Confirm the Overrides listed on this screen. Click
Proceed Next.
Note:
The overrides are generated by the application based on information provided in the data entry screens.The Stage Movement Submission dialog displays the Checklist items for this stage.
- Confirm the checklist items and click Proceed
Next.
The Stage Movement Submission dialog displays the Outcomes to select.
- Select one of the outcomes from the dropdown.
- Proceed: To proceed with the submission.
- Cancel: To cancel the submission.
- Click Submit.A Nostro Account Creation Enrich task is created if Proceed is selected in the previous step.
- In the left navigation panel, click Tasks. Under
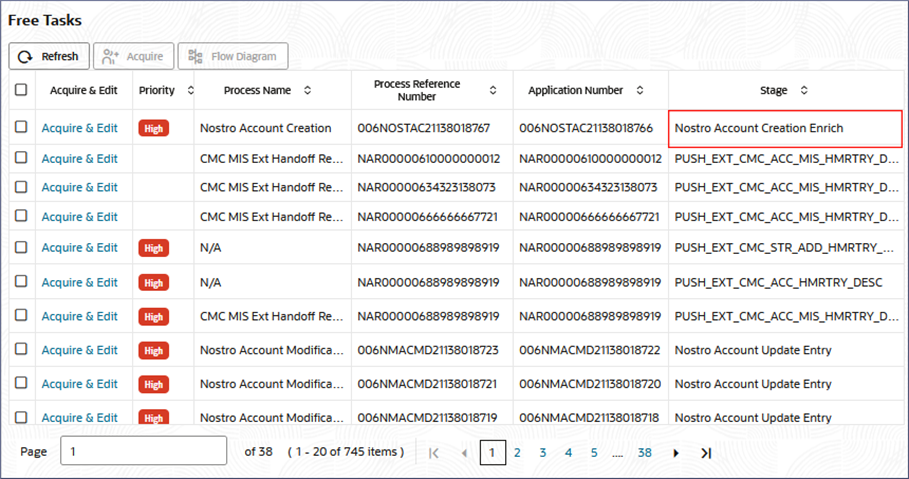
Tasks click Free Tasks.The Free Tasks page displays.
Figure 3-3 Nostro Account Creation - Free Tasks
- Search the listed tasks for the application number. This is the number noted in step 1.c. The Process Name must be Nostro Account Creation and the Stage must be Nostro Account Creation Enrich.
- Click Acquire and Edit.
The Nostro Account Creation Enrich - <Application Number> Summary page displays.
- Make the required changes to enrich the data entry screens. Click the required data entry screen and make the required changes.
- Click Submit from the Summary screen. The Stage Movement Submission dialog displays.
- Confirm the Overrides and Checklist items for the Enrich stage, then click
Proceed Next.The Stage Movement Submission dialog displays the Outcomes.
- Select one of the outcomes from the dropdown.
- Proceed: To proceed with the submission.
- Reject: To reject the submission.
- Click Submit in the Outcomes.
This creates a Nostro Scrutinize Account Creation task, and the Free Tasks page opens.
- Search the listed tasks for the application number of the New Account Creation. This is the number noted down in step 1.c. The Process Name must be Nostro Account Creation and the Stage must be Nostro Scrutinize Account Creation.
- Click Acquire and Edit.The Nostro Account Creation Scrutinize - <Application Number> page displays the Summary page.
- Scrutinize and ensure that all the data entry screens are properly defined.
- Click Submit from the Summary screen. The Stage Movement Submission dialog displays.
- Confirm the Overrides and Checklist items.The Stage Movement Submission dialog displays the Outcomes.
- Select one of the outcomes from the dropdown.
- Proceed: To proceed with the submission.
- Reject: To reject the submission.
- Click Submit in the Outcomes stage.
This creates a Nostro Approve Account Creation task, and the Free Tasks page opens..
- Search the listed tasks for the application number of the New Account Creation. This is the number noted in step 1.c. The Process Name must be Nostro Account Creation and the Stage must be Nostro Approve Account Creation.
- Click Acquire and Edit.The Nostro Account Creation Approve - <Application Number> page displays the Summary page.
- Review and ensure that all the data entry screens are properly defined.
- Click Submit from the Summary screen. The Stage Movement Submission dialog displays.
- Confirm the Overrides and Checklist items.The Stage Movement Submission dialog displays the Outcomes.
- Select one of the outcomes from the dropdown.
- Proceed: To proceed with the submission.
- Reject: To reject the submission.
- Click Submit in the Outcomes stage.
The Nostro Account is created.
- Confirm that all stages of the Nostro Account Creation process are complete.
Click Tasks. Under Tasks click
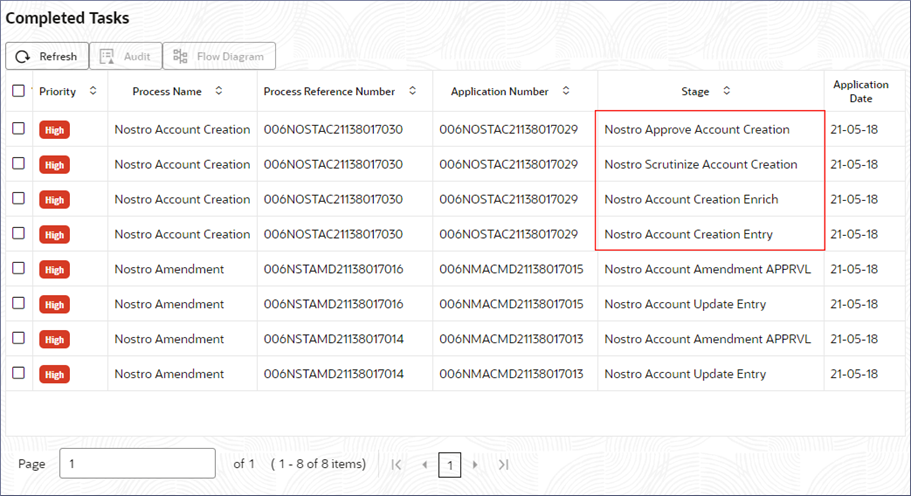
Completed Tasks.The Completed Tasks page displays all four stages of the Nostro Account Creation process: Entry, Enrich, Scrutinze, and Approve.
Figure 3-4 Nostro Account Creation - Completed Tasks
Parent topic: Nostro Account Services


