- Core User Manual
- Electronic Bill Presentment and Payment
- Biller Onboarding
- Biller Onboarding - Edit
6.1.4 Biller Onboarding - Edit
Using this option, system administrator can edit the biller details. All the fields are editable except ‘Biller Id’, ‘Biller Type’, ‘Biller Category’ and ‘Biller Currency’.
To edit the biller details:
- Navigate to one of the above paths.The Biller Onboarding screen appears.
- In the Biller Onboarding screen, enter the search
criteria and click SearchThe Biller Onboarding screen with search results appears.
OR
Click Clear to reset the search parameters.
OR
Click Cancel to cancel the search process.
- Click the Biller Name and Id link of the record for
which you want to modify the details. The Biller Onboarding - Biller Details screen appears.
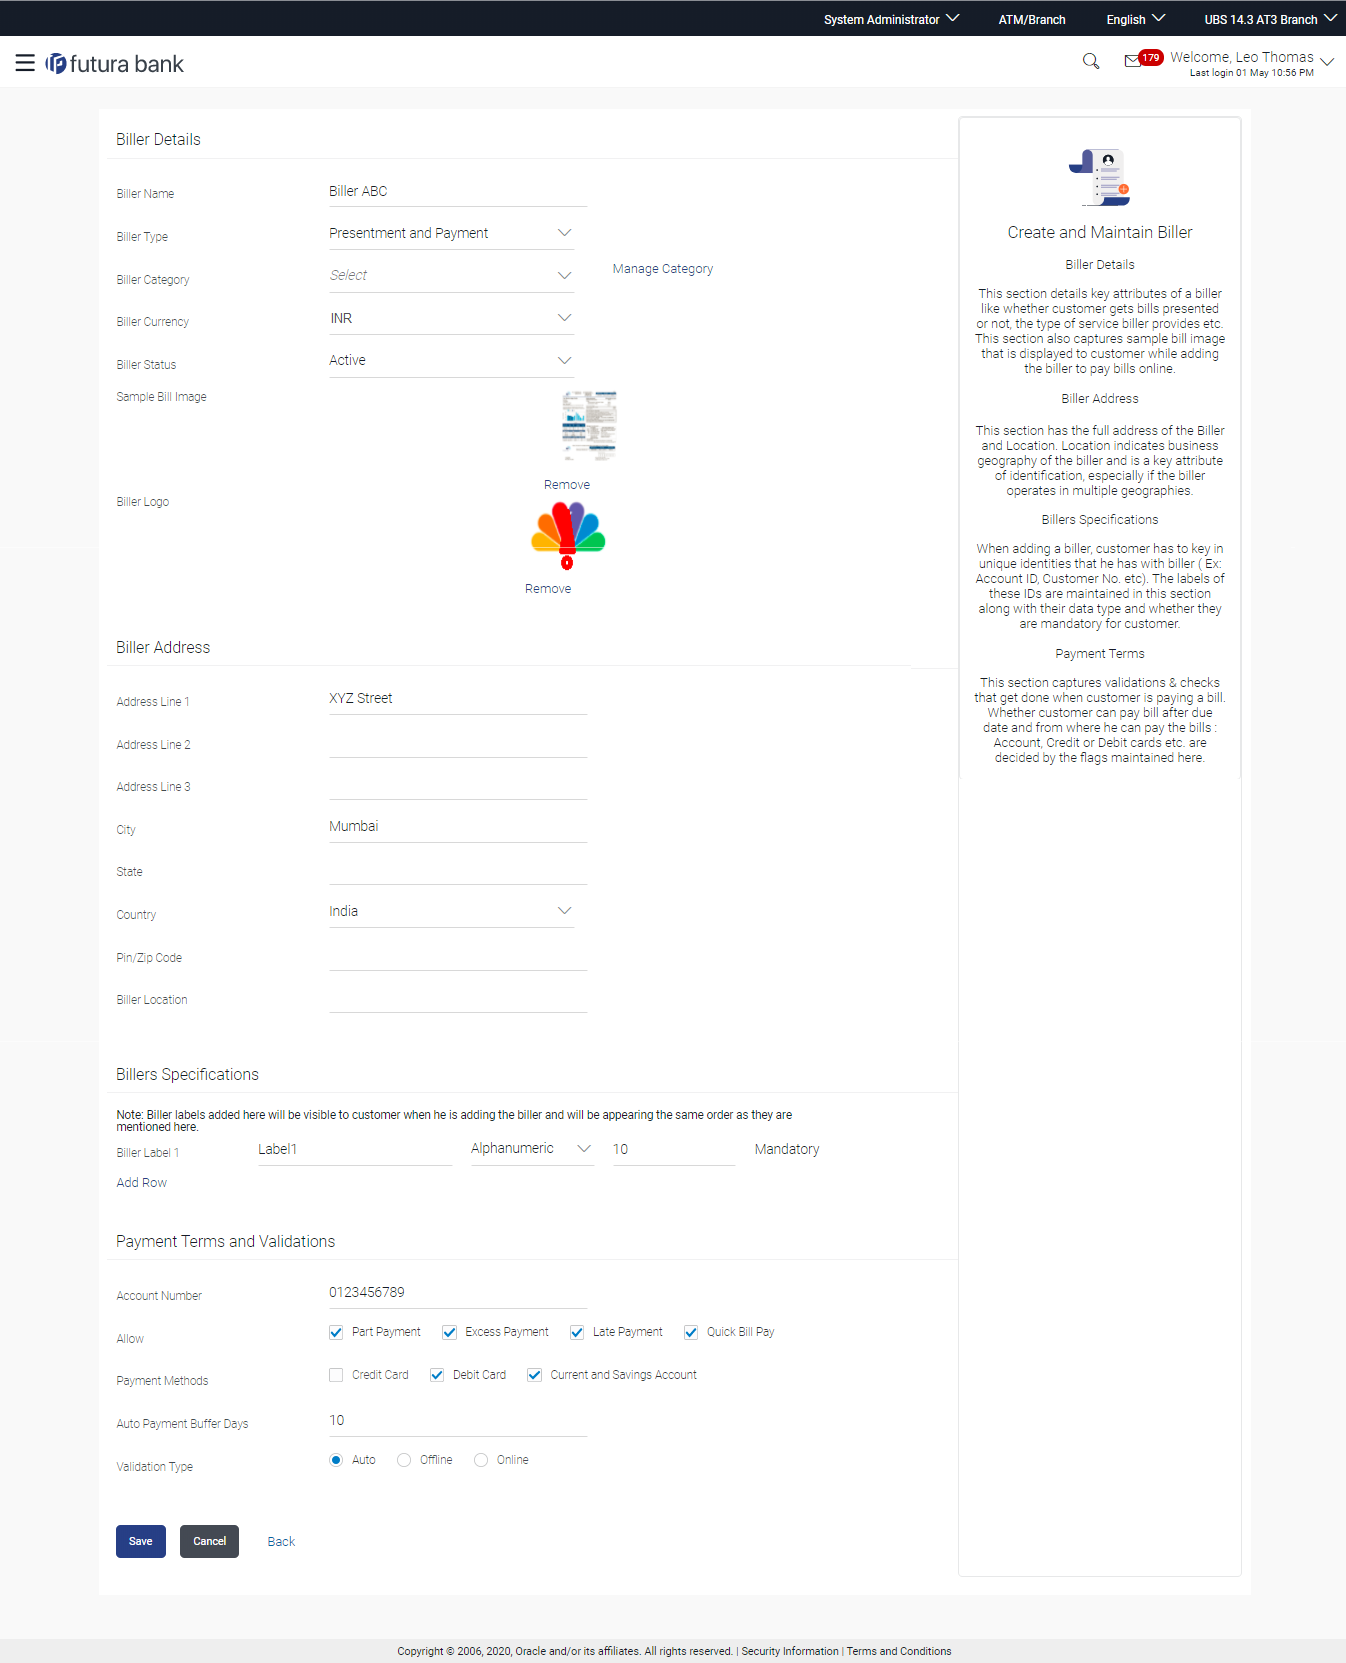
- Click Edit to edit the biller detailsThe Biller Onboarding - Edit screen appears.
Table 6-5 Field Description
Field Name Description Biller Name The name of the biller. Biller Type The option to select biller type. The biller type can be:- Presentment: Biller is of Presentment type
- Payment: Biller is of Payment type
- Presentment and Payment: Biller is of Presentment + Payment type
- Recharge: Biller is of Recharge type
Biller Category The biller category. Biller Currency Currency of the biller. Biller Status The status of the biller. The options are:- Active
- Inactive
Sample Bill Image The image of the physical bill presented by the biller, which is to be uploaded by the user. This helps the user to compare and identify Relationship number fields.
This field appears only for biller types Presentment and Presentment and Payment.
Biller Logo The biller logo which is to be uploaded by the user. This logo appear as an icon on the screen after uploading. Biller Address Address Line 1 to 3 Address of the biller. City City of the biller. State State of the biller. Country Country of the biller. PIN/ Zip Code Pin/ Zip code of the biller. Biller Location Location of the biller. Location could be City, Country, State, or combination of these values. Biller Specifications Biller Label 1 Relationship # 1 that the user has with the biller. This label will be displayed in customer screens (ex: Add Biller) to capture customer's unique id with biller.
The data type, field length and whether the field is mandatory or optional are also displayed against the field and are not editable.
Payment Terms and Validations Account Number Account number of the biller. Allow Select whether Part Payment, Excess Payment, Late Payment, Quick Bill Payment and Quick Recharge is allowed by the biller. This field appears only for Presentment type of biller.
Payment Methods Select the payment method accepted by the biller. The options are:- CASA
- Debit Card
- Credit Card
Auto Payment Buffer Days The number of days before bill due date, when the auto payment will be triggered by the system. This field will appear for Presentment and Presentment and Payment type of billers.
Validation Type The option to select the validation type. The options are:
- Auto
- Offline
- Online
Validation URL Redirection URL for customer validation. - In Biller Name field, enter the name of the biller that is to be searched, if required.
- From the Biller Status list, select the appropriate option, if required.
- Click the Remove link to remove the uploaded image, and click Choose Files to select and upload a new Sample Bill Image and Biller Logo if required.
- In the Biller Address section, enter the relevant address details of the biller.
- In the Biller Specifications section, edit the Relationship # 1 in the Biller Label 1 field, if required.
- In Account Number field, enter the account number of the biller.
- To enable the Part Payment, Excess Payment, Late Payment, Quick Bill Payment and Quick Recharge facilities, select the appropriate check boxes depending on the Biller Type.
- To enable the payments from current and savings account, debit card or credit card, select CASA, Debit Card or Credit Card check box.
- In the Validation Type field, select the appropriate option.
- If you select Online as Validation Type, enter the redirection URL in the Validation URL field.
- Click Save .OR
Click Cancel to cancel the transaction.
OR
Click Back to navigate to the previous screen.
- The Review screen appears.Verify the details, and click Confirm.
OR
Click Cancel to cancel the transaction.
OR
Click Back to navigate to the previous screen.
- 16. The success message along with the transaction reference number and status
appears.Click OK to complete the transaction.
Parent topic: Biller Onboarding
