13.3 Party Resource Access - Edit

The Bank Administrator gets a request with the list of remitter lists and transactions under each Remitter List for which access details needs to be edited for the party.

To edit remitter lists and transaction access for the party:

  1. Navigate to one of the above paths.
    The Party Resource Access - Edit screen appears.
  2. In the Party ID field, enter the party id of the user.
    OR

    In the Party Name field, enter the party name of the user.

  3. Click Search.
    For a searched party, Remitter List Mapping Summary appears.

    OR

    Click Cancel to cancel the transaction.

    OR

    Click Clear to reset the details.

  4. If there is no mapping done for a party , the message No Resource mapped for the party with Map option appears.
  5. Click the Remitter Type link to view/edit the details.
    The Party Resource Access- View screen appears.
  6. Click Edit.
    The Party Resource Access - Edit screen appears.

    This enables the selection and de-selection option against the Remitter List IDs and allows changing the map remitters from Auto to Manual and vice-versa.

    OR

    Click Next to go to the next tab (Transaction Mapping).

    OR

    Click Delete to delete the Party Resource Access setup.

    OR

    Click Cancel to cancel the transaction.

    OR

    Click Back to navigate to the previous screen.

    Figure 13-8 Party Resource Access - Remitter List Mapping - Edit


  7. To map the new resources (remitter lists), select appropriate option from New Remitter List Mapping field;
    Select Auto if you wish to allow access to all future remitter list.

    OR

    Select Manual if you wish to allow specific access to all future remitter list.

  8. Select the respective check boxes preceding the Remitter List ID to be mapped.
    OR

    Select Map All Remitter List, if you want to map all the remitters.

  9. Click Next.
    The Party Resource Access - Edit screen with mapped transaction - to the remitter appears.

    OR

    Click Cancel to cancel the transaction.

    OR

    Click Back to navigate to the previous screen.

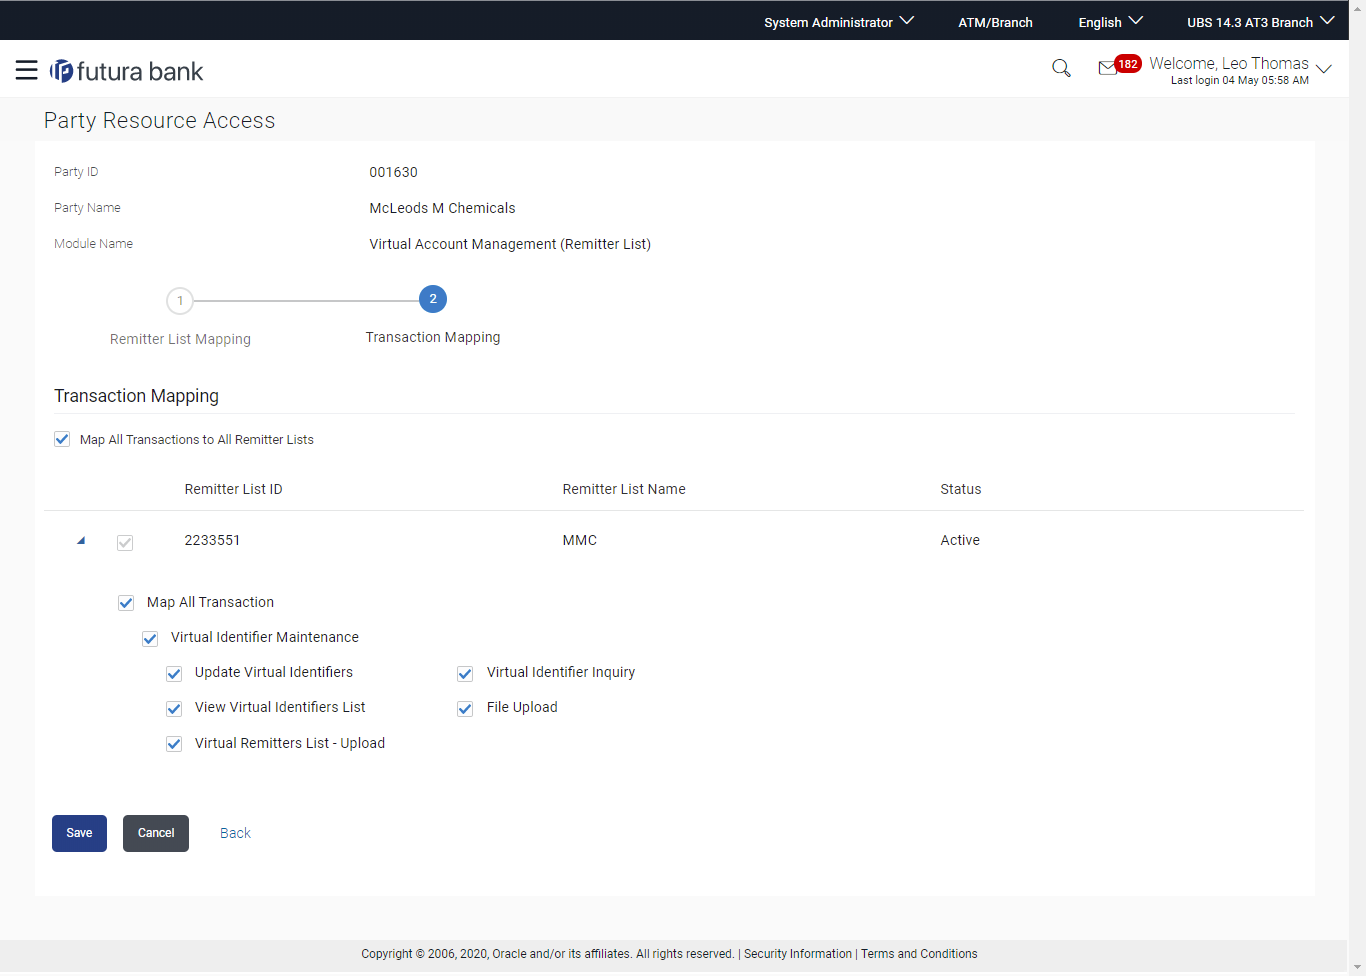
    Figure 13-9 Party Resource Access - Transaction Mapping - Edit


  10. To map the transactions to the Remitter lists, click against the particular remitter list ID to view the transaction mapping.
  11. Select the respective check boxes preceding the transaction to be mapped.
    OR

    Select Map All Transactions, if you want to map all the transactions to all remitter list IDs.

  12. Click Save to save the changes.
    OR

    Click Cancel to cancel the transaction.

    OR

    Click Back to navigate to the previous screen.

  13. The Party Resource Access - Review screen appears.
    Verify the details, and click Confirm.

    OR

    Click Cancel to cancel the transaction.

    OR

    Click Back to navigate to the previous screen.

  14. The screen with success message appears along with the reference number and status of the transaction.
    Click OK to complete the transaction.