- Core User Manual
- Service Request Form Builder
- Service Request Form Builder - Create
18.3 Service Request Form Builder - Create
- Request Parameters: This step involves entering the request name, description, product, type of service request etc.
- Build Your Form: In this steps System/ Bank administrator defines the various form fields and its attributes like field name, field type, field validations and error message which will be used to create business user's 'Service Request' screen for raising a new SR.
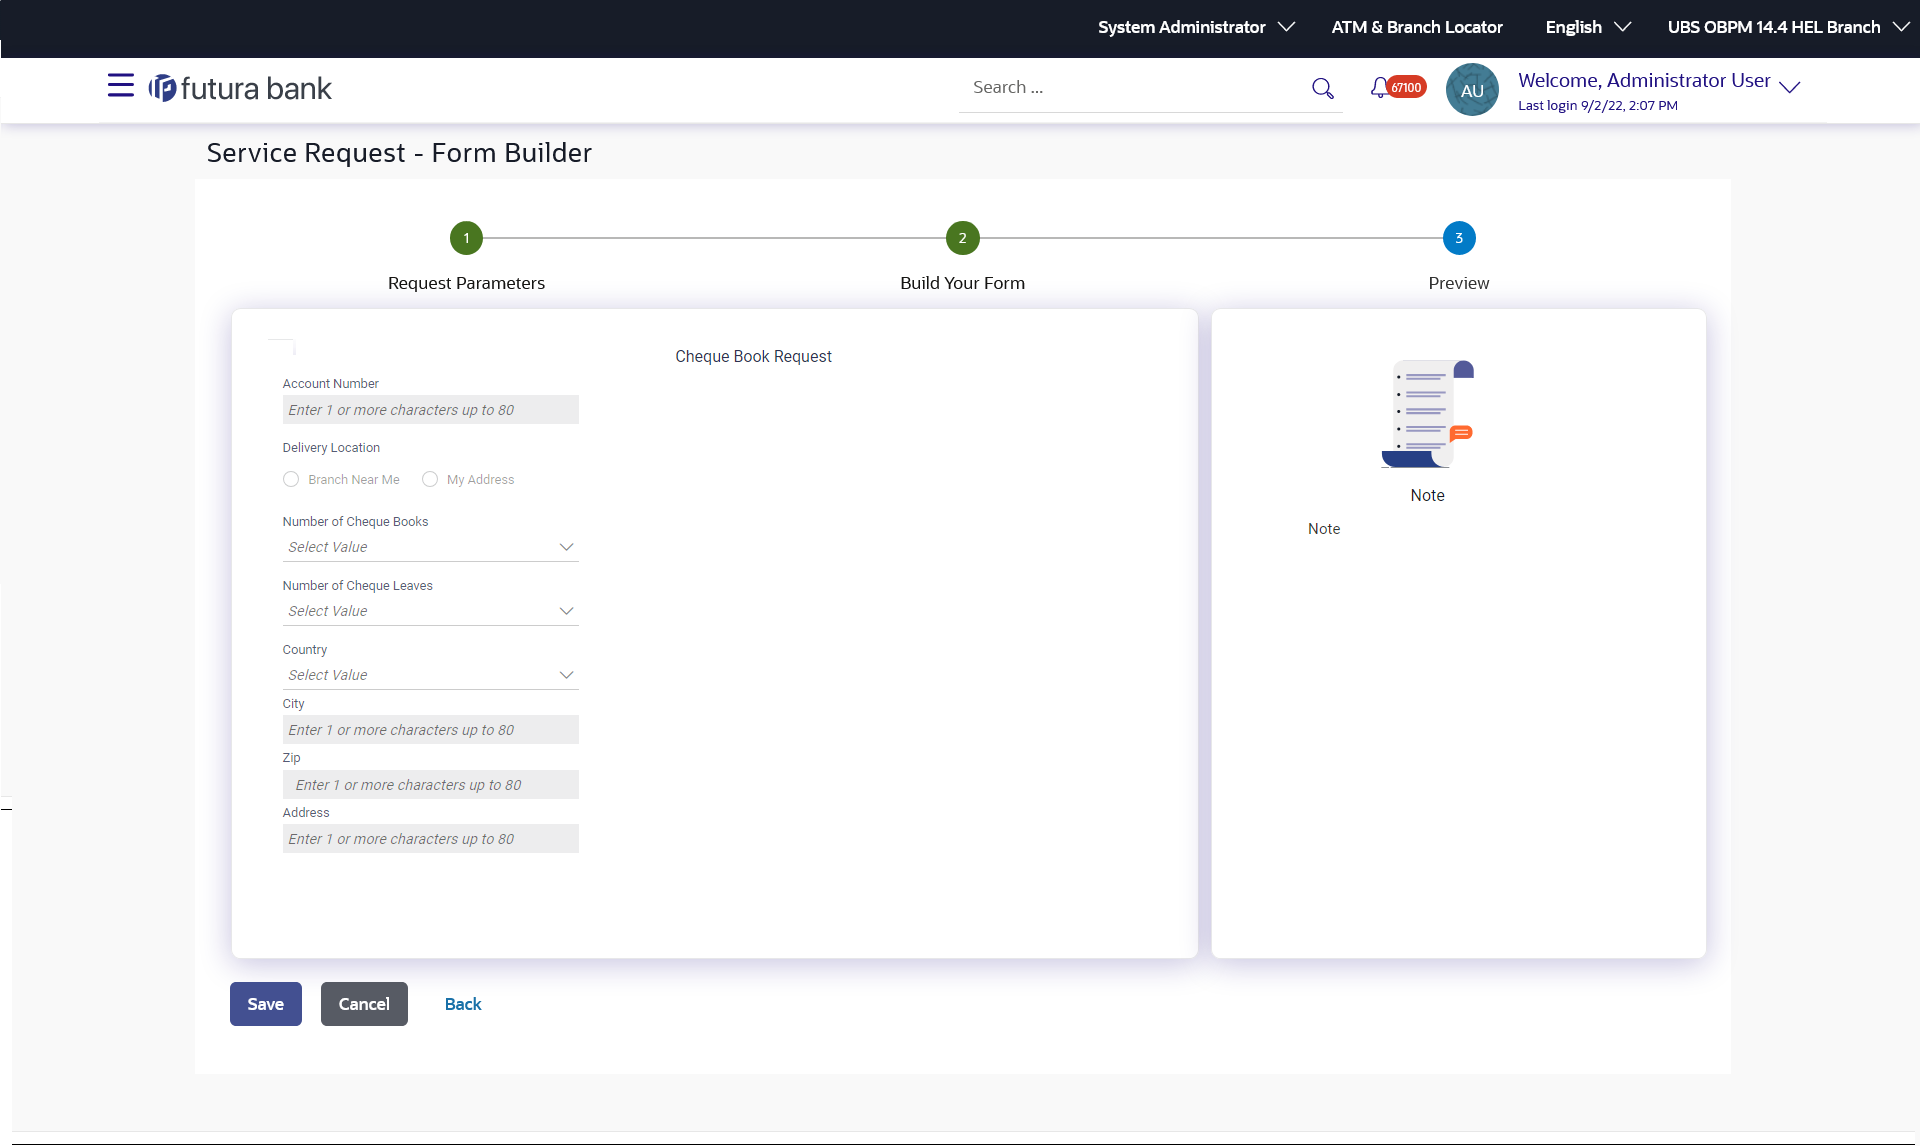
- Preview: After completing the screen creation System/Bank administrator previews the created Service Request in this step.
To create a new service request:
- Navigate to one of the above paths.The Service Request Definition screen appears.
- Click CreateThe Service Request - Form Builder screen appears.
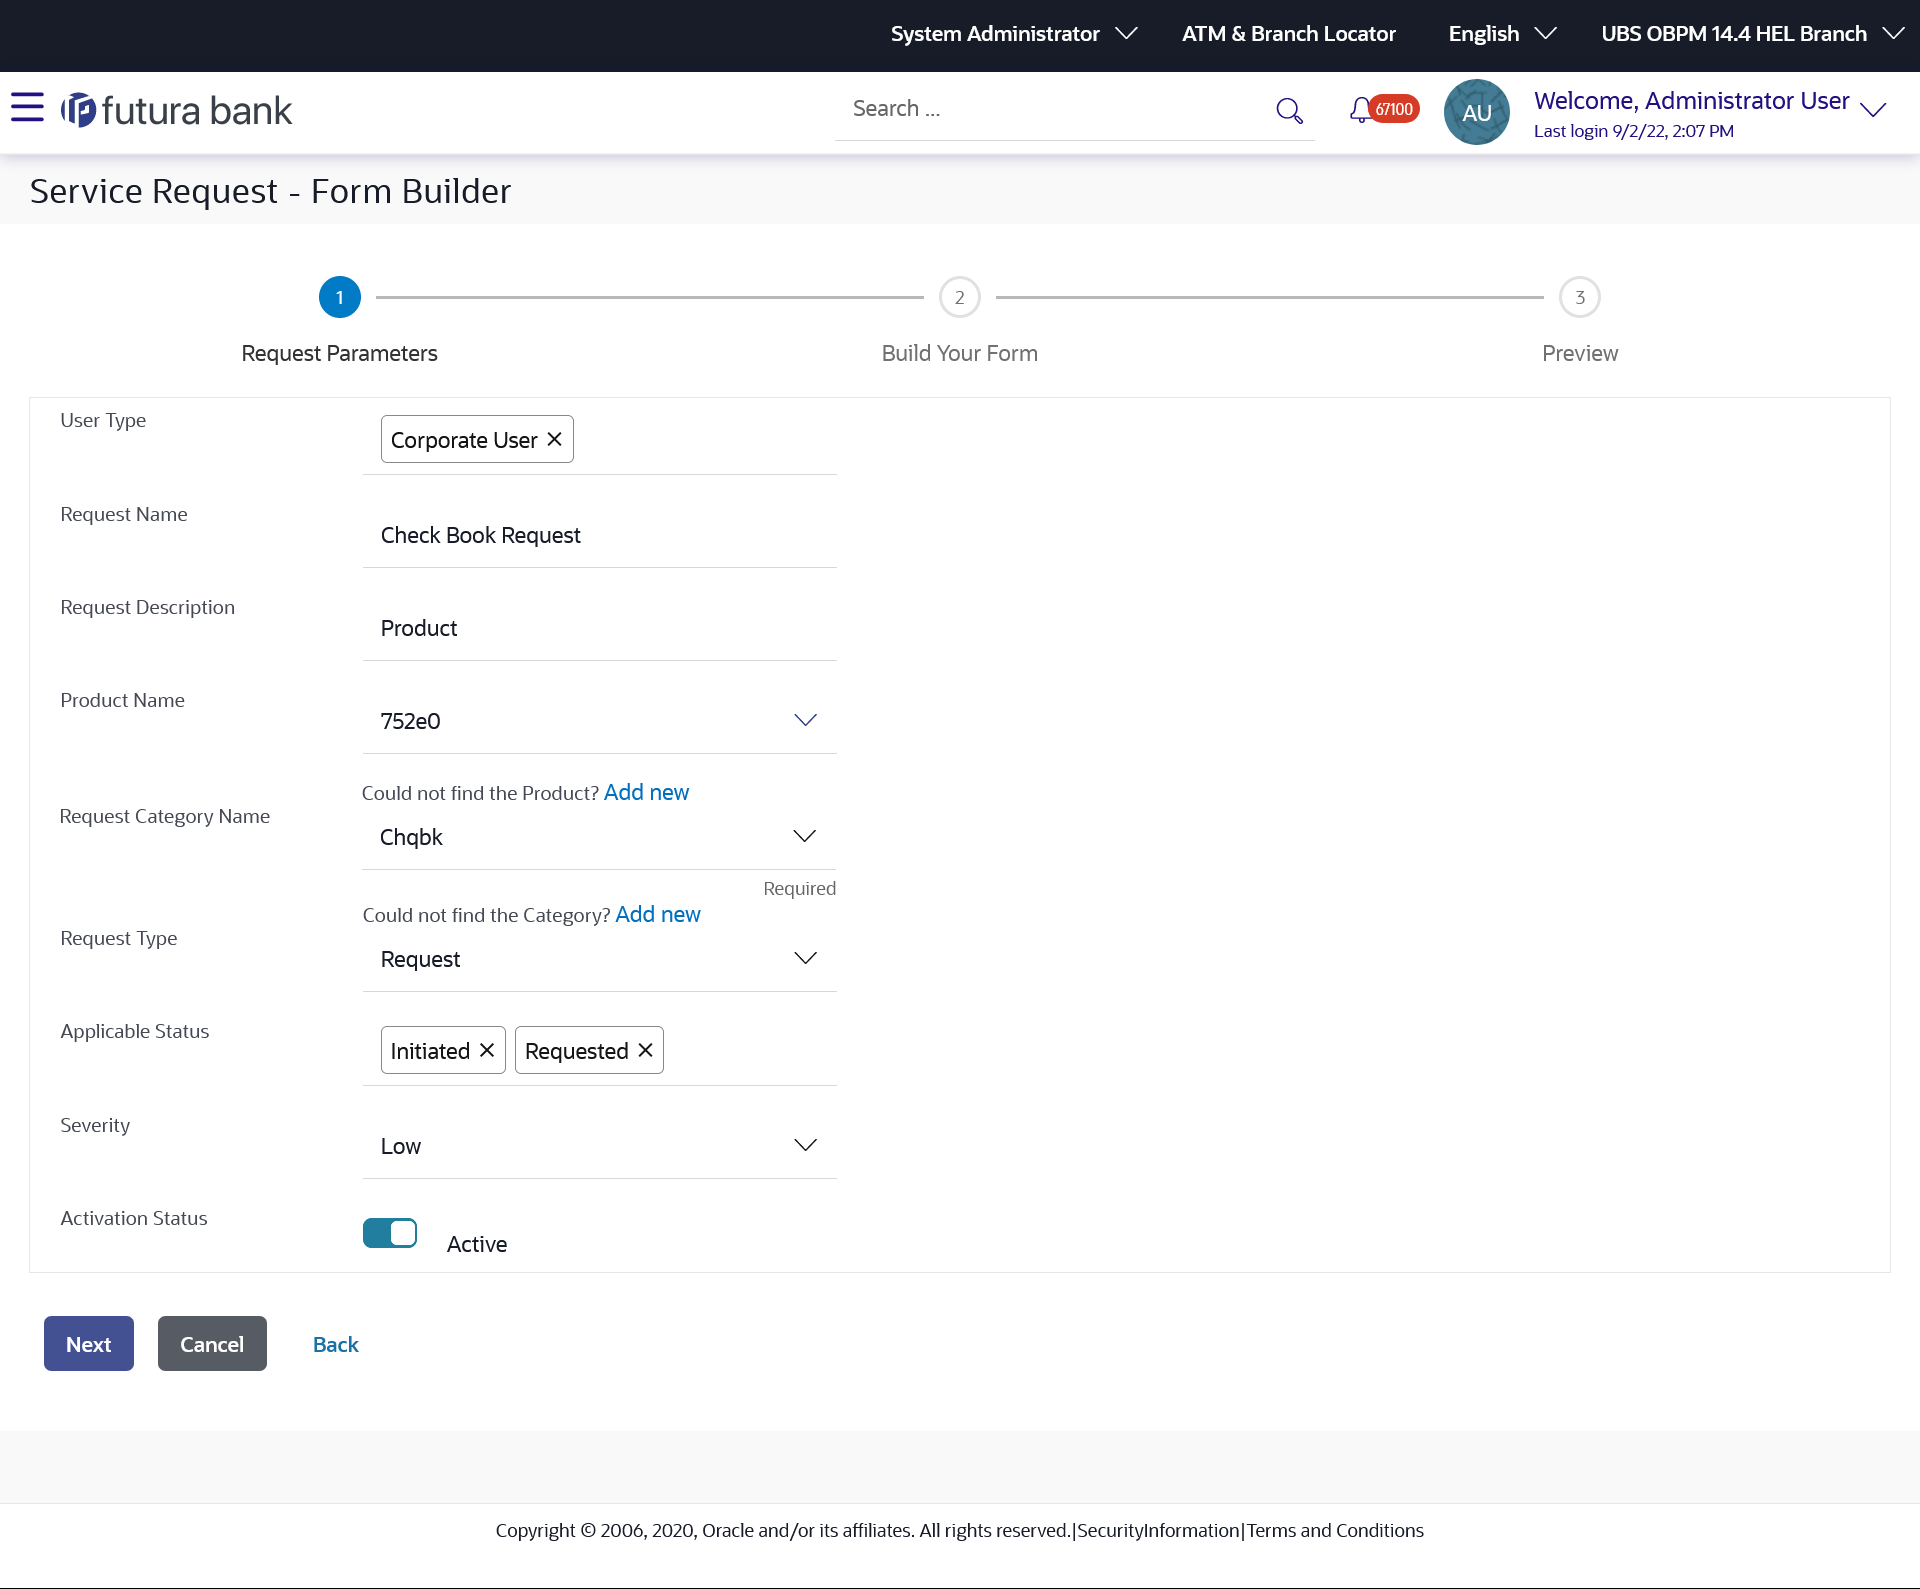
Figure 18-4 Service Request Form Builder - Request Parameters
Table 18-3 Field Description
Field Name Description User Type Specify the user type for whom the service request that is to be created.
The options are:
- Corporate User
- Retails User
Request Name The name of the service request that is to be created. Request Description The description of the service request. Product Name The name of the product for which service request is applicable. Service request definition will get listed in the business user's login, under the Product name selected in this field.
Click the Add New link to add a new product that is not listed in the drop-down list.
Request Category Name Category list gets populated on the basis of the product name selected. Service request definition will get listed in the business user's login, under the category name selected in this field.
Click the Add New link to add a category that is not listed in the drop-down list.
Request Type The type of service request. The options are:- Complaint
- Feedback
- Query
- Request
- Lead
- Fraud
Applicable Status The statuses that should be applicable for the service request. Administrator can select multiple status in this field. Default status for any request that raised by user will in 'Initiated' status.
Severity The severity of the service request. Activation Status The option to activate or de-activate the service request. Only Active requests will be available for getting raised by business user. The statuses are:- Active
- Inactive
- In the User Type field, select the appropriate user type for whom the service request that is to be created
- In the Request Name field, enter the name of the service request.
- In the Request Description field, enter the description of the service request.
- From Product Name list, select the appropriate product
for the service request.OR
Click the Add New link, if you want to add a product that is not listed in the drop-down list.
- From Request Category Name list, select the appropriate
product category for the service request.OR
Click the Add New link, if you want to add a new product category that is not listed in the drop-down list.
- From Request Type list, select the appropriate type of service request.
- From Applicable Status list, select the status applicable for the service request.
- From Severity list, select the severity of the service request.
- In the Activation Status toggle field, select the activation status of the service request.
- Click Next.The Service Request Form Builder - Build Your Form screen appears.
OR
Click Cancel to cancel the transaction.
OR
Click Back to navigate to the previous screen.
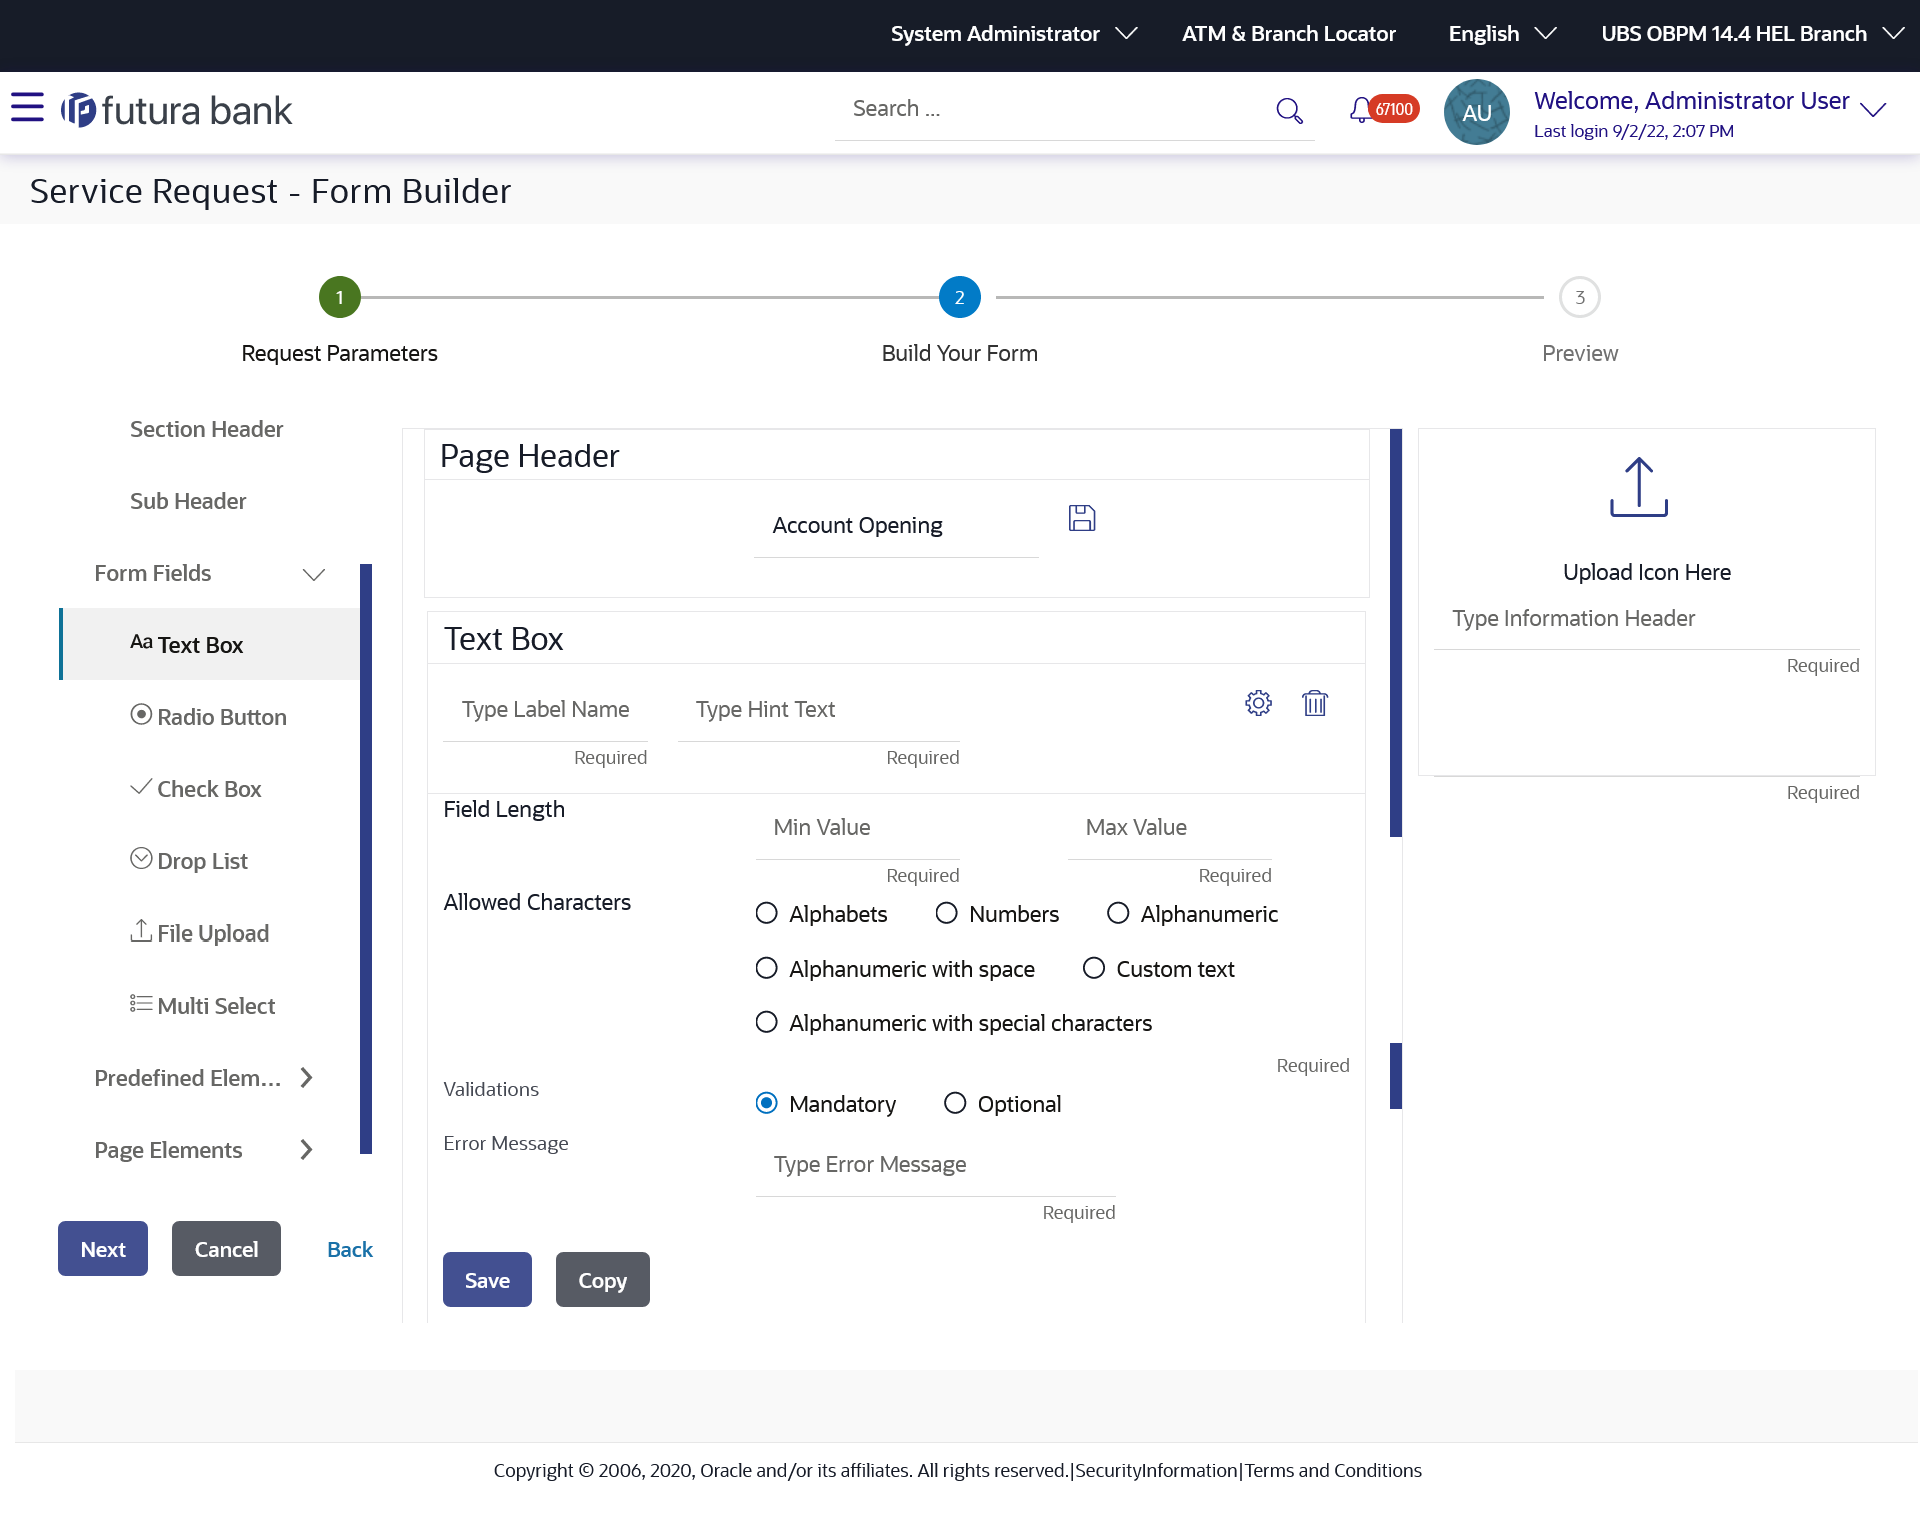
Figure 18-5 Service Request Form Builder - Build Your Form
Table 18-4 Field Description
Field Name Description Header H1 Page Header Page header for the request form. By default the header is available on the form, there it is shown is disabled mode on the left side panel. H2 Section Header The section header of the request form. H3 Sub Header The section sub header of the request form. Form Fields Text Box Type Label Name The label name of the field. This fields is mandatory If the user selects Text box.
Type Hint Text The hint text to explain the field. Field Length - Min Value-Max Value Minimum and maximum field length of the text box for the text to be entered. Allowed Characters Characters that should be allowed in the text box as input. The options are:- Alphabets
- Numbers
- Alphanumeric
- Alphanumeric with space
- Alphanumeric with special characters
Validations The validation to define whether the field is mandatory or optional. Error Message The error message to be displayed to the business user if he does not enter data in the field that is defined as mandatory field. Radio Button Type Label Name The label name of the field. Type Value 1 The first option of the radio button field. Type Value 2 The second option of the radio button field. Add More Values The button to add more options to the radio button. Validations The validation to define whether the field is mandatory or optional. Error Message The error message to be displayed to the business user if he does not enter data in the field that is defined as mandatory field. Check Box - Multiple Choice Type Value The label name of the multiple-choice field. Type Value 1 The first option of the multiple-choice field. Type Value 2 The second option of the multiple-choice field. Add More Values The button to add more options to the multiple-choice check box. Validations The validation to define whether the field is mandatory or optional. Error Message The error message to be displayed to the business user if he does not enter data in the field that is defined as mandatory field. Drop List Type Value The label name of the drop-down list field. Combo Box for Drop - down values The combo box to enter the options of the drop-down list. Validations The validation to define whether the field is mandatory or optional. Error Message The error message to be displayed to the business user if he does not enter data in the field that is defined as mandatory field. File Upload Type Label Name The label name of the field, where the user want to upload the file. Validations The validation to define whether the field is mandatory or optional. Error Message The error message to be displayed to the business user if he does not enter data in the field that is defined as mandatory field. Multi Select Type Value The label name of the multi select field. Combo Box for Drop - down values The combo box to enter the options of the multi select field. Validations The validation to define whether the field is mandatory or optional. Error Message The error message to be displayed to the business user if he does not enter data in the field that is defined as mandatory field. Predefined Elements The fields that are already defined and are commonly used, can be added directly in the business user form. Value for these fields gets auto populated, administrator can only define the label name, validations and error message for the same. Following predefined elements are defined in this option:- Account Number: Text box to enter the account number of the user. This field populates all active accounts for the customer who is raising that Service Request when displayed on the Service request form.
- Account Number & Debit Card: Drop-down to select the account number and debit card. This field populates all active accounts and debit cards (for the selected account) for the customer who is raising that Service Request when displayed on the Service request form.
- Gender: Drop-down to select the gender of the user
- Salutation: Drop-down to select the salutation of the user
- Date: Date picker to select the date
- Country And States: Drop-down to select the country and state of the user
Page Elements The page elements consists of text that needs to be displayed to the business user. The page elements are:
Confirmation Message: confirmation message that is to be displayed to the business user after submission of the request.
Information Header The header name and the information notes that is to be displayed on information panel section of the Service request page of the business user. - In the H1 Page Header field, enter the header of the
service request form and click
 icon.
icon. - Select the H2 Section Header and H3 Sub Header field (if required) and enter the H2 header name and H3 sub header name on the request form.
- In the Form Fields,click the Text Box field if required, the text box section appears.
- In the Type Label Name field, enter the label name of the field.
- In the Field Length field, enter the minimum and maximum value for the length of the field.
- In the Allowed Characters field, select the appropriate option.
- In the Error Message field, enter the error message to be displayed to the business user.
- Click Save to save the
details.
OR
Click Copy if you want to make the copy of this field with similar field attributes.
- In the Form Fields, click the Radio
button field if you want to add radio button in the business
user request form the radio button section appears.OR
Click Add More Values to add more options of radio button.
- Enter the required detail and click Save to save the
details.OR
Click Copy if you want to make the copy of this field with similar field attributes.
- You can also add Check Box, Drop-Down list, Multi Select fields, if required to build the business user request form.
- You can drag and drop the field attributes window, if you want to change the sequence of the fields.
- Click the Predefined Elements section, if you want to add the fields that are already defined.
- In the Page Elements field select Confirmation message, enter the required text message which you want to appear in the business user form on the confirmation page.
- In the Information box, enter the header name and the
information notes that you want to appear in the right side of the business user
service request form.Click the Upload icon, if you want to upload an image.
- Click Next.The Service Request Form Builder - Preview screen appears.
OR
Click Cancel to cancel the transaction.
OR
Click Back to navigate to the previous screen.
Figure 18-6 Service Request Form Builder - Preview
- Click Save to save the details.OR
Click Cancel to cancel the transaction.
OR
Click Back to navigate to the previous screen.
- The Review screen appears.Verify the details, and click Confirm.
OR
Click Cancel to cancel the transaction.
OR
Click Back to navigate to the previous screen.
- The success message appears along with the reference number and status.Click OK to complete the transaction.
Parent topic: Service Request Form Builder


