- Core User Manual
- Touch Point Maintenance
- Touch Point Maintenance - Create
30.3 Touch Point Maintenance - Create
Using this option, System Administrator can create new touch point of
type Internal or External.
To create a touch point:
- Navigate to one of the above paths.The Touch Point Maintenance screen appears.
- Click Create.The Touch Point Maintenance - Create screen appears.
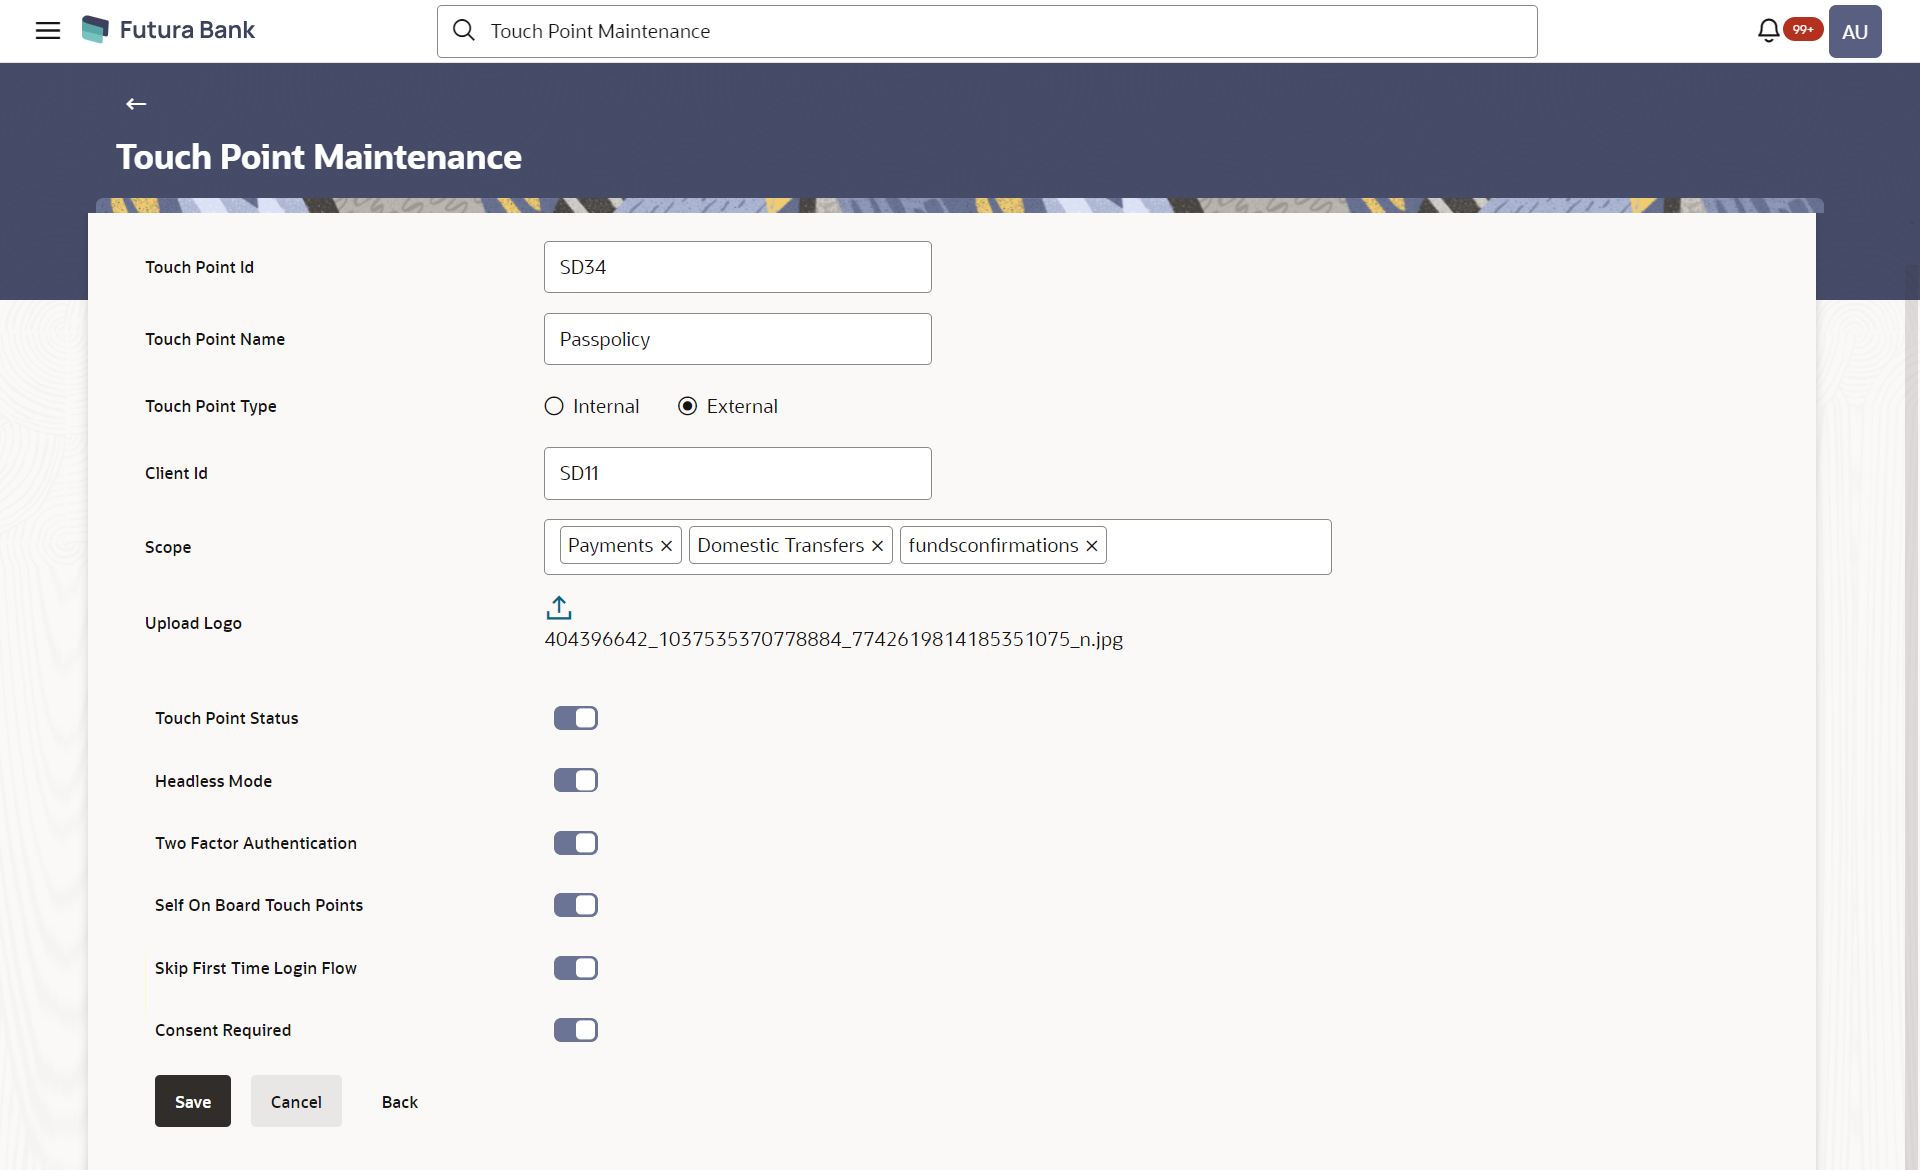
Figure 30-5 Touch Point Maintenance - Create
Table 30-4 Field Description
Field Name Description Touch Point ID Specify the unique ID for the Touch Point. Touch Point Name Specify the name for the Touch Point. Touch Point Type Select the type of Touch point type i.e. whether the type is Internal or External Client ID Specify the Client ID for the touch point. This field is mandatory for External Type of Touch point. Scope Specify the applicable scope(s) for the touch point. This field is enabled, if you select External option in the Touch Point Type field.
Upload Logo Upload logo of the Third Party Provider through browse and upload image option. This field is enabled, if you select External option in the Touch Point Type field. Touch Point Status Select the status for the touch point i.e. whether it is active/inactive. Headless Mode Select the mode in which the touch point operates i.e. whether headless mode is to be enabled for a touch point. Note:
By default this mode is in disabled state.Two Factor Authentication Select if Two Factor Authentication is required for a touch point. Default Available Select if Touch point is to be default made available to users. If enabled, then the user gets access to touch points which are default available Self On Board Touch Points Select if user will self on board himself on the touch point or by the bank administrator. If the bank administrator on boards the user on a touch point, then the same needs to be disabled. Skip First Time Login Flow Select if user wants to skip the first time login flow for a touch point. If this option is enabled for the selected touch point, user will not be shown the first time login steps (configured in system rule), when he/she logs in for the first time. Consent Required Select if user wants Consent definition and validation is required for a Touch Point i.e. TPPs. For UK/Berlin Open Banking, it should always be defined as ‘Y’. - In the Touch Point ID field, enter the unique ID for the touch point.
- In the Touch Point Name field, enter the name for touch point.
- In the Touch Point Type field, select the appropriate option i.e. Internal or External.
- In the Client ID field, enter the client ID.
- If you select External;
- Click Scope; select the appropriate scope from the drop-down.
- Click on upload icon to upload a logo for the external type of touch point.
- If you select External;
- Click the Touch Point Status toggle to enable it to mark the touch point ‘Active’.
- Click the Headless Mode toggle to enable the touch point in headless mode.
- Click the Two Factor Authentication toggle to enable 2FA for a touch point.
- Click the Default Available toggle to make the touch point available to users by default in case of self-onboarding.
- Click the Self On board Touch Point toggle if the user will self-onboard himself on the touch point and not by bank administrator.
- Click the Skip First Time Login Flow toggle if the user wants to skip it for touch point.
- Click Save to save the template information.OR
Click Cancel to cancel the transaction.
OR
Click Back to navigate to the previous screen.
- The Review screen appears.Verify the details, and click Confirm.
OR
Click Cancel to cancel the transaction.
OR
Click Back to navigate to the previous screen.
- The success message of touch point creation successfully appears along with the
transaction reference number. Click OK to complete the transaction.
Parent topic: Touch Point Maintenance
