- Core User Manual
- Transaction Blackout
- Transaction Blackout - Create
50.2 Transaction Blackout - Create
- Full – Black out for the entire period.
- Daily - Blackout between start and end time daily, for the days set.
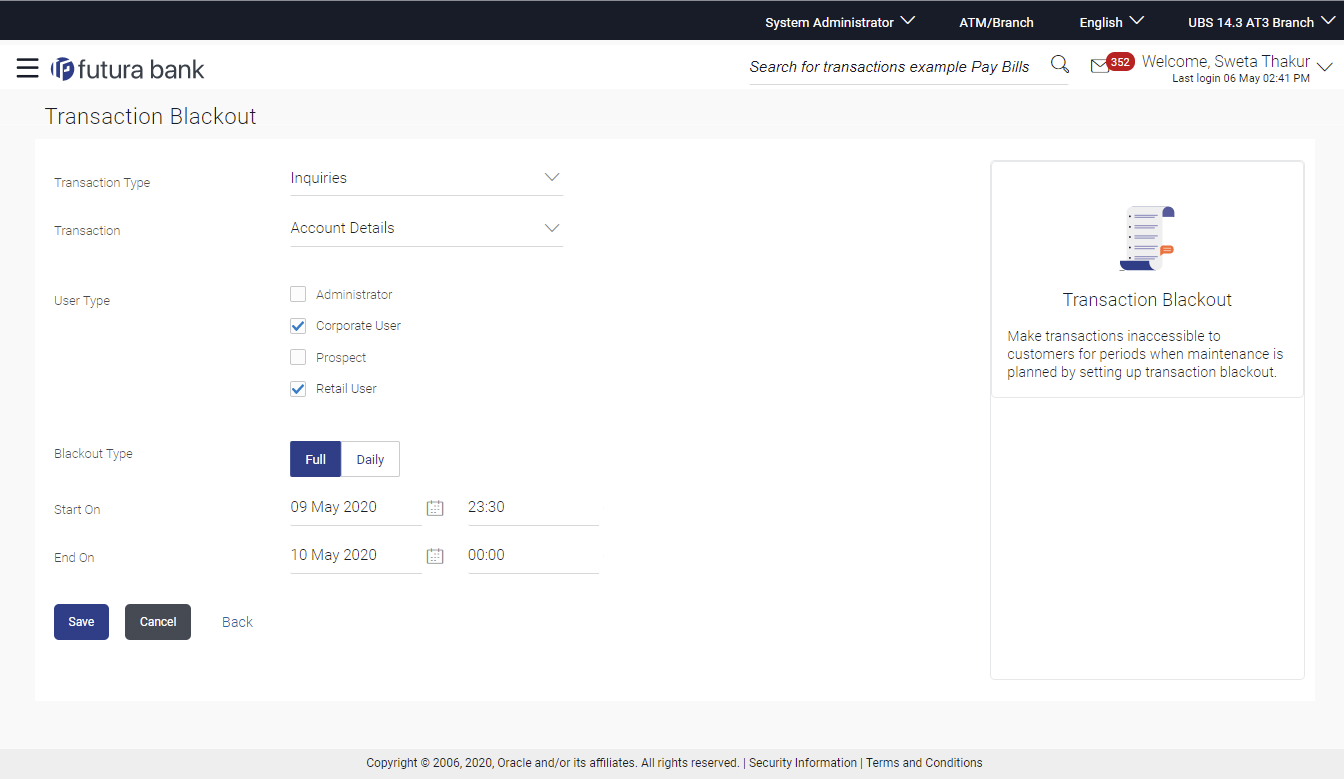
To create new transaction blackout:
- Navigate to one of the above paths.The Transaction Blackout screen appears.
- Click Create.
- From the Transaction list select the appropriate
option.
Note:
- You can select multiple transactions out of the listed transactions for setting up the blackout in one go.
- There will be an option as ‘All transactions’ in the dropdown, on selecting the same all the listed transactions, will get selected for maintaining the blackout.
- From the User Type select the appropriate option.
- From the Blackout Type select the appropriate option:
- If you select Full Day:
- From the Start On list, select the start date and time of the transaction blackout.
- From the End On list, select the end date and time of the transaction blackout.
- If you select Daily:
- From the Date Range list select the start and end date of the transaction blackout.
- From the Time Range list select the start and end time of the transaction blackout.
Note:
You can click +Add Time Range button, to add multiple time options for transaction blackout.Table 50-3 Field Description
Field Name Description Transaction Type Transaction type to be blacked out. The options are:- Maintenances
- Administration
- Inquiries
- Non-Financial
- Financial
Transaction The specific transaction, for which a blackout is to be maintained. Note:
- You can select multiple transactions out of the listed transactions for setting up the blackout in one go.
- There will be an option as ‘All transactions’ in the dropdown, on selecting the same all the listed transactions, will get selected for maintaining the blackout.
- Selected transactions will go as an individual maintenance for approval (one approval for one transaction)
- Selected transactions will be available as a single maintenance in view and edit.
- Multiple selection would be available only at the time of set up. Maintained blackout can be inquired and edited only for one transaction at a time
User Type The type of user for whom the transaction is blacked out. The user types could be:- Corporate User
- Administrator
- Retail User
- Prospect
Blackout Type Type of black out. - Full: A Full transaction blackout prevents access to a transaction from a certain day/time to certain day / time. The transaction is not enabled at all, during a full blackout
- Daily: A daily transaction blackout prevents access to a transaction for the defined time in a day, over few days. The transaction is enabled, outside of the blackout window, in case of a daily blackout
Start On Start date and time for the blackout. This field will be displayed if the Blackout type is selected as ‘Full’.
End On End date and time for the blackout. This field will be displayed if the Blackout type is selected as ‘Full’.
Date Range Blackout start and end date. This field will be displayed if the Blackout type is selected as ‘Daily’.
Time Range Blackout start and end time. This field will be displayed if the Blackout type is selected as ‘Daily’.
Note:
When blackout type is full - the following fields are displayed and enabled: Start On (Date and Time) End On and (Date and Time)
When blackout type is Daily - the following fields are displayed and enabled - Date Range - From and To. Time Range - From and To. And, an option to Add Time Range
- Click Save to create the transaction blackout.User will be directed to the Transaction Blackout-Create - review page post necessary validations.
OR
Click Cancel to cancel the transaction.
OR
Click Back to navigate to the previous screen.
- The Review screen appears.Verify the details, and click Confirm.
OR
Click Cancel to cancel the transaction.
OR
Click Back to navigate to the previous screen.
- The success message appears along with the transaction reference number.Click OK to complete the transaction.
Parent topic: Transaction Blackout
