- Core User Manual
- Transaction Blackout
- Transaction Blackout - Search
50.1 Transaction Blackout - Search
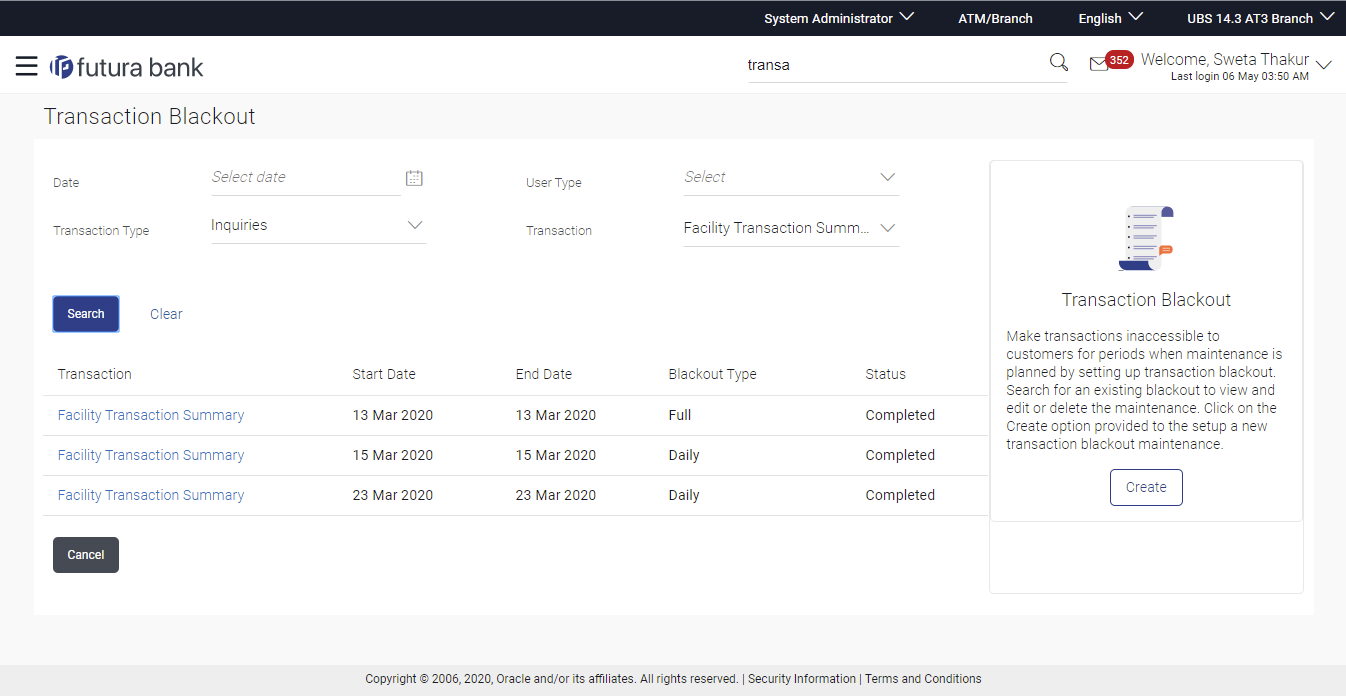
To search for transactions under a particular user type:
- Navigate to one of the above paths.The Transaction Blackout screen appears.
- Enter the search criteria.
- Click Search, displays results based on search
criteria.OR
Click Clear to reset the details.
OR
Click Cancel to cancel the transaction.
Table 50-1 Field Description
Field Name Description Date Date of the transaction blackout. User Type The type of user for whom the transaction is blacked out. The user types could be:
- Corporate User
- Administrator
- Retail User
- Prospect
Transaction Type Transaction type to be blacked out. The options are:- Maintenances
- Administration
- Inquiries
- Non-Financial
- Financial
Transaction The specific transaction, for which a blackout is maintained. Transactions list displayed here gets populated basis on the transaction type selected in the previous field. Search Result Transaction The specific transaction, for which a blackout is maintained Start Date Start date for the blackout. End Date End Date End date for the blackout. Blackout Type Type of black out.
- Full: Indicates that it will be complete transaction blackout for the set date and time.
- Daily: Indicates that it will be daily blackout for the set date and time.
Status The transaction blackout status. The options are:- Ongoing: Indicates that blackout is ongoing.
- Scheduled: Indicates that scheduled for some day in the future.
- View the table with search results. This table contains the start date and end date of the blackout maintenance. Transaction for which the blackout is applicable, the type of blackout (full or daily) and the status – whether the blackout is ongoing, or scheduled for some day in the future.
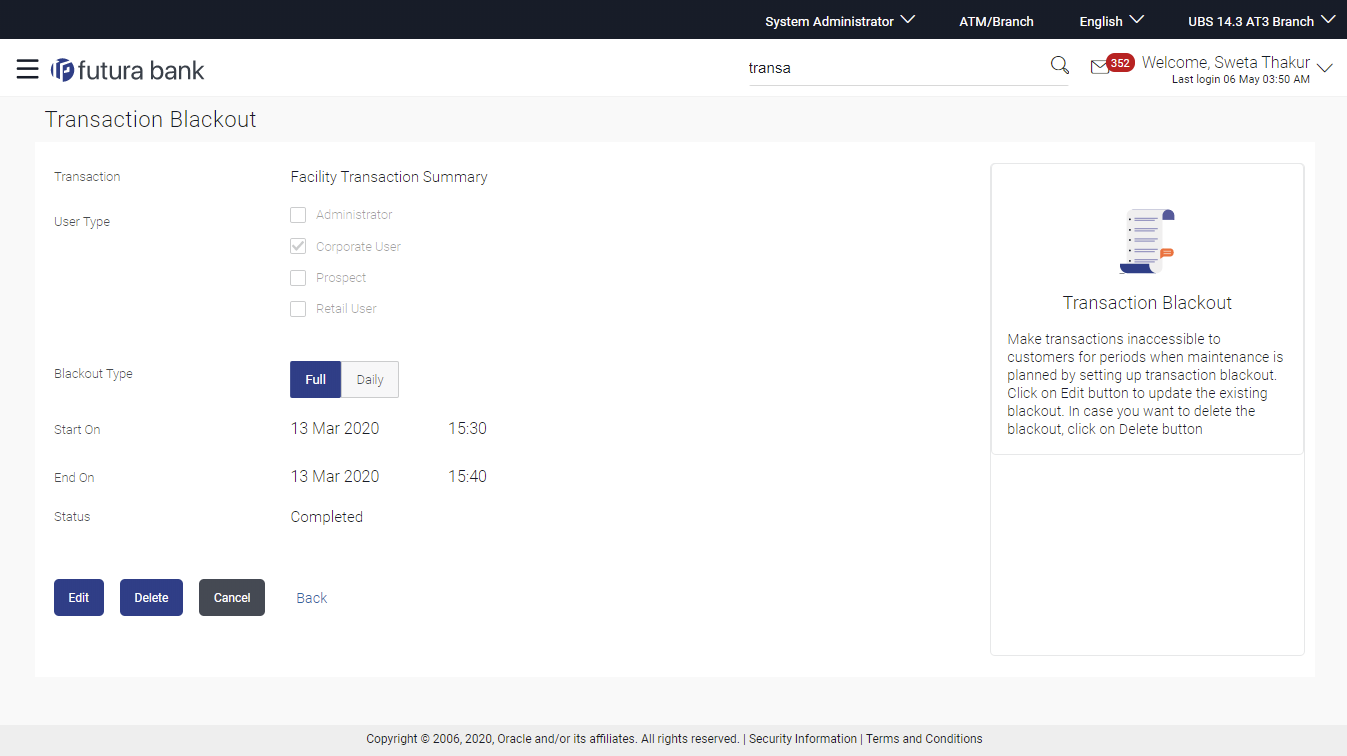
- Click on the field Transaction to view more
details.
Figure 50-3 Transaction Blackout- View details

Table 50-2 Field Description
Field Name Description Transaction The specific transaction, for which a blackout is maintained. User Type The type of user for whom the transaction is blacked out. The user types could be:- Corporate User
- Administrator
- Retail User
- Prospect
Blackout Type Type of black out. - Full: Indicates that it will be complete transaction blackout for the set date and time.
- Daily: Indicates that it will be daily blackout for the set date and time.
Start On Start date and time for the blackout. This field will be displayed if the Blackout type is selected as ‘Full’.
End On End date and time for the blackout. This field will be displayed if the Blackout type is selected as ‘Full’.
Date Range Blackout start and end date. This field will be displayed if the Blackout type is selected as ‘Daily’.
Time Range Blackout start and end time. This field will be displayed if the Blackout type is selected as Daily’.
Note:
When blackout type is full - the following fields are displayed and enabled: Start On (Date and Time) End On and (Date and Time)
When blackout type is Daily - the following fields are displayed and enabled - Date Range - From and To. Time Range - From and To. And, an option to Add Time
Status The transaction blackout status. The options are:- Ongoing: Indicates that blackout is ongoing.
- Scheduled: Indicates that scheduled for some day in the future.
- Click Edit to edit the maintenance.Click Delete to delete the maintenance.
OR
Click Cancel to cancel the operation.
OR
Click Back to navigate to the previous screen.
Parent topic: Transaction Blackout
