- Core User Manual
- User Account Access
- User Account Access - Mapping (Create)
12.1 User Account Access - Mapping (Create)
To provide the user with account and transaction access:
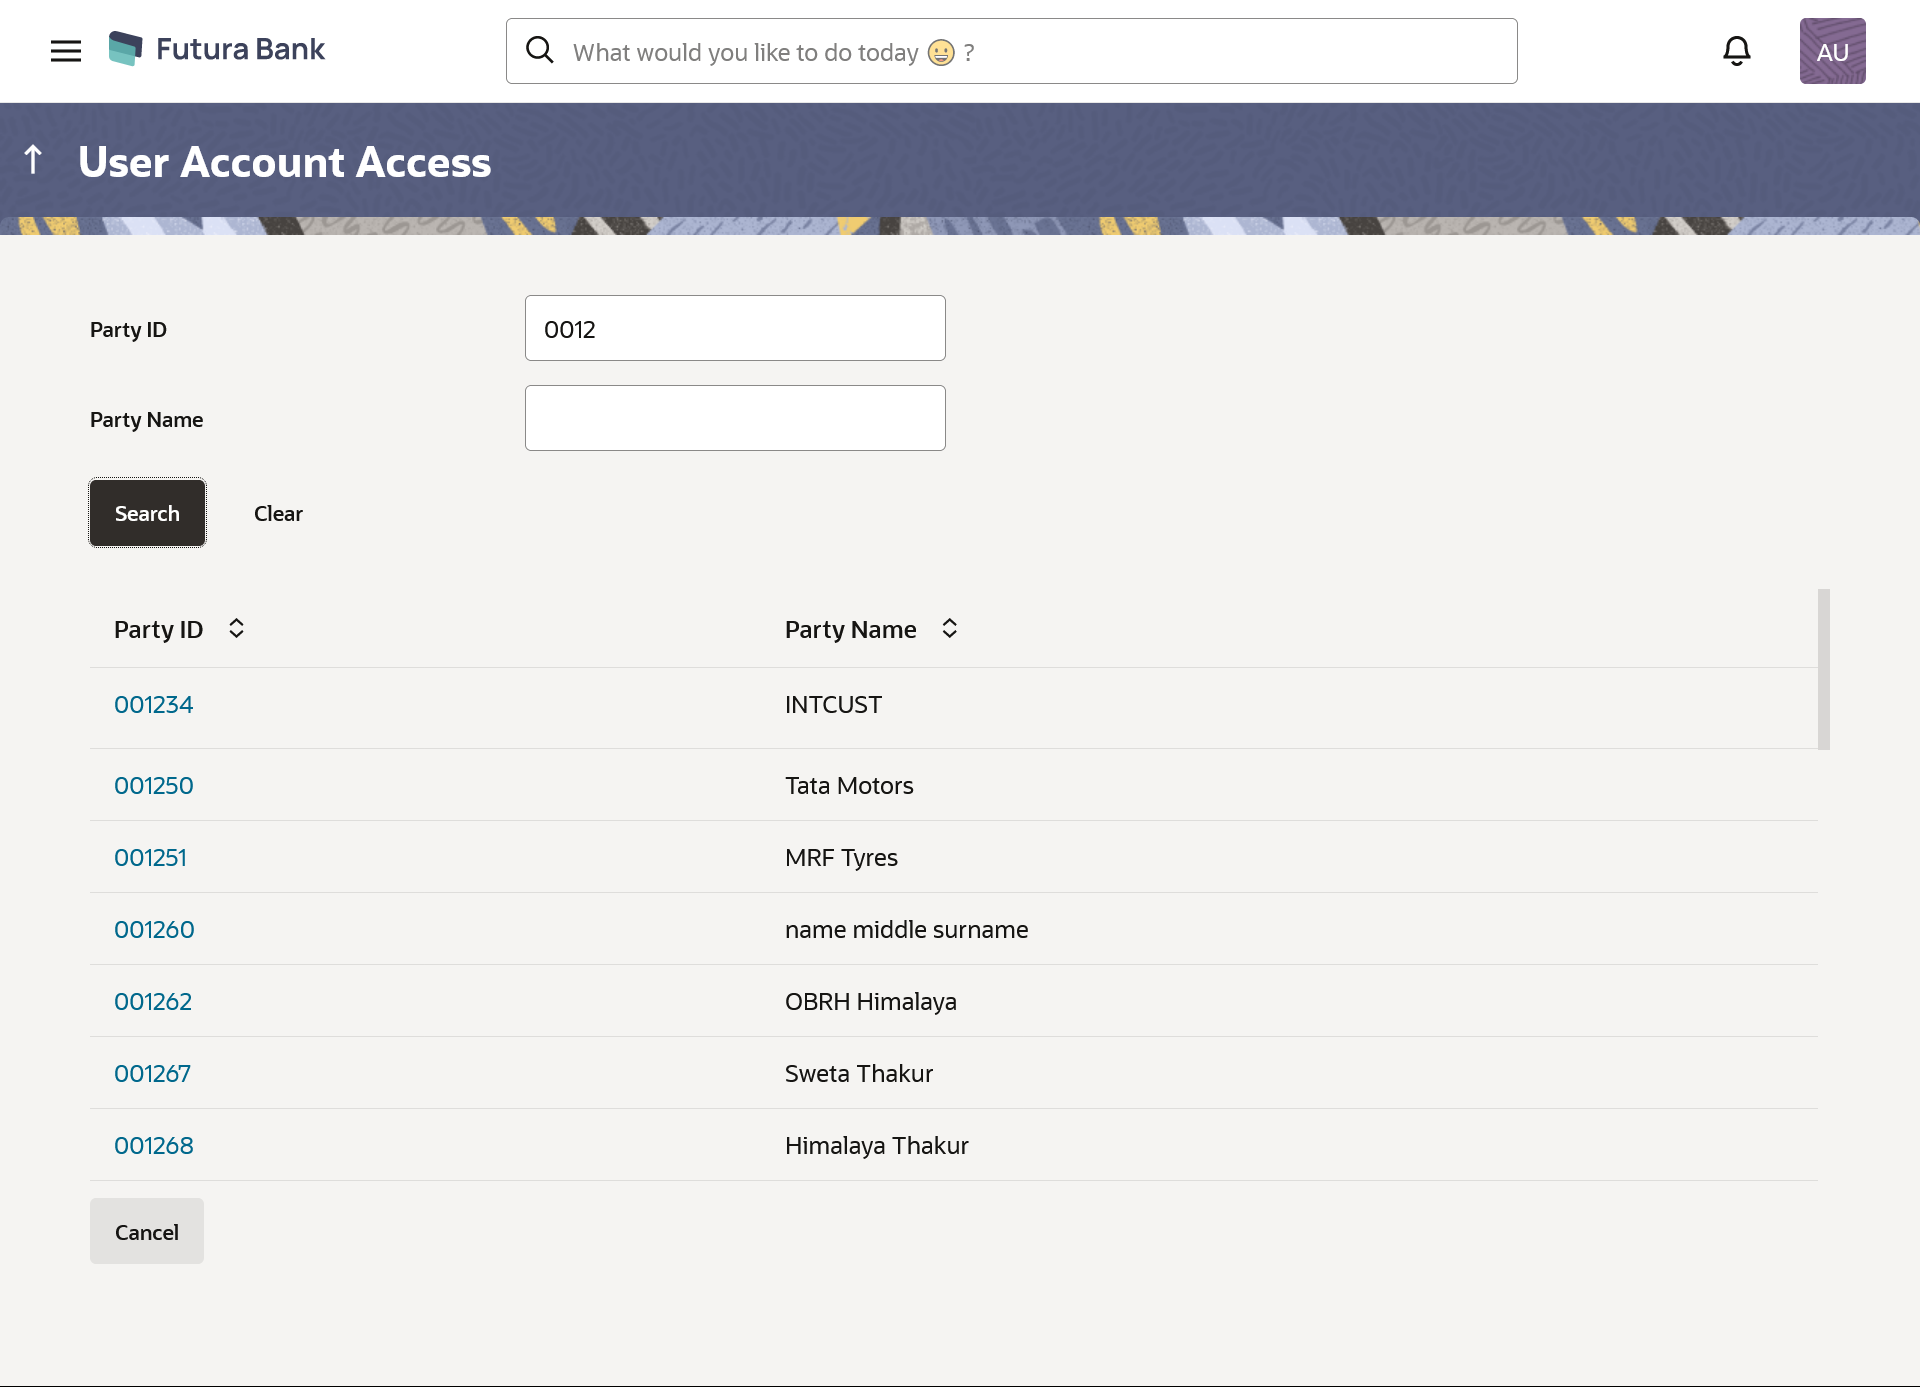
- Navigate to one of the above paths.The User Account Access - Mapping screen appears.
- In the Party ID enter the party id of the user.In the Party Name field, enter the party name of the user.
- Click Search.The system displays the result based on search criteria.
OR
Click Cancel to cancel the transaction.
OR
Click Clear to clear the search parameters.
Table 12-1 Field Description
Field Name Description Party ID The party ID to be searched by the Bank Administrator. Party Name The name of the party. Search Result Party ID The party ID searched by the Bank Administrator. Party Name The name of the searched party. - Click on the Party ID. For a searched party, there will be a list of users displayed with information like username, full name of the user and an indicator whether there is an account mapping done for the user.
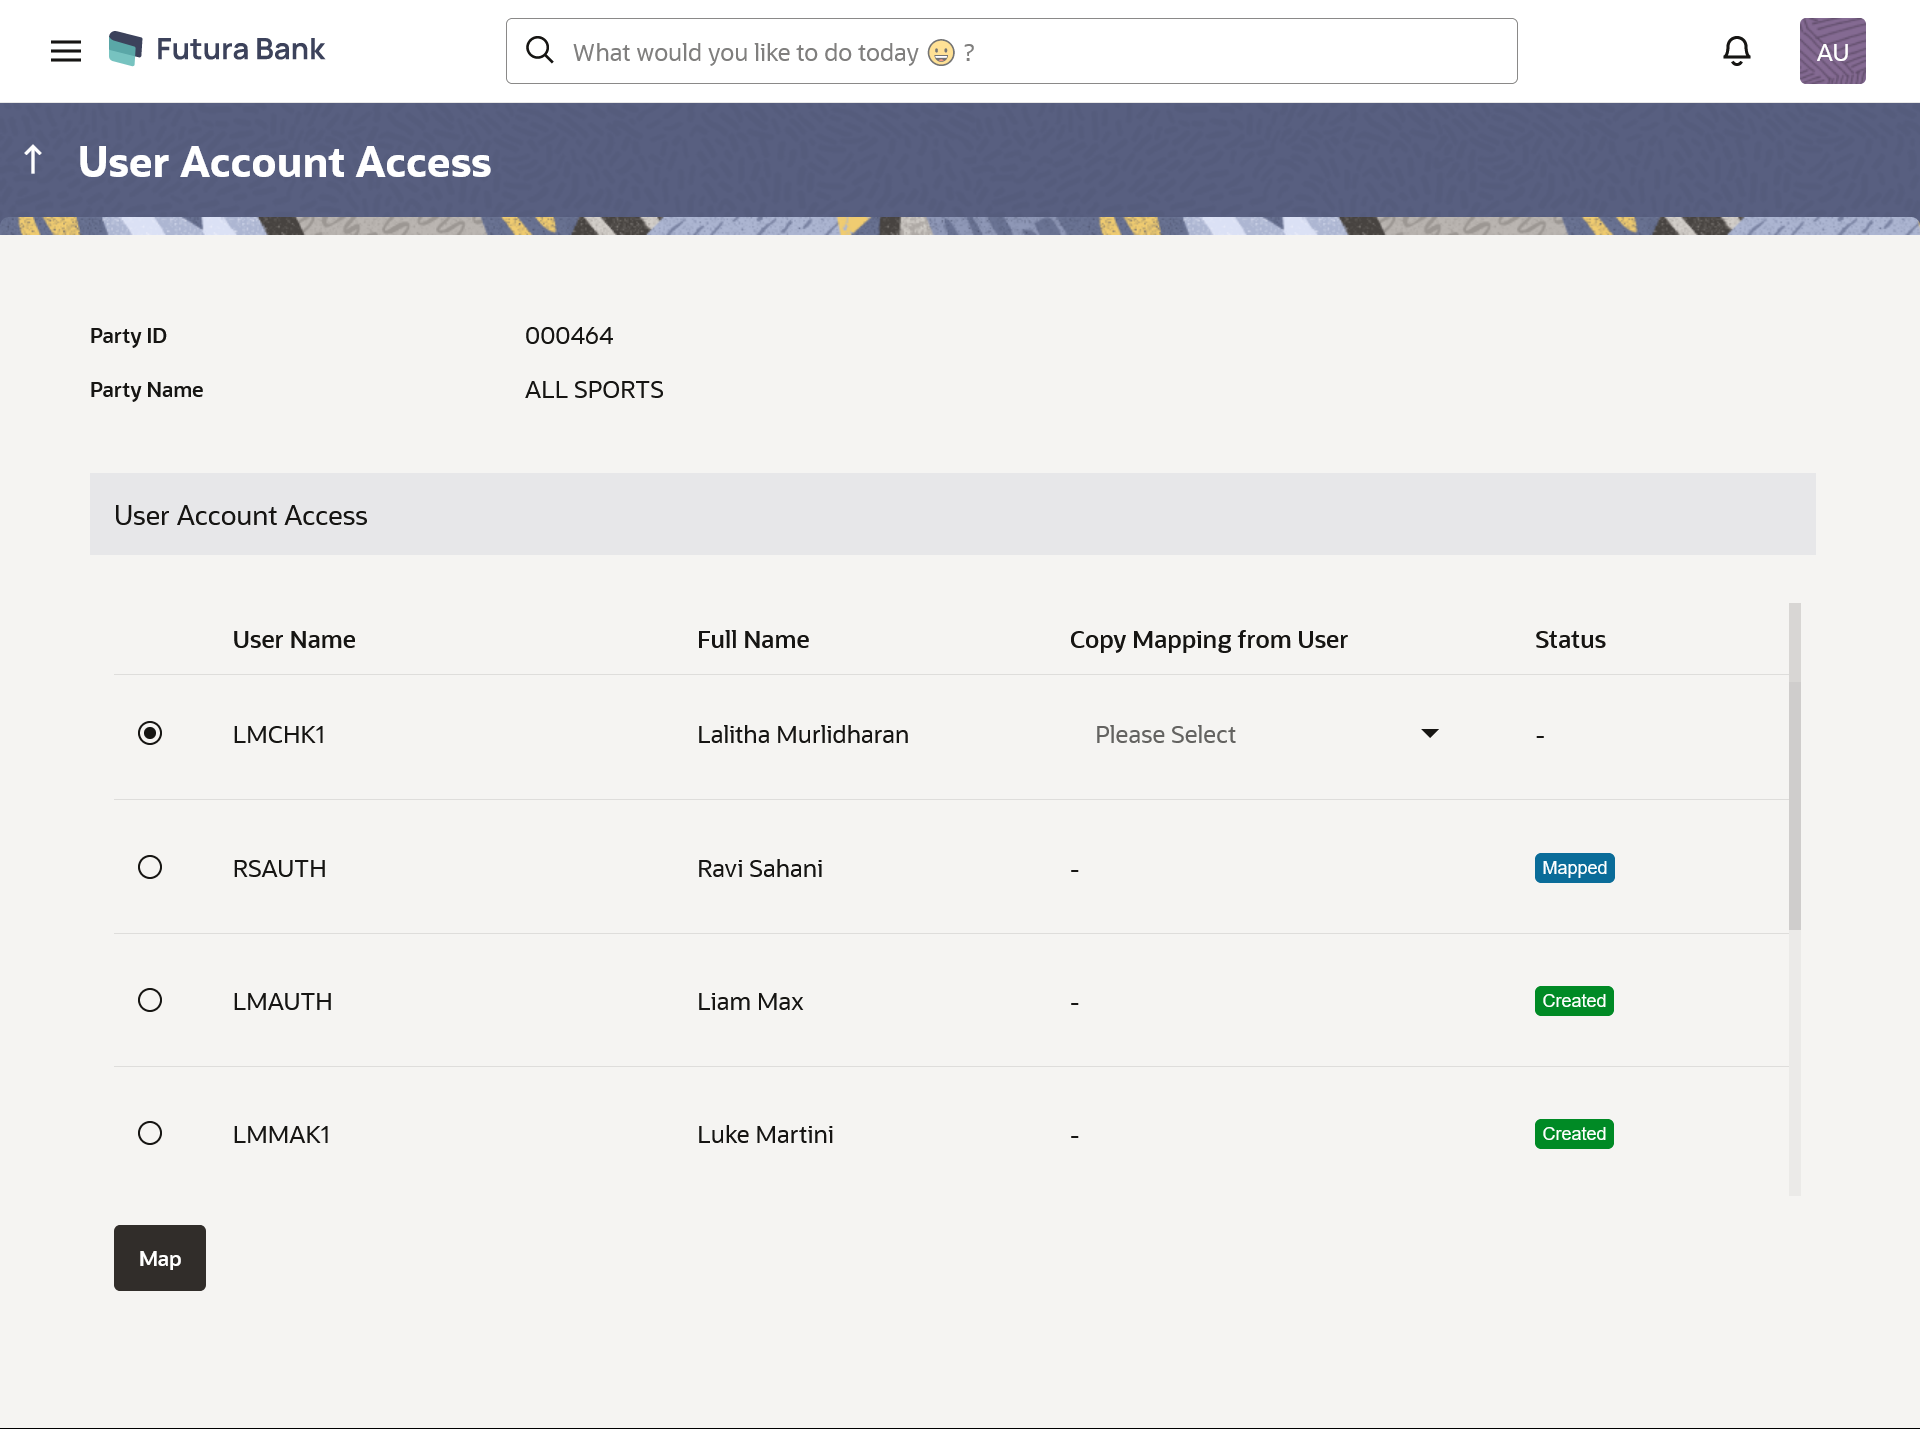
- Click on the Party ID. For a searched party, there will be a list of users displayed with information like username, full name of the user and an indicator whether there is an account mapping done for the user.
Table 12-2 Field Description
Field Name Description Party ID The party ID to be searched by the Bank Administrator. Party Name The name of the party. User Account Access User Name The name of the selected user. Full Name The full name of the selected user. Copy Mapping from User Select this to inherit and copy account maintenance from already setup user to a new user Note:
For a user whose mapping is not done, select the user whose mapping you wish to copy from the Copy Mapping from User drop-down list.Status Displays whether mapping of the accounts is done or not. It can be:
- Created
- Mapped
- Select the user ID and click on “Map” to navigate to Account Access summary.
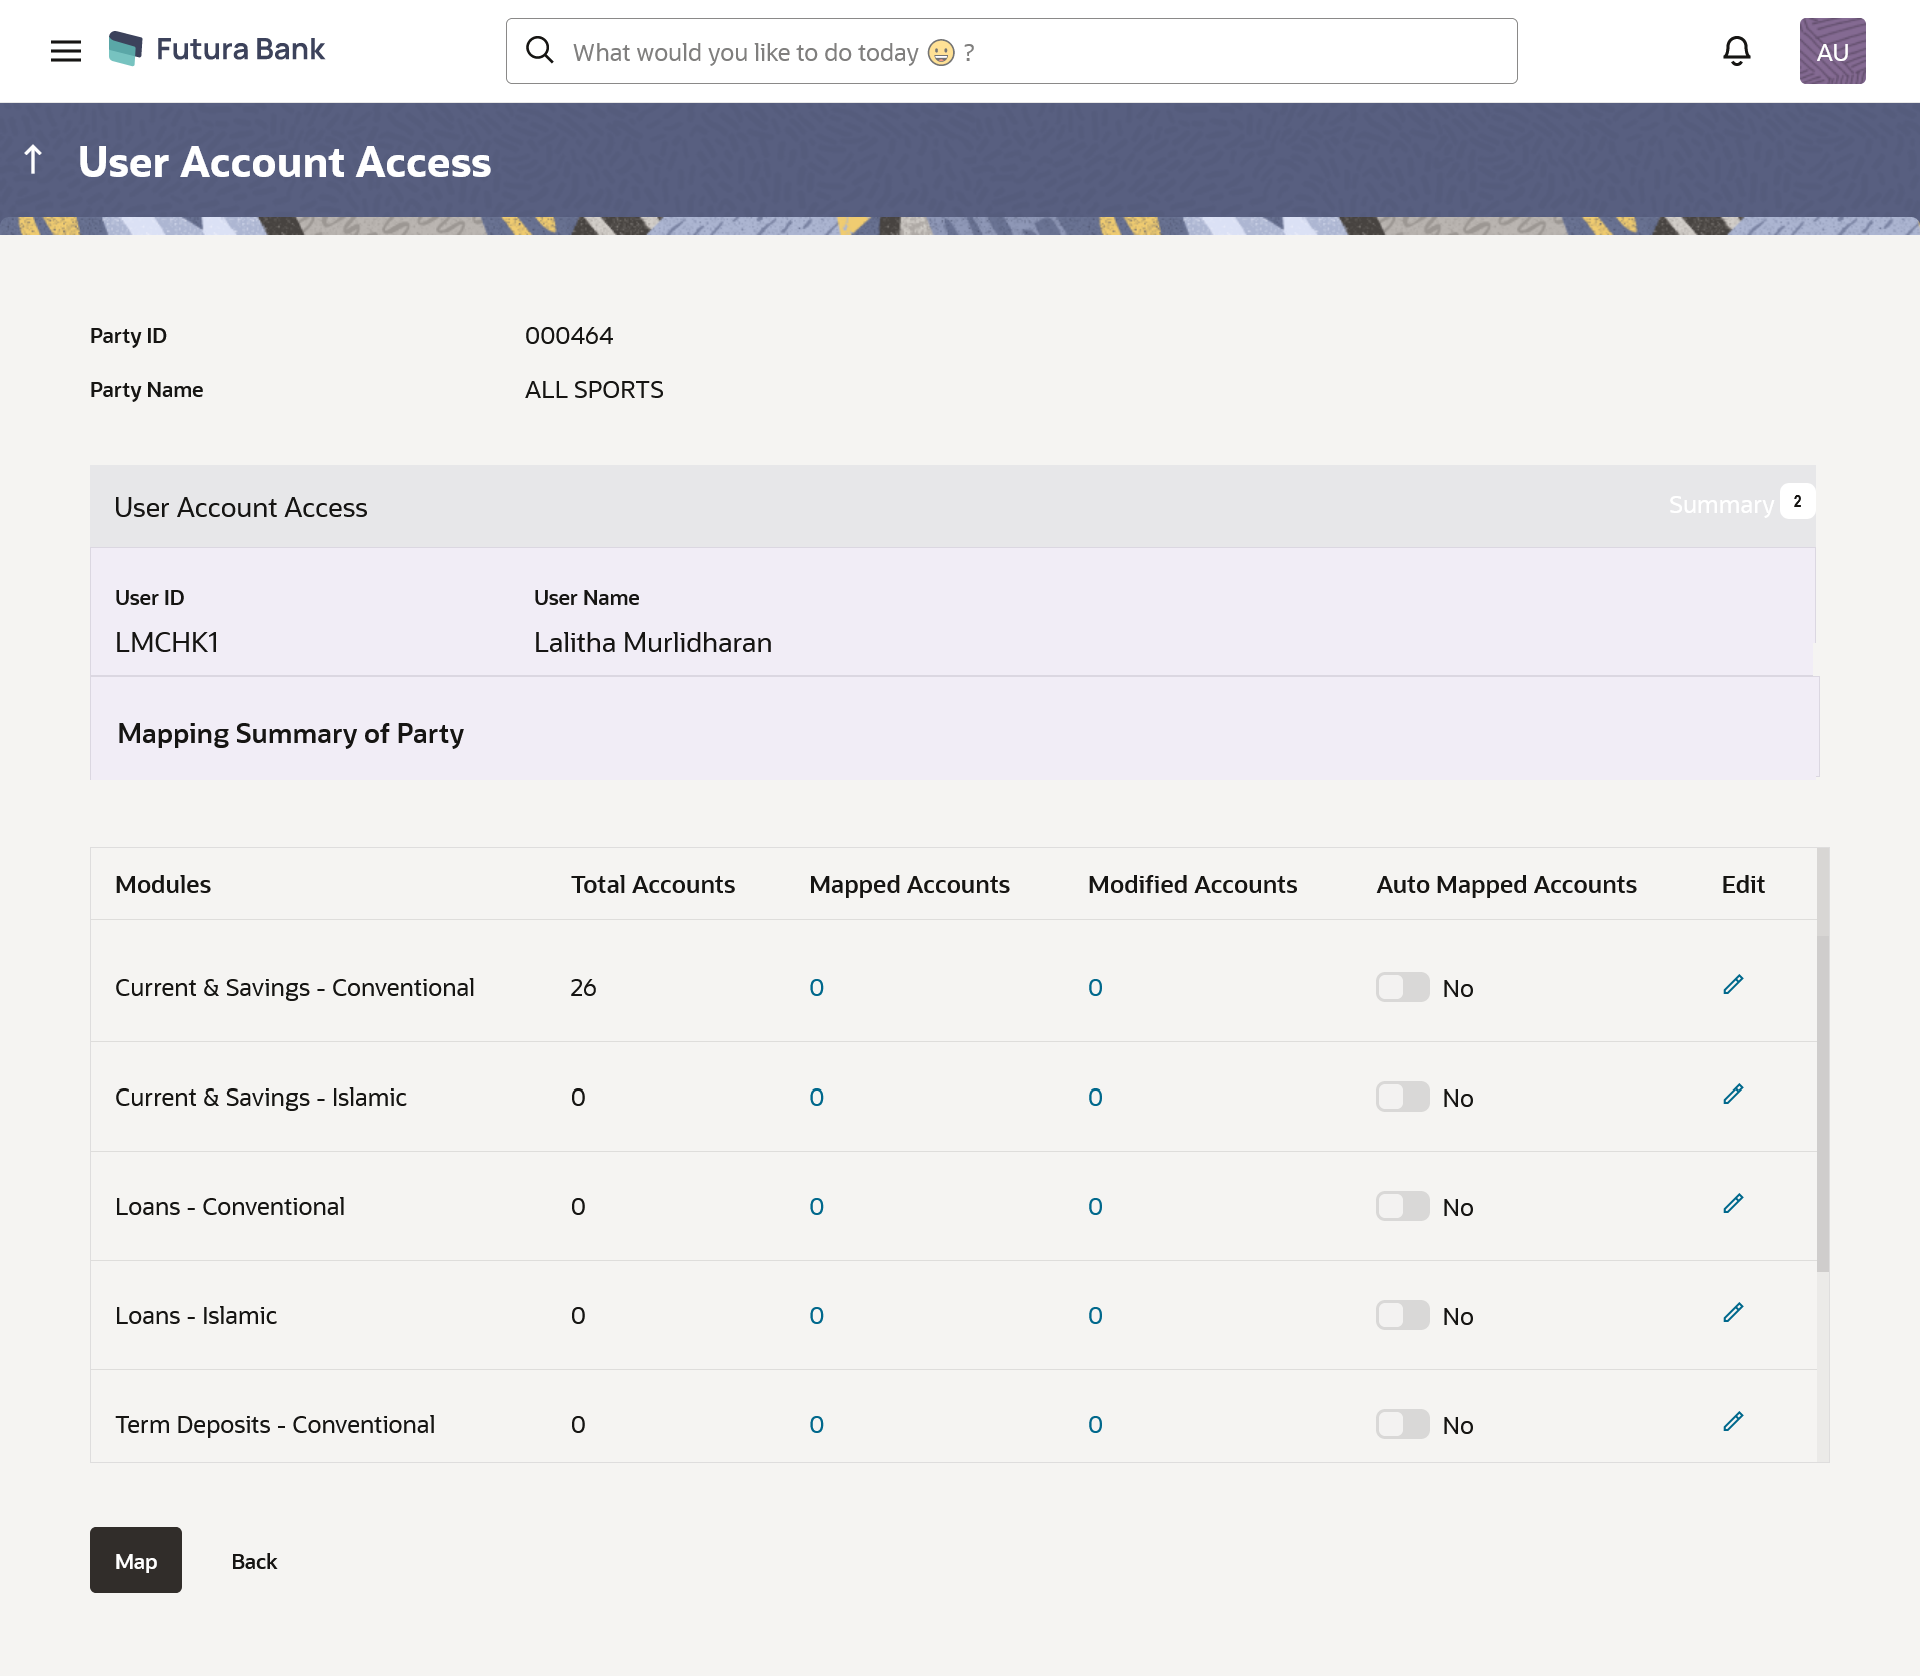
- For a searched user, summary screen will be displayed with total accounts
associated with party of that user, status of the accounts mapped for the
internet banking for user, modified accounts if any and Auto account mapping
status .
Figure 12-4 User Account Access – Summary
Table 12-3 Field Description
Field Name Description User ID User ID the user. User Name User name of the user. Mapping Summary of Party The party for which Party accounts access is being viewed Modules Banking module names. Total Accounts Total number of accounts available under the party that can be map with user. Mapped Accounts Number of accounts mapped to the particular account type of user. Modified Accounts Number of accounts modified for the particular account type of user. Auto Mapped Accounts Mapping status of the accounts. The options can be:
- Auto: gives default access to all newly added accounts and transactions of the party as soon as the account is opened in future.
- Manual: gives specific access to future accounts. The new accounts and transactions need to be mapped explicitly if access needs to be provided
Mapping Summary of Modified Transaction Group Modules Banking module names. Modified Groups Number of transaction groups modified for the particular module. Edit or Map Click on the icon next to every module or click on Map button to edit User account access - If there is no mapping done for a user, the count for the Mapped Accounts will be ‘0’.
- All the accounts held by the selected party as a relationship with the bank as available in the core banking system or the respective mid-office system will be fetched and displayed in the respective categories i.e. Current and Savings Accounts for both Conventional and Islamic, Credit Card, Term Deposit, Loan accounts.
- User Account Access will inherit the account access setup at the party level
for all the parties associated to him (party association will be done at the
time of user onboarding in user management screen). The screen will show the
inherited Maintenance in User Account Access screen. In the
Auto Mapped Accounts field, toggled
ON to allow access to all future Accounts across
banking module. OR
In the Auto Mapped Accounts field, toggled OFF to explicitly map new accounts and transactions manually.
- Click on the Modified Groups count link to view the details of transaction groups details.
- Click Map or Edit (available across each banking
module). The User Account Access - Create screen appears.
- Click
 icon against the user record for which you want to view the
details.The User Account Access – Mapping Summary screen appears.
icon against the user record for which you want to view the
details.The User Account Access – Mapping Summary screen appears.OR
Click Back to navigate to the previous screen.
OR
Click Cancel to cancel the transaction.
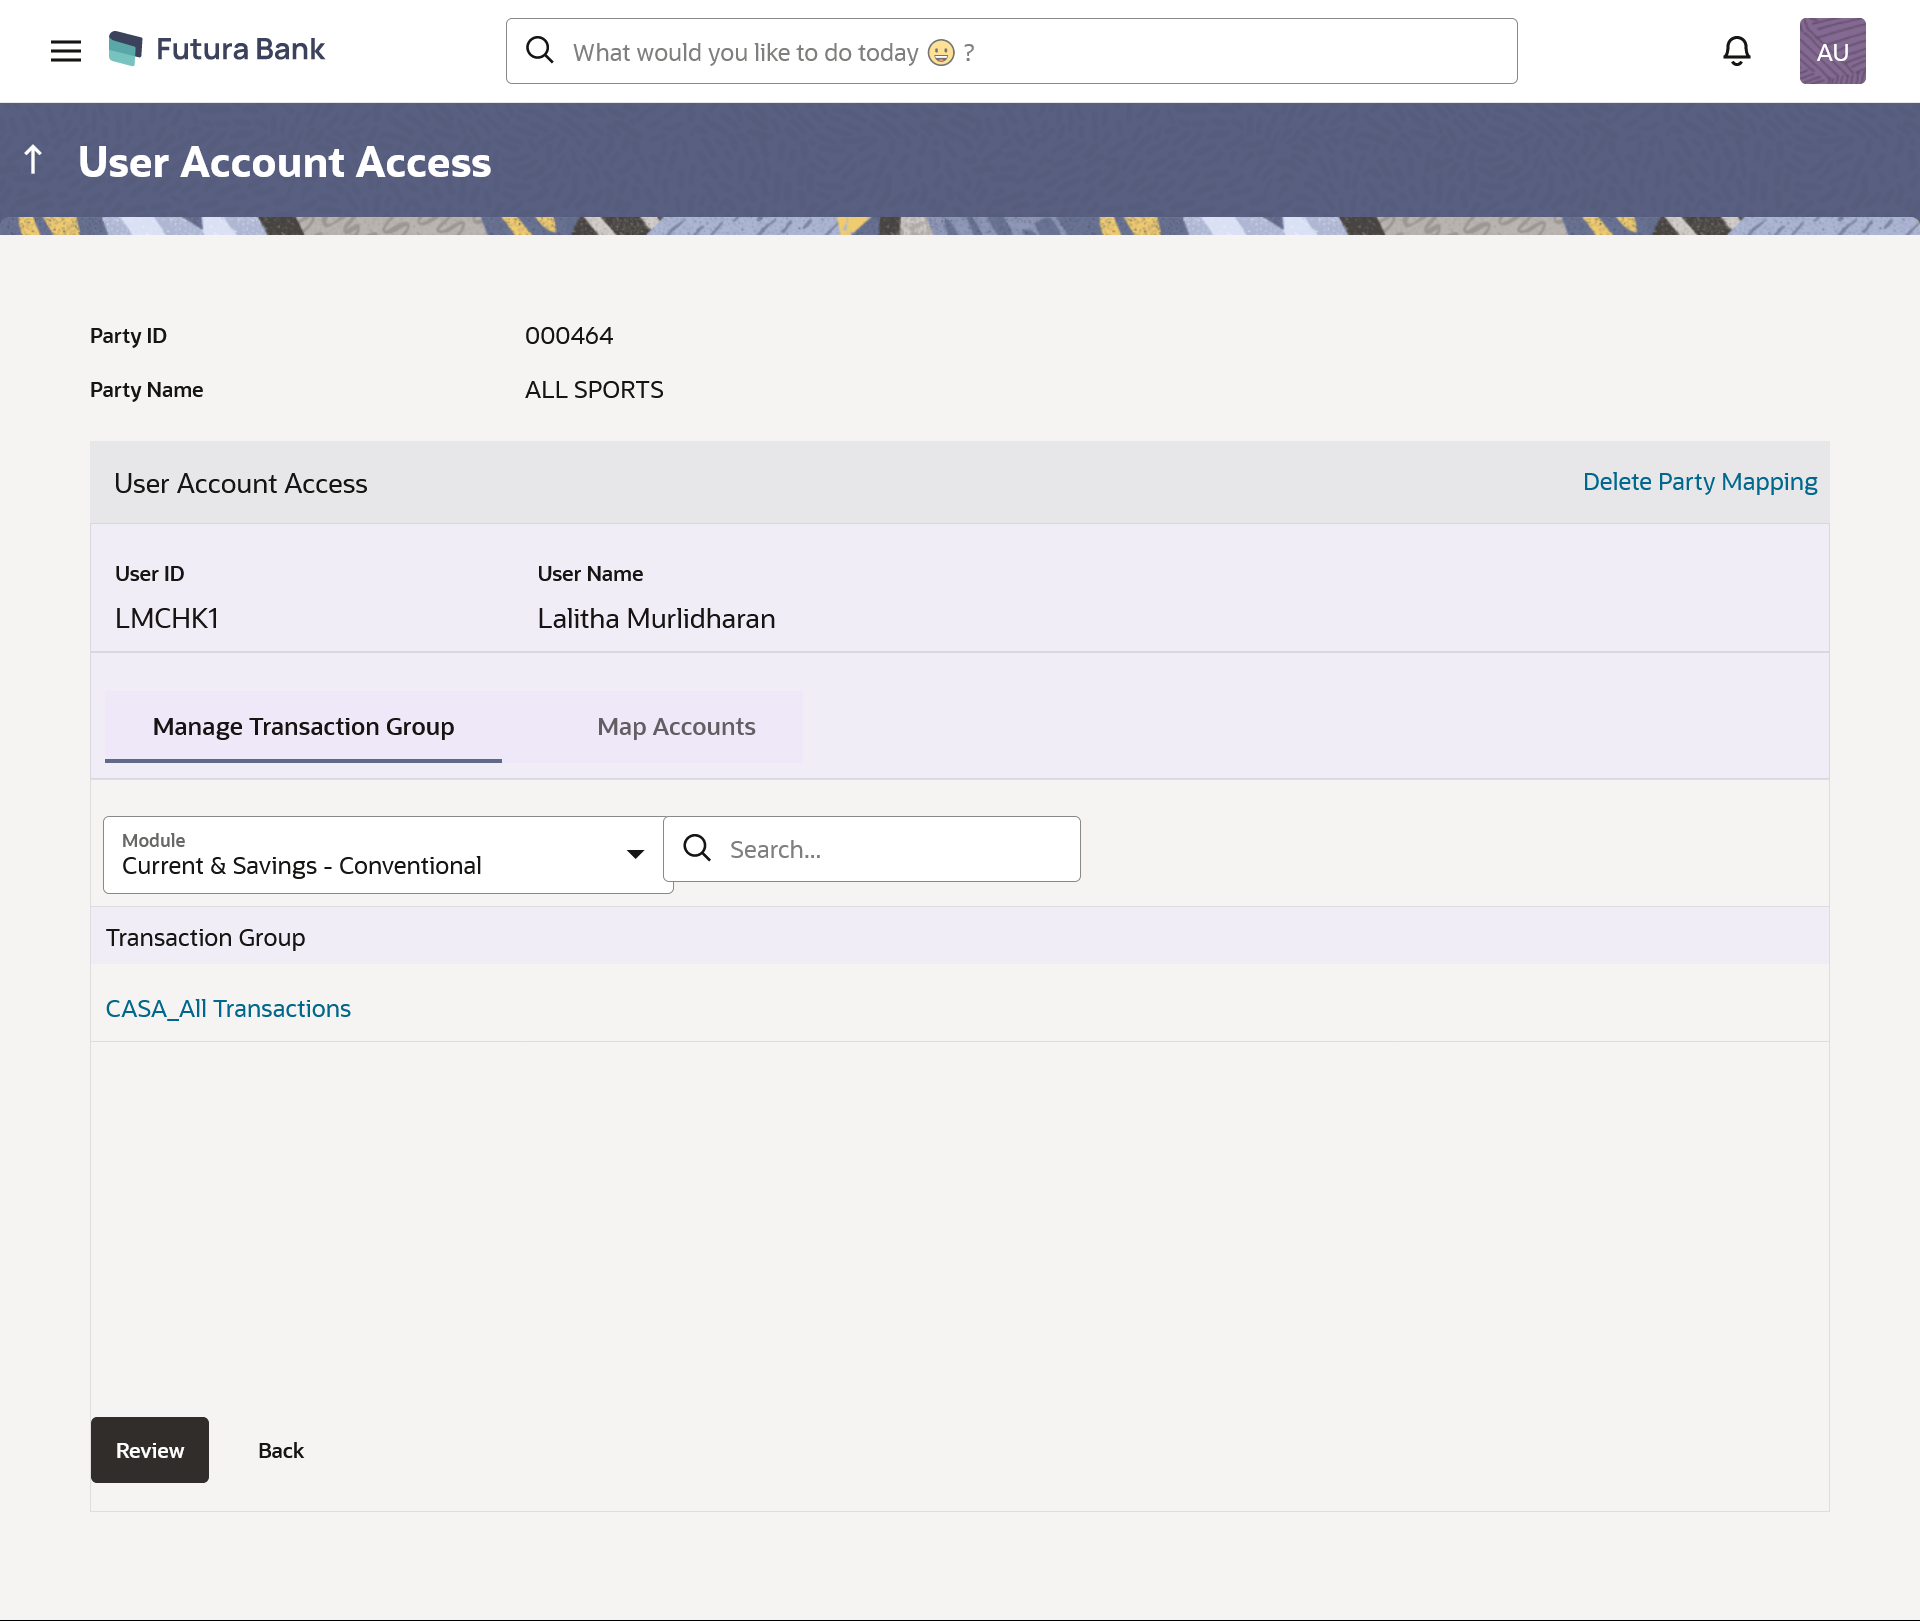
Figure 12-5 User Account Access – Manage Transaction Group Tab
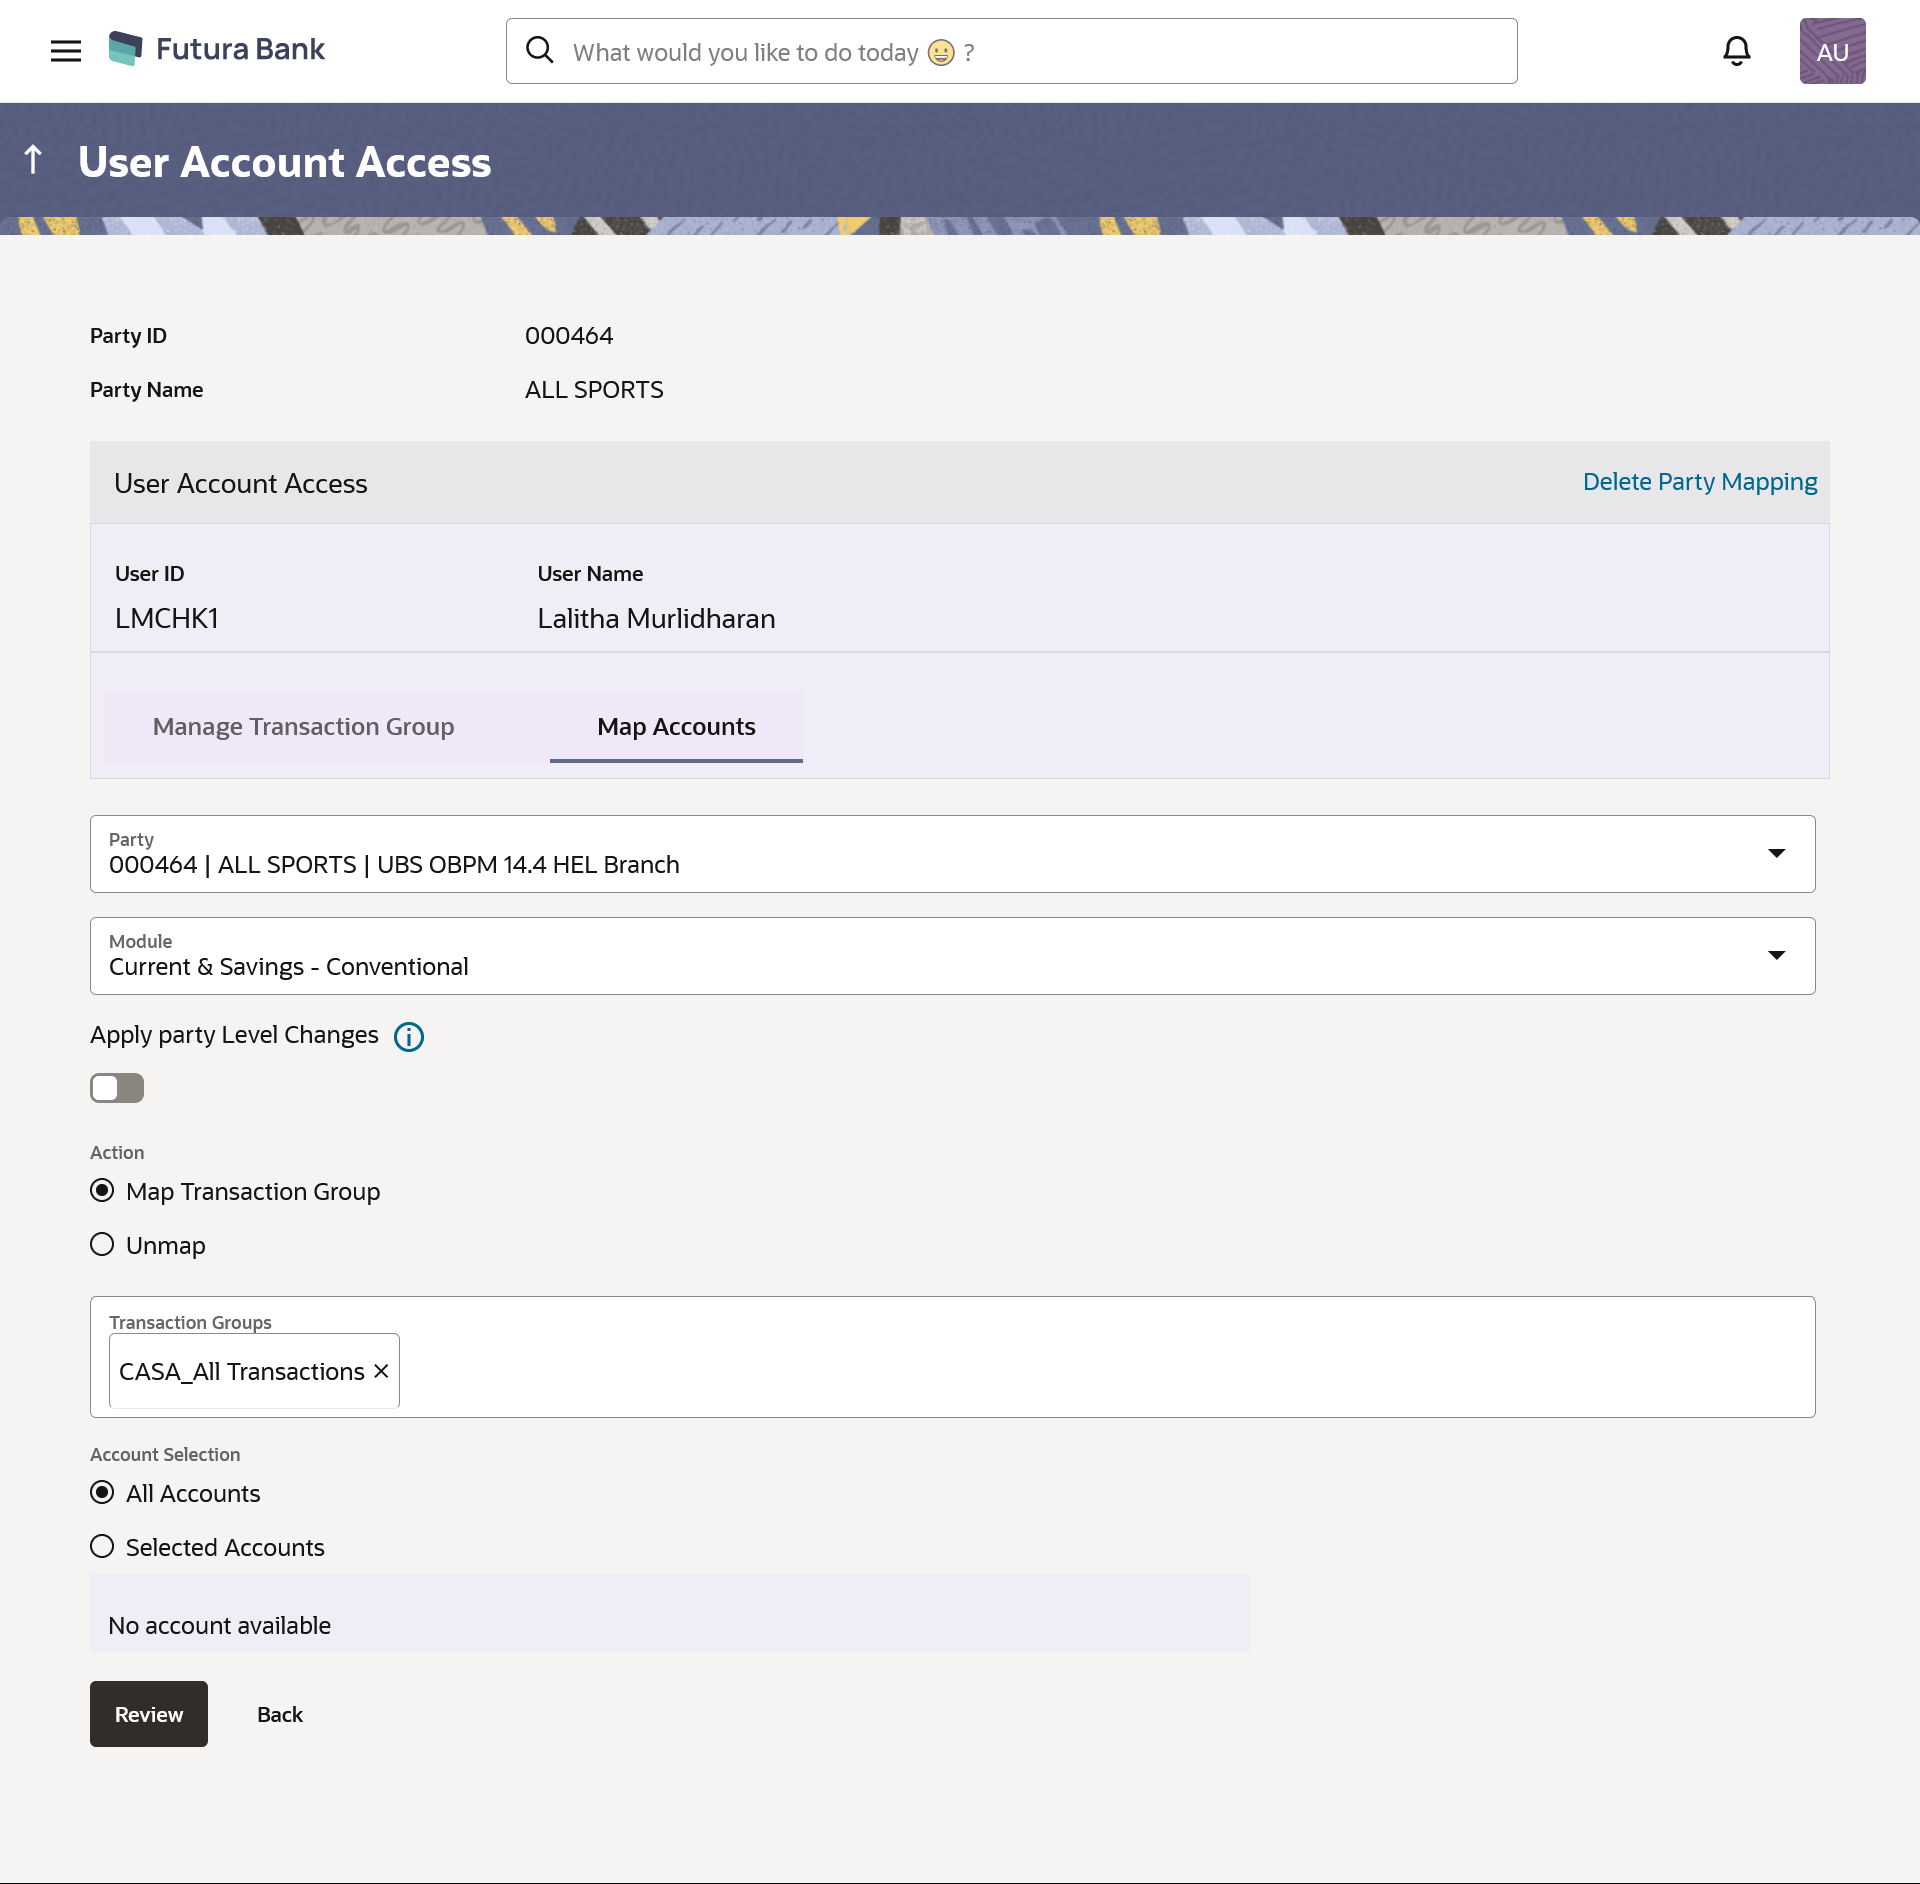
Figure 12-6 User Account Access – Map Accounts Tab
Table 12-4 Field Description
Field Name Description User ID User ID the user for whom account access in being setup User Name User name of the user Manage Transaction Group Tab Module Select Banking Module types available under the selected party to setup account access. Select Transaction Groups Select the Transaction group to map transactions and maintain access in Account Access screens. Note:
- Transaction groups mapped to the accounts at party level will be shown on this screen.
- In user account access, the accounts can be mapped to the same transaction group to which the accounts are mapped at the party level
Transactions Groups Search and add the transaction groups. Map Accounts Tab Mapping Summary of Party The corporate party for which user accounts access is being viewed. Modules Select Banking Module available under the selected party to setup account access Apply Party level Changes Toggle to enable to apply party level changes automatically. Action Option to map/unmap the transactions and maintain access in Account Access screens of Transaction Groups. The options are:
- Map Transaction Group
- Unmap
Note:
Only one transaction group can be unmapped at a time. A transaction group can be unmapped from All Accounts or Selected Accounts.Transaction Groups Select one or multiple Transaction group/s to map transactions and maintain access in Account Access screens. Note:
- Transaction groups mapped to the accounts at party level will be shown on this screen.
- In user account access, the accounts can be mapped to the same transaction group to which the accounts are mapped at the party level
Account Selection Select accounts to map the transaction groups. The options are:
- All Accounts
- Selected Accounts
Note:
System will show a tag as 'Modified' followed by the transaction group name after the account numberAll Accounts Click to select all the accounts available under the selected module. Selected Accounts Selected Accounts Select the desired accounts to map the transaction group. System displays the Account Number along with the Account Name, Account Currency, and Branch Code.
Number of Accounts Selected Number of accounts selected under the particular module. Delete Party Mapping Click on Delete Party Mapping to delete all the Transaction and account access maintenance done for corporate users in one step. - In the Manage Transaction Group Tab;
- Select specific module tab (Including viz. Current and Savings Accounts for both Conventional and Islamic, Credit Card, Term Deposit, Loan accounts for which account and transaction access mapping maintenance need to be setup.
- Click on the
 icon to search & select the Transaction group/s under
selected module.
User can modify the transaction group other than the factory shipped to select or deselect the transaction access.
- Click on the Transaction Group link, the
Transaction Group Details overlay screen appears.
Click Edit to modify the transaction/ inquires.
Click Save to save the changes.
- In the Map Accounts Tab;
- From the Module list, select the factory shipped
Transaction group under selected module which will have all transactions
and inquiries grouped together.
Note:
Factory shipped user group cannot be deleted or modified. - In the Apply Party Level Changes field, toggle to enable to apply party level changes automatically.
- In Action field, select the desired option to map/ unmap the Transaction Group.
- If the Map Transaction Group option is selected;
- In the Transaction Groups list, select the transaction Group/s to map / unmap from the drop-down list.
- In Account Selection field, select the option to map the transaction groups to all the accounts or specific accounts.
- Once the transaction group/s are created, user can map these transaction groups to one or multiple accounts . Click on Map Accounts tab and select Party, then select Transaction Groups, select the account numbers and then click on Save to map the transaction groups to the selected accounts.
- Click on the Transaction Group link, to view the list of transactions within the mapped transaction group in an overlay.
- From the Module list, select the factory shipped
Transaction group under selected module which will have all transactions
and inquiries grouped together.
- Once the user maps the accounts, system will show a tag as 'Modified' followed by the transaction group name after the account number.
- If the Unmap option is selected;
- User can unmap the accounts by selecting accounts and then clicking on Unmap button to reset their mapping with Group Corporate.
- User can click on Delete Party Mapping to delete all the Transaction and account access maintenance done for corporate user in one step.
- Click on the
 icon to further drill down by applying new sear criteria in Filter
overlay screen on basis of Account Number, Transaction Group, Currency, Mapping
Status.
 - The Review screen appears.Verify the details, and click Submit.
OR
Click Back to navigate to the previous screen.
Note:
Admin can submit the maintenance after any step. Maintenances saved so far will be sent for approval in one flow. Admin would not be able to make any changes or maintain another step for the same Group Corporate till the time the approval of the wizard is not done. - The screen with success message appears along with the transaction reference number.
Parent topic: User Account Access
