- Servicing Configurations User Guide
- Business Product Configuration
- Create Business Product
2.2 Create Business Product
You can use this screen to create the business product and map it to the host product.
The following data segments of the screen allows you to define the various elements for the products:
-
Business Product Details
-
Host Product Mapping
Perform the following steps to create business product:
- On the Homepage, from the Servicing
Configurations, under Business Product,
click Create Business Product. You can also open the
screen by specifying Create Business Product in the
search icon bar and selecting the screen.
The Create Business Product screen is displayed.
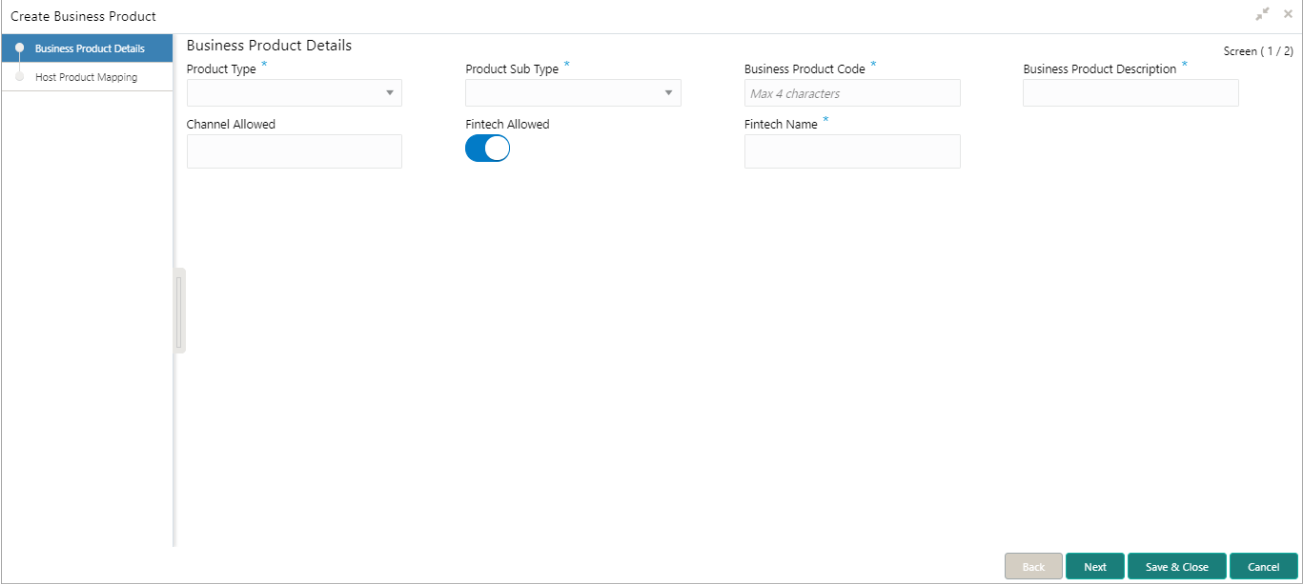
Figure 2-1 Create Business Product - Business Product Details

Description of "Figure 2-1 Create Business Product - Business Product Details" - On the Business Product Details segment, specify the
fields. For more information on fields, refer to the field description
table.
Note:
The fields, which are marked with an asterisk, are mandatory.Table 2-1 Business Product Details – Field Description
Field Description Product Type
Select the product from the drop-down list. The available options are:-
Customer Account Services
-
Term Deposit Account Services
-
Loan Account Services
Product Sub Type
Select the product sub-type from the drop-down list. Product sub-types supported are based on the Product Type selected.-
Customer Account Services
-
Scheduled Transfer
-
Sweep In to Account
-
Sweep Out from Account
-
Cheque Leaves Default
-
-
Term Deposit Account Services
-
Loan Account Services
Business Product Code
Specify the business product code.Note:
The maximum length of the business product code should not be more than six characters. Alphanumeric and alphabets should be in the capital.Business Product Description
Specify the business product description.
Channel Allowed
Select the channels that should be allowed for the business product from the drop-down list. For Example – Oracle Banking Digital Experience.
Fintech Allowed
Select if the business product is supported for servicing transactions from Fintech Companies.
Fintech Name
Select the Fintech Company name from the drop-down list. The system allows the selection of multiple companies.Note:
This field is mandatory if Fintech Allowed is selected. -
- Click Next.
- If Scheduled Transfer, Sweep In to
Account, Sweep Out from Account,
Term Deposit Account Services, or Loan
Account Services option is selected from the
Product Sub Type field in the Business
Product Details segment, then the following Host
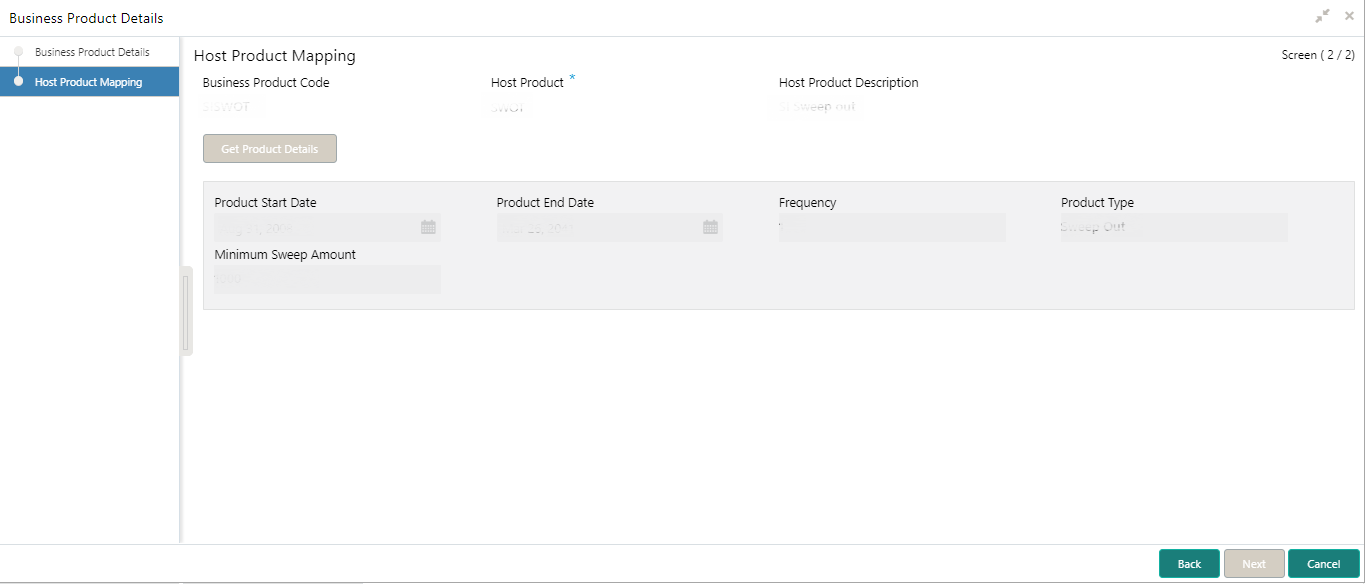
Product Mapping segment is displayed. In this data segment,
the business product is mapped to the host product and parameters for
processing servicing transactions are defined.
Figure 2-2 Create Business Product – Host Product Mapping

Description of "Figure 2-2 Create Business Product – Host Product Mapping"For more information on fields, refer to the field description table.
Table 2-2 Host Product Mapping - Field Description
Field Description Business Product Code
Displays the business product code defaulted from the Business Product Code entered in the Business Product Details data segment.
Host Product
Select the host product from the drop-down list.
Host Product Description
Displays the product description once the host product is selected in Select Host Product.
Get Products Details
Click Get Product Details, and the system will default the parameter configured at the host product. When you click this button, the system defaults the values in the following fields:-
Product Start Date
-
Product End Date
-
Frequency
-
Product Type
-
Minimum Sweep Amount
Product Start Date
Displays the product start date defaulted from the host.
Product End Date
Displays the product end date defaulted from the host.
Frequency
Displays the frequency defaulted from the host.
Product Type
Displays the product type defaulted from the host.
Minimum Sweep Amount
Displays the minimum sweep amount defaulted from the host.Note:
This field is displayed only if the Product Sub Type in the Business Product Details segment is selected as Sweep Out from Account or Sweep In to Account. -
- If Cheque Leaves Default option is selected from
the Product Sub Type field in the Business
Product Details segment, then the following Host
Product Mapping segment is displayed.
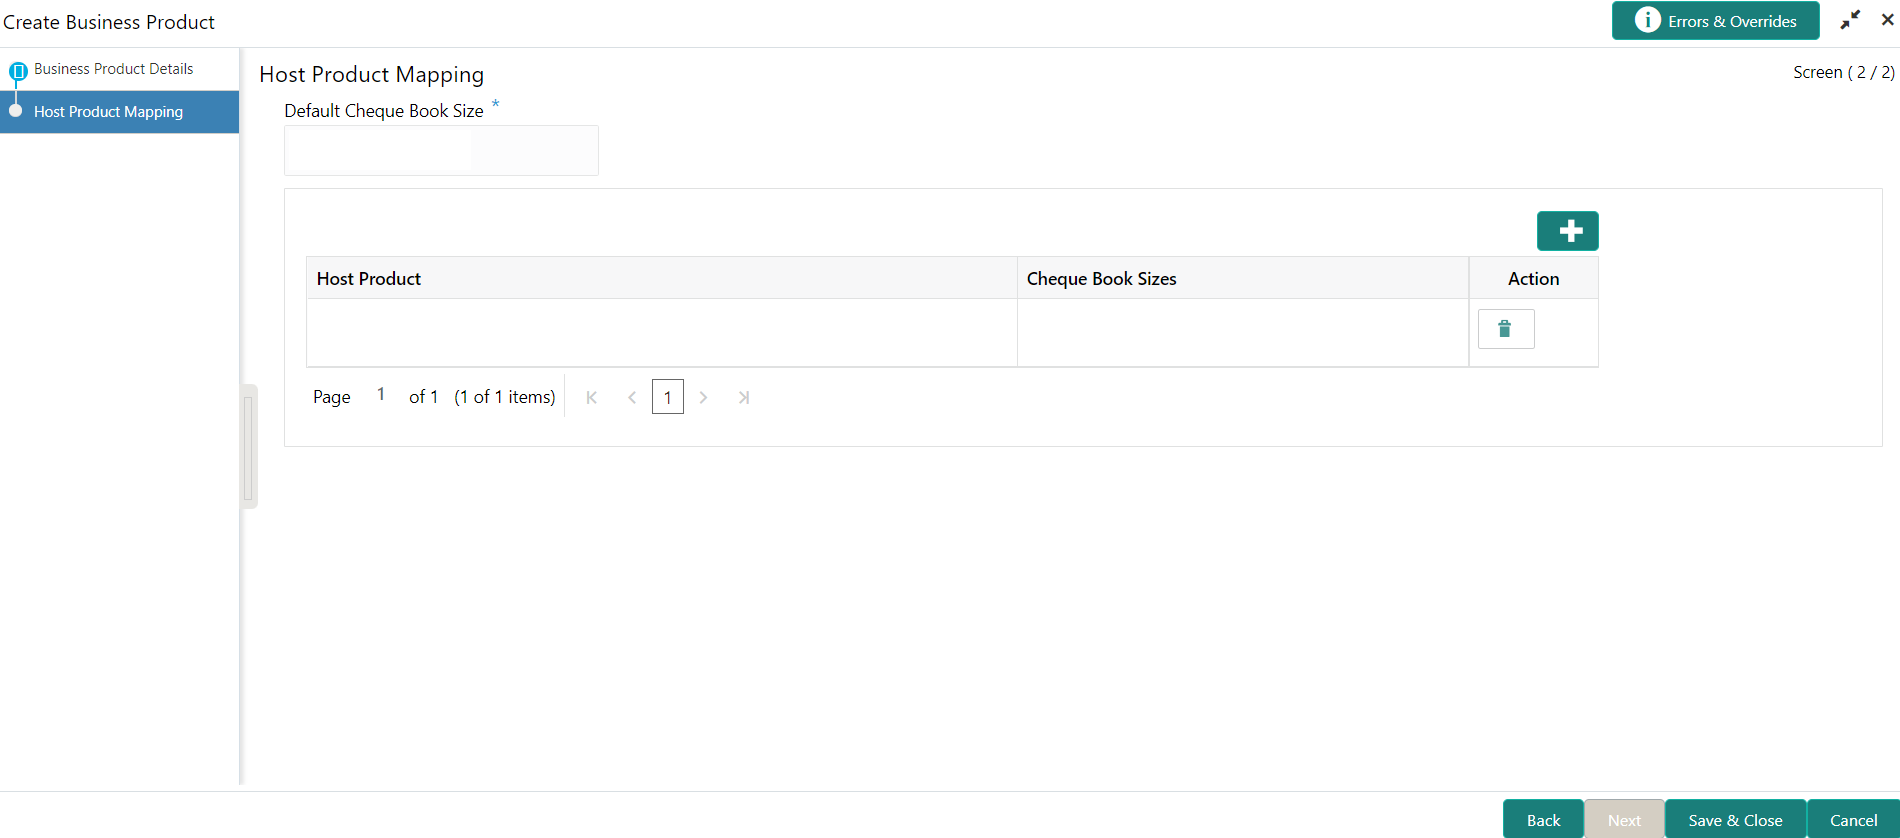
Figure 2-3 Create Business Product – Host Product Mapping (Cheque Leaves Default)

Description of "Figure 2-3 Create Business Product – Host Product Mapping (Cheque Leaves Default)"For more information on fields, refer to the field description table.
Table 2-3 Create Business Product – Host Product Mapping (Cheque Leaves Default) – Field Description
Field Description Default Cheque Book Size Specify the numeric values for cheque book sizes against those accounts, for which the Account Classes have not been mapped or that have been created newly in the system. Note:
A Close icon is displayed next to the value specified as you tab out of the field. To remove the value, click the Close icon.Host Product Select the account classes defined in the system. Note:
- This field is enabled if you click
 the icon displayed above the table.
- An Account Class cannot belong to more than one group of Host Product.
Cheque Book Sizes Specify numeric values for the cheque book sizes for the account classes selected. Note:
- This field is enabled if you click
 the icon displayed above the table.
- You are not allowed to enter duplicate values in this field.
Action Displays the  icon to remove the row added.
Note:
This field is enabled if you click the icon displayed above the
table.
- This field is enabled if you click
- If Scheduled Transfer, Sweep In to
Account, Sweep Out from Account,
Term Deposit Account Services, or Loan
Account Services option is selected from the
Product Sub Type field in the Business
Product Details segment, then the following Host
Product Mapping segment is displayed. In this data segment,
the business product is mapped to the host product and parameters for
processing servicing transactions are defined.
- Click Save & Close.
Parent topic: Business Product Configuration