- Current Account and Saving Account User Guide
- Standing Instructions
- Online Account Sweep In
10.1 Online Account Sweep In
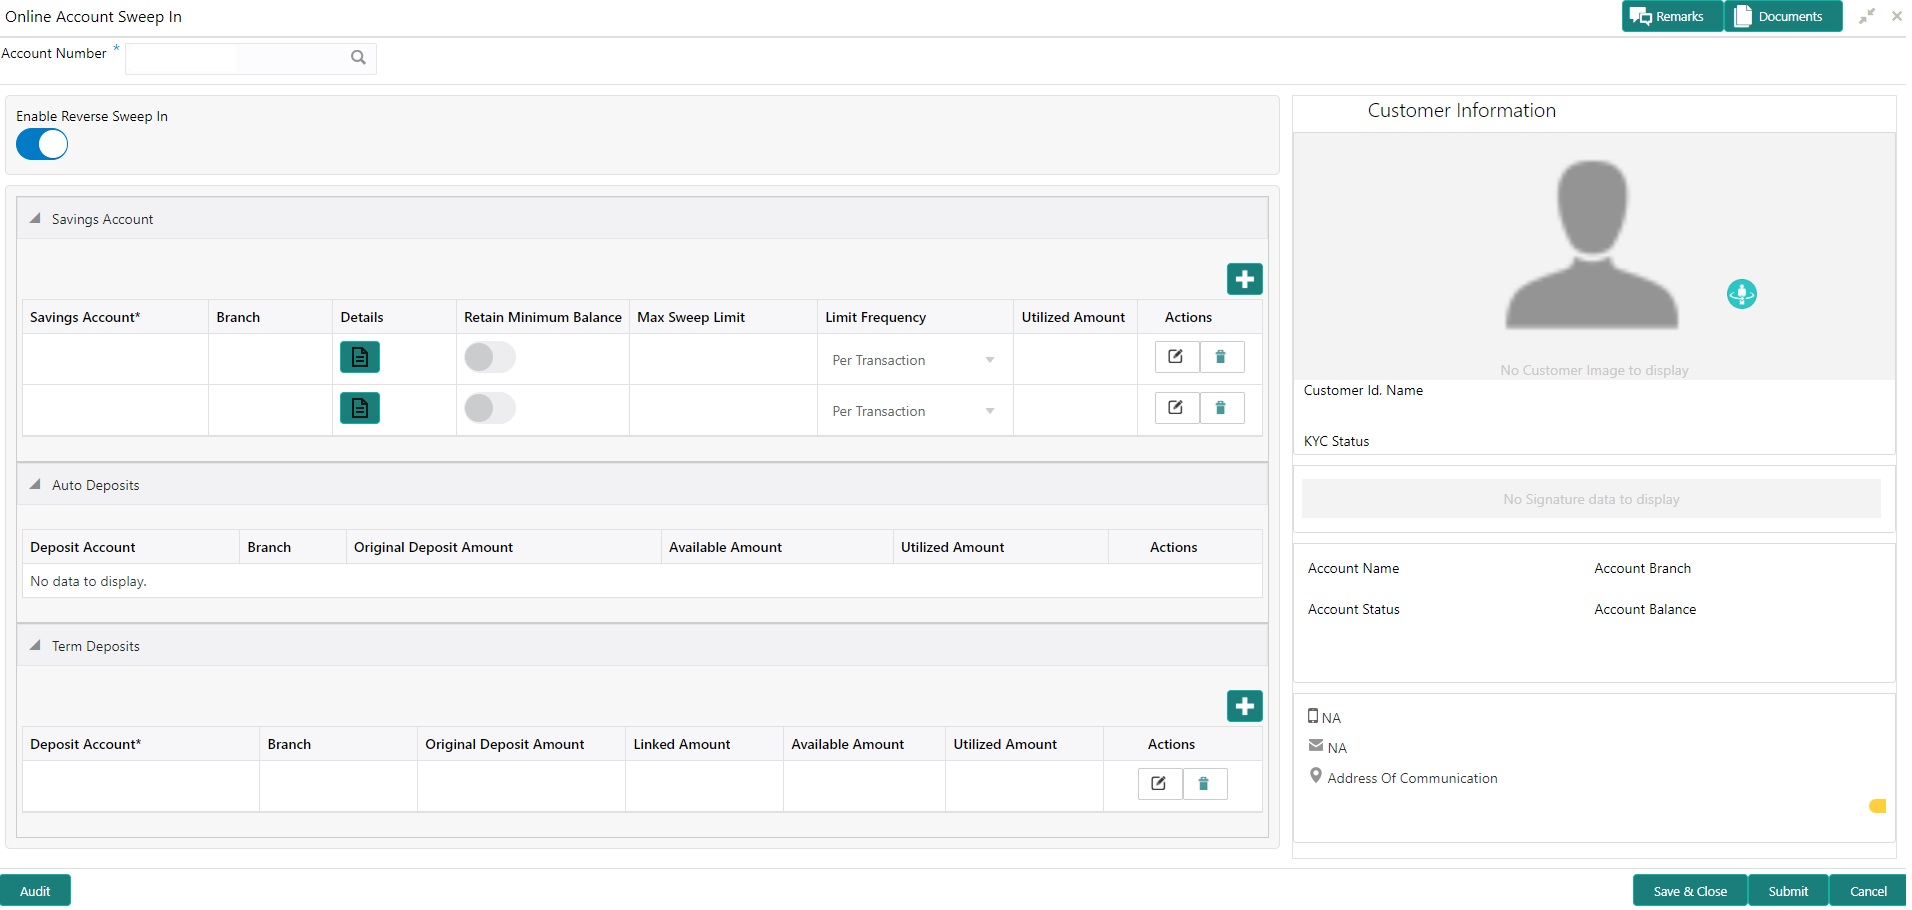
This topic describes the systematic instructions about Online Account Sweep In. This screen helps the users to link Savings accounts, Auto Deposits, and Term Deposits to a Primary Account to enable online sweep-in and reverse sweep-in feature.
- On the Homepage, from Account
Services, under Standing Instruction
Maintenance, click Online Account Sweep
In, or specify the Online Account Sweep
In in the Search icon bar.Online Account Sweep In screen is displayed.
Note:
The fields which are marked in asterisk blue are mandatory fields. - On Online Account Sweep In screen, specify the
fields.For more information on fields, refer to the field description table.
Table 10-1 Scheduled Transfer - Field Description
Field Description Account Number Enter the Account Number or click the search icon to view the Account Number pop-up window. By default, this window lists all the Account Numbers present in the system. You can search for a specific Account Number by providing Customer ID, Account Number, or Account Name and click on the Fetch button. Note:
- The Account Name is displayed adjacent to this field as the account number is selected.
- The customer information is also displayed to the left of the screen.
Search Users need to click on Search button to view the Sweep History details. - After clicking on the Search button, the system displays the existing records for Savings Account, Auto Deposits, and Term Deposits in a tabular format. If no records are found, the system displays a message 'No records exist for the given account number'.
- Users can link new Savings Account, Term Deposits by clicking on
 icon.
icon. - To input the editable fields like Savings Account, Seep Limit, Limit Frequency,
Deposit Account, Linkage Percentage, Linked Amount click
 icon.
icon. - To link the new Savings Account, Term Deposits click
 icon.
icon. - To delete the linked Savings Account, Auto Deposits and Term Deposits by
clicking
 icon.
icon. - On Savings Account, specify the fields.For more information on fields, refer to the field description table.
Table 10-2 Online Account Sweep In-Savings Account
Field Description Savings Account Displays the saving account numbers that are linked as a part of the sweep structure. Branch Displays the branch code for the selected Savings account number. Details Displays  icon to view more details about the cover account
that is linked to the parent account.
Note:
If you click the icon, the following details are displayed:- Customer Name
- Available Balance
- Currency
- Last sweep in Amount
Retain Minimum Balance Users can click on the toggle button to enable or disable the minimum balance. When the Toggle button is enabled, the amount swept from the Savings Account is the difference between the available balance and the minimum balance maintained. The system considers the minimum balance of the Savings Account when the account balance goes below the minimum balance.
If the toggle button is not enabled, the available balance in the Savings Account is swept during a transaction.
Sweep Limit Users can input the maximum amount to be swept from the Savings Account. Limit Frequency Users can select the Limit Frequency from the drop-down list. The drop-down lists the below values: - Per Transaction - The sweep limit maintained for the Savings Account is applied for every transaction that requires the amount to be swept from the Savings Account.
- Daily - The sweep limit maintained for the Savings Account is the cumulative limit up to which the sweep transactions will be allowed for the day.
Utilized Amount Displays the amount utilized by the receiving account number during a sweep in transaction. Actions Enables the options to Create, Modify, Delete. - When Primary Account and Auto Deposit account classes are enabled for Sweep in, then the system by default includes auto deposits of a primary account in Sweep structure maintained for the primary account and allocates 100% of Auto Deposit amount as Linked Amount.
- On Auto Deposits, system displays the following fields.
- Linkage Order
- Branch
- Deposit Account
- Original Deposit Amount
- Available Amount
- Utilized Amount
- On Term Deposits, specify the fields.For more information on fields, refer to the field description table.
Table 10-3 Online Account Sweep In-Term Deposits
Field Description Linkage Order Displays the sequential order of the Term Deposit account linked.This is automatically updated by the system. Branch Displays the branch code for the selected Deposit account number. Deposit Account Enter the Deposit Account number or click on the search icon to view the Deposit Account pop-up window. By default, this window lists all the Account Numbers present in the system. You can search for a specific Deposit Account by providing Customer ID, Account Number, or Account Name and click on the Fetch button. Credit Account Name Credit Account Name is displayed based on the account selected. Original Deposit Amount Displays the amount for the Deposit Account. Linkage Percentage Users can input the percentage. The value can be less than or equal to 100. Note:
The value cannot be in negative value. If the entered value is more than 100, the system displays an error.Linked Amount Users can specify the amount. This amount cannot be greater than the available deposit amount. Available Amount Displays the available amount for the Deposit Account. Utilized Amount Displays the amount utilized by the receiving account number during a sweep in transaction. Actions Enables the options to Delete, Create. - To Enable Reverse Sweep In, click on the toggle button.
Parent topic: Standing Instructions
