6.1.5 Link Account for Drain Pool Structure
This topic describes the systematic instruction to link the accounts and form a drain pool structure.
- Click Next in the Structure Details screen to link the accounts.The Link Account screen displays.
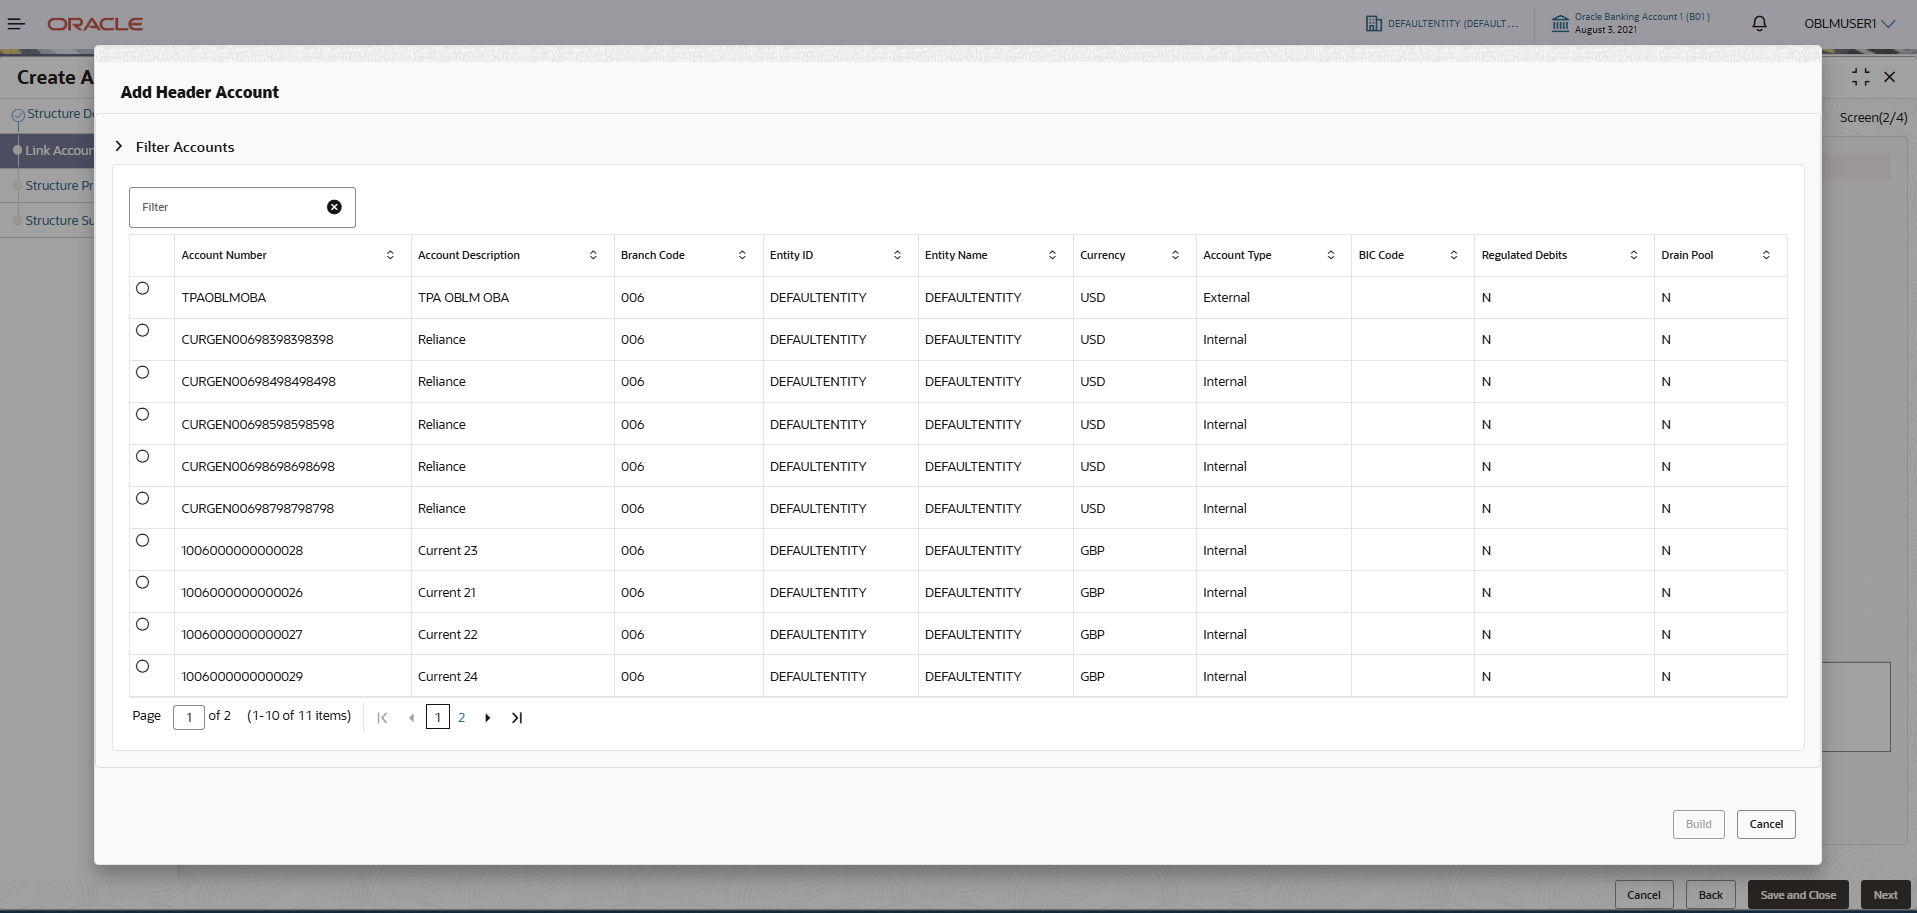
- Click Start Building Structure to link the accounts for the structure.The Add Header Account screen displays. For more information on fields, refer to the field description table.
Table 6-32 Add Header Account – Field Description
Field Description Filter Account Identify and search for either complete or partial account information to generate a list of accounts that correspond across all criteria. Account Number Displays the account number for the structure creation. Account Description Displays the description of the account. Branch Code Displays the branch code of the account. Entity ID Displays the Entity ID of the account. Entity Name Displays the name of the Entity name of the account. Currency Displays the currency of the account. Account Type Displays the account type. The available options are- External
- Internal
BIC Code Displays the BIC code for the account. Regulated Debits Displays whether the account is regulated for debits or not. The available options are- Yes
- No
Drain Pool Displays whether the structure is enabled for drain pool. The available options are- Yes
- No
- Select the notional account in the Add Header Account screen.The selected notional account is added to Add Header Account.
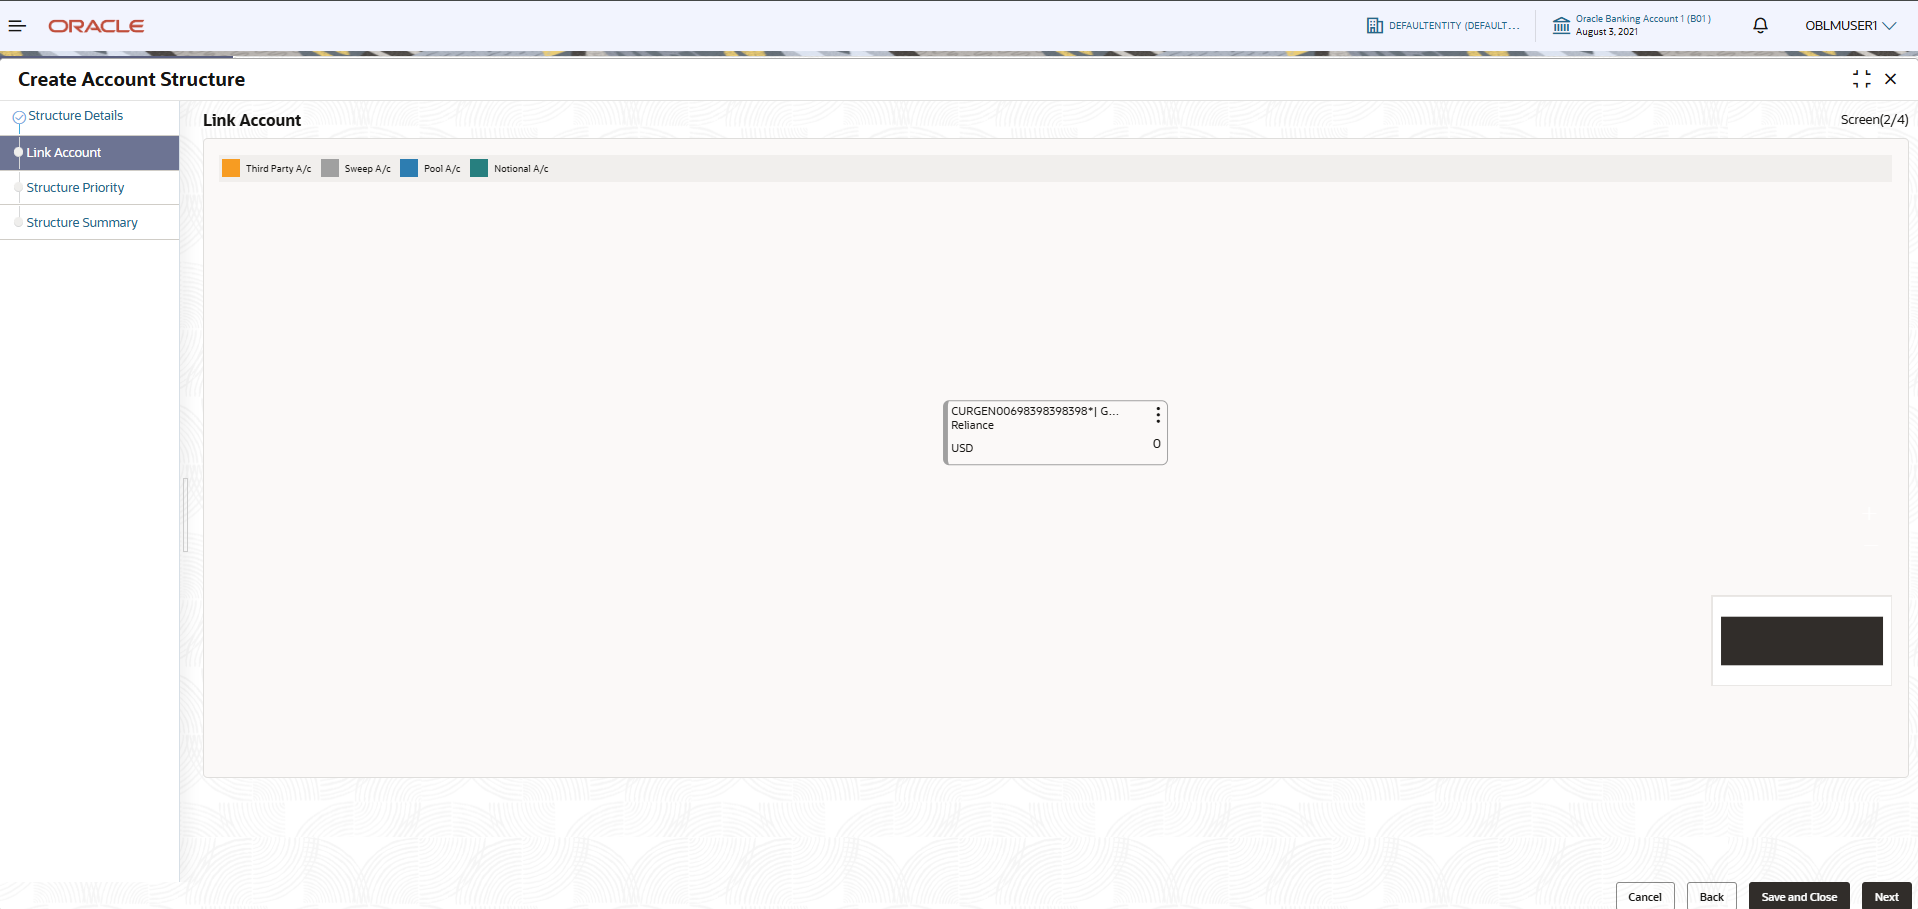
- Click Build to add the selected header account in the Structure.The selected account is added to Create Account Structure – Added Header Account screen.For more information on fields, refer to the field description table.
Figure 6-43 Create Account Structure – Added Header Account
Table 6-33 Create Account Structure – Added Header Account - Field Description
Field Description Account Number Displays the account number of the header account. Account Description Displays the description of the account. Location Displays the location of the account. Currency Displays the currency of the account. 
Displays the sweep direction and number of the child account(s) linked to the header account. Note: The upward arrow indicates sweeps direction from child to parent, while the downward arrow signifies the sweeps direction from parent to child.
- Perform anyone of the following actions on the header node.
- Click
 and then click Link Account to add the child accounts for the header account
Note:
For more details information, please refer to the Step 6. - Click
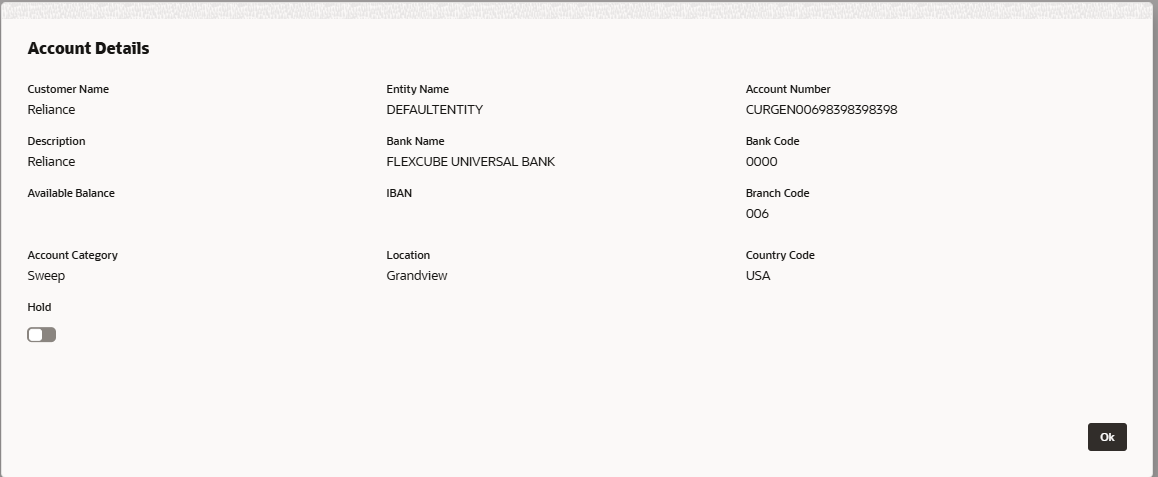
 and then click View Account Details to view the account details of header account.The Account Details screen displays
Table 6-34 Account Details - Field Description
Field Description Customer Name Displays the name of the customer. Entity Name Displays the name of the entity. Account Number Displays the account number. Description Displays the description of the particular account. Bank Name Displays the bank name in which the account is maintained. Note: This field appears only for External Accounts.
Bank Code Displays the bank code of the account. Available Balance Displays the available balance in the account IBAN Displays the IBAN number of the account. Branch Code Displays the branch code of the account. Account Category Displays the category of the account. Location Displays the location of the account. Country Code Displays the country code for the account Hold Select the toggle to enable the hold for the account. Hold Start Date Select the hold start date for the account. Hold End Date Select the hold end date for the account. - Click
 and then click Delink Account to delink the child account from header account.
Note:
This option is disabled for the Header Account. - Click
 and then click Delink Account Hierarchy to delink all the child accounts and header account from the structure.
 - Click
 and then click Replace Account to replace the header account in the structure.
Note:
This option is disabled, if the account being replaced has child accounts. - Click
 and then click Set Child Instructions to set the child instructions to the child account of the header account.
- Click
Create Account Structure - Append Accounts in Structure
By default, only pool accounts are permitted when adding child nodes at the notional header level.
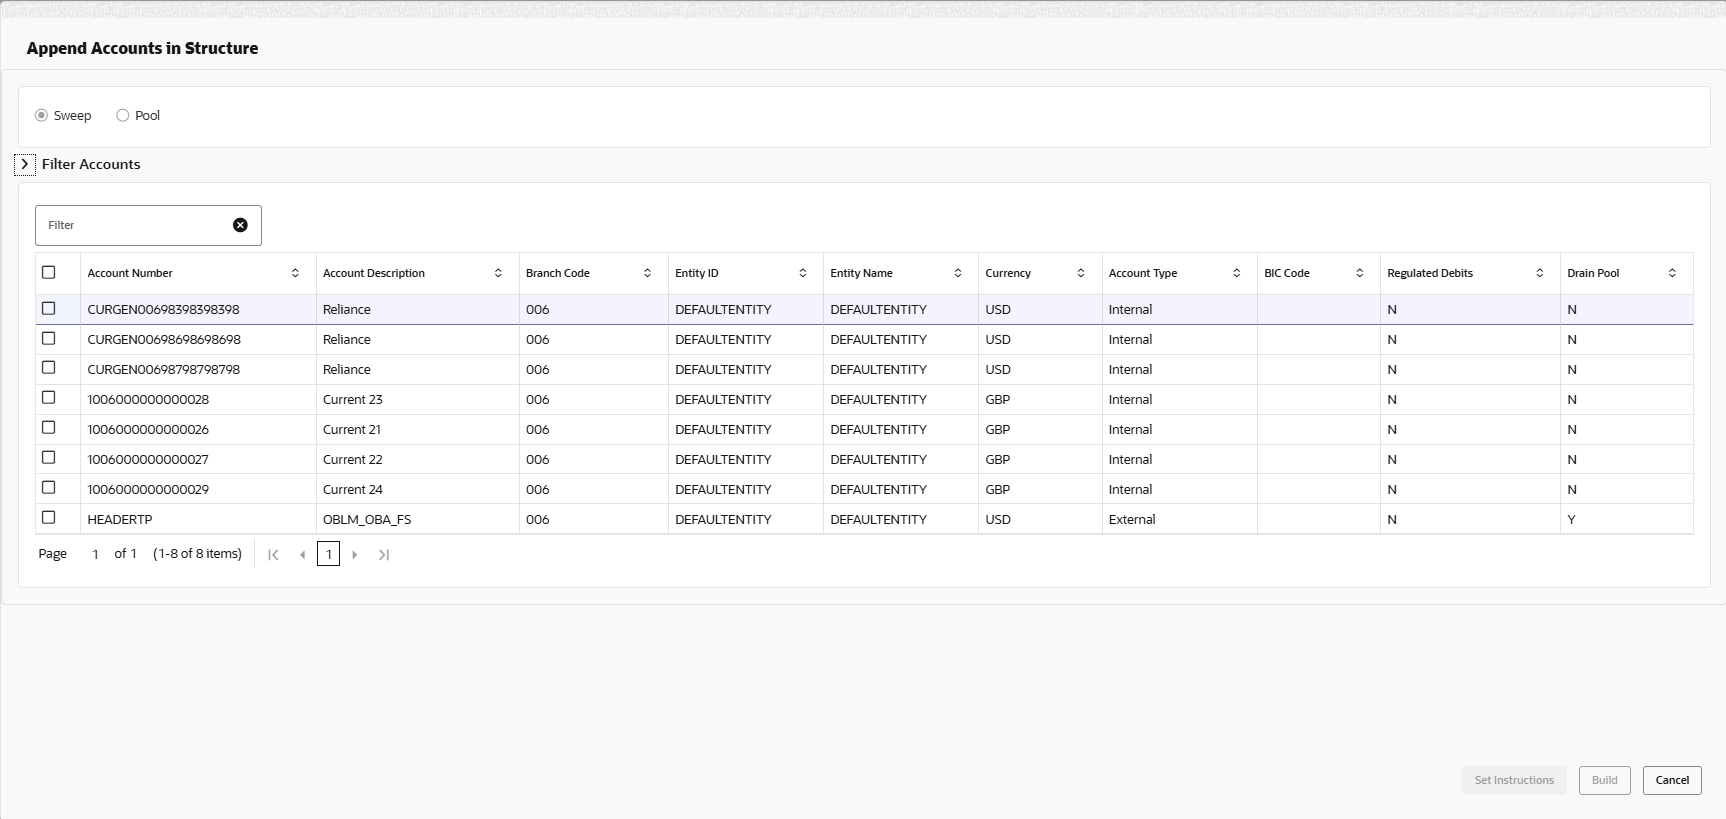
- Click and then click Link Account to add the child accounts for the header account.The Append Accounts in Structure screen displays. For more information on fields, refer to the field description table.
Table 6-35 Append Accounts in Structure – Field Description
Field Description Filter Account Specify and search the complete or partial account details to display the list of accounts that matches across the fields. For Drain the pool use cases, user should add the notional header of an existing pool structure as the child account. User should also add a nominated account for the notional header which is described in the subsequent sections.
Account Number Displays the account number for the structure creation. Account Description Displays the description of the account. Branch Code Displays the branch code for the account. Entity ID Displays the Entity ID for the account. Entity Name Displays the name of the Entity ID. Currency Displays the currency of the account. Account Type Displays the account type. The available options are- External (An account which is external to the Bank and linked for liquidity management)
- Internal (An account which is internal to the Bank)
BIC Code Displays the BIC code for the account. Regulated Debits Displays whether the account is regulated for debits or not. The available options are- Yes
- No
Drain Pool Displays whether the account is regulated for drain pool or not. The available options are- Yes
- No
- Select the Checkbox of the accounts to be added as child accounts for the header account.
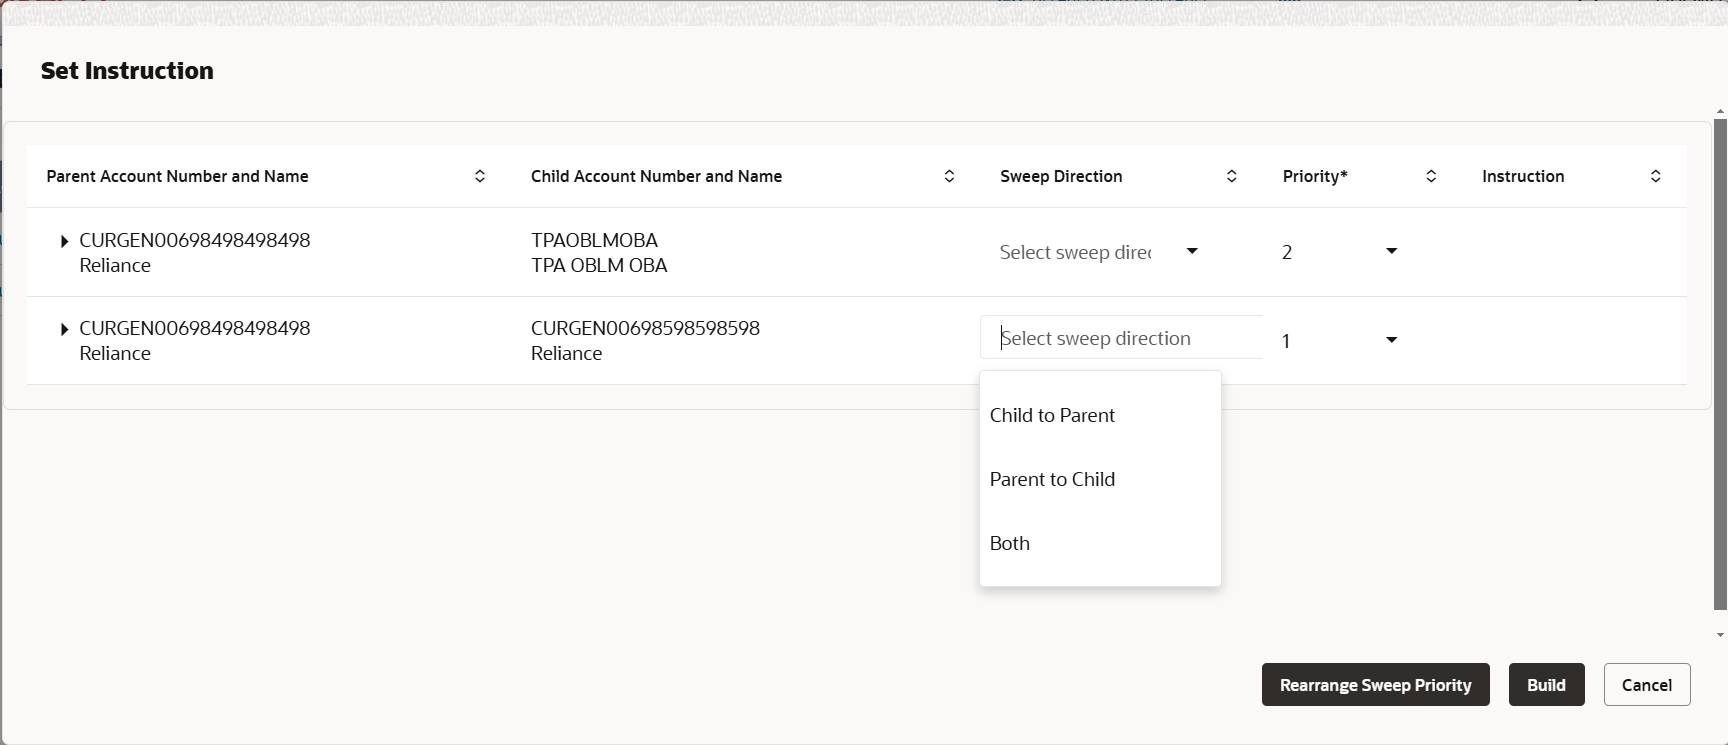
- Click Set Instructions to set the instruction of the selected the child accounts.The Set Instructions screen displays. For more information on fields, refer to the field description table.
Table 6-36 Set Instructions – Field Description
Field Description Parent Account Number and Name Displays the parent account number and name of the structure. Child Account Number and Name Displays the child account number and name of the structure. Sweep Direction Displays the sweep direction of the structure The available options are- Child to Parent
- Parent to Child
- Both
Priority Displays the priority number to the accounts in the structure. Instructions Displays the instructions of the structure. - Click Rearrange Sweep Priority to rearrange the priority of the accounts.
- Click Build to add the sweep/pool accounts to the structure.
- Click
 and then click Link Account to add the child accounts for the parent account
Create Account Structure - Append Accounts in Structure
After linking the child accounts to the header account, the user can proceed to establish instructions for the account pair, including details about both the parent and child accounts.
- Click
 and then click Link Account to add the child accounts for the header account.The Append Accounts in Structure screen displays. For more information on fields, refer to the field description table.
Table 6-37 Append Accounts in Structure – Field Description
Field Description Sweep/Pool Select the account category for the account pair. The options are:- Pool
- Sweep
Filter Account Specify and search the complete or partial account details to display the list of accounts that matches across the fields. Account Number Displays the account number for the structure creation. Account Description Displays the description of the account. Branch Code Displays the branch code for the account. Entity ID Displays the Entity ID for the account. Entity Name Displays the name of the Entity ID. Currency Displays the currency of the account. Account Type Displays the account type. The available options are- External (An account which is external to the Bank and linked for liquidity management)
- Internal (An account which is internal to the Bank)
BIC Code Displays the BIC code for the account. Regulated Debits Displays whether the account is regulated for debits or not. The available options are- Yes
- No
Drain Pool Displays whether the account is regulated for drain pool or not. the available options are- Yes
- No
- Select the Checkbox of the accounts to be added as child accounts for the header account.
- Click Set Instructions to set the instruction of the selected the child accounts.The Set Instructions screen displays. For more information on fields, refer to the field description table.
Table 6-38 Append Accounts in Structure – Field Description
Field Description Parent Account Number and Name Displays the parent account number and name of the structure. Child Account Number and Name Displays the child account number and name of the structure. Sweep Direction Displays the sweep direction of the structure. The available options are- Child to Parent
- Parent to Child
- Both
Priority Indicates the sweep priority that establishes the sequence of execution for pairs within a specific level of the structure. Instruction Displays the instruction type for the account pair. - Click Expand icon to view the instructions for the account pair.
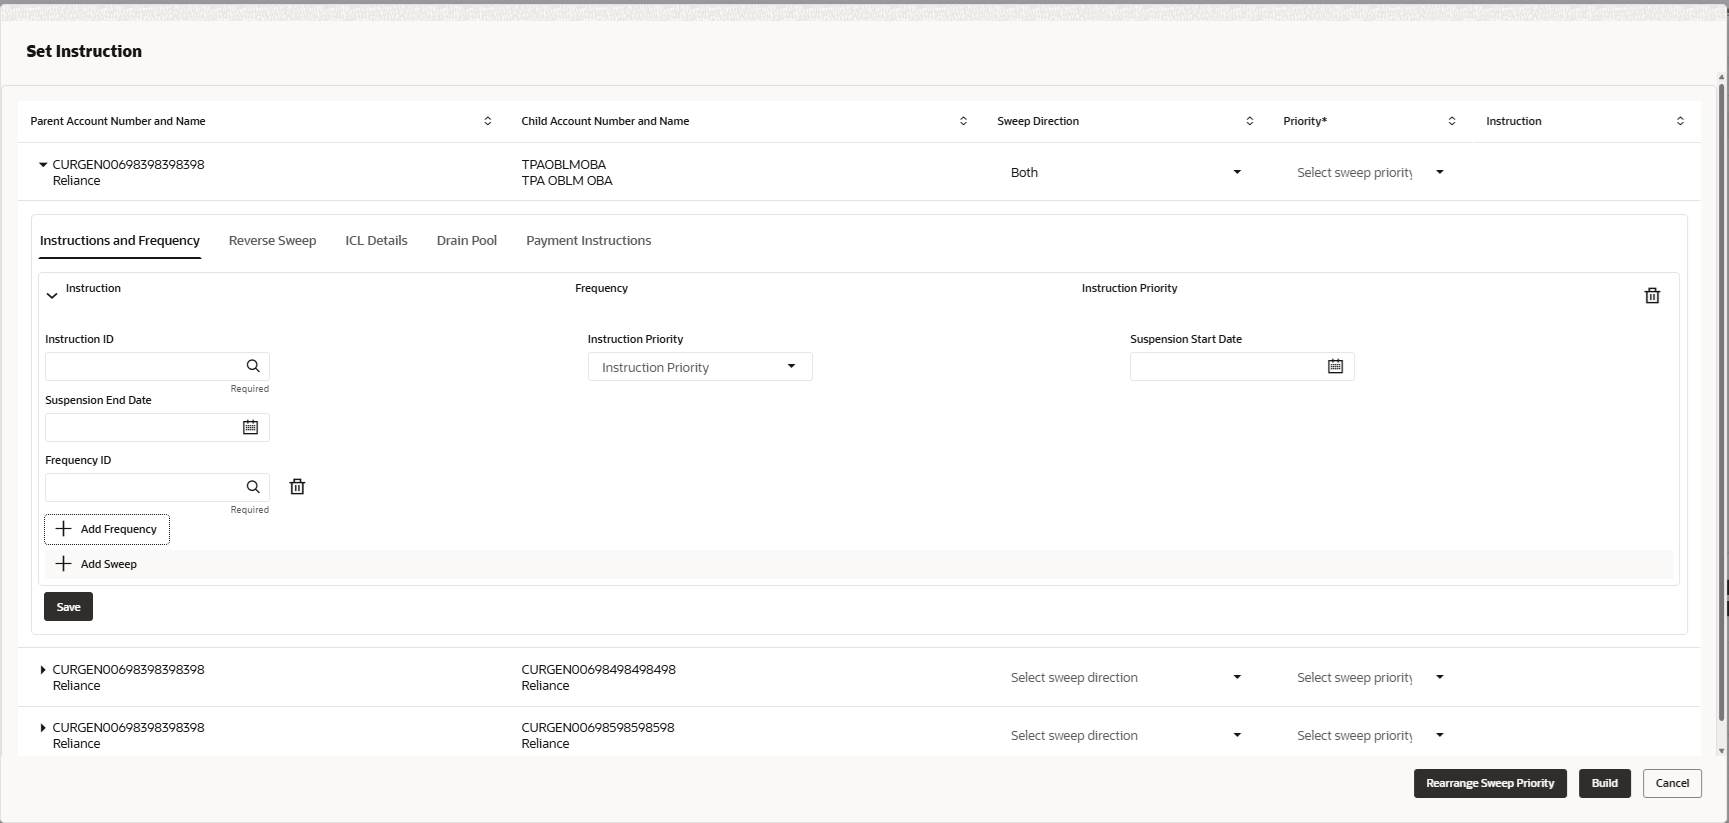
- Click Instruction & Frequency tab to set the instruction and frequency for the account pair.The Set Instructions – Instruction & Frequency screen displays.For more information on fields, refer to the field description table.
Figure 6-49 Set Instructions – Instruction & Frequency
Table 6-39 Set Instructions – Instruction & Frequency – Field Description
Field Description Instruction ID Click the Searchicon and select the instruction ID to set between the account pair. Instruction Priority Specify the instruction priority across multiple instructions within an account pair. Suspension Start Date Select the suspension start date of the account pair. Suspension End Date Select the suspension end date of the account pair. Frequency ID Click the Searchicon and select the frequency at which the account structure should be executed. Collar Amount Specify the collar amount set for executing sweep is displayed. Note: This field appears if the Instruction ID is selected as Collar Model from the list.
The value established in the product processor is presented in an editable format.
Maximum Specify the maximum amount for executing sweep. The value established in the product processor is presented in an editable format.
Maximum Deficit Specify the maximum deficit amount for executing sweep. The value established in the product processor is presented in an editable format.
Minimum Specify the minimum amount for executing sweep. The value established in the product processor is presented in an editable format.
Minimum Deficit Specify the minimum deficit amount for executing sweep. The value established in the product processor is presented in an editable format.
Threshold Amount Specify the threshold amount for executing sweep. Note: This field appears if the Instruction ID is selected as Threshold Model or Collar Model from the list.
The value established in the product processor is presented in an editable format.
Multiple Specify the amount in multiples of which the sweep is to be executed. The value established in the product processor is presented in an editable format.
Percentage Specify the percentage for which the sweep is to be executed. Note: This field appears if the Instruction ID is selected as Percentage Model from the list.
The value established in the product processor is presented in an editable format.
Fixed Amount Specify the fixed amount for which the sweep is to be executed. Note: This field appears if the Instruction ID is selected as Fixed Amount Model or Range Based Model from the list.
The value established in the product processor is presented in an editable format.
- Perform the following actions on the Set Instructions – Instruction & Frequency screen.
- Click Delete icon to delete the Instruction or Frequency of the account pair.
- Click Add Sweep to add the new instruction for the account pair.
- Click Add Frequency to add the new frequency for the account pair.
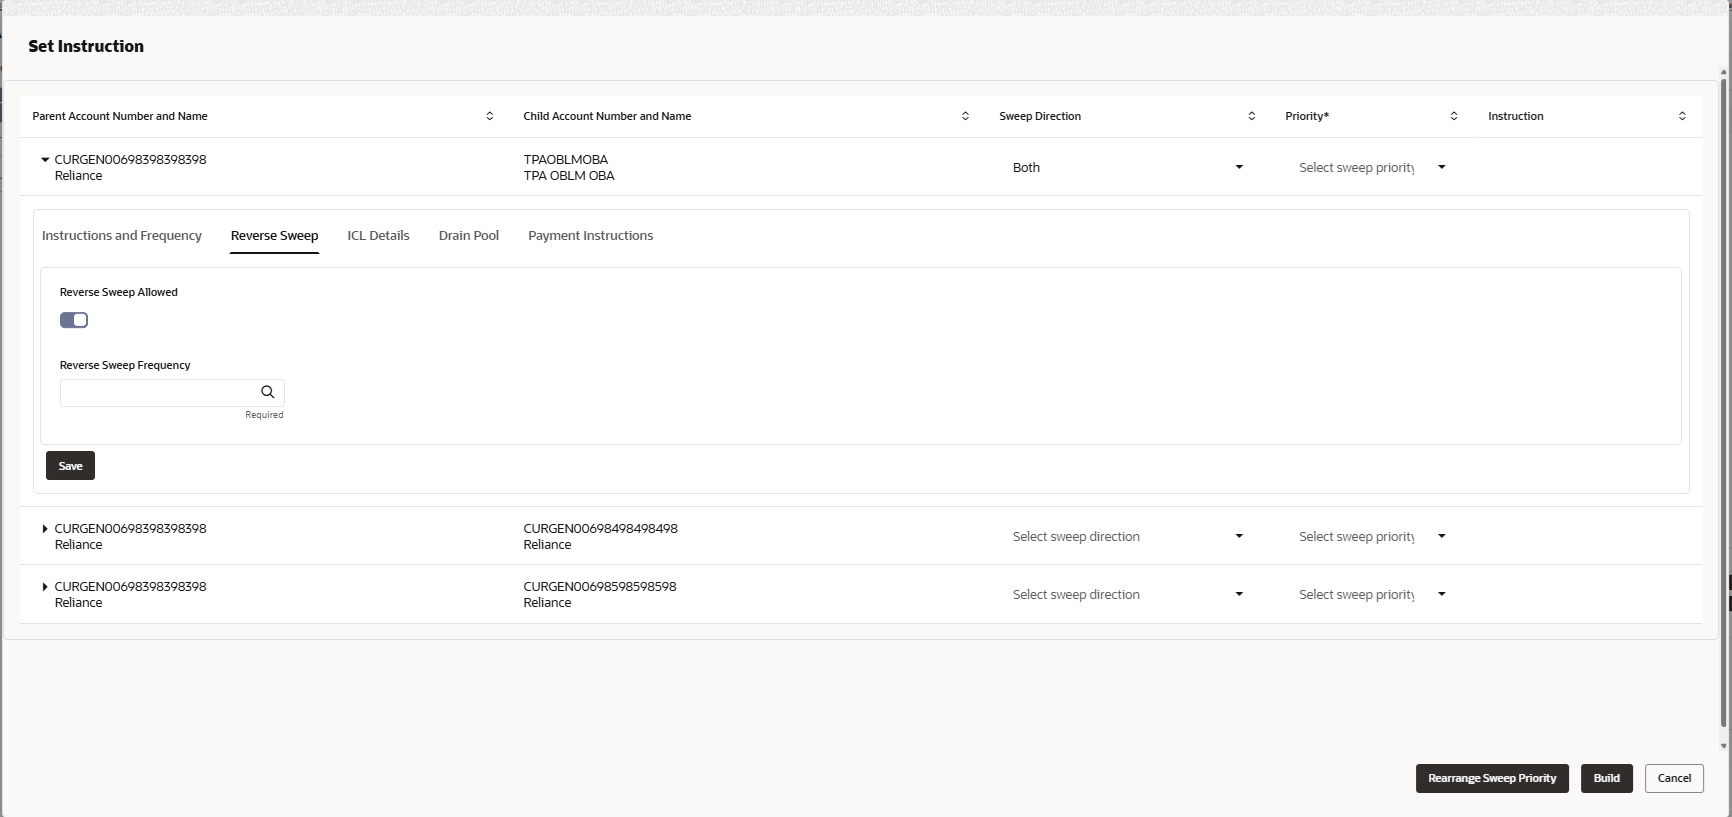
- Click Reverse Sweep tab to set the reverse sweep instruction for the account pair.The Set Instructions – Reverse Sweep screen displays.For more information on fields, refer to the field description table.
Figure 6-50 Set Instructions – Reverse Sweep
Table 6-40 Set Instructions – Reverse Sweep – Field Description
Field Description Reverse Sweep Allowed Select the Reverse Sweep Allowed toggle to enable the reverse sweep for the account pair. Reverse Sweep Frequency Select the frequency for executing the reverse sweep of the account structure. Note: This field appears only if the Reverse Sweep Allowed toggle is enabled.
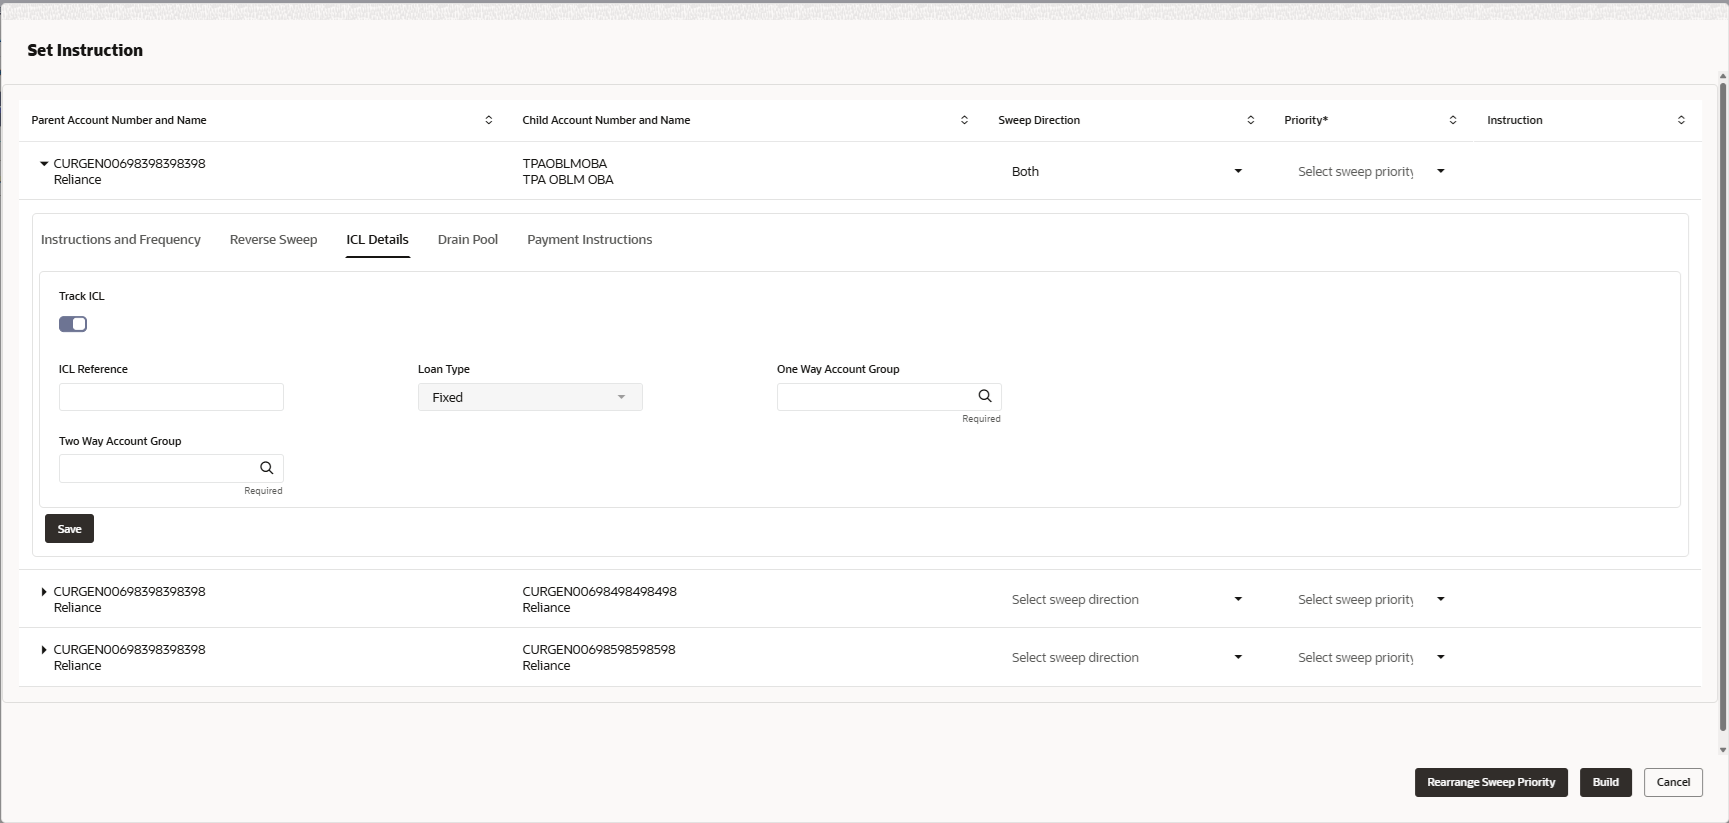
- Click ICL Details tab to set the Intercompany loan instruction for the account pair.The Set Instructions – ICL Details screen displays.For more information on fields, refer to the field description table.
Figure 6-51 Set Instructions – ICL Details
Table 6-41 Set Instructions – ICL Details – Field Description
Field Description Track ICL Select the Track ICL toggle to enable the ICL for the account pair. ICL Reference Specify the Intercompany Loan Reference details. Note: This field appears only if the Track ICL toggle is enabled.
Loan Type Displays the type of the loan. - If Reverse Sweep Allowed toggle is ON, the Loan Type is displayed as Fixed.
- If Reverse Sweep Allowed toggle is OFF, the Loan Type is displayed as Open.
Note: This field appears only if the Track ICL toggle is enabled.
Child to ParentAccount Group Click Search and select the account group to maintain Interest Rate for reallocation at Parent-Child Pair level. The Child to parent Account Group interest rate will be applicable for reallocations happening for a sweep from Child to Parent direction. (Reallocation will be from Parent to Child).
Parent to Child Account Group Click Search and select the account group to maintain Interest Rate for reallocation at Child-Parent Pair level. The interest rate for the Child to Parent Account Group will apply to reallocations occurring for a sweep from the Child to Parent direction. (This means reallocations will be made from Parent to Child).
Note: This field appears only if the parent to child sweep toggle is enabled.
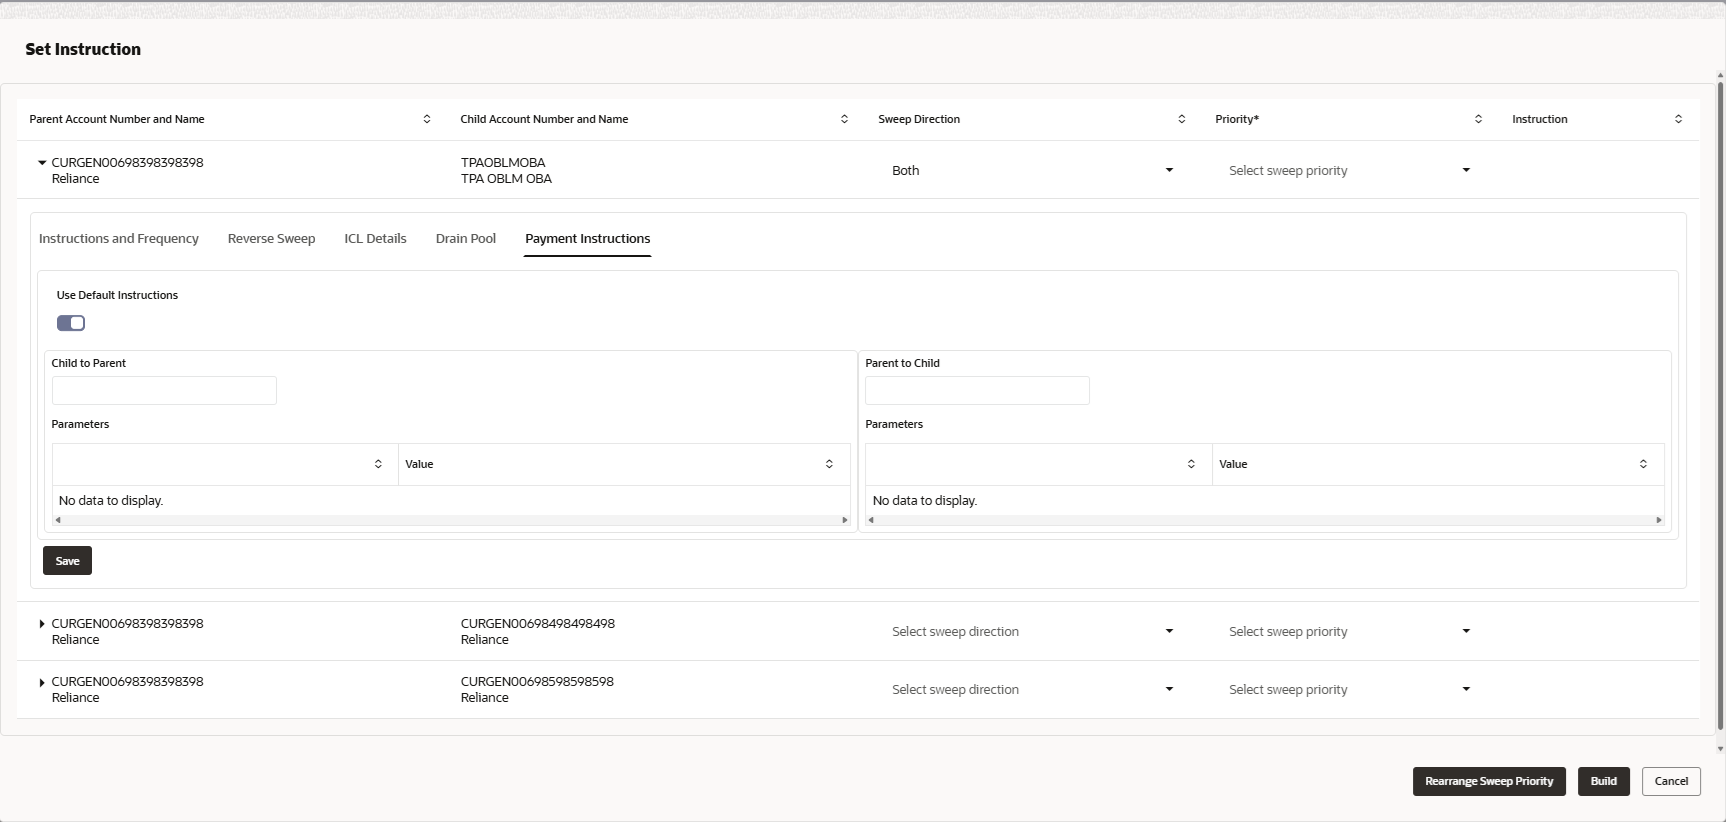
- Click Payment Instructions tab to set the payment instruction for the account pair.The Set Instructions – Payment Instructions screen displays.For more information on fields, refer to the field description table.
Figure 6-52 Set Instructions – Payment Instructions
Table 6-42 Set Instructions – Payment Instruction – Field Description
Field Description Use Default Instructions Select the Use Default Instructions toggle whether the default payment instruction is being applied or not. The system automatically sets the toggle to ON for the account pair, enabling the use of the default payment instruction.
Child to Parent Select the child to parent parameters from the drop-down list. The list displays all the parameters that are set for the account in Payment Parameters setup. Note: This field appears only if the Use Default Instructions toggle is disabled.
Parent to Child Select the parent to child parameters from the drop-down list. The list displays all the parameters that are set for the account in payment parameters setup. Note: This field appears only if the Use Default Instructions toggle is disabled.
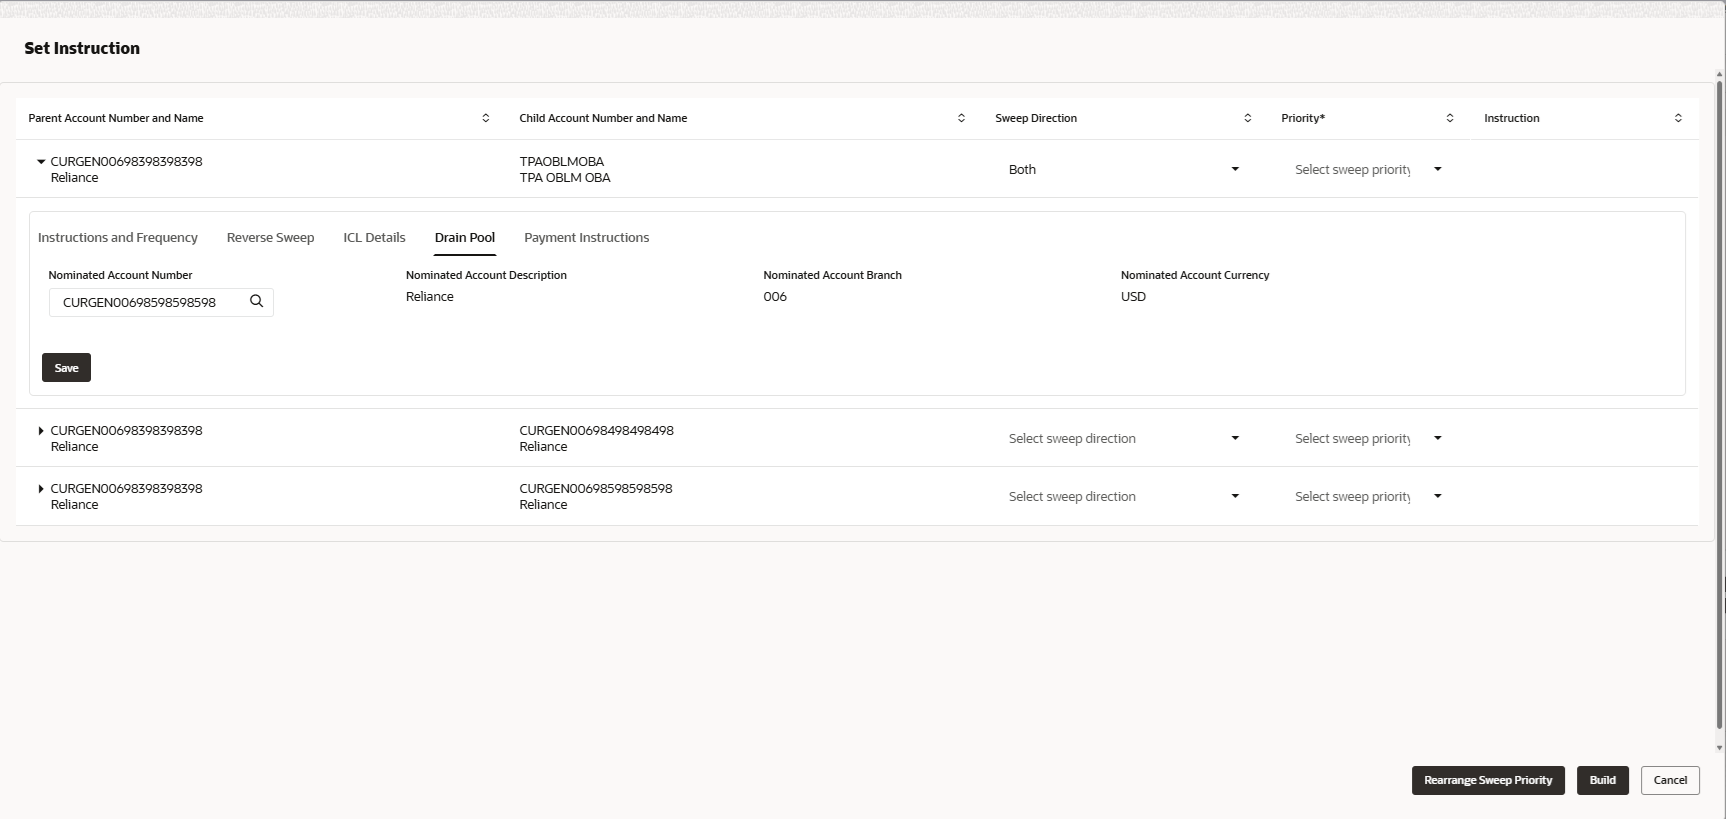
Parameters Displays the table with the name and value set for the selected parameter. - Click Drain Pool tab to set the drain pool for the accounts.The Set Instructions – Drain Pool screen displays. For more information on fields, refer to the field description table.
Table 6-43 Set Instructions – Drain Pool – Field Description
Field Description Nominated Account Name Click Search icon and select the nominated account name. The nominated account would only be displayed and enabled when user has selected a notional header of an existing pool as part of Drain the pool scenario. In Drain the pool type of sweeps, system would consider the pool balance while performing sweeps and the debit / credit would happen from/ to the nominated account.
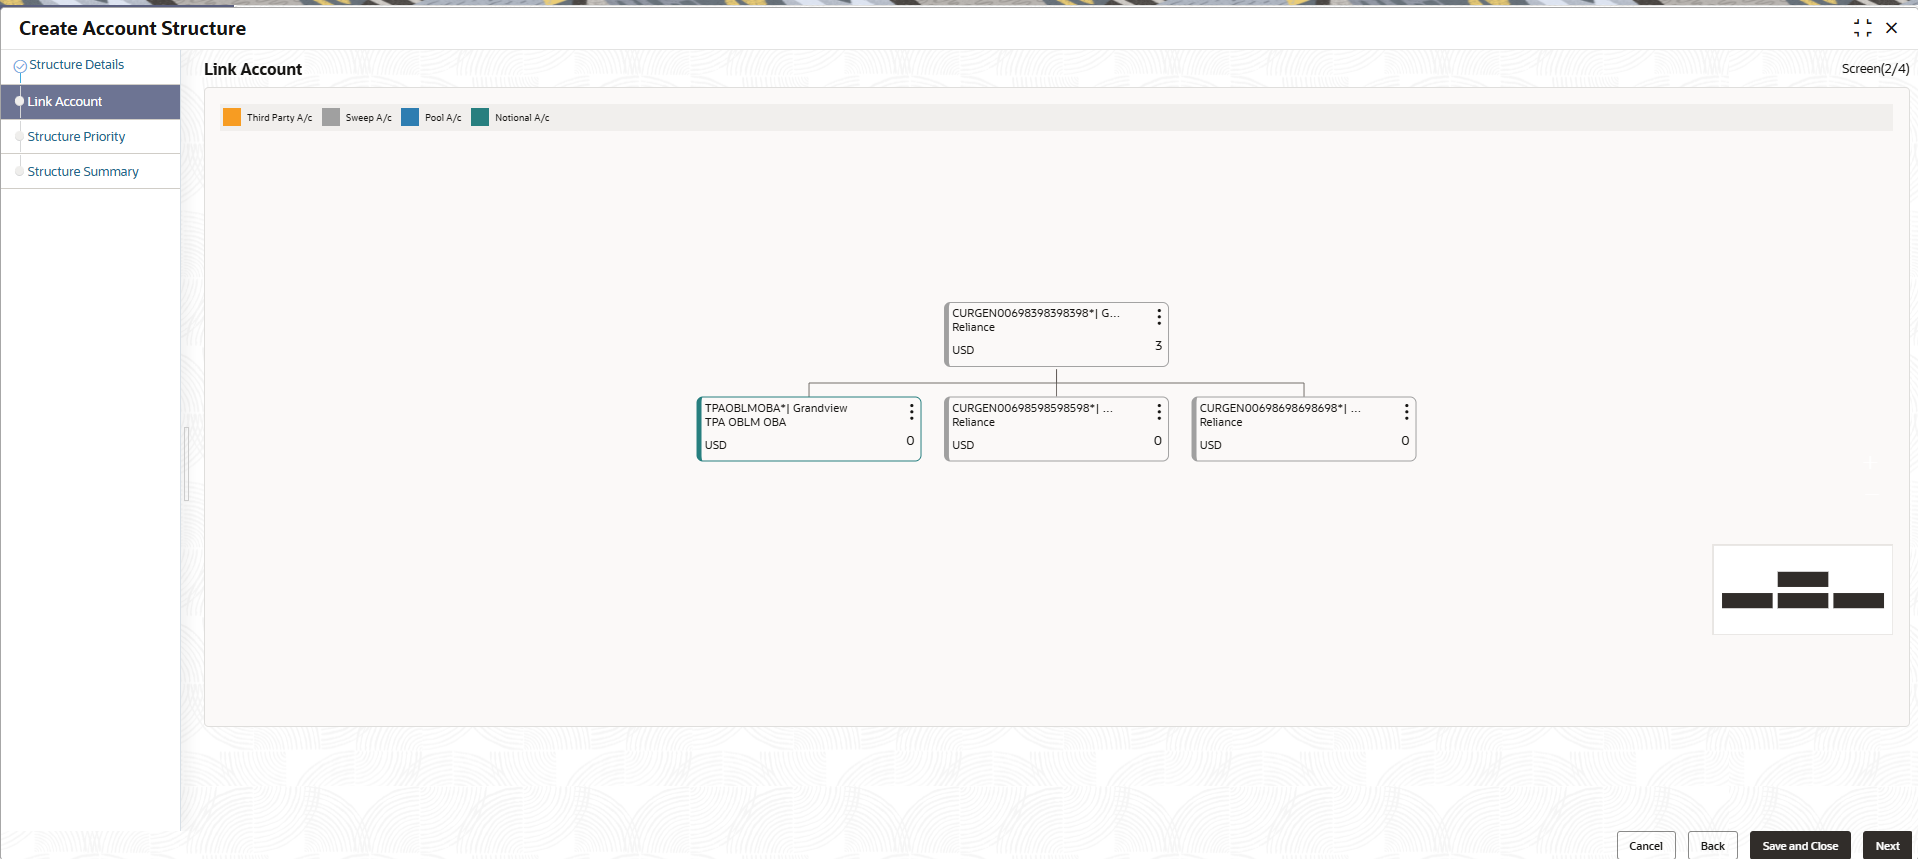
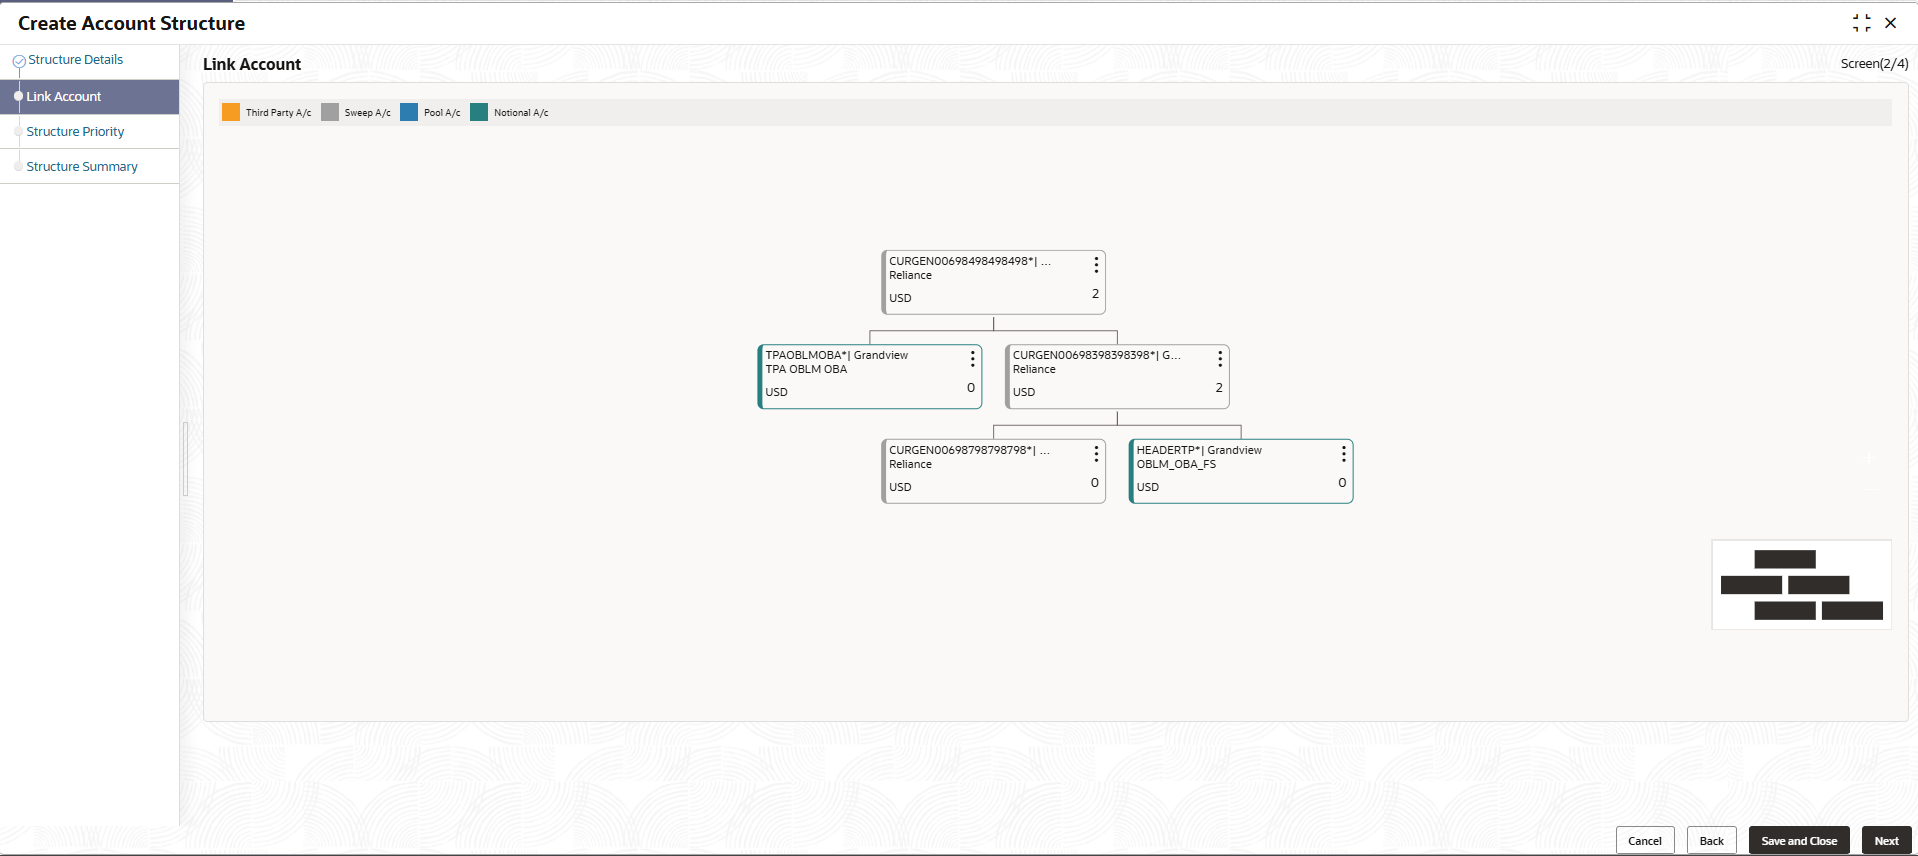
Nomination Account Description Displays the nomination account description based on the Nominated Account Name selected. Nominated Account Branch Displays the nomination account branch based on the Nominated Account Branch selected. Nominated Account Currency Displays the nomination account currency based on the Nominated Account Currency selected. - Click Build to add the child accounts to the structure.The Create Account Structure - Link Account - View screen displays.
Figure 6-54 Create Account Structure - Link Account - View
Note:
Initially, only the Header node and its direct child accounts will be visible on the screen. To access additional nodes, click on the relevant nodes to expand and reveal their child accounts. Pagination will be shown at each level of the structure and will appear if the number of nodes surpasses the configured limit. - Perform anyone of the following actions on the child accounts node.
- Click
 and then click Link Account to add the additional child accounts.
 - Click
 and then click View Account Details to view the account details of the accounts.The Account Details screen displays
Table 6-44 Account Details - Field Description
Field Description Customer Name Displays the customer name. Entity Name Displays the entity name. Account Number Displays the account number. Description Displays the description of the particular account. Bank Name Displays the bank name of the account. Note: This field appears only for External Accounts.
Bank Code Displays the bank code of the account. Available Balance Displays the balance of the account. IBAN Displays the IBAN number of the account. Branch Code Displays the branch code of the account. Account Category Displays the Category of the account. Location Displays the location of the account. Country Code Displays the country code of the account. Hold Select the toggle to hold the account. - Click
 and then click Delink Account to delink the child account from parent account.
 - Click
 and then click Delink Account Hierarchy to delink all the child accounts and parent account of the structure.
 - Click
 and then click Replace Account to replace the account in the structure.
Note:
This option is disabled, if the account being replaced has associated child accounts.
- Click
- Click Search button to filter the accounts which need to be added to the structure.
- Click Previous to navigate to the previous screen (Structure Details).
- Click Next to save and navigate to the next screen (Structure Priority).The Alert Message - Accounts in Multiple Structure popup screen displays. If an account added is already a part of another structure.
Figure 6-56 Alert Message - Accounts in Multiple Structure
- Click Confirm to confirm and proceed to next data segment.
- Click Cancel to cancel the action and stay on the same data segment.
- Click Save and Close to save and close the Structure screen. In such case, the structure gets saved and available in Summary screen.
- Click Cancel to discard the updated details and close the Structure screen. In such case, the structure will not get saved.
The following account pair parameters needs to be maintained:
Parent topic: Create Account Structure
