- Receivables and Payables User Guide
- Create Receivables and Payables
- Create Credit Note
4.4 Create Credit Note
This topic describes the systematic instruction to create a credit note using Create Receivables and Payables screen.
- On Create Receivables and Payables screen, select Credit Note from the Instrument Type list.
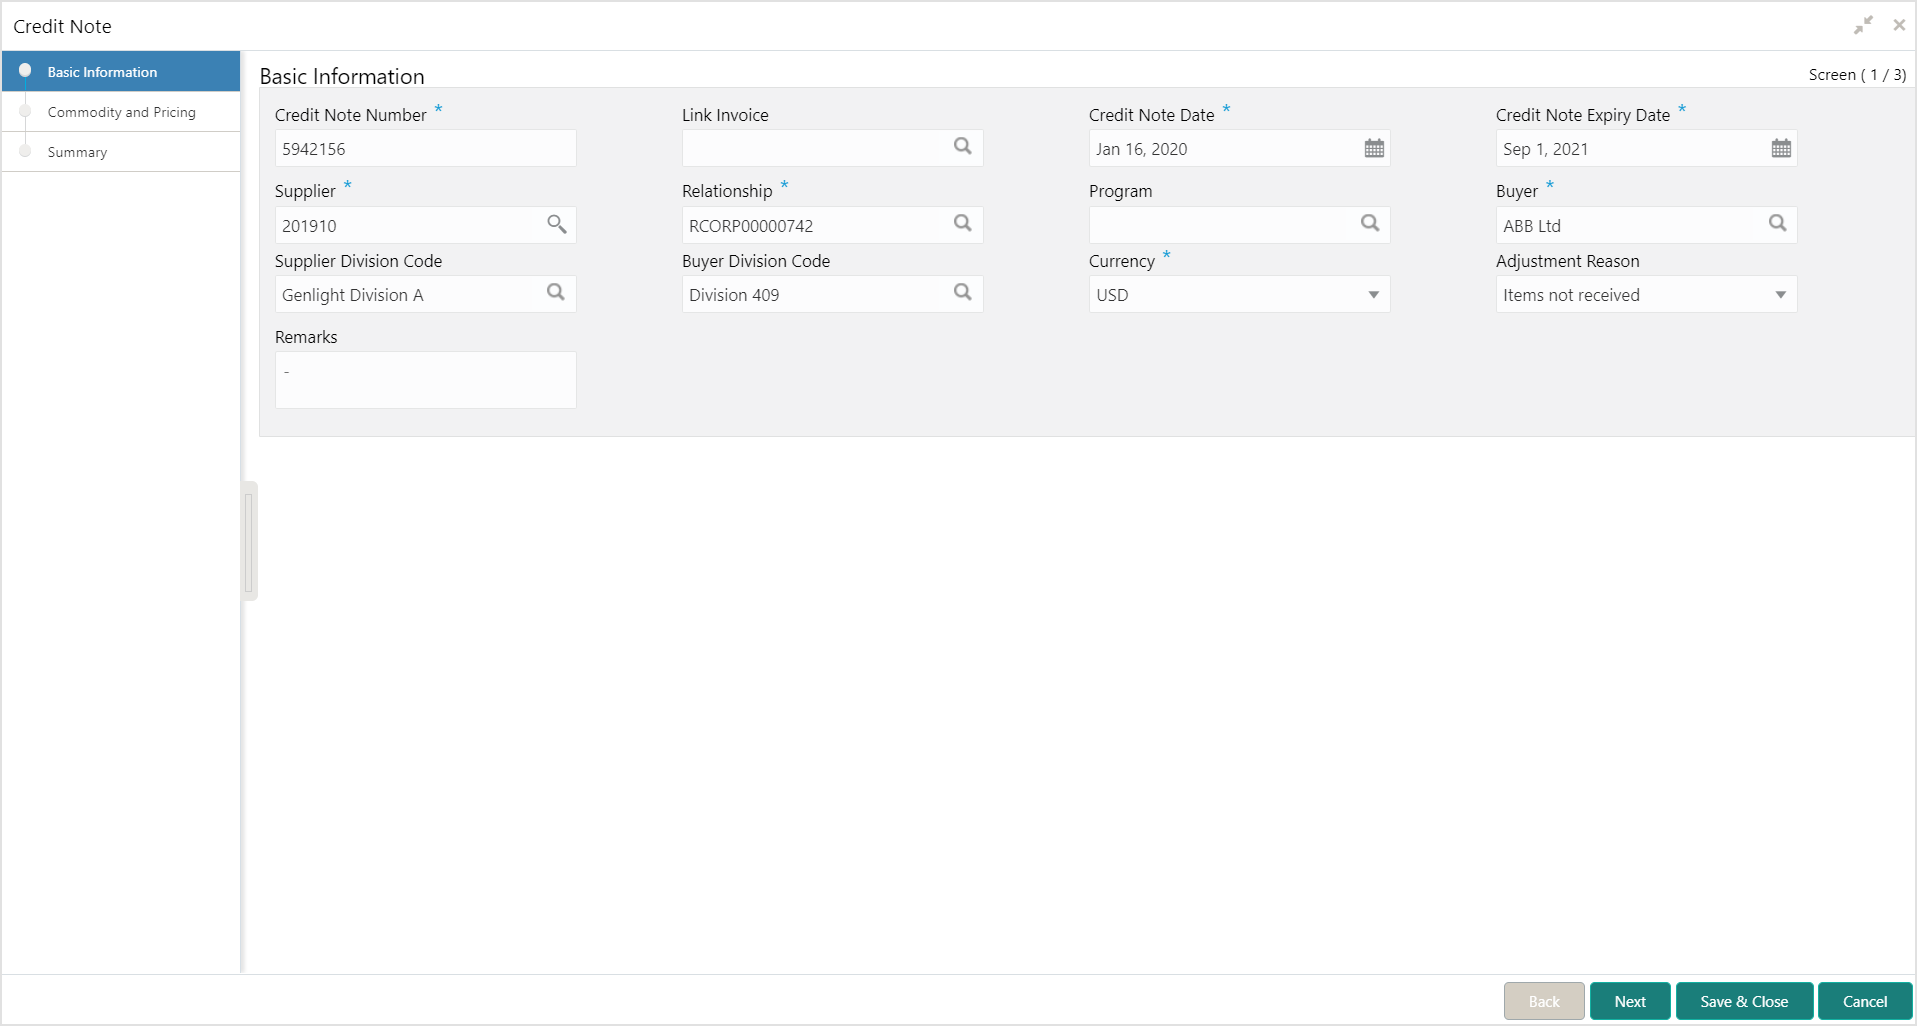
- Click Proceed to view the screen for populating credit note details.The Credit Note - Basic Information screen displays.
Figure 4-16 Credit Note - Basic Information
- In the Credit Note Number field, enter the unique credit note number to be created. Or in case of existing credit note number, click the Search icon and select the existing credit note number.
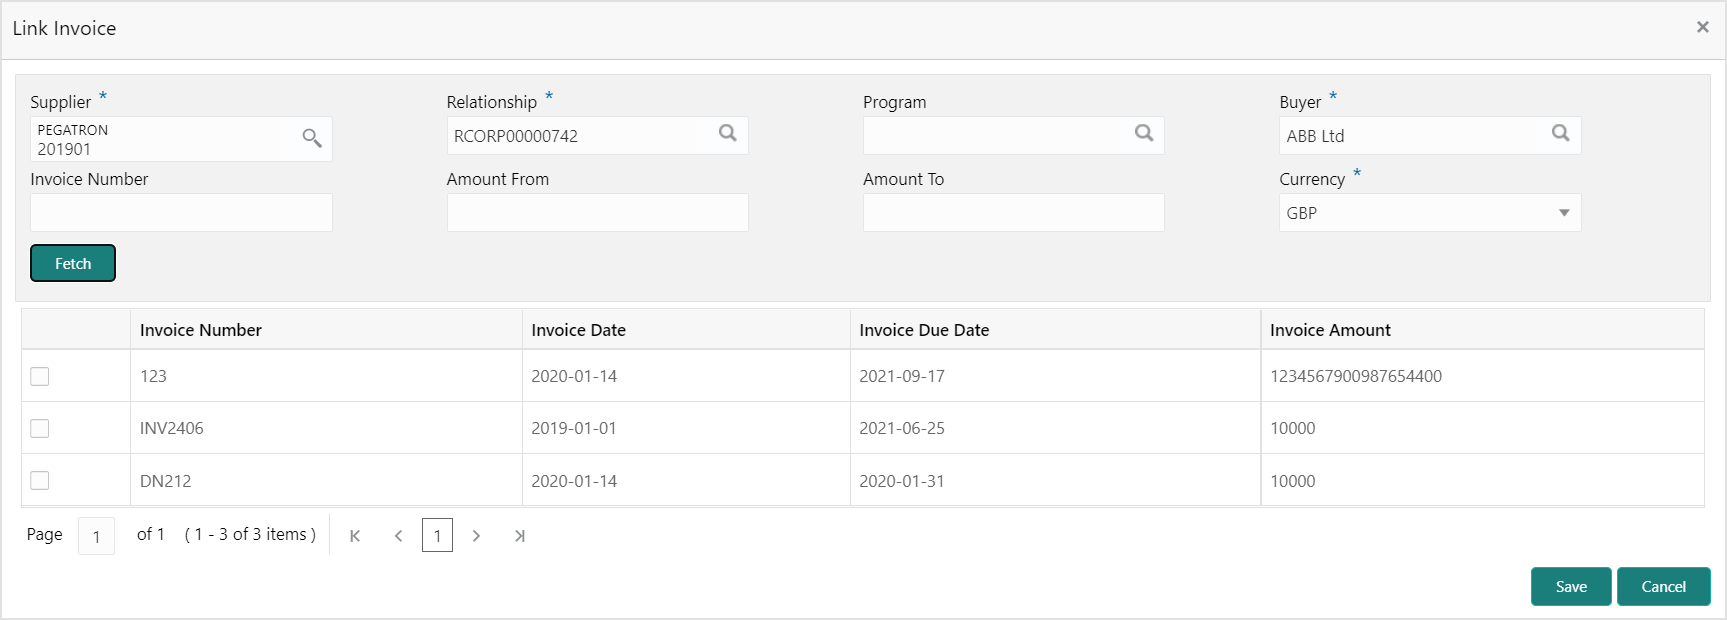
- In the Link Invoice field, click the Search icon to search and select the invoice to be linked with the credit note.The Link Invoice screen displays.
- Perform the following steps to search and select the invoice to be linked.For more information on fields, refer to the field description table.
Note:
The fields, which are marked with an asterisk, are mandatory.Table 4-17 Link Invoice - Field Description
Field Description Supplier Click Search icon and select the supplier of the invoice. Relationship Click Search icon and select the any of the relationship maintained for the selected supplier. In case of linked invoice, the relationship is auto-populated.
Buyer Click Search icon and select the buyer for the credit note. In case of linked invoice, the buyer is auto-populated.
Invoice Number Specify the specific invoice to search for. Amount From Specify the minimum amount of the invoice respectively to filter the invoice search. Amount To Specify the maximum amount of the invoice respectively to filter the invoice search. Currency Select the invoice currency. - Click Fetch to view the invoices matching to the search criteria.
- Select the invoice(s) from the search result and then, click Save to select the invoices for the credit note.
- Specify the following credit note details in the Basic Information screen.For more information on fields, refer to the field description table.
Note:
The fields, which are marked with an asterisk, are mandatory.Table 4-18 Basic Information - Field Description
Field Description Credit Note Number Specify a unique reference number for the credit note to be created. OR
Click Calendar icon and select an existing credit note number.This field cannot be modified once authorized.
Link Invoice Click Search icon to find the invoice(s) to link the credit note to. Credit Note Date Click Calendar icon and select the date on which credit note is created. Credit Note Expiry Date Click Calendar icon and select the date till when the credit note is valid. Supplier Click the Search icon and select the supplier for the credit note. In case of linked invoice, the supplier is auto-populated.
Relationship Click the Search icon and select the any of the relationship maintained for the selected supplier. In case of linked invoice, the relationship is auto-populated.
Program Click the Search icon and select the program to create the credit note for. In case of linked invoice, the program is auto-populated.
This field is applicable only for OBSCF system.
Buyer Click the Search icon and select the buyer for the credit note. In case of linked invoice, the buyer is auto-populated.
Supplier Division Code Click the Search icon and select the division code of the selected supplier. Buyer Division Code Click the Search icon and select the division code of the selected buyer. Currency Select the currency of the credit note. In case of linked invoice, the currency is auto-populated.
Adjustment Reason Select the adjustment reason to be considered for creation of credit note. Funding Request Date Click the Calendar icon and select the requested date for funding the credit note. Remarks Specify the remarks about the credit note, if any. - Perform any of the below action from the Basic Information screen:
- Click Next to go to the Commodity and Pricing screen.
- Click Save & Close to save the credit note details and submit it for authorization.
- Click Cancel to cancel the creation of the credit note.
Commodity and Pricing
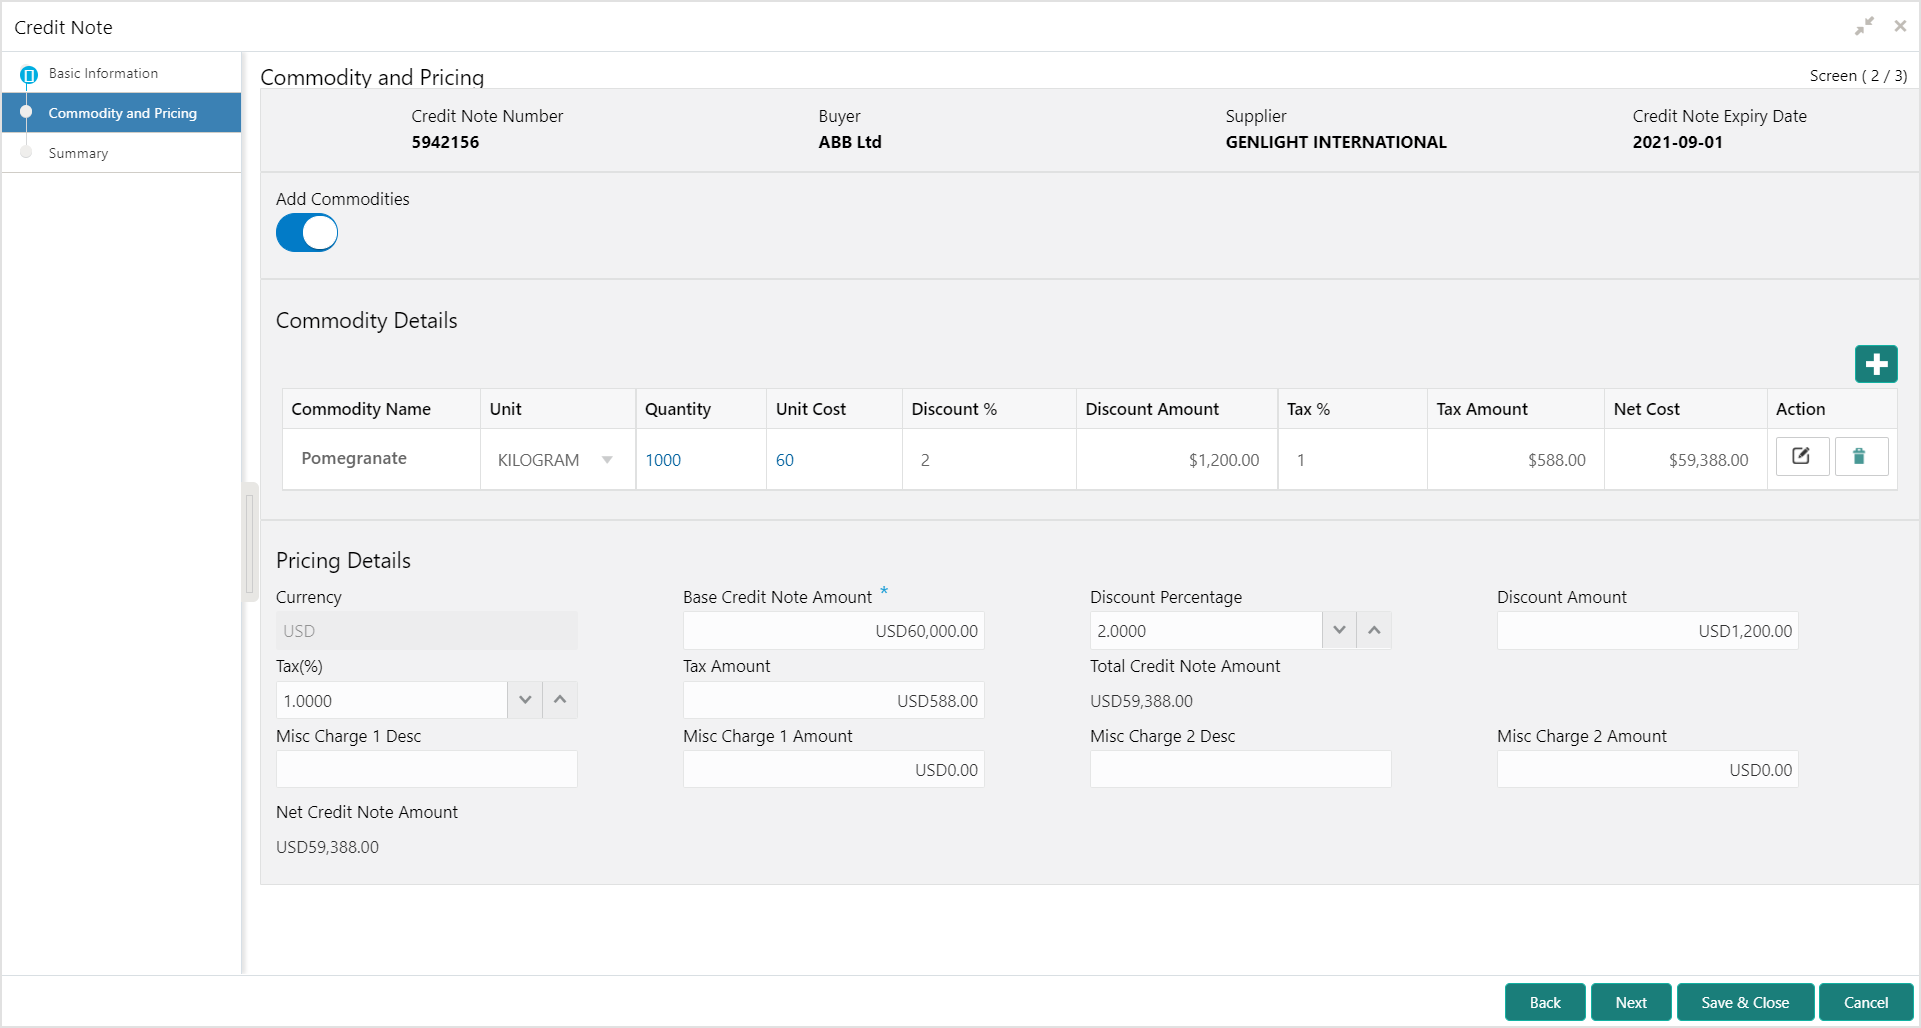
- Click Next on Basic Information tab.The Credit Note - Commodity and Pricing screen displays.
Figure 4-18 Credit Note - Commodity and Pricing
- Switch the Add Commodities toggle ON to view Commodity Details section.For more information on fields, refer to the field description table.
Note:
The fields, which are marked with an asterisk, are mandatory.Table 4-19 Commodity Details - Field Description
Field Description Credit Note Number Displays the reference number of the credit note. Buyer Displays the name of the buyer. Supplier Displays the name of the supplier. Credit Note Expiry Date Displays the date when the credit note expires. Inherit Commodities Switch this toggle ON to inherit commodity details from the linked invoice(s). This toggle is present only if one or more invoices have been linked. Add Commodities Switch this toggle ON to add the commodities for which the credit note is being raised. Commodity Details Displays the fields related to the Commodity details. This section appears if the ‘Add Commodities’ toggle is switched ON.
Invoice Number Select the invoice whose commodity record is to be linked to the credit note. Commodity Name Displays the commodity name based on the selected commodity code. Unit Select the measuring unit for the goods. Quantity Specify the quantity of the goods as per selected measuring unit. Unit Cost Specify a single unit’s cost of the goods. Discount (%) Specify the percentage of discount to be applied on the total cost. Discount Amount Displays the discount amount based on the discount percentage. Tax (%) Specify the percentage of tax to be applied on total amount post discounting. Tax Amount Displays the tax amount based on tax percentage. Net Cost Displays the net costing based on all the previous fields. - Specify the following details on the Pricing Details section.For more information on fields, refer to the field description table.
Note:
The fields, which are marked with an asterisk, are mandatory.Table 4-20 Pricing Details - Field Description
Field Description Currency Displays the selected currency. Base Credit Note Amount Displays the base amount of the Credit Note. Modify the base credit note amount, if required. Discount Percentage Specify the percentage of discount to be applied on the base credit note amount. Discount percentage is auto-calculated based on entered discount amount. Discount Amount Specify the amount to be discounted from the base credit note amount. Discount amount is auto-calculated based on entered discount percentage. Tax (%) Specify the percentage of tax to be levied on the total credit note amount. Tax percentage is auto-calculated based on entered tax amount. Tax Amount Specify the amount of tax to be levied on the total credit note amount. Tax amount is auto-calculated based on entered tax percentage. Total Credit Note Amount Displays the total credit note amount post calculating base credit note amount, discount, and tax. Misc Charge 1 Desc Specify the description of the miscellaneous charges to be added in total credit note amount. Misc Charge 1 Amount Specify the miscellaneous charge amount to be added in total credit note amount. Misc Charge 2 Desc Specify the description of another miscellaneous charges to be added in total credit note amount. Misc Charge 2 Amount Specify the miscellaneous charge amount to be added in total credit note amount. Net Credit Note Amount Displays the net credit note amount post adding miscellaneous charges in the total credit note amount. - Click Add icon to add rows in the grid.
- In the Action column of grid, perform any one of the following steps:
- Click Delete icon to remove that specific row.
- Click Edit icon and specify the commodity details in the grid.
- Perform any of the below action from the Commodity and Pricing screen.
- Click Next to go to the Summary screen.
- Click Save & Close to save the credit note details and submit it for authorization.
- Click Back to go to the Basic Information screen.
- Click Cancel to cancel the creation of the credit note.
Summary
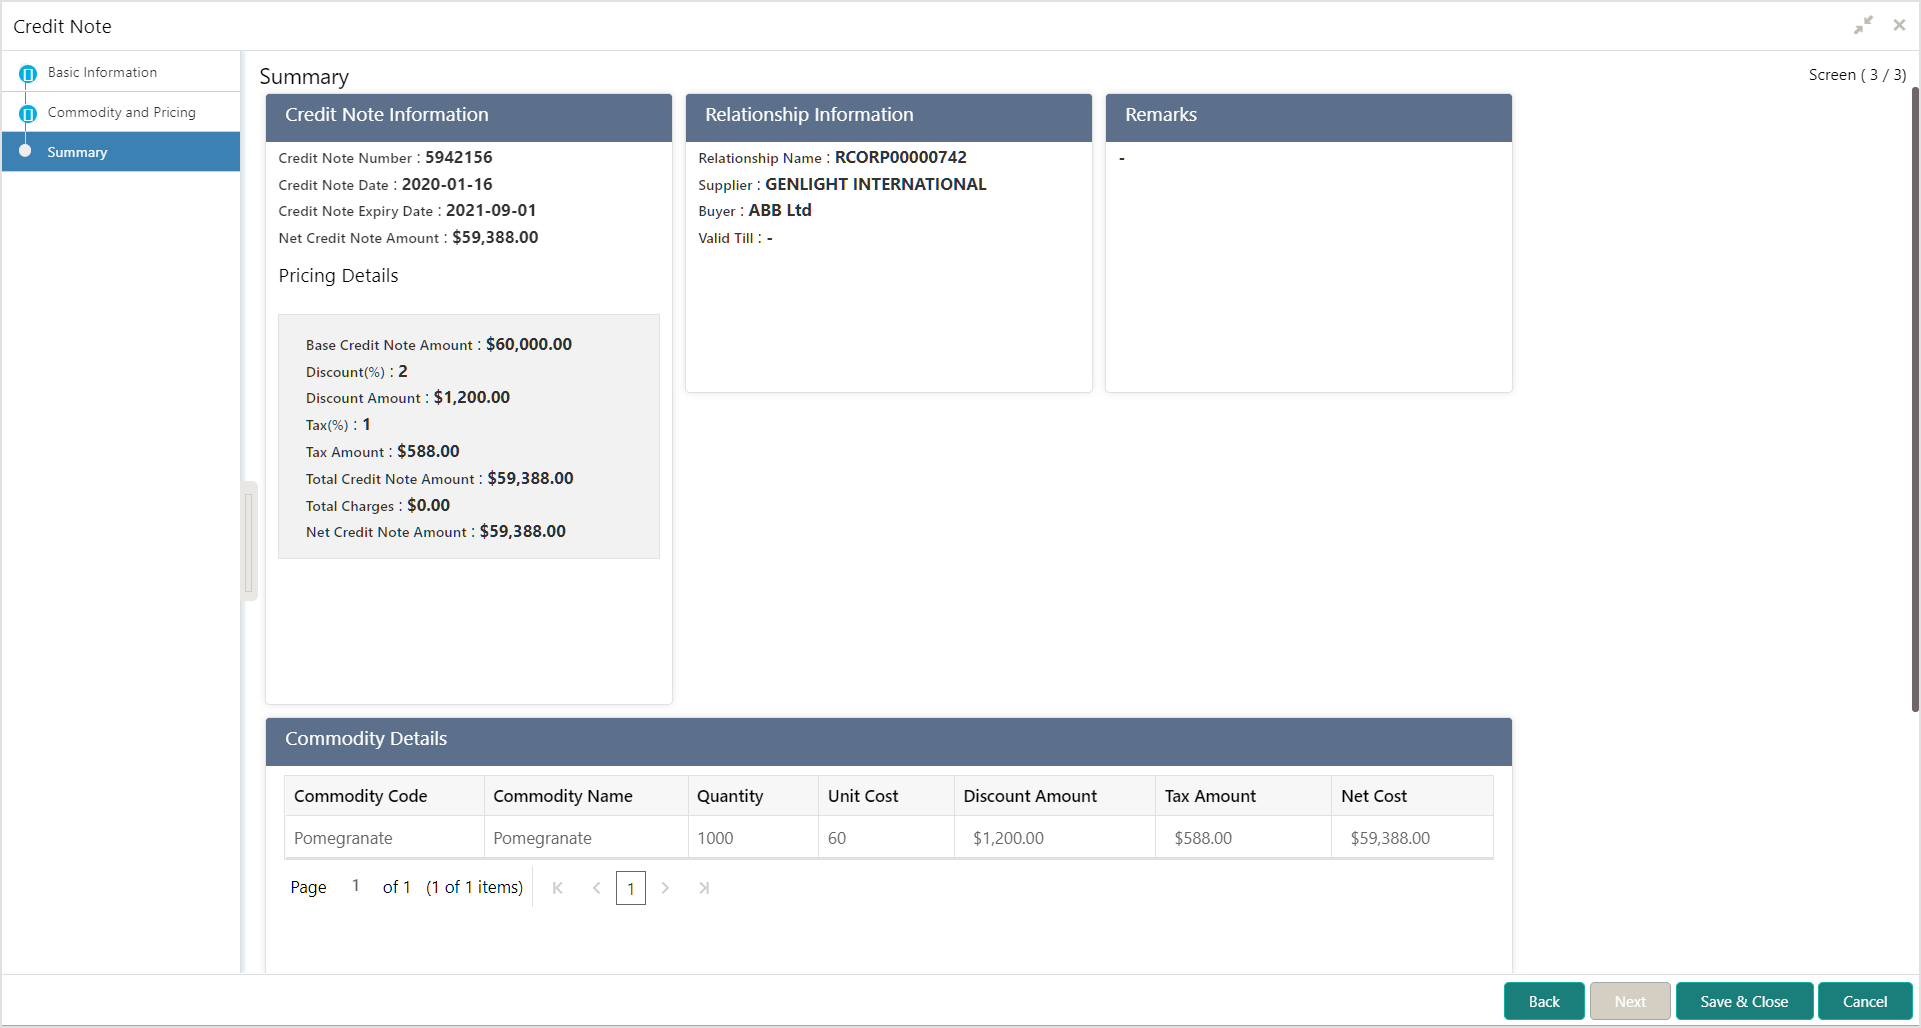
- Click Next on Shipment Information tab.The Credit Note - Summary screen displays.
- Review the detail of the credit note being created and perform any of the below action from the Summary screen.
- Click Save & Close to save the credit note details and submit it for authorization.
- Click Back to go to the Commodity and Pricing screen.
- Click Cancel to cancel the creation of the credit note.
Parent topic: Create Receivables and Payables


