- Receivables and Payables User Guide
- Create Receivables and Payables
- Create Purchase Order
4.2 Create Purchase Order
This topic describes the systematic instruction to create a purchase order using Create Receivables and Payables screen.
- On Create Receivables and Payables screen, select Purchase Order from the Instrument Type list.
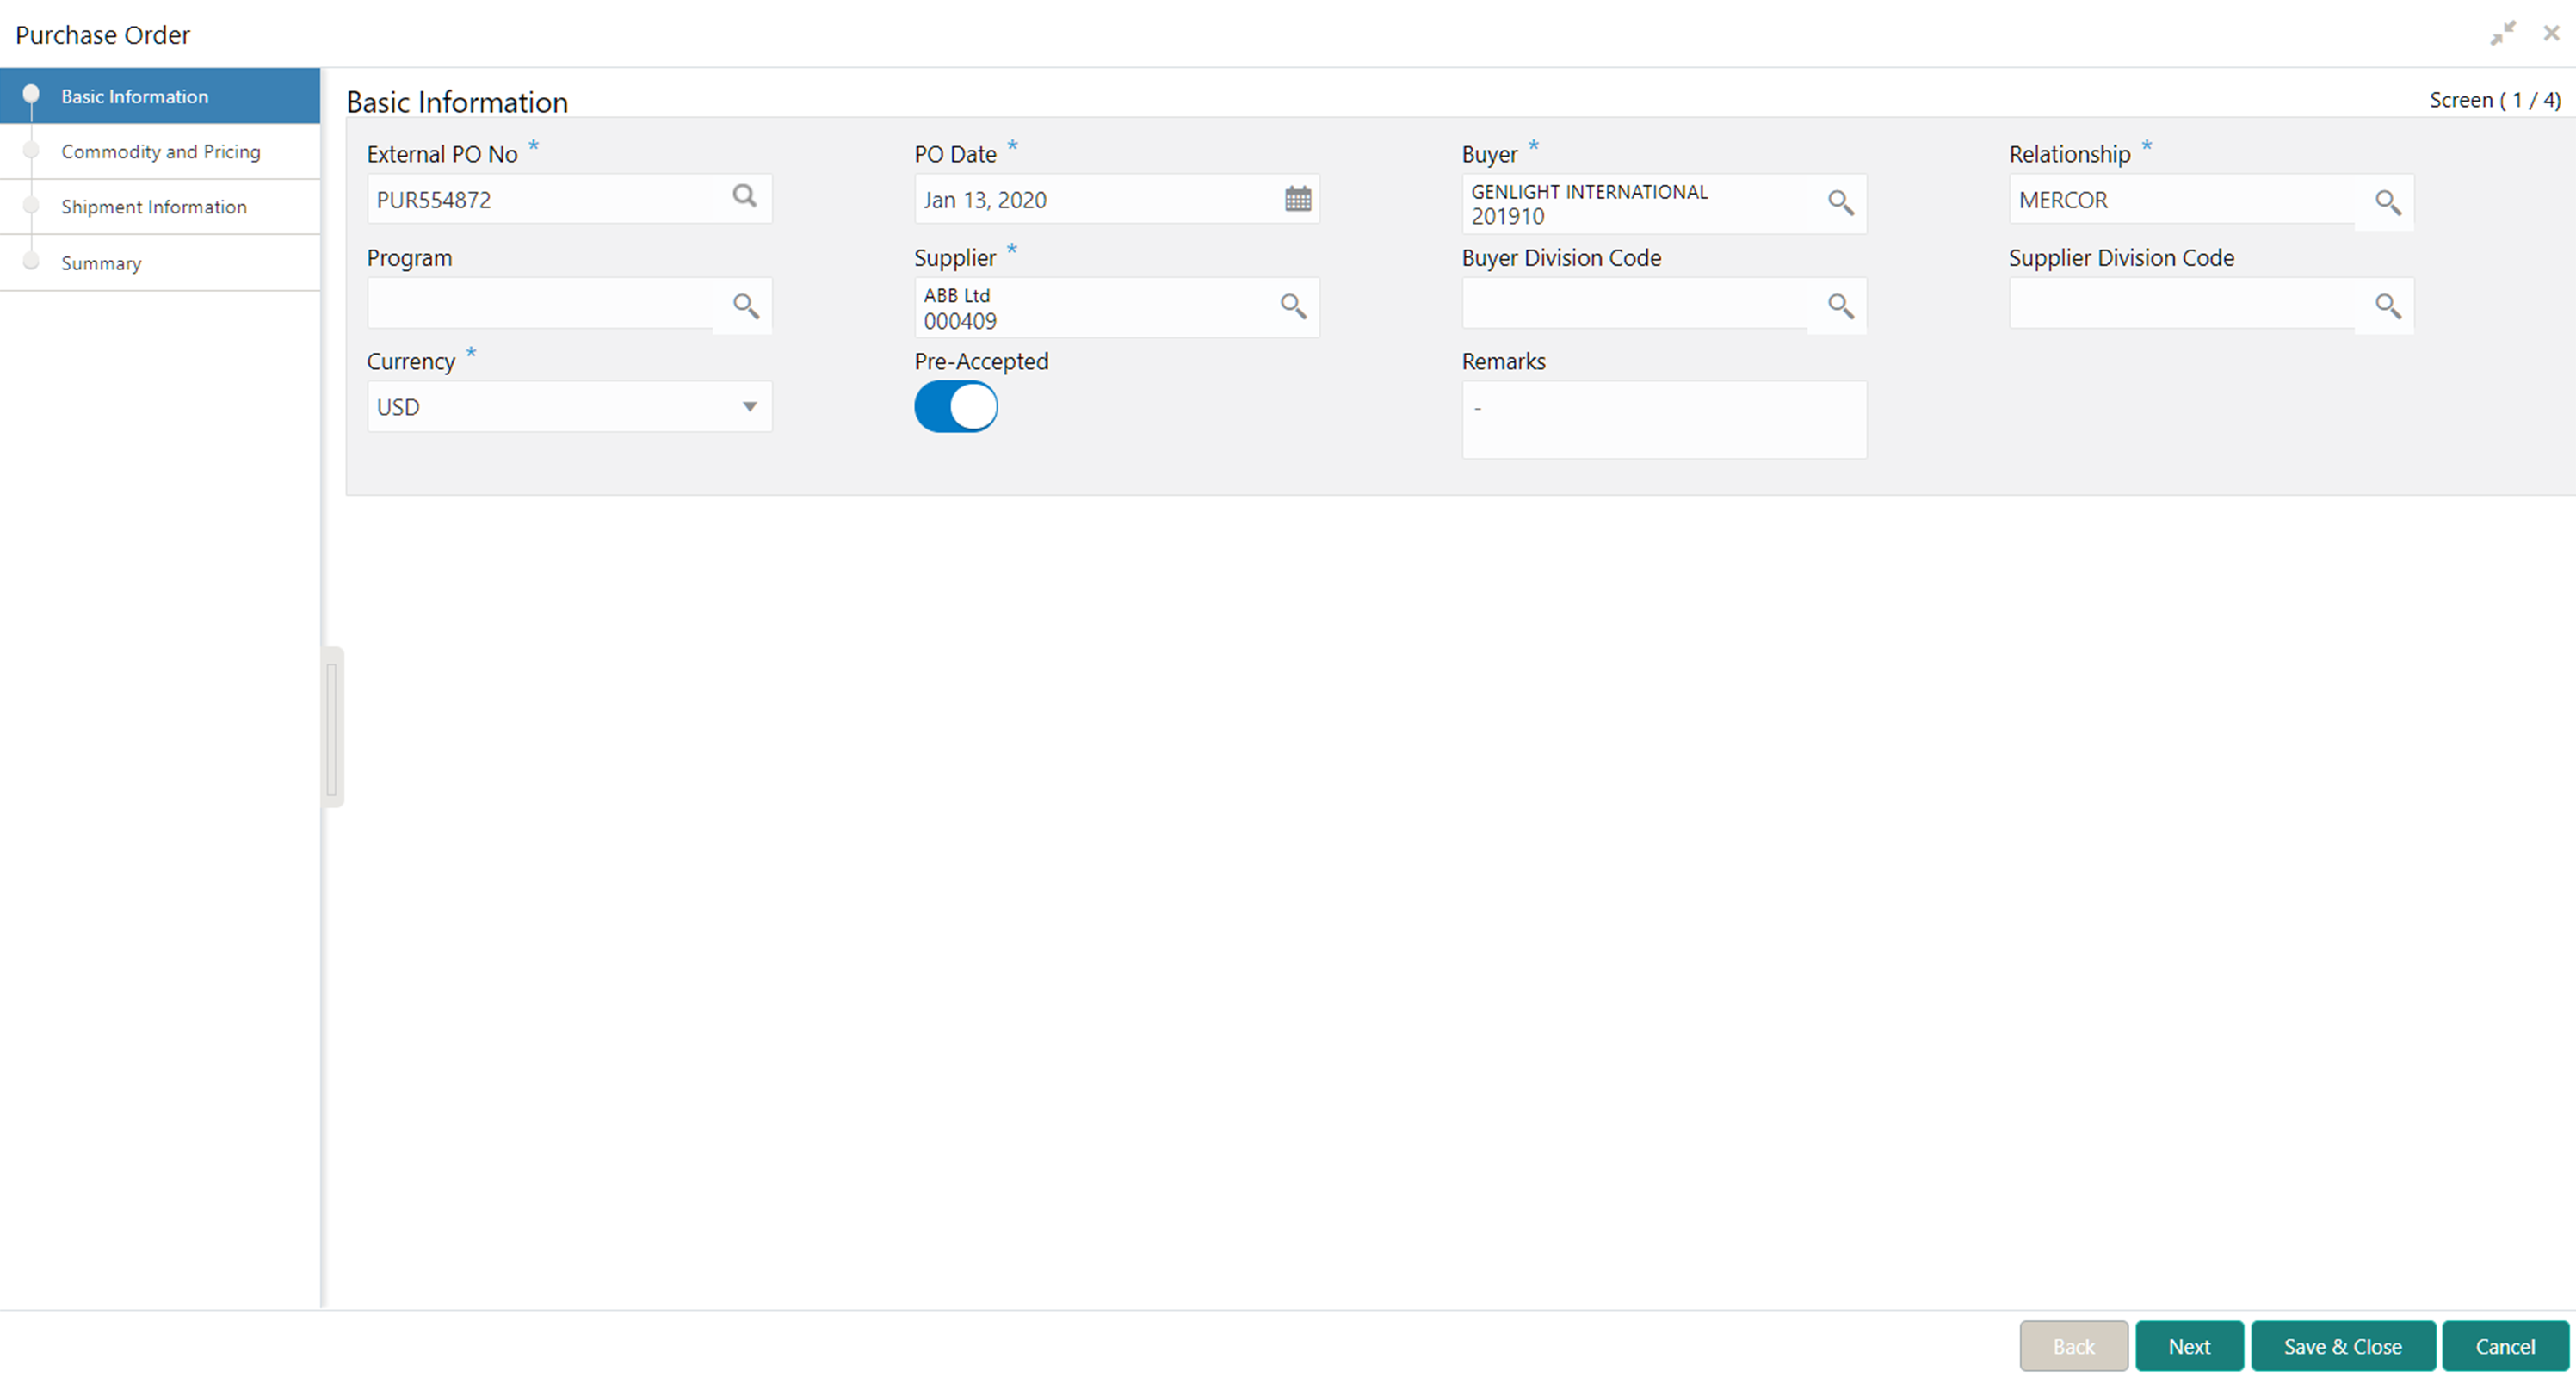
- Click Proceed to view the screen for populating purchase order (PO) details.The Purchase Order - Basic Information screen displays.
Figure 4-7 Purchase Order - Basic Information
- Specify the fields on Basic Information screen.For more information on fields, refer to the field description table.
Note:
The fields, which are marked with an asterisk, are mandatory.Table 4-8 Basic Information - Field Description
Field Description External PO No Specify the external reference number for purchase order to be created. OR
Click Search icon to select the existing PO number.
Only “-” is allowed as a special character.
This field cannot be modified once authorized.
PO Date Click Calendar icon and select the date of purchase order creation. By default, the system’s current date is set. Buyer Click Search icon and select the buyer to create the purchase order for. This field cannot be modified once authorized.
Relationship Click Search icon and select the relationship of the selected buyer under which this purchase order should be created. This field cannot be modified once authorized.
Program Click Search icon and select the required program under which the purchase order should be created. This field is applicable to only OBSCF system.
Supplier Click Search icon and select the supplier of the goods/commodity. This field cannot be modified once authorized.
Buyer Division Code Click Search icon and select the division code of the buyer. Supplier Division Code Click Search icon and select the division code of the supplier. Currency Select the currency of the purchase order. Pre-Accepted Switch the toggle ON if the purchase order is pre-accepted by the supplier. Remarks Specify the comments regarding the purchase order, if any. - Perform any of the below action from the Basic Information screen:
- Click Next to go to the Commodity and Pricing screen.
- Click Save & Close to save the PO details and submit it for authorization.
- Click Cancel to cancel the creation of the PO.
Commodity and Pricing
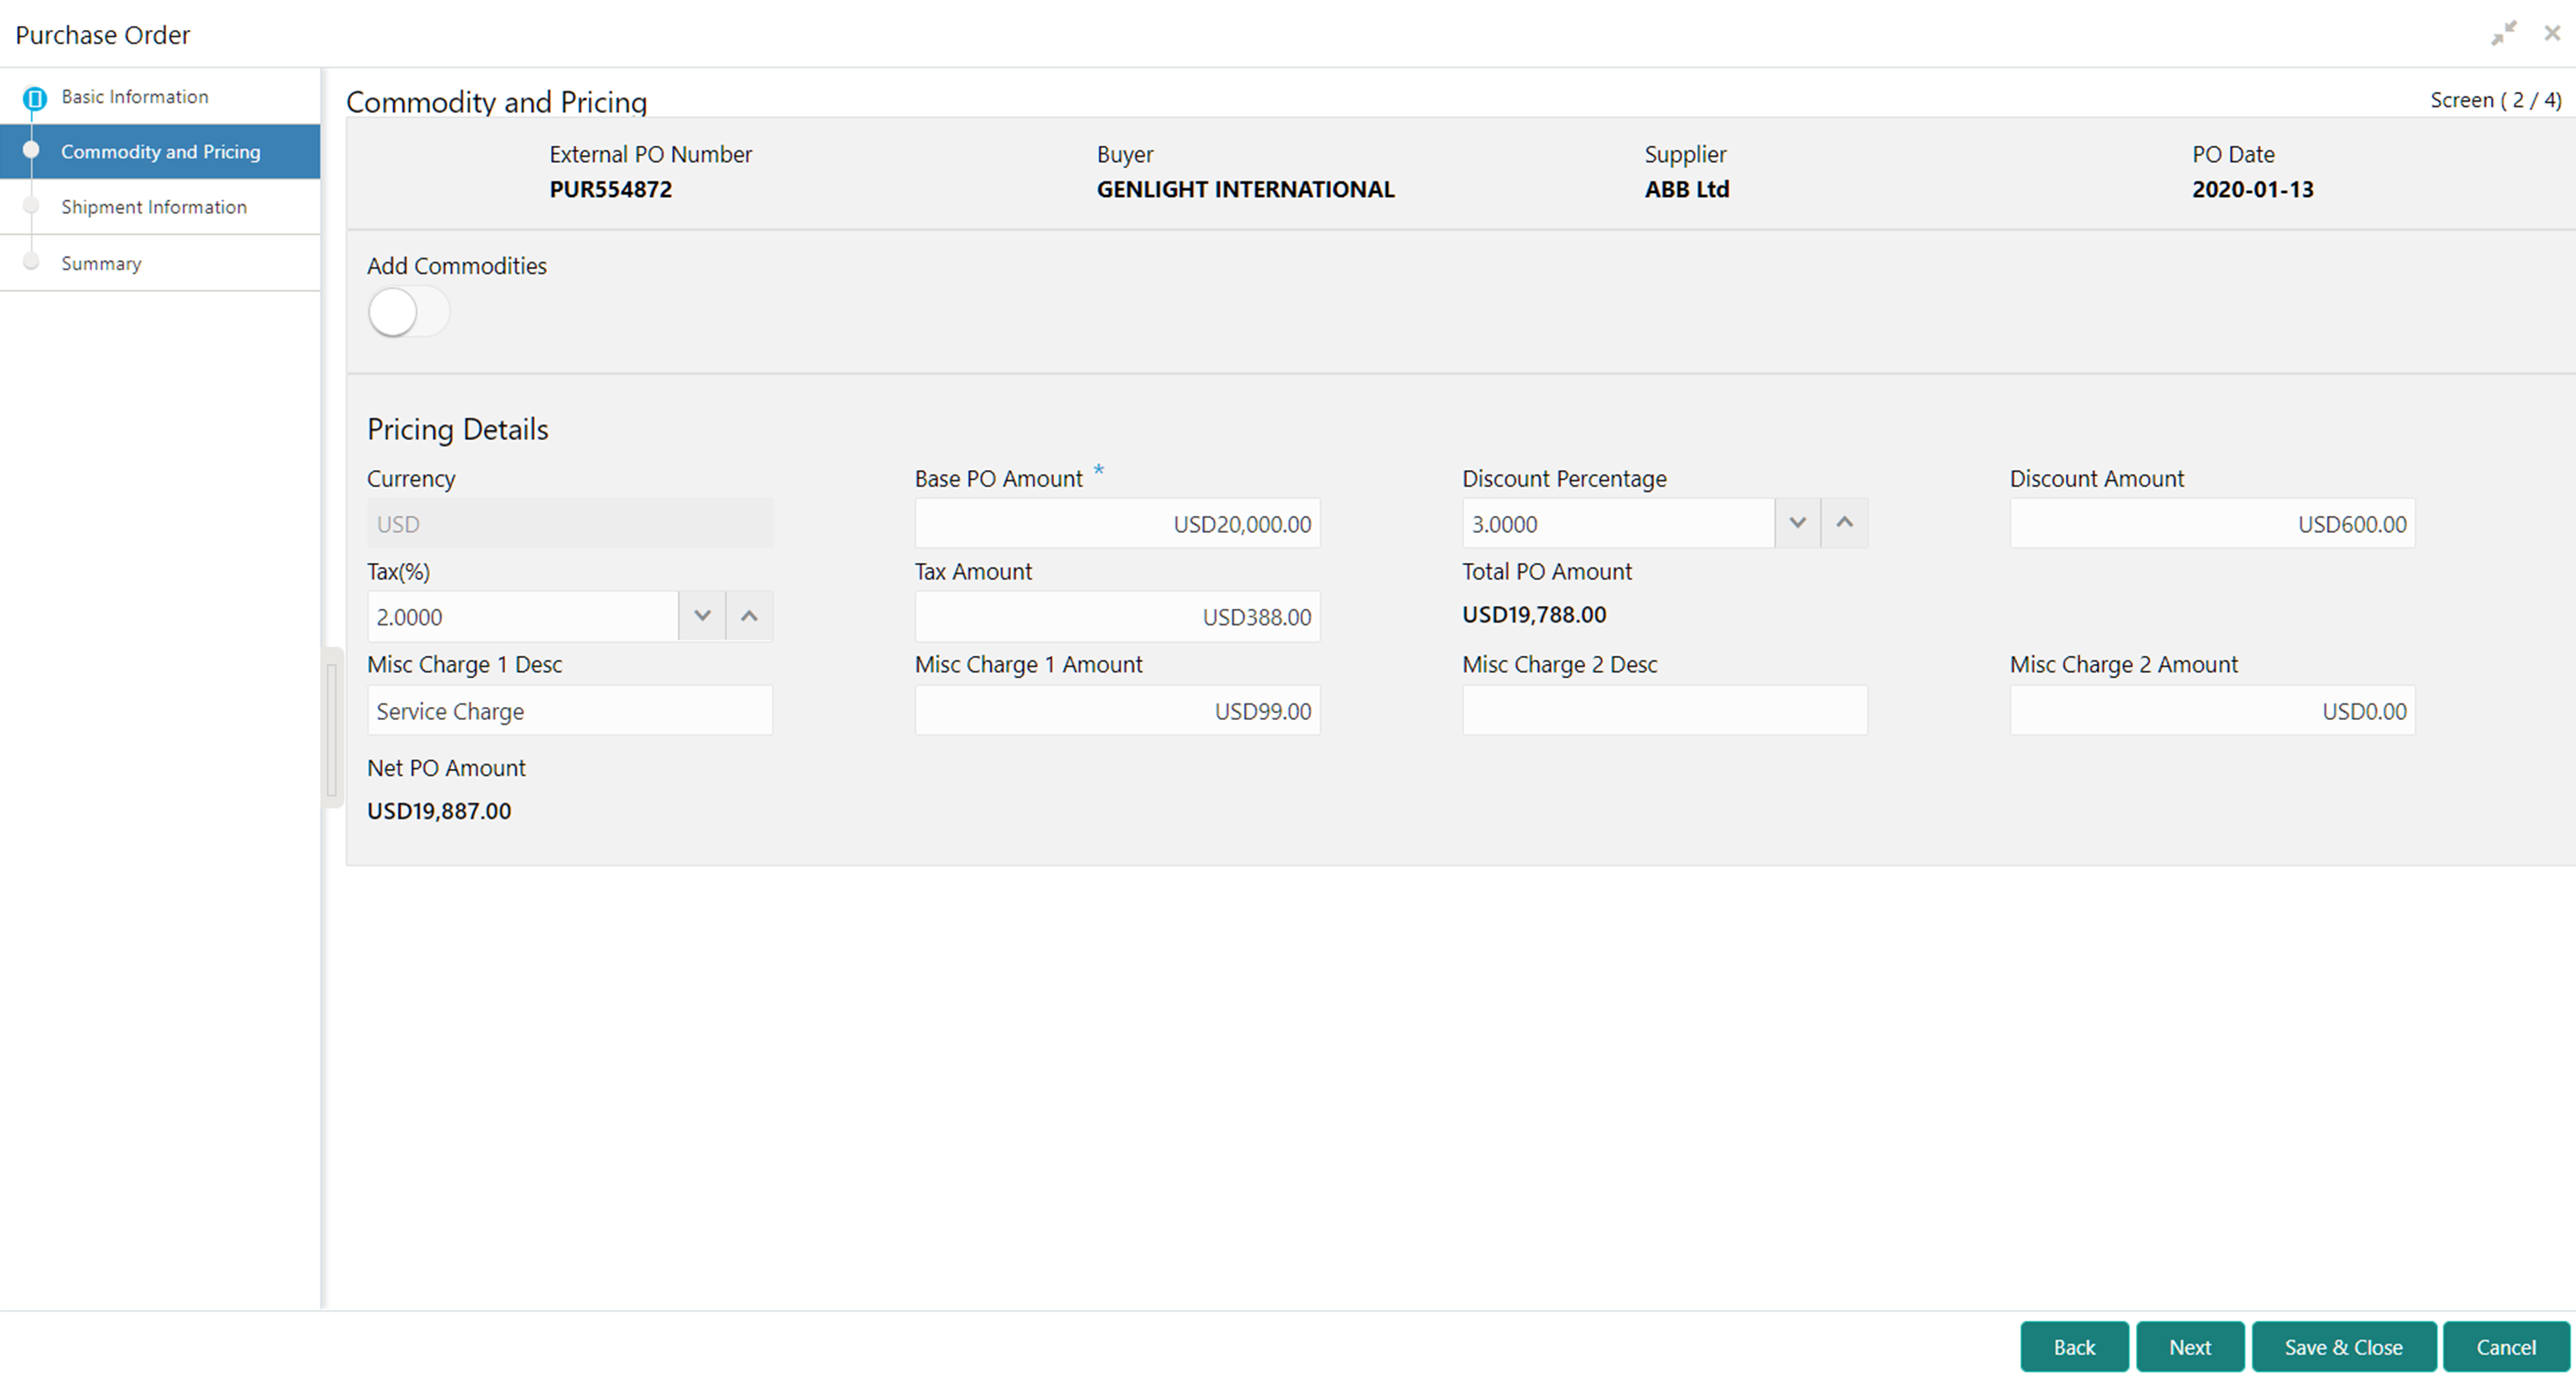
- Click Next on Basic Information tab.The Purchase Order - Commodity and Pricing screen displays.
Figure 4-8 Purchase Order - Commodity and Pricing
- Switch the Add Commodities toggle ON to view Commodity Details section.For more information on fields, refer to the field description table.
Note:
The fields, which are marked with an asterisk, are mandatory.Table 4-9 Commodity Details - Field Description
Field Description External PO Number Displays the reference number of the purchase order. Buyer Displays the name of the buyer. Supplier Displays the name of the supplier. PO Date Displays the date of creation of the purchase order. Add Commodities Switch this toggle ON to add the commodities being purchased. Commodity Details Displays the fields related to the Commodity details. This section appears if the ‘Add Commodities’ toggle is switched ON.
Commodity Name Displays the commodity name based on the selected commodity code. Unit Select the measuring unit for the goods. Quantity Specify the quantity of the goods as per selected measuring unit. Unit Cost Specify a single unit’s cost of the goods. Discount (%) Specify the percentage of discount to be applied on the total cost. Discount Amount Displays the discount amount based on the discount percentage. Tax (%) Specify the percentage of tax to be applied on total amount post discounting. Tax Amount Displays the tax amount based on tax percentage. Net Cost Displays the net costing based on all the previous fields. - Specify the following details on the Pricing Details section.For more information on fields, refer to the field description table.
Note:
The fields, which are marked with an asterisk, are mandatory.Table 4-10 Pricing Details - Field Description
Field Description Currency Displays the selected currency. Base PO Amount Displays the total gross amount of all commodities that have been added. This field is editable and allows you to add the base amount manually as well. Discount Percentage Displays the overall discount percentage received on the base amount. This field is editable and allows you to add the percentage manually as well. Discount Amount Displays the overall discount amount received. This field is editable and allows you to add the amount manually as well. Tax (%) Displays the overall tax percentage. This field is editable and allows you to add the percentage manually as well. Tax Amount Displays the overall tax amount. This field is editable and allows you to add the amount manually as well. Total PO Amount Displays the total PO amount post calculating base PO amount, discount, and tax. Misc Charge 1 Desc Specify the description of the miscellaneous charges to be added in total PO amount. Misc Charge 1 Amount Specify the miscellaneous charge amount to be added in total PO amount. Misc Charge 2 Desc Specify the description of another miscellaneous charges to be added in total PO amount. Misc Charge 2 Amount Specify the miscellaneous charge amount to be added in total PO amount. Net PO Amount Displays the net PO amount post adding miscellaneous charges in the total PO amount. - Click Add icon to add rows in the grid.
- In the Action column of grid, perform any one of the following steps:
- Click Delete icon to remove that specific row.
- Click Edit icon and specify the commodity details in the grid.
- Perform any of the below action from the Commodity and Pricing screen.
- Click Next to go to the Shipment Information screen.
- Click Save & Close to save the PO details and submit it for authorization.
- Click Back to go to the Basic Information screen.
- Click Cancel to cancel the creation of the PO.
Shipment Information
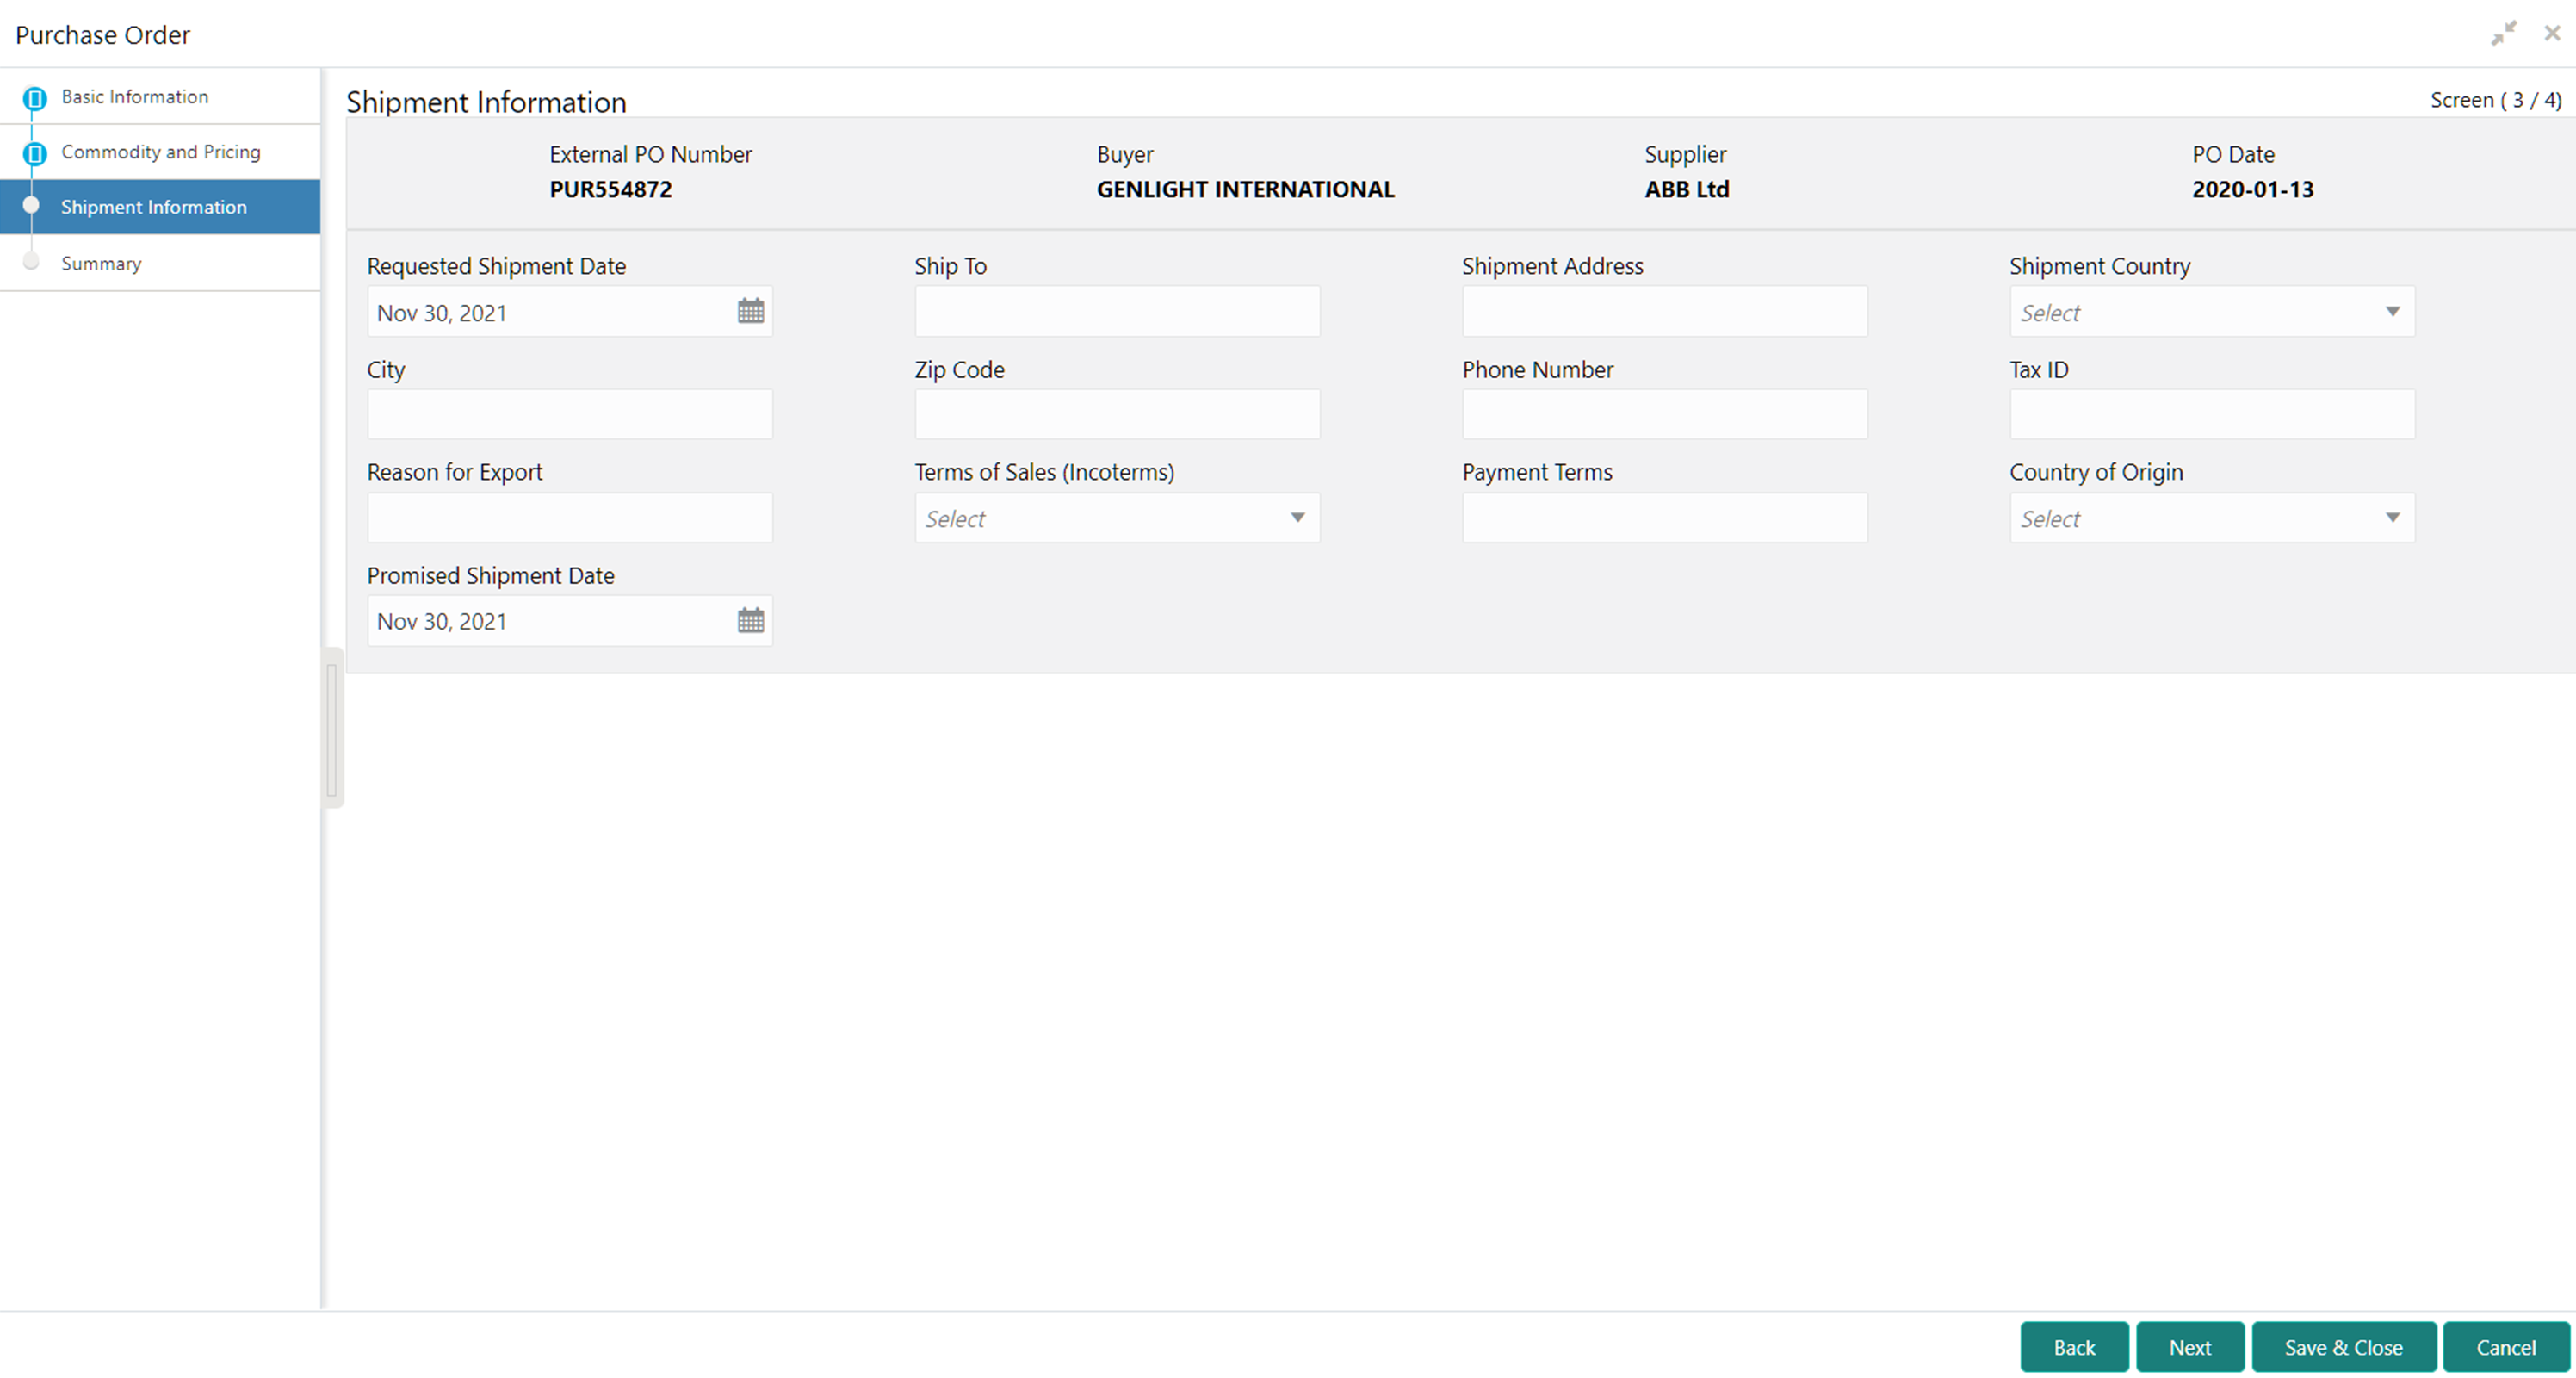
- Click Next on Commodity and Pricing tab.The Purchase Order - Shipment Information screen displays.
Figure 4-9 Purchase Order - Shipment Information
- Specify the fields on Shipment Information screen.For more information on fields, refer to the field description table.
Note:
The fields, which are marked with an asterisk, are mandatory.Table 4-11 Shipment Information - Field Description
Field Description Requested Shipment Date Click the Calendar icon and select the date on which the buyer expects commodity to get dispatched. Ship To Specify the name of the location where shipment should be sent. Shipment Address Specify the complete address where shipment should be sent. Shipment Country Specify the country to send the shipment to. City Select the city to send the shipment to. Zip Code Specify the postal code to send the shipment to. Phone Number Specify the contact number of the shipment company. Tax Id Specify the unique tax id if shipment charge includes tax amount. Reason for Export Specify the reason for exporting the shipment. Terms of Sale(Incoterms) Select any of the below terms of sales: - DAF – Delivered At Frontier
- DES - Delivered Ex Ship
- DEQ - Delivered Ex Quay
- DDU - Delivered Duty Unpaid
- CIP - Carriage and Insurance Paid To (Insert place of destination)
- CPT - Carriage Paid To (Insert place of destination)
- CIF - Cost, Insurance and Freight
- CFR - Cost and Freight
- FOB - Free On Board
- DDP - Delivered Duty Paid (Insert place of destination).
- FCA - Free Carrier (Insert named place of delivery)
- EXW - Ex Works (Insert place of delivery)
- FAS - Free Alongside Ship (insert name of port of loading)
Payment Terms Specify the terms of payments, if any. Country of Origin Select the country from where the shipment is being sent. Promised Shipment Date Click the Calendar icon and select the date agreed by the supplier to send the shipment. - Perform any of the below action from the Shipment Information screen:
- Click Next to go to the Summary screen.
- Click Save & Close to save the PO details and submit it for authorization.
- Click Back to go to the Commodity and Pricing screen.
- Click Cancel to cancel the creation of the PO.
Summary
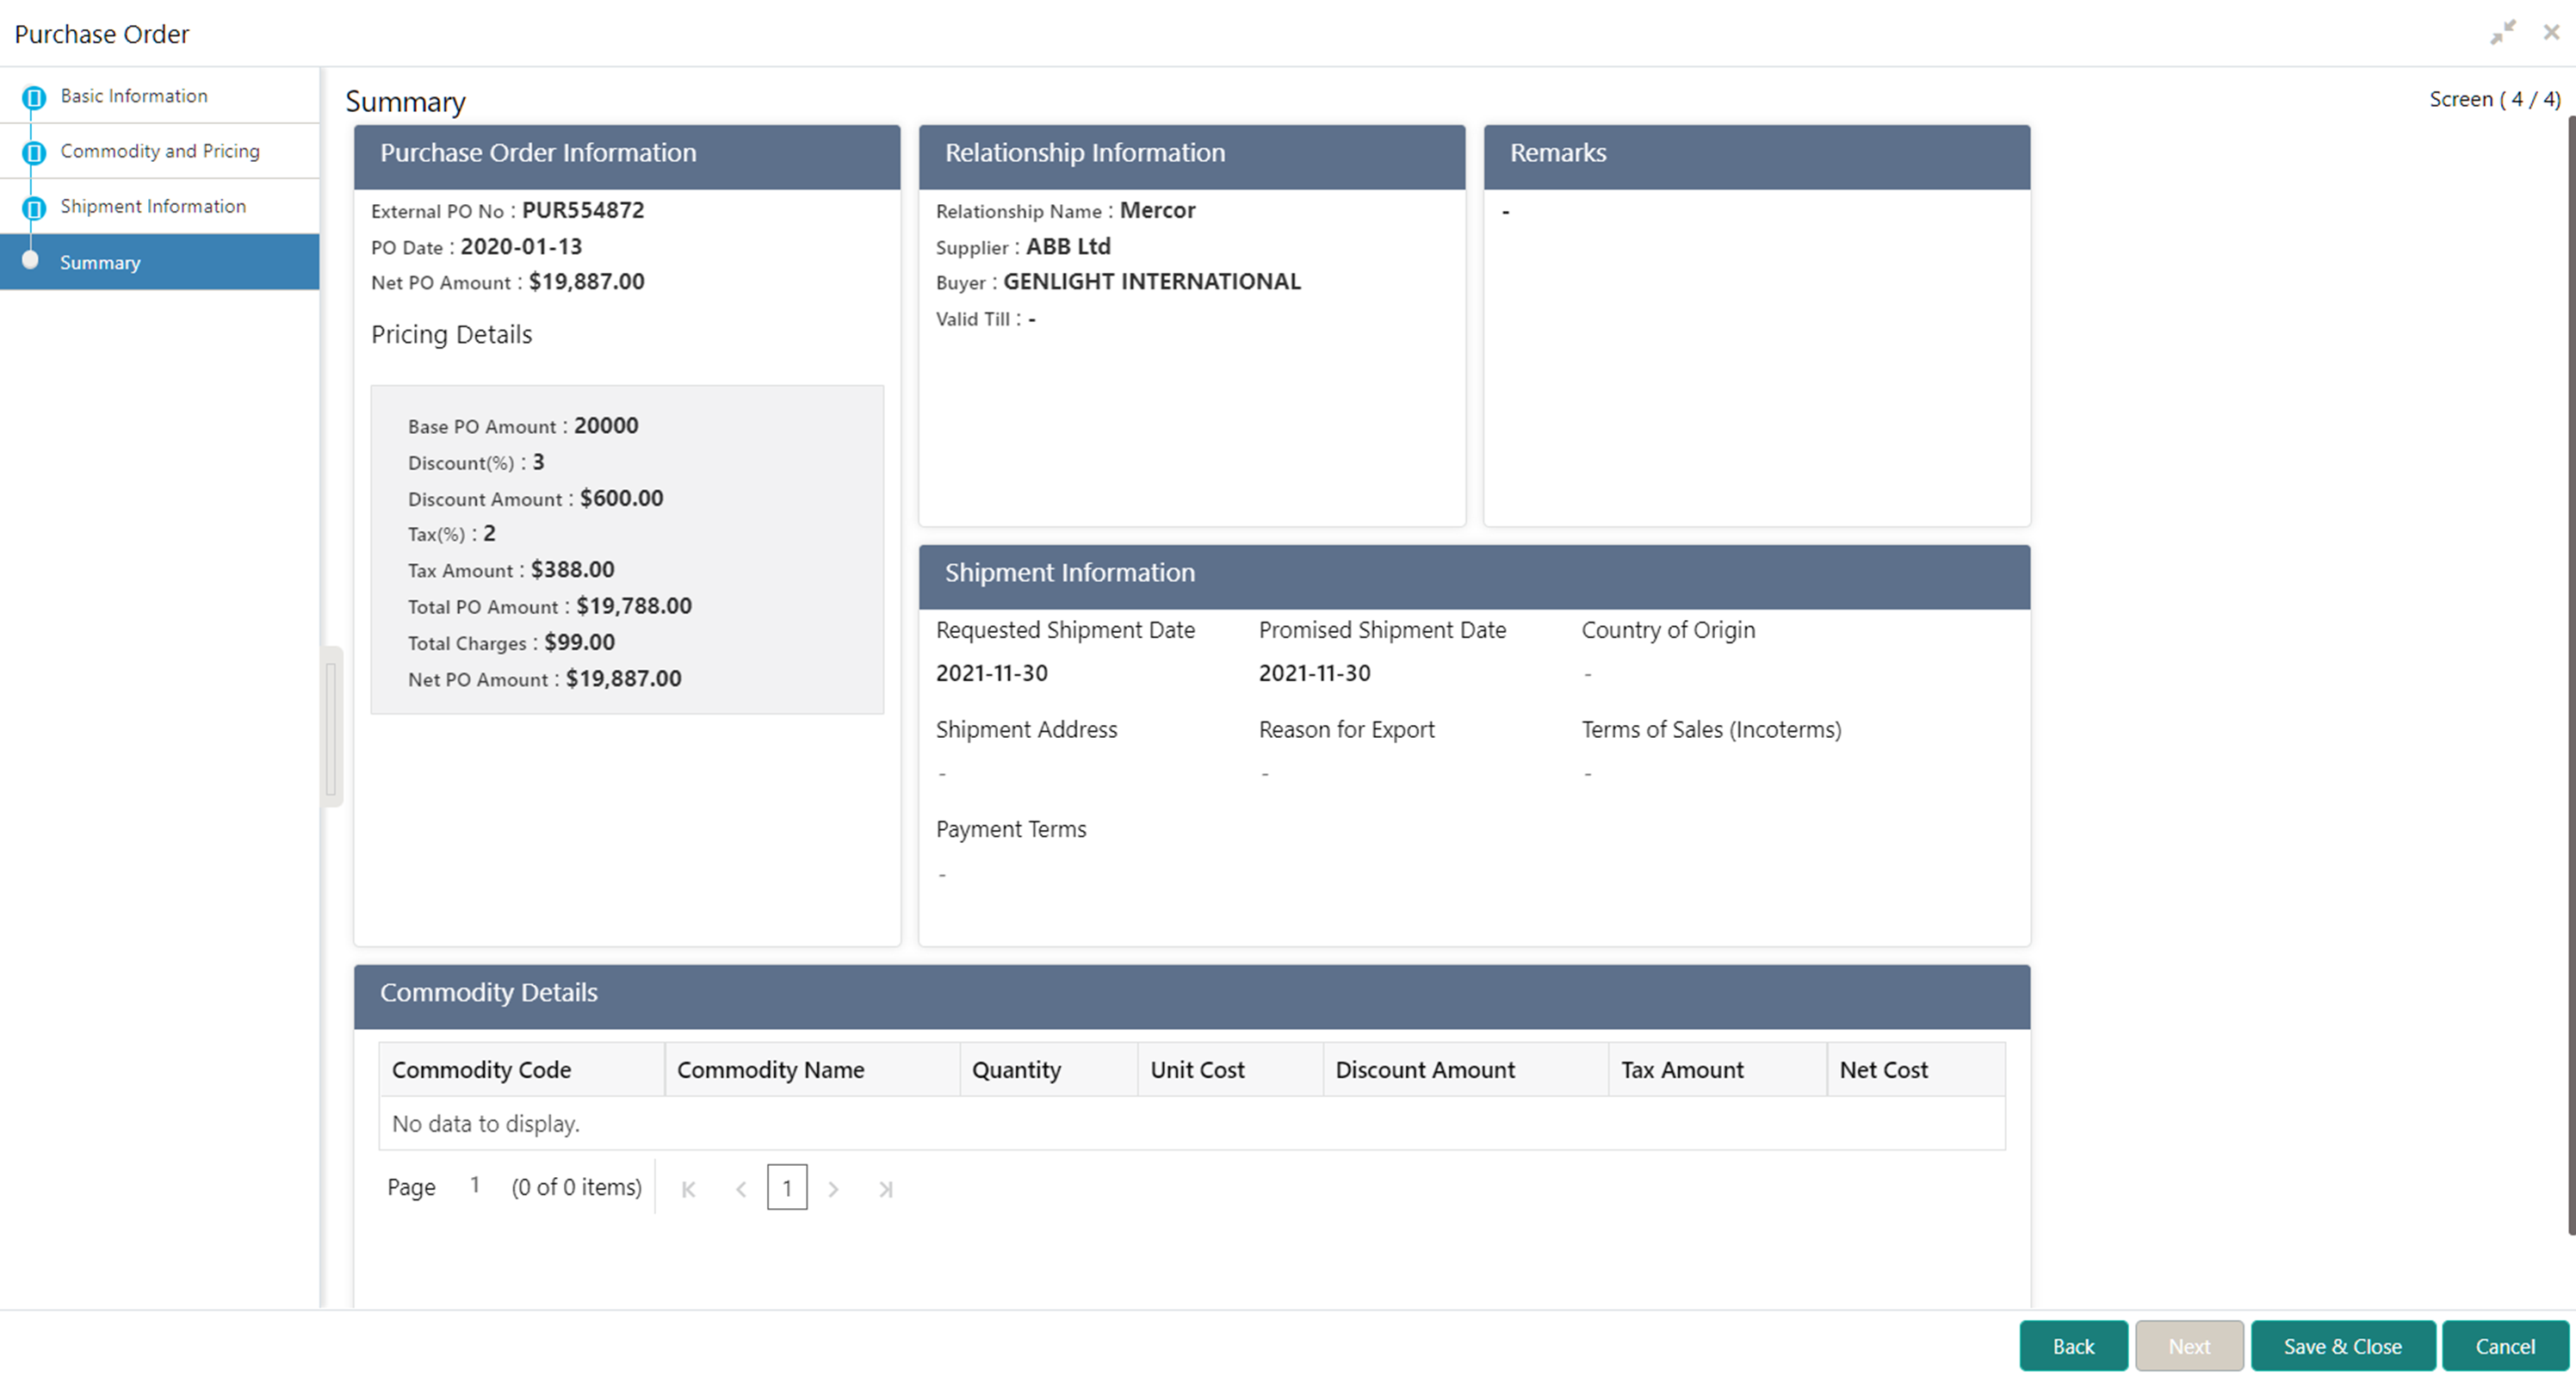
- Click Next on Shipment Information tab.The Purchase Order - Summary screen displays.
- Review the detail of the PO being created and perform any of the below action from the Summary screen.
- Click Save & Close to save the PO details and submit it for authorization.
- Click Back to go to the Shipment Information screen.
- Click Cancel to cancel the creation of the PO.
Parent topic: Create Receivables and Payables


