- Product Definition
- Product Definition
- Setting up Accounting Details for a Product
- Identifying the Accounting Roles and Heads for a Product
- Defining Events and Accounting Details specifically for a Product
1.7.1.3 Defining Events and Accounting Details specifically for a Product
If you do not use an events class, you should define event details specifically for the product.
Click Add row to display a list of events pertaining to the module. Select an event from the list by double-clicking on it.
For every event you select, you should specify the accounting entries that should be passed and the advices that should be generated.
Specify the User ID and Password, and login to Homepage.
From the Homepage, navigate to Bilateral Loans Product Definition screen.
To capture details of accounting entries screen
From the Bilateral Loans Product Definition screen, click on Events tab.
- From the Events screen, click on Accounting
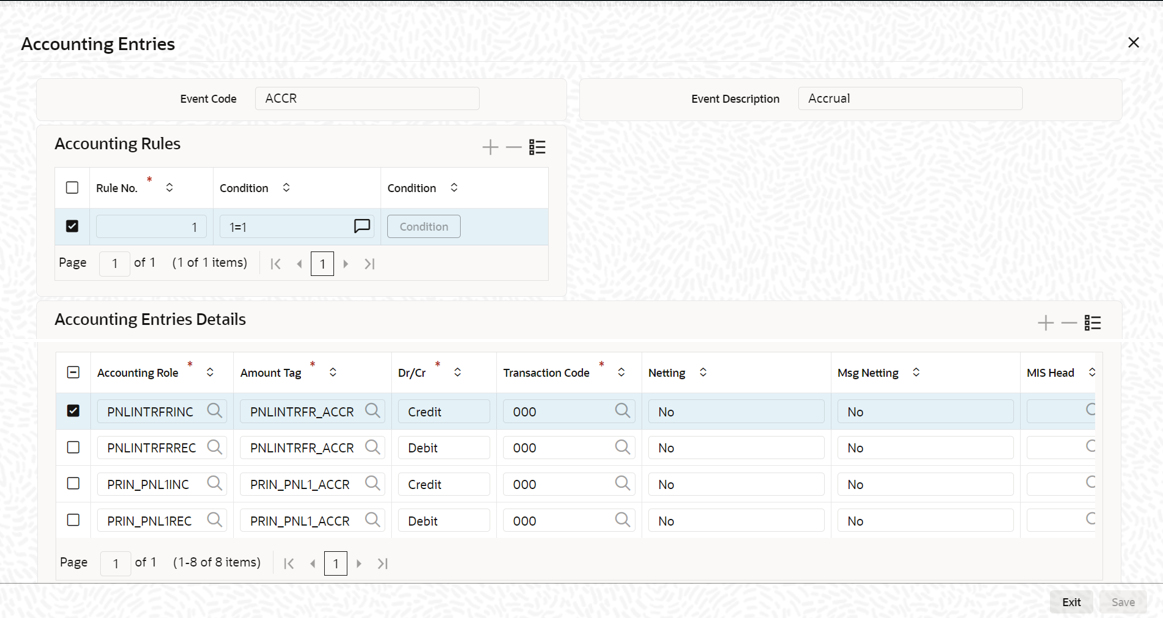
Entries tab.The Accounting Entries screen is displayed.
- You can define the accounting entries based on the set of rules.SDEs are used to define rules while creating the product. When the product is created, the rules and the accounting entries for the respective rules are also saved.During the life cycle of a loan when an event occurs, the system does the following:
- System checks the rules that are getting satisfied by deriving the SDEs defined in the rule.
- Select the accounting entries for that corresponding rule.
- Process the events accordingly.
- You can specify below details in this screen. For information on fields, refer
to the field description table.
Table 1-4 Accounting Entries
Field Description Rule No Every rule/condition you define for a product should be assigned a unique number. The rule number can consist of a maximum of 5 digits. Condition You can either enter the condition here or using condition builder. If you use condition builder, the condition gets defaulted here. Condition Builder You can define conditions for rule using Condition Builder. For more information, refer Condition Builder table.
Accounting Role Specify the accounting role that should be used at the event. The drop-down list displays all the accounting roles specified for the product in the Accounting Role Definition screen. Amount Tag Specify the tag, which identifies the component that has to be posted to the account head. Indicating a debit or credit Indicate whether the accounting role you specified is for the debit or credit leg of the contract event. Transaction Code Every accounting entry in Oracle Lending is associated with a Transaction Code that describes the nature of the entry. Specify the transaction code that should be used to post the accounting entry to the account head. Indicating if accounting entries can be netted Specify whether accounting entries should be netted at an event. You can net the accounting entries that are generated at an event if the set of entries satisfy the following criteria: - The entries belong to the same Account and Branch.
- The entries to be netted are in the same currency.
- The entries have the same value date.
- The exchange rate to be picked up for the entries is the same
You should define details for both the legs of an accounting entry. For each accounting entry, you should specify the details of the debit and the credit leg. Thus, the first two specifications are for one entry, the next two for another, and so on. The Transaction Code for the entry should be specified for both legs of the entries.
This netting of accounting entries is only for processing and not for message generation.Netting outgoing payment instructions You can net multiple entries posted into the same account for processing. Independent of this, you can net entries posted into the same account with a view to sending out netted payment instruction messages. If you want a particular leg of an accounting entry to be considered for netting for messaging purpose, select Yes from the drop-down list in the Msg Netting field against this leg.
For sending out payment instructions, the system identifies the netted amount based on entries in the Msg Netting field, and not based on entries in the Netting field. Therefore, you can specify an accounting entry to be considered for Msg Netting and not for Netting.The validation criteria mentioned for the Netting field is same for the Msg Netting field also.
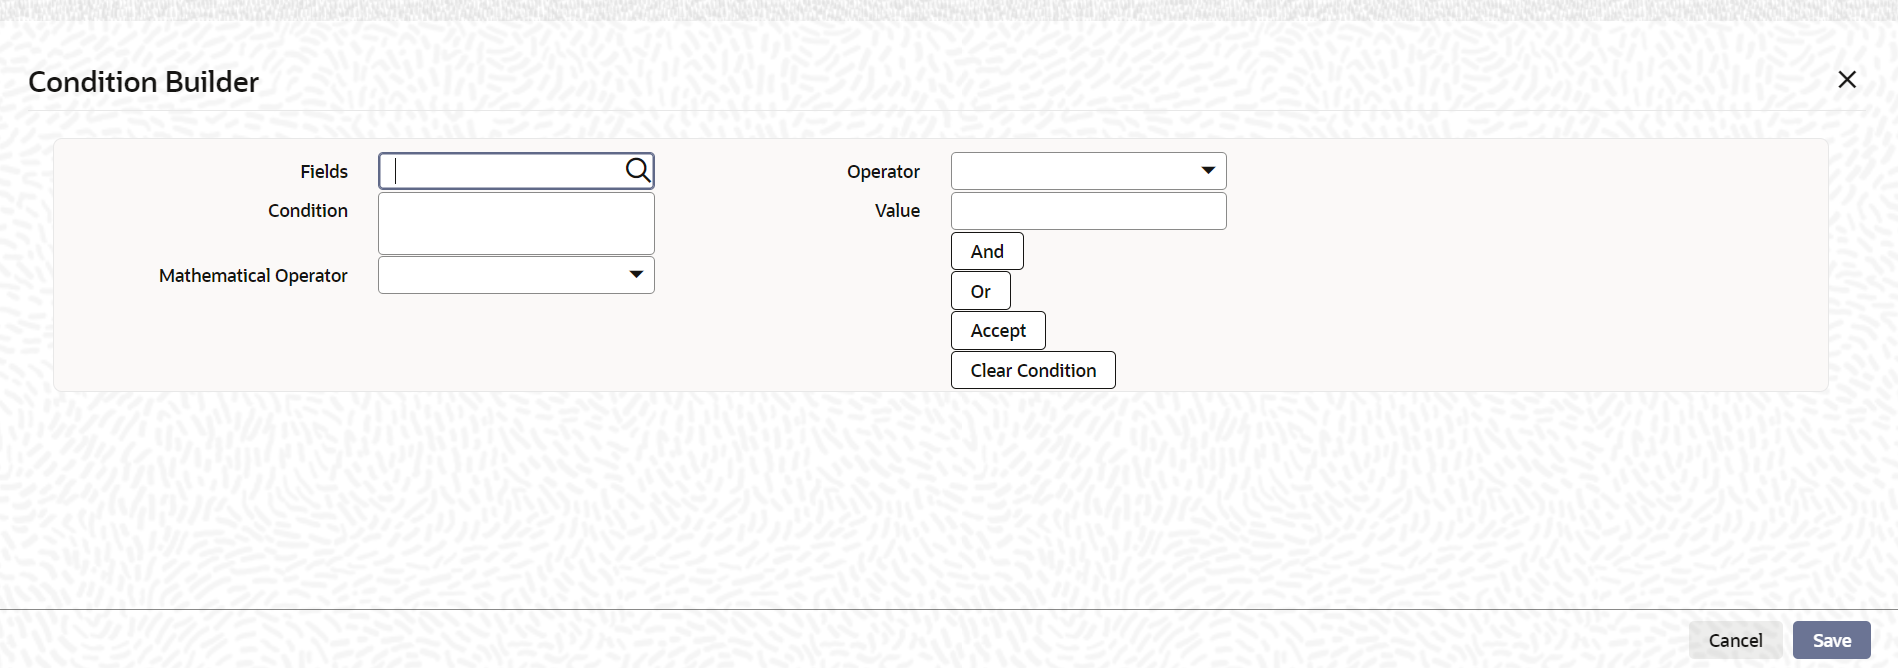
You can specify the following details in Condition Builder screen:Table 1-5 Condition Builder
Field Description Fields You can select the SDEs from the adjoining option list. The system displays list of SDEs maintained. Condition The system displays the final condition that is defined. Mathematical Operations You can select the mathematical operations like + , - , *, \ from the drop-down list. Operator You can select the logical operators from the drop-down list. - Equal to
- Not Equal to
- Greater than
- Less than
- Greater than or Equal to
- Less than or Equal to
- Like
- Not Like
Value You can enter the value. Using And, Or, Accept button you build the condition. After selecting Fields, Operator and Value the condition gets build in the Condition field.
For an each event, you have to maintain the following accounting entries information.

