4.2.1 Create Sweep Structure Simulation

The Create Sweep Structure Simulation screen enables the user to build the sweep structure simulation to move funds as per the business needs.

  1. On the Liquidity Management Structure Simulation Creation screen, click Get Started under the Sweep Structure Simulation section.
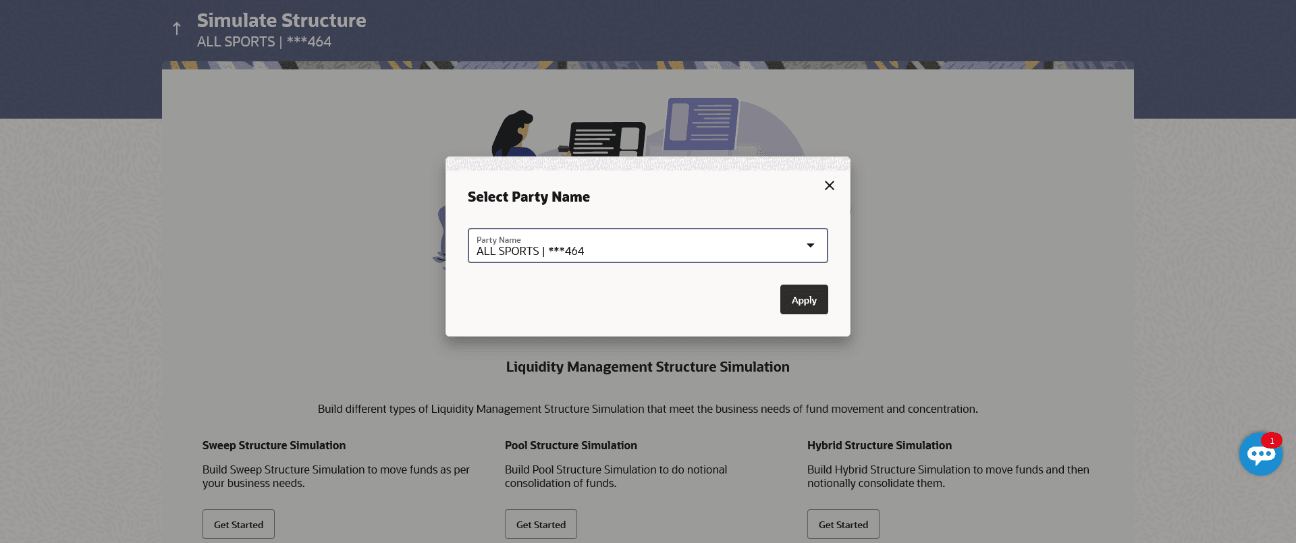
    The Create Sweep Structure Simulation - Select Party Name screen displays.

    Figure 4-2 Create Sweep Structure Simulation – Select Party Name


    For more information on fields, refer to the field description table.

    Table 4-2 Create Sweep Structure Simulation - Select Party Name - Field Description

    Field Description
    Party Name Select the party name and ID from the drop-down list in which the simulation structure must be created.

    By default, the primary party of the logged-in user is selected.

    Note: Only accessible parties are displayed to the user.

  2. Click Apply, based on the party name selection the mapped account structures are displayed.
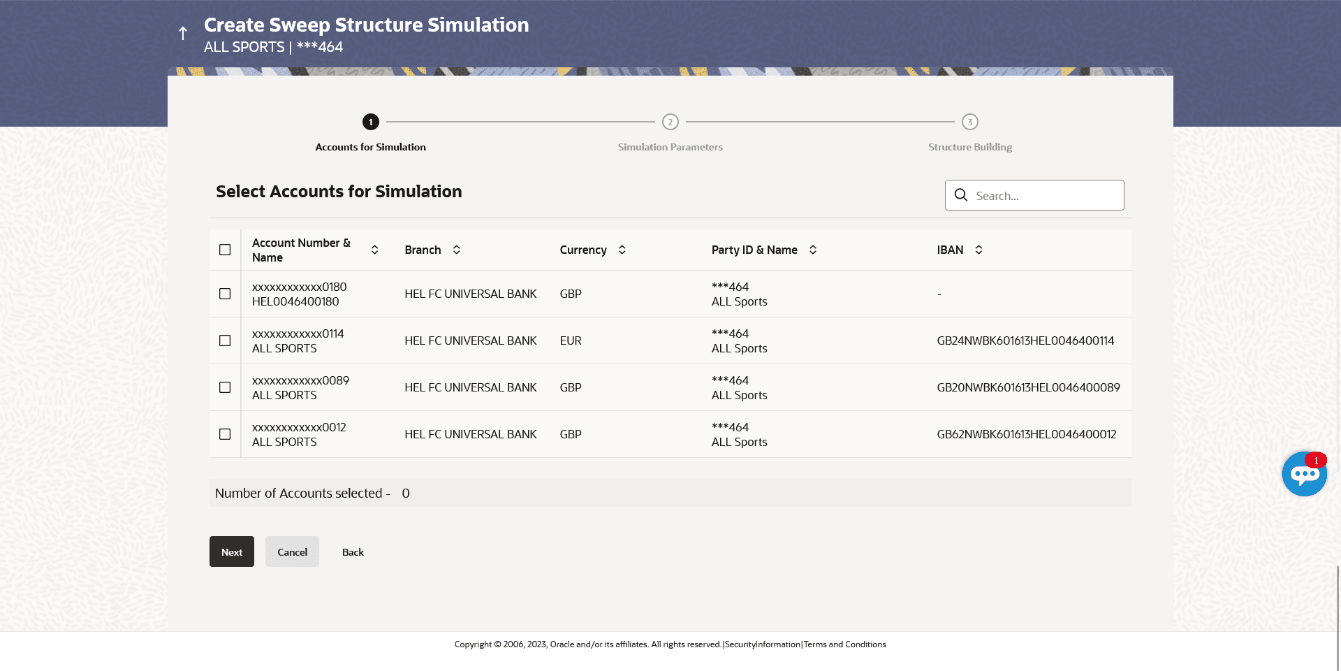
    The Create Sweep Structure Simulation – Accounts for Simulation screen displays.

    Figure 4-3 The Create Sweep Structure Simulation – Accounts for Simulation


    The first step of sweep structure simulation creation involves searching and selecting multiple accounts from the list to build the simulation structure.

  3. Click Search to search and select the accounts to be added for the structure simulation.
  4. Click Next to navigate to the Simulation Parameters screen.
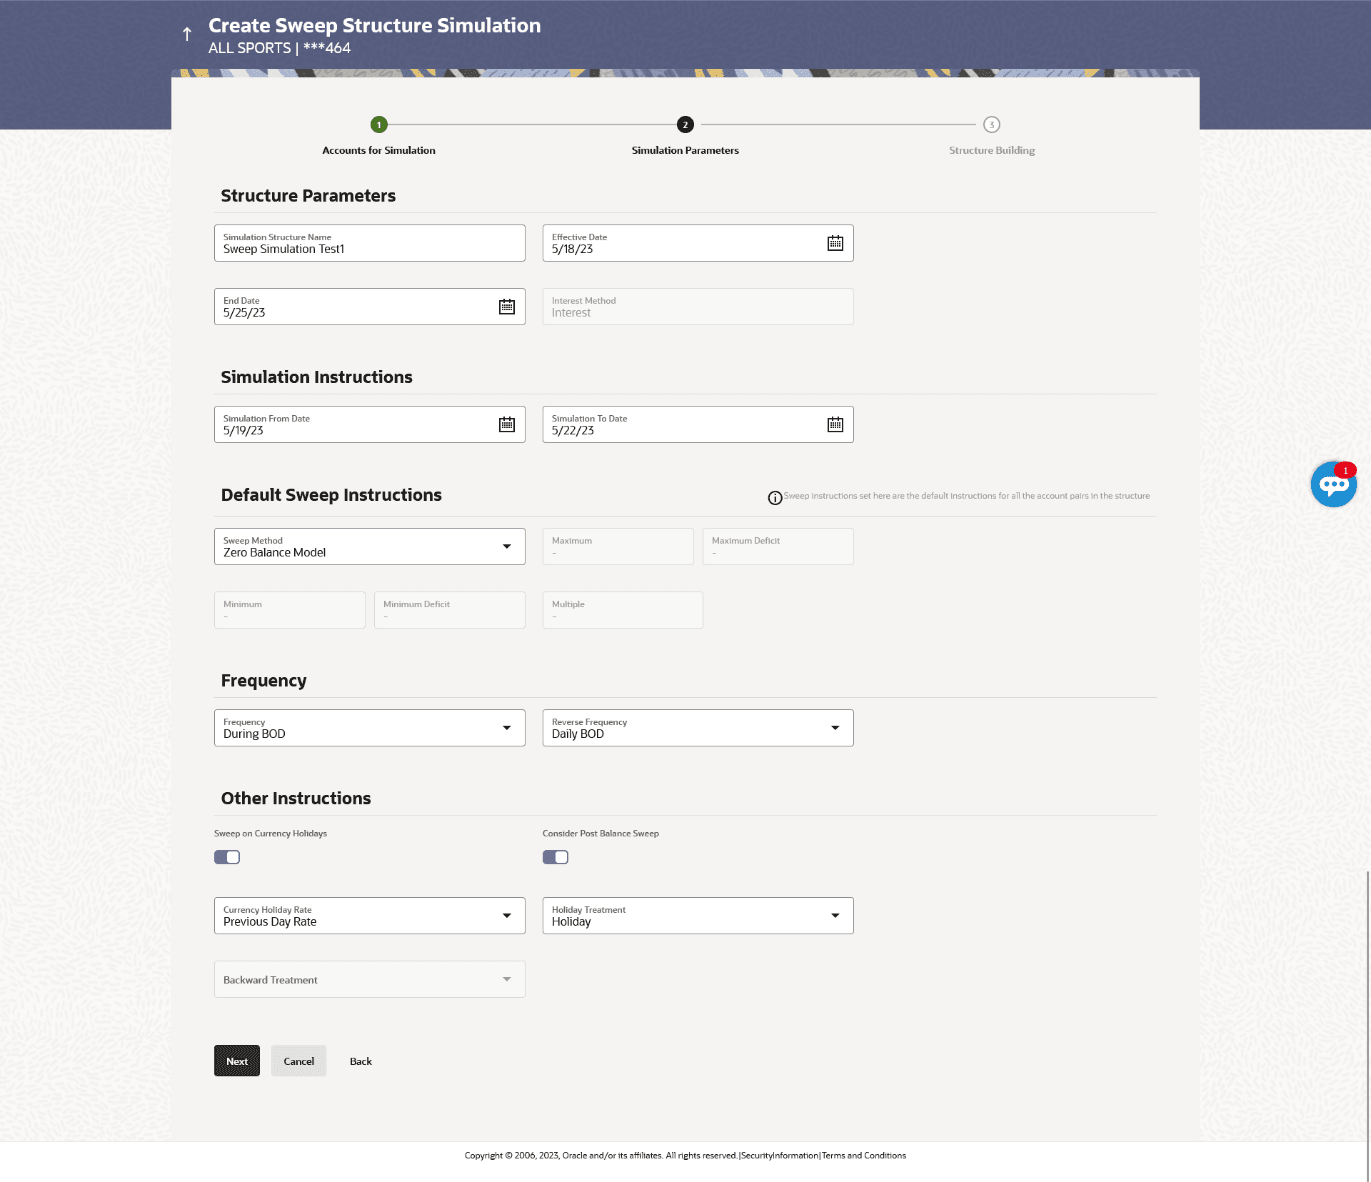
    The Create Sweep Structure Simulation – Simulation Parameters screen displays.

    Figure 4-4 Create Sweep Structure Simulation - Simulation Parameters


    For more information on fields, refer to the field description table.

    Table 4-3 Create Sweep Structure Simulation - Simulation Parameters - Field Description

    Field Description
    Structure Parameters Information specified in below fields are related to structure simulation parameters.
    Structure Name Specify the name of the sweep structure simulation that is to be created.
    Effective Date Select the date from which the sweep structure execution should take place.
    End Date Select the date till which the sweep structure execution should take place.
    Interest Method Displays the method by which the interest is calculated.

    By Default, this field will appear as Interest. This field is non-editable.

    Simulation Instructions Information specified in below fields are related to simulation instructions.
    Simulation From Date Select the date from which the sweep structure simulation execution should take place.

    Note: Simulation From Date should be within the structure Effective Date and End Date.

    Simulation To Date Select the date till which the sweep structure simulation execution should take place.

    Note: Simulation To Date should be within the structure Effective Date and End Date.

    Default Sweep Instructions Information specified in below fields is defaulted at each parent-child account pair whereas user can override and define a specific frequency for a specific pair of account as a part for instruction set up.
    Sweep Method Select the sweep method that is to be applied to the structure.
    The available options are:
    • Zero Balance Model
    • Fixed Amount Model
    • Collar Model
    • Target Model - Constant
    • Target Model - Fixed
    • Threshold Model
    • Range Based Model
    • Cover Overdraft Model
    • Percentage Model
    Frequency Information specified in below fields are related to frequency.
    Frequency Select the frequency at which the account structure should be executed.
    Reverse Frequency Select the reverse frequency at which the reverse sweep for account structure should be executed.

    The list displays the frequencies for which the BOD is enabled.

    Other Instructions Information specified in below fields are related to other instructions
    Sweep on Currency Holiday Move the slider to enable the sweep on currency holiday.
    Consider Post Sweep Balance Move the slider to consider the post sweep balance.
    Currency Holiday Rate Select the interest rate on Currency Holiday.
    The available option is:
    • Previous Day Rate

    Note: This field is enabled only if the user toggle on the Sweep on Currency Holidays.

    Holiday Treatment Select the holiday treatment.
    The available options are:
    • Holiday
    • Next Working Date
    • Previous Working Date
    Maximum Backward days Specify the maximum backward days.

    Note: This field is enabled only if the user select Previous Working Date from the holiday treatment.

    Backward Treatment Select the backward treatment.
    The available options are:
    • Move forward
    • Holiday

    Note: This field is enabled only if the user select Previous Working Date from the holiday treatment.

  5. In the Simulation Structure Name field, enter the name of the simulation structure.
  6. From the Effective Date and End Date list, select the appropriate date to set up the instruction.
  7. In the Simulation Instructions section, select the from date and to date for the structure Simulation.
  8. In the Default Sweep Instructions section, select the sweep method for the structure.
  9. In the Frequency section, select the frequency and reverse frequency for the structure.
  10. In the Other Instructions section, select the appropriate instructions for sweep structure.
  11. Perform any one of the following actions:
    • Click Next to navigate to Create Sweep Structure Simulation – Build Structure screen.
    • Click Cancel to cancel the operation and navigate back to Dashboard.
    • Click Back to navigate back to the previous screen.

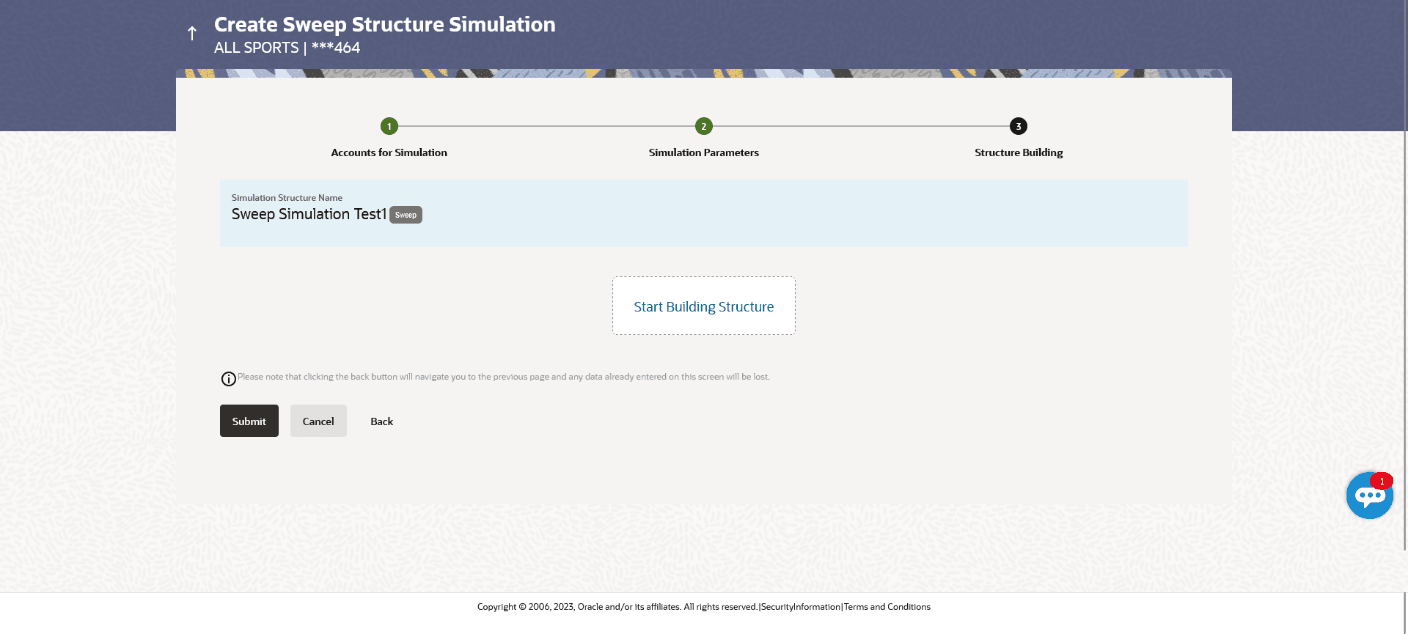
As a part of following step, the user can build the structure by adding the header and child accounts.By default, the Build Structure screen displays.

Figure 4-5 Create Sweep Structure Simulation – Build Structure


  1. Click Start Building Structure to build the structure.
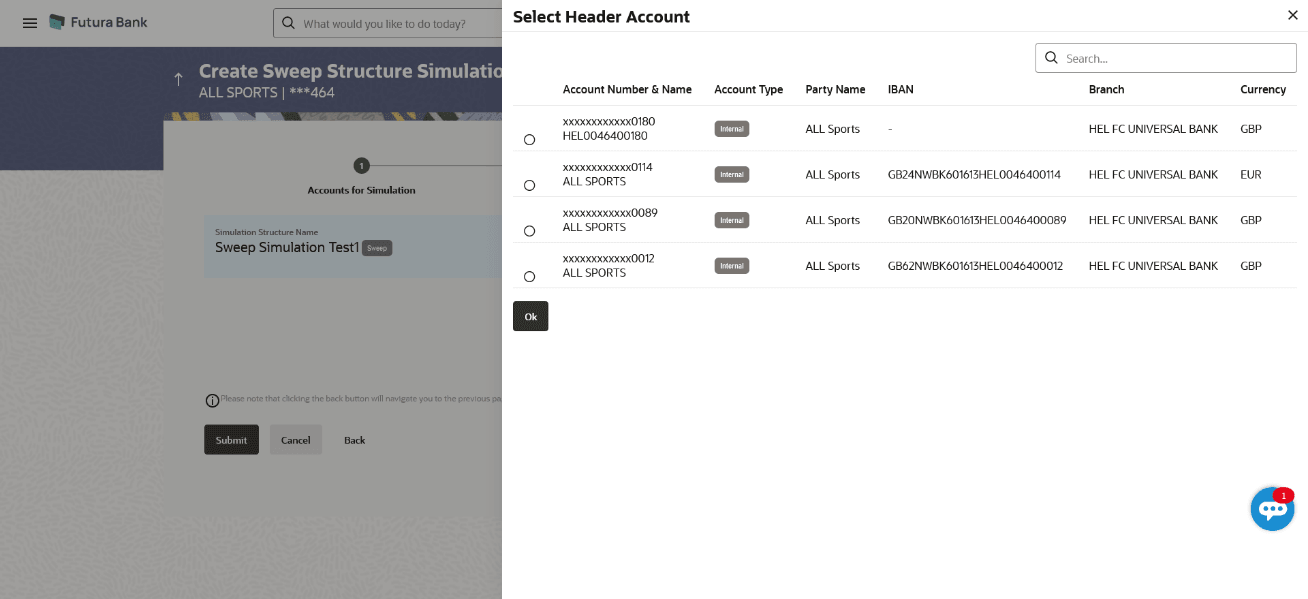
    The Create Sweep Structure Simulation – Select Header Account overlay screen displays.

As a part of following step, the user can select the header account in which the funds will concentrated. The accounts selected for simulation will appear on the screen. The user is expected to select the one of the Liquidity Management enabled accounts as header account.

Figure 4-6 Create Sweep Structure Simulation - Select Header Account


For more information on fields, refer to the field description table.

Table 4-4 Create Sweep Structure Simulation - Select Header Account – Field Description

Field Description
Search Specify and search the complete or partial account details to display the list of accounts that matches across the fields in the table.
Account Number and Name Displays the account number and name (Internal and External) mapped to the user in masked format.
Account Type Displays the type of account.
The available option is:
  • Internal: An account which is internal to the bank.
Party Name Displays the name of the party linked to the user's account.
IBAN Displays the IBAN number of the user’s account.
Branch Displays the branch name of the user's account.
Currency Displays the currency of the user's account.

  1. In the Select Header Account screen, select the account that the user want to add as header account in the structure.
    • In the Search By Party Name, Account Number field, specify and search the complete or partial account details to display the list of accounts that matches across the fields in the table and select the account that the user want to add as header account in the structure.
    • Click OK. The selected account is added to Create Sweep Structure Simulation – Added Header Account screen.
    • Click Close to close the overlay screen.

Once the header account is selected, the user can further link the child accounts.

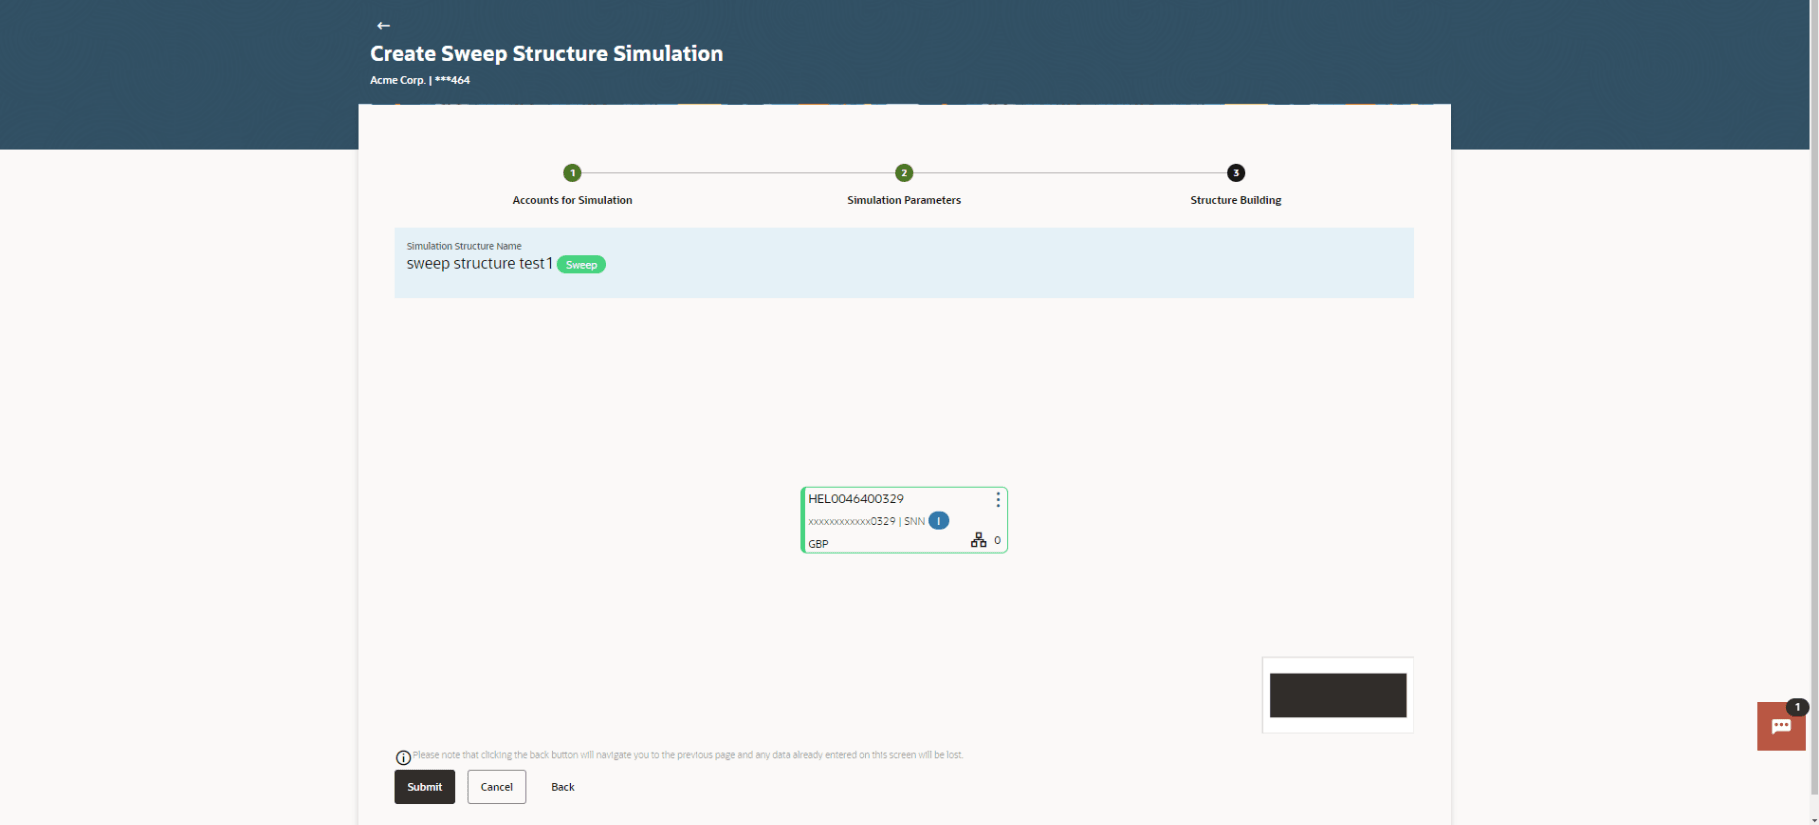
This screen is available in the tree view.

Figure 4-7 Create Sweep Structure Simulation – Added Header Account – Tree View


For more information on fields, refer to the field description table.

Table 4-5 Create Sweep Structure Simulation - Added Header Account - Tree View– Field Description

Field Description
Simulation Structure Name Displays the name of the simulation structure.
Simulation Structure Type Displays the type of the simulation structure.
Header Account Information displayed on header account card in tree view.
Account Name Displays the name of the account.
Account Number Displays the account number of the user.
Location Displays the location of the account.
Account Type Displays the type of account.
The available options are:
  • I: An account which is internal to the bank.
  • E: An account which is external to the Bank and linked for liquidity management.
Account Currency Displays the currency of the account.
Link Displays the number of the child account(s) linked to the parent account.

  1. Click Kebab and then click Link to add the child accounts for the header account.
    • The Create Sweep Structure Simulation - Link Accounts pop-up screen displays.
    • Click Account Details to view the account details.
    • The Create Sweep Structure Simulation– Account Details overlay screen displays.
    • Click Delink. A delink account pop-up displays confirming the removal of selected account and all the linked child accounts under it.


    1. Click OK, if the user want to remove the added header account.
    2. Click Cancel to cancel the removing process.

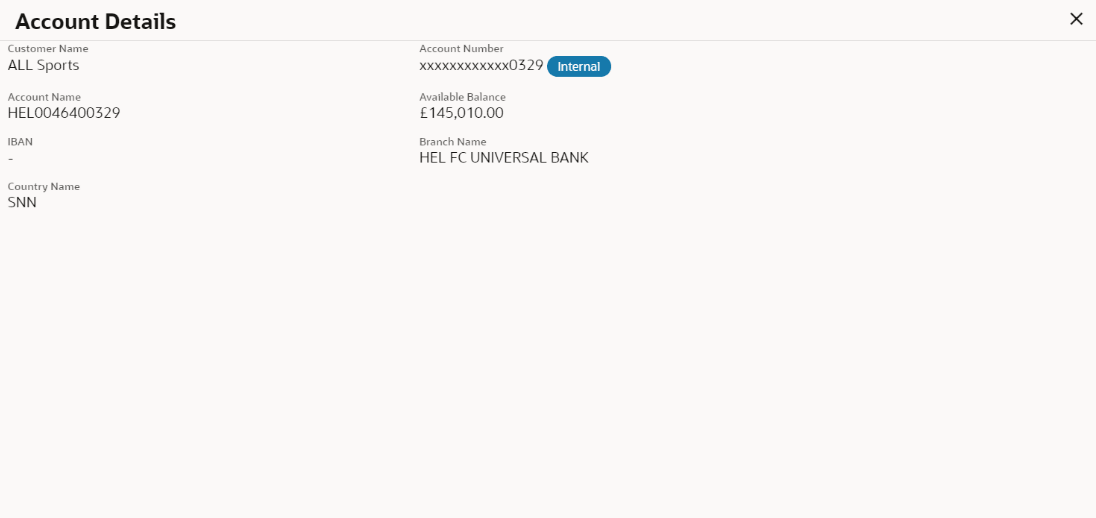
The following overlay screen is displayed to the user in an account structure for each parent and child accounts. The account details of the parent/child account is shown on the screen.

Figure 4-8 Create Sweep Structure Simulation – Account Details


For more information on fields, refer to the field description table.

Table 4-6 Create Sweep Structure Simulation – Account Details – Field Description

Field Description
Customer Name Displays the name of the customer.
Account Number Displays the account number in masked format.
Account Name Displays the name of the account.
Available Balance Displays the available balance in the account.
IBAN Displays the IBAN number of the account.
Branch Name Displays the branch name of the user's account.
Country Name Displays the country name for the account.

  1. Click Close to close the overlay displayed with account details.

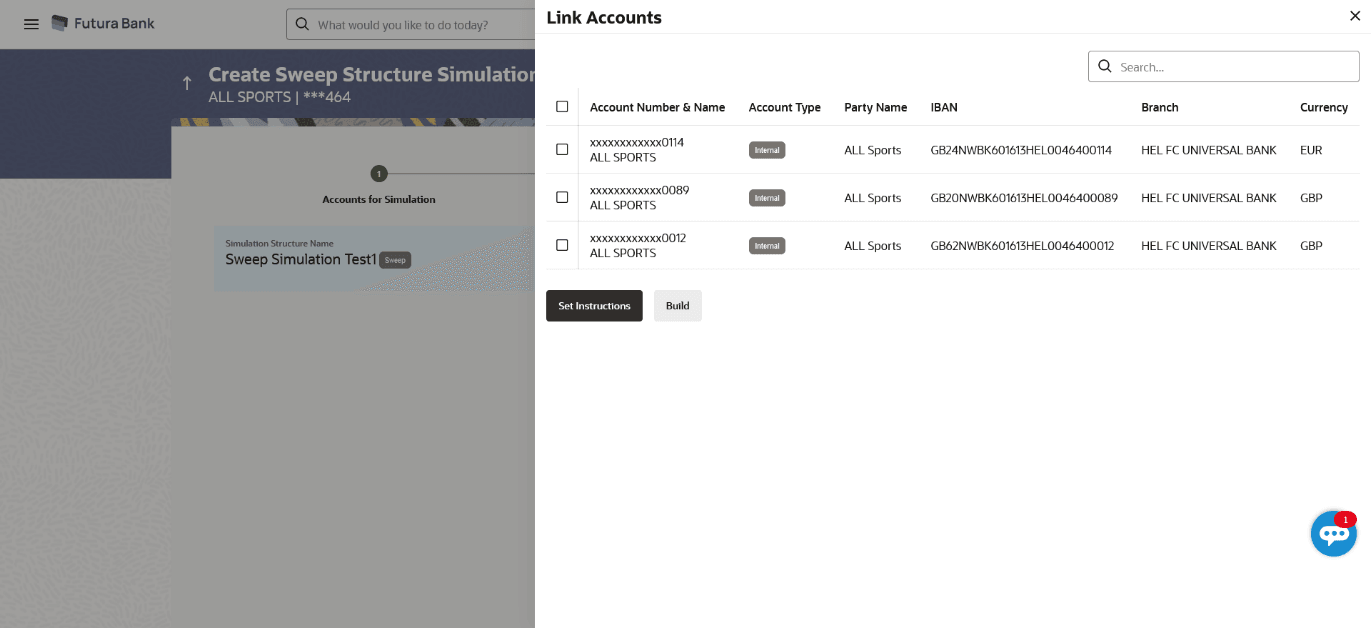
The user can search and select the accounts to be linked to the selected header/parent account. The accounts selected for simulation will displays on the screen.

Note:

The user can either select the accounts directly in the overlay or can use the UI search to filter and select additional records. In this case, the accounts that were filtered using UI search will appear at the top, while those selected before applying UI search will appear at the bottom.

  1. Select the accounts that the user want to link to the header account.
    • In the Search By Party Name, Account Number field, specify and search the complete or partial account details and displays the list of accounts that matches across the fields in the table and select the accounts that the user want to link to the header account.
    The Create Sweep Structure Simulation – Link Accounts screen displays.

    Figure 4-9 Create Sweep Structure Simulation – Link Accounts


    For more information on fields, refer to the field description table.

    Table 4-7 Create Sweep Structure Simulation – Link Accounts – Field Description

    Field Description
    Account Type Displays the type of account.
    The available options are:
    • Internal: An account which is internal to the bank.
    • External : An account which is external to the bank and linked for liquidity management.
    Party Name Displays the name of the party linked to the user's account.
    IBAN Displays the IBAN number of the account.
    Branch Displays the branch name of the user's account.
    Currency Displays the currency of the account.
  2. Perform any one of the following actions:
    • Click Set Instructions.

      The Create Sweep Structure Simulation - Set Instructions pop-up screen displays.

    • Click Build to use the default instructions and add the child accounts to the header account.

      The Create Sweep Structure Simulation – Submit screen displays.

    • Click Closeto close the overlay screen.

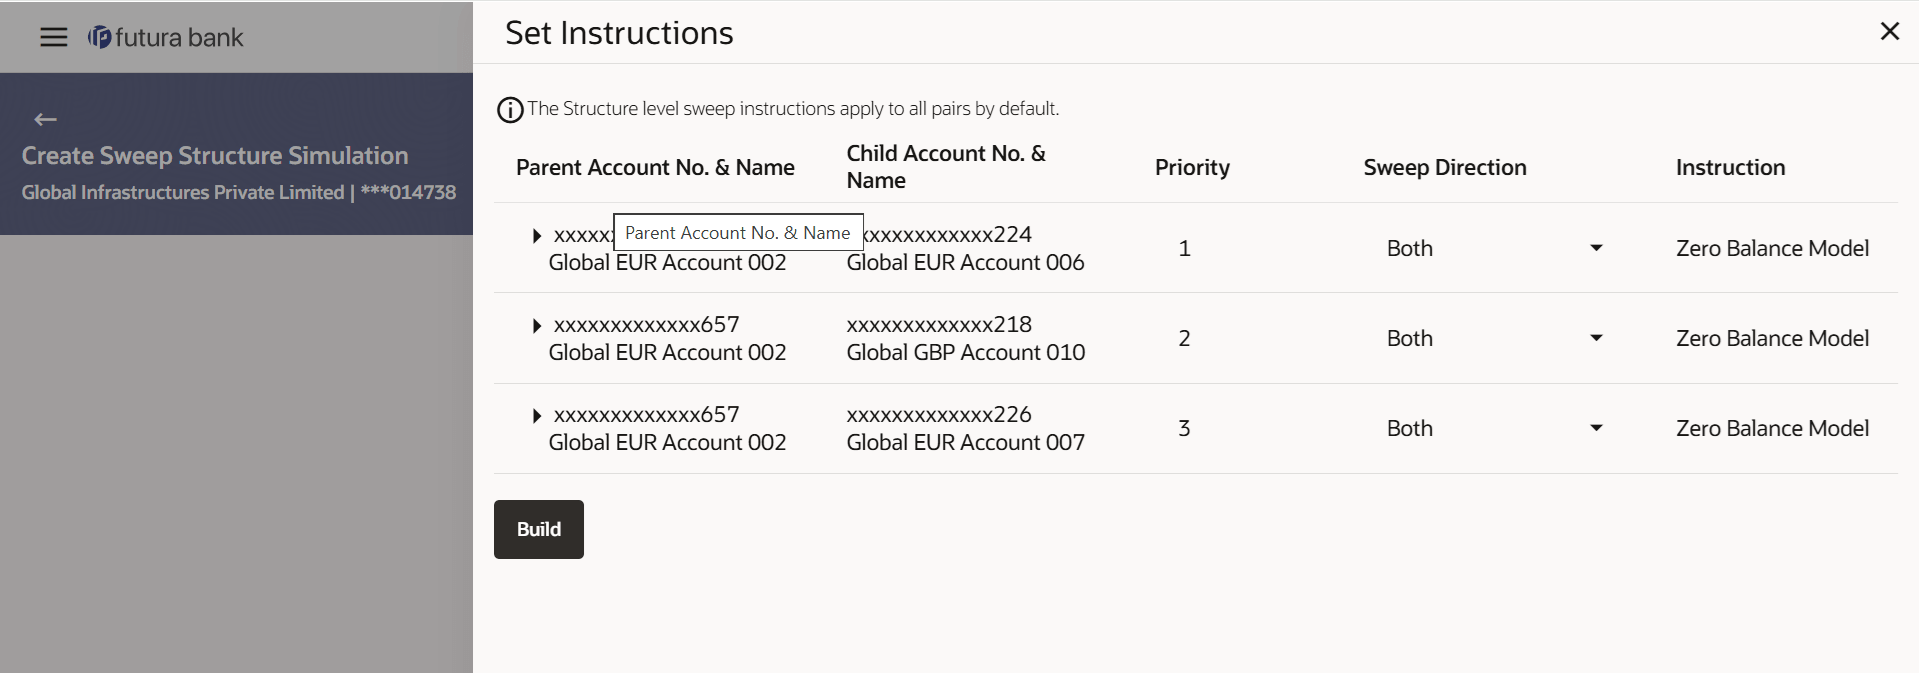
Once the child accounts are linked, the user can further set the instruction between an account pair along with the parent and child account information.

Figure 4-10 Create Sweep Structure Simulation - Set Instructions


For more information on fields, refer to the field description table.

Table 4-8 Create Sweep Structure Simulation - Set Instructions – Field Description

Field Description
Parent Account No & Name Displays the parent account number & name of the structure in masked format.
Child Account No & Name Displays the child account number & name of the structure in masked format.
Priority Specify the sweep priority used to determine the order of execution across pairs at a level in the structure.
Sweep Direction Select the sweep direction for the account pair.
The options are:
  • Child to Parent - Upward only sweep option to set up child instructions to sweep from child to parent.
  • Both - Sweep option to set up child instructions to sweep from parent to child as well as child to parent. By default this option is displayed in Sweep Direction.
Instruction Displays the instruction type for the account pair.

  1. Click Expand to view the instructions for the account pair.

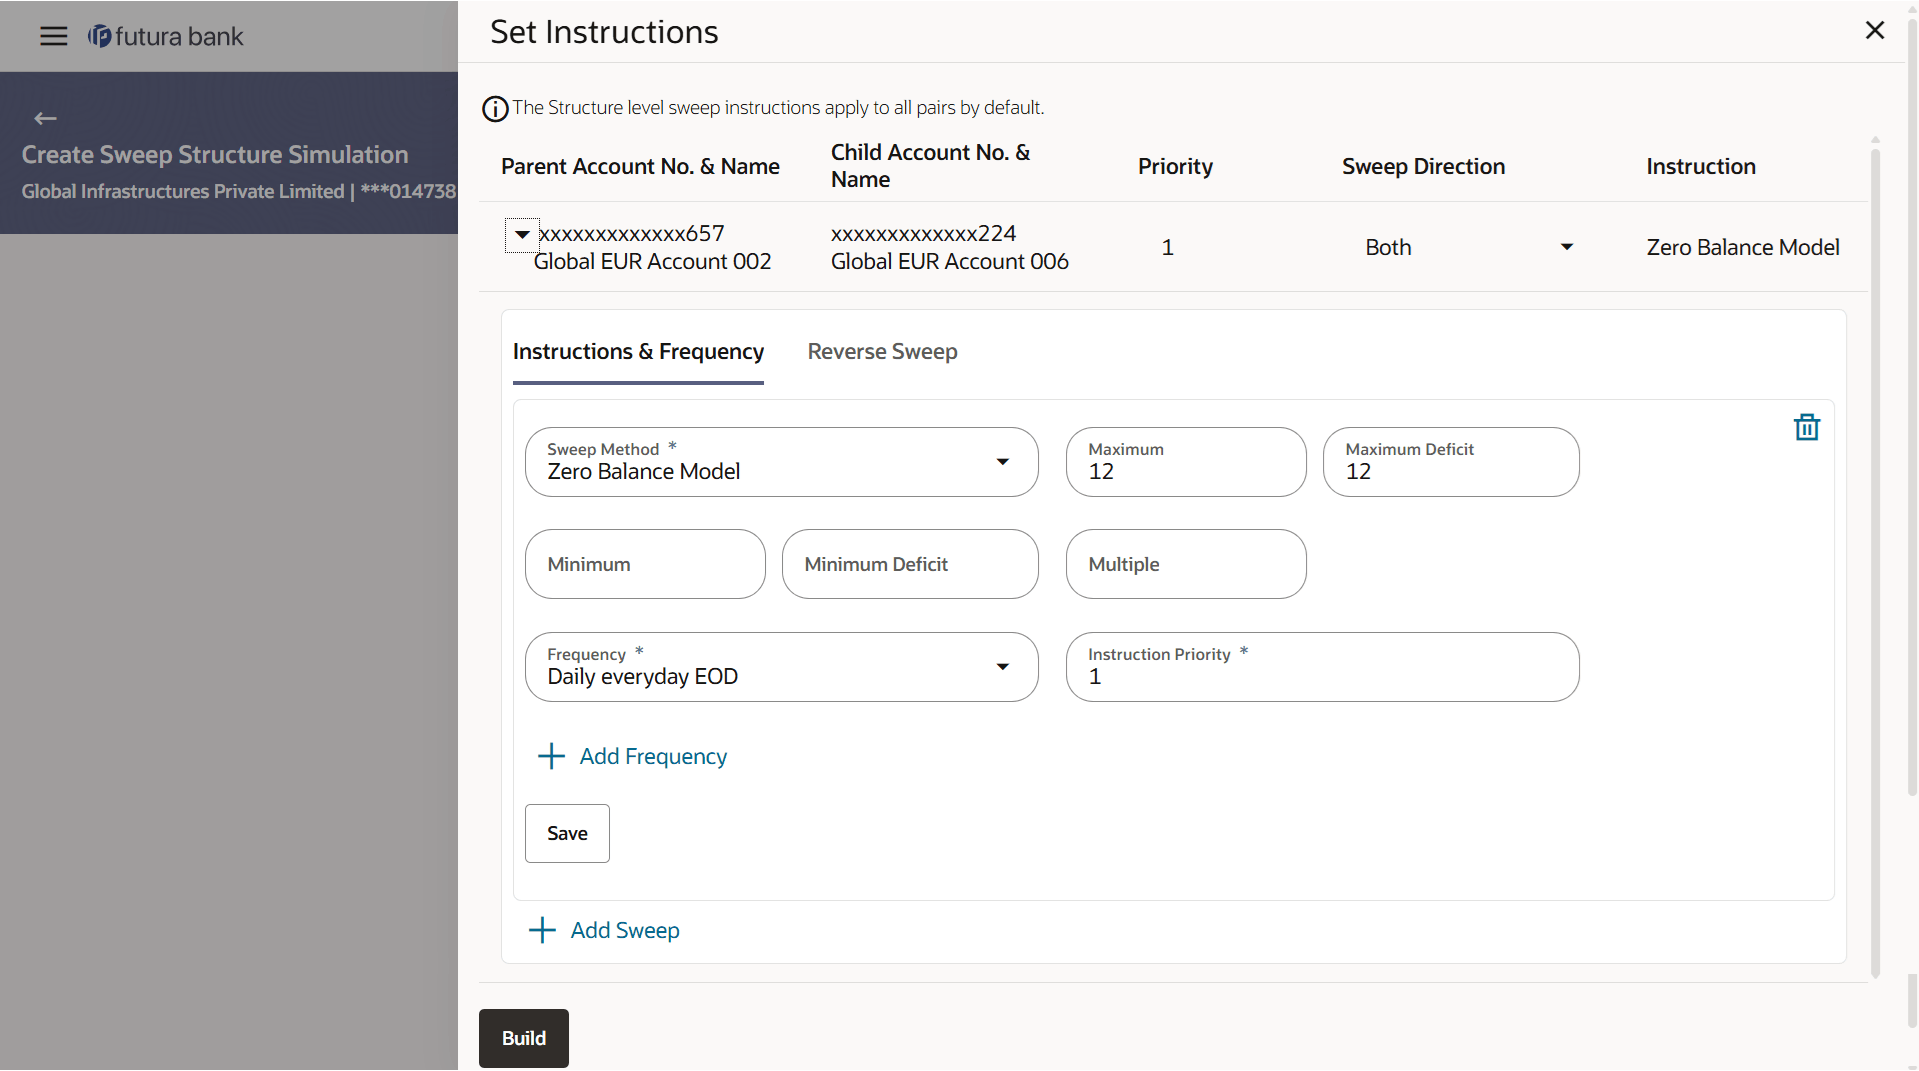
The user can create the instructions and frequency for the account pair.The Create Sweep Structure Simulation - Set Instructions – Instructions & Frequency screen displays.

Figure 4-11 Create Sweep Structure Simulation - Set Instructions – Instructions & Frequency


For more information on fields, refer to the field description table.

Table 4-9 Create Sweep Structure Simulation - Set Instructions – Instructions & Frequency – Field Description

Field Description
Sweep Method Select the sweep method set between the account pair from the drop-down list.
The available options are:
  • Zero Balance Model
  • Fixed Amount Model
  • Collar Model
  • Target Model - Constant
  • Target Model - Fixed
  • Threshold Model
  • Range Based Model
  • Cover Overdraft Model
  • Percentage Model

Value defined as a part of 1st step will be shown in an editable form.

Frequency Select the frequency at which the account structure should be executed.

The list displays all the frequencies maintained in the product processor.

Instruction Priority Specify the instruction priority across multiple instructions within an account pair.
Parameters Applicability of the below fields varies based on the instruction type selected between the accounts.
Collar Amount Specify the collar amount set for executing sweep is displayed.

Value set at the product processor is displayed in an editable form.

Note: This field appears for if the user have selected Collar Model from Instruction Type list.

Maximum Specify the maximum amount for executing sweep.

Value set at the product processor is displayed in an editable form.

Maximum Deficit Specify the maximum deficit amount for executing sweep.

Value set at the product processor is displayed in an editable form.

Minimum Specify the minimum amount for executing sweep.

Value set at the product processor is displayed in an editable form.

Minimum Deficit Specify the minimum deficit amount for executing sweep.

Value set at the product processor is displayed in an editable form.

Threshold Amount Specify the threshold amount for which the sweep is to be executed.

Value set at the product processor is displayed in an editable form.

Multiple Specify the amount in multiples of which the sweep is to be executed.

Value set at the product processor is displayed in an editable form.

Percentage Specify the percentage for which the sweep is to be executed.

Value set at the product processor is displayed in an editable form.

Fixed Amount Specify the fixed amount for which the sweep is to be executed.

Value set at the product processor is displayed in an editable form.

  1. In the Instruction & Frequency tab, do the following:
    1. From the Sweep Method list, select the appropriate option.
    2. From the Frequency list, select the appropriate frequency.
    3. In the Instructions Priority field, the instruction priority.
    4. On Selection of Sweep Method, the related parameters is displayed with defined values in the editable form.
    5. Click Add Frequency and select the frequency to add multiple frequency.
    6. Click Deleteto delete the frequency.
    7. Click Save to save the sweep method.
    8. Click Editto edit the saved sweep method.
    9. Click Delete to delete the saved sweep method.
    10. Click Add Sweep to add multiple sweep method for the account pair.

    Note:

    • In a structure, swapping the priority set in two instructions within an account pair is not allowed.
    • To do so, the user will have to delete one of the instructions and then re-add it with the desired priority.
  2. Perform any one of the following actions:
    • Click Reverse Sweep to set the reverse sweep instruction for the account pair.
    • Click Closeto close the overlay screen.
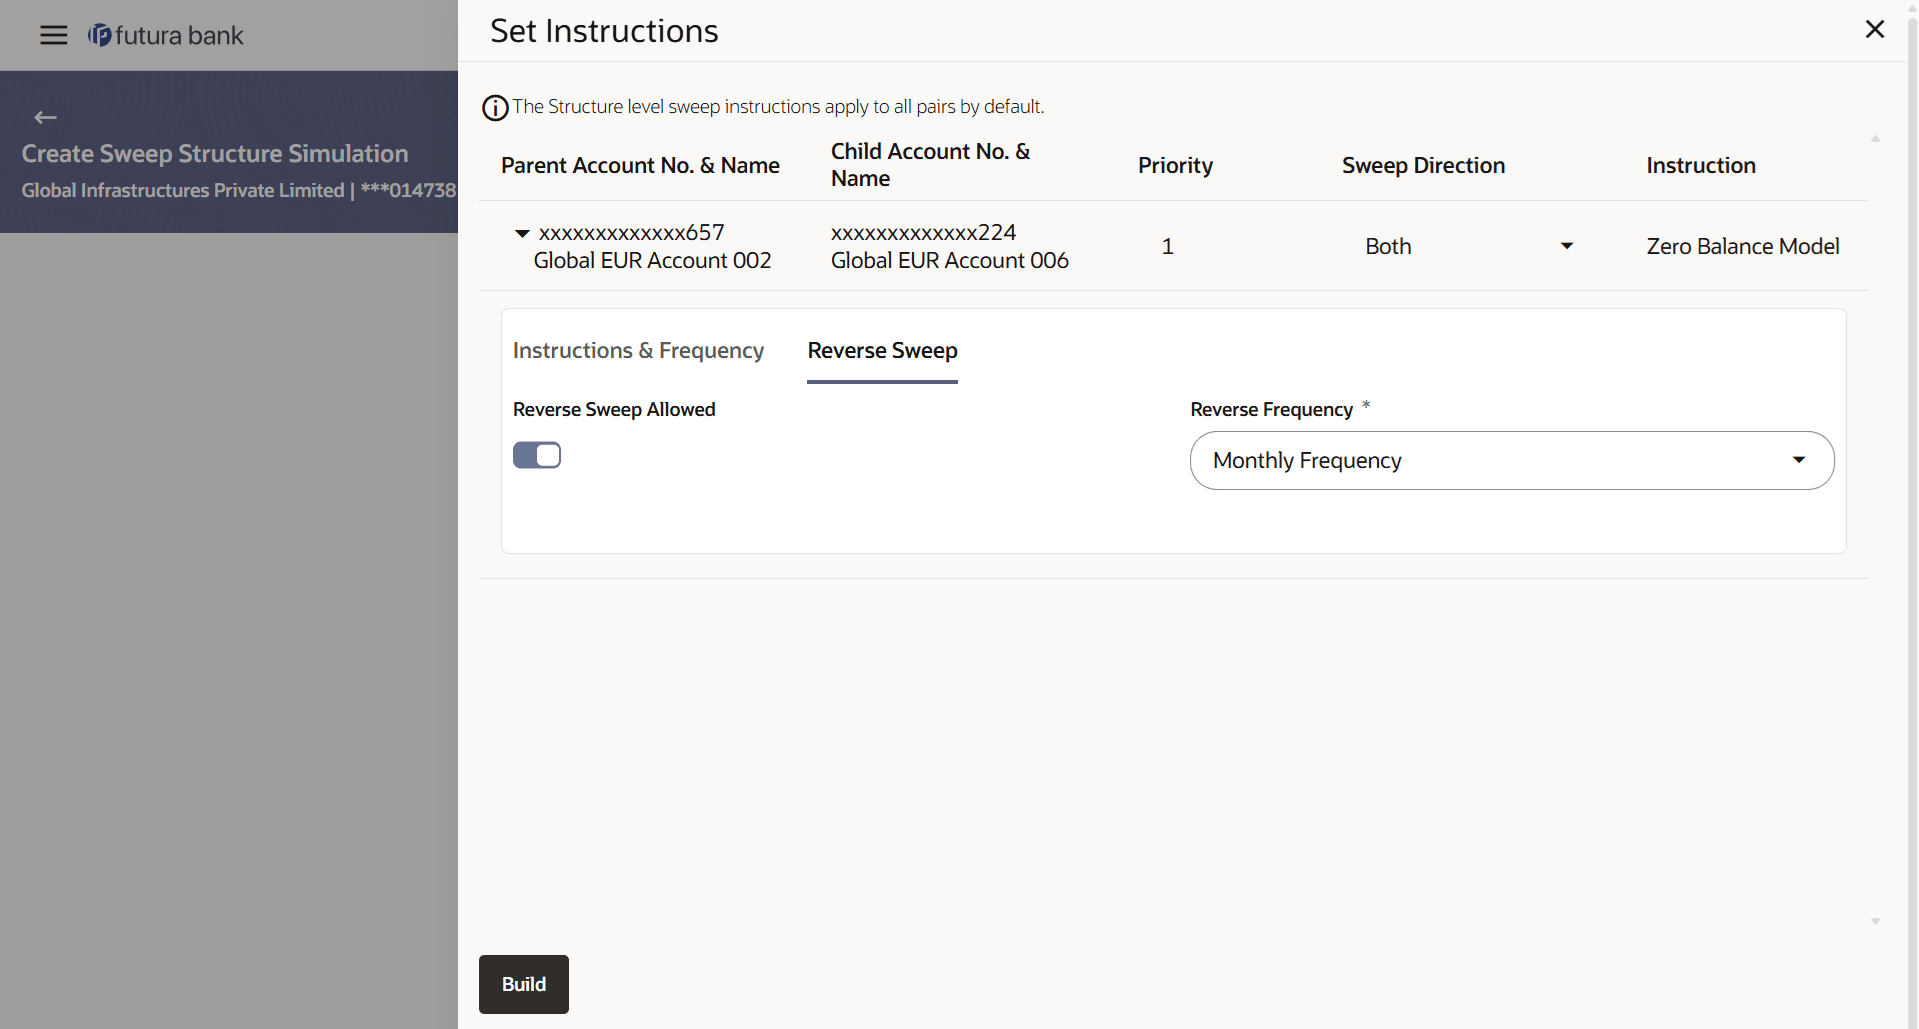
  3. In the Reverse Sweep tab, do the following:
    1. Select the Reverse Sweep Allowed toggle to enable the reverse sweep for the account pair.
    2. From the Reverse Frequency list, select the appropriate option if the Reverse Sweep Allowed toggle is enabled.

The user can create the reverse frequency for the account pair.The Create Sweep Structure Simulation - Set Instructions – Reverse Sweep screen displays.

Figure 4-12 Create Sweep Structure Simulation - Set Instructions – Reverse Sweep


For more information on fields, refer to the field description table.

Table 4-10 Create Sweep Structure Simulation - Set Instructions – Reverse Sweep – Field Description

Field Description
Reverse Sweep Allowed Select the toggle to enable the reverse sweep for the account pair.
Reverse Frequency Select the frequency at which the reverse sweep for the account structure should be executed.

The list displays the frequencies for which the BOD is enabled.

Note: This field appears only if the Reverse Sweep Allowed toggle is enabled.

  1. Perform any one of the following actions:
    • Click Build. The Create Sweep Structure Simulation – Submit screen displays in tree view .
    • Click Close to close the overlay screen.

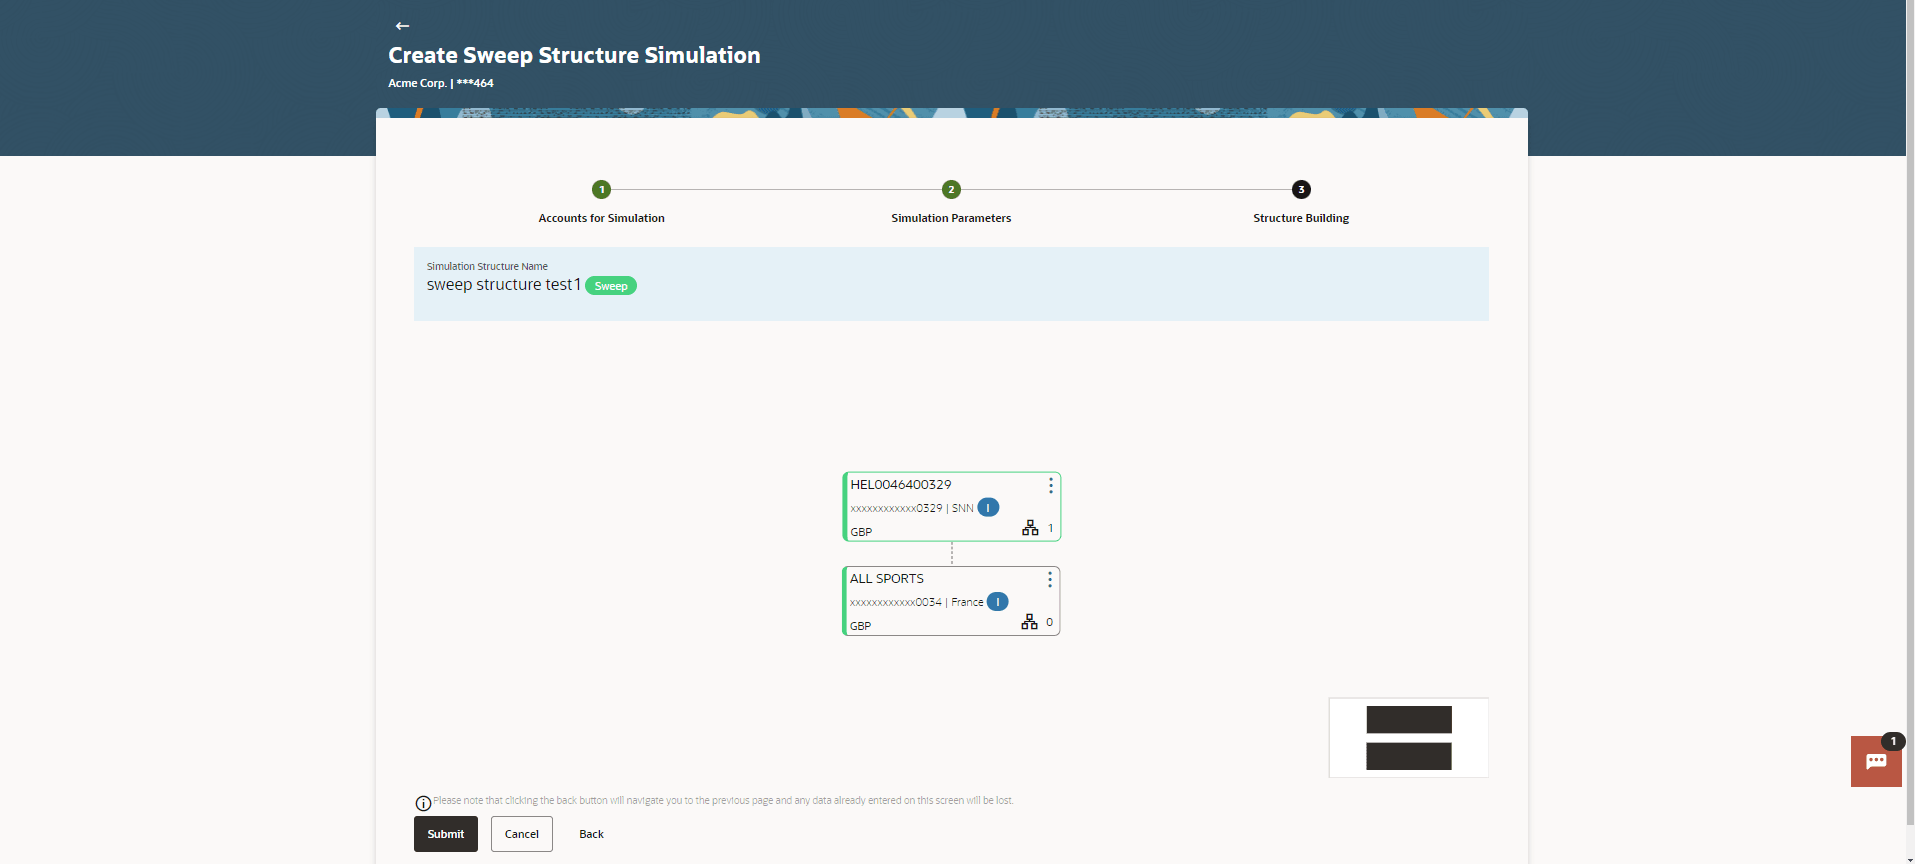
This screen enables the user to view the added parent and child accounts in the tree view.The Create Sweep Structure Simulation – Submit - Tree View screen displays

Figure 4-13 Create Sweep Structure Simulation – Submit - Tree View


For more information on fields, refer to the field description table.

Table 4-11 Create Sweep Structure Simulation – Submit – Field Description

Field Description
Simulation Structure Name Displays the name of the simulation structure.
Structure Simulation Type Displays the type of the simulation structure.
Parent/child Account Information displayed on parent/child account card in tree view.
Account Name Displays the name of the account.
Account Number Displays the account number of the user in masked format.
Location Displays the location of the account.
Account Type Displays the type of account.
The available options are:
  • I: An account which is internal to the bank.
  • E: An account which is external to the bank and linked for liquidity management.
Account Currency Displays the currency of the account.
Link Displays the number of the child account(s) linked to the parent account.

  1. Click Expand to expand/collapse the child accounts.
  2. Click Kebab and then click Link to add the additional child accounts for the selected parent account.
    • The Create Sweep Structure Simulation - Link Accounts pop-up screen displays.
    • Click Child Instructions to set the instructions for the account pairs. This option will appear only for the parent accounts with child accounts.
    • The Create Sweep Structure Simulation – Set Instructions screen displays.
    • Click Account Details to view the account details.
    • The Create Sweep Structure Simulation– Account Details overlay screen displays.
    • Click Delink. A delink account pop-up appears confirming the removal of accounts.
      • Click OK. if the user wants to remove the added header account.
      • Click Cancel to cancel the removing process.
  3. Perform any one of the following actions:
    • Click Submit to submit the sweep structures.
    • Click Cancel to cancel the operation and navigate back to Dashboard.
    • Click Back to navigate back to the previous screen.

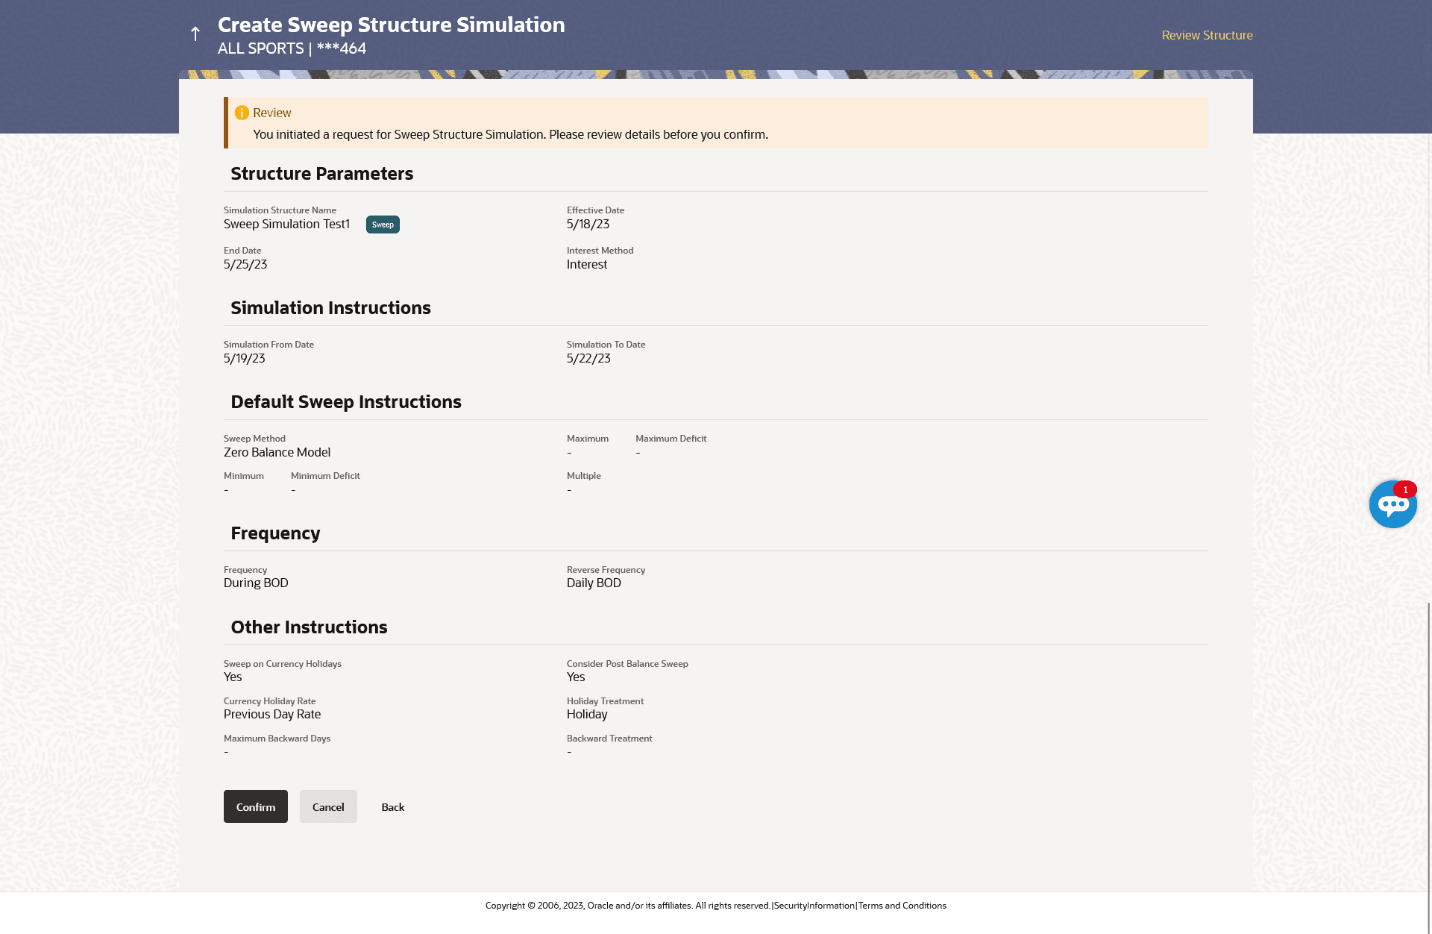
This screen enables the user to review the updated structure details in the new structure.

Figure 4-14 Create Sweep Structure Simulation – Review


  1. Perform any one of the following actions:
    • Click Review Structure to review the structure.
    • Click Confirm to create the sweep structure.
    • Click Cancel to cancel the operation and navigate back to Dashboard.
    • Click Back to navigate back to the previous screen.
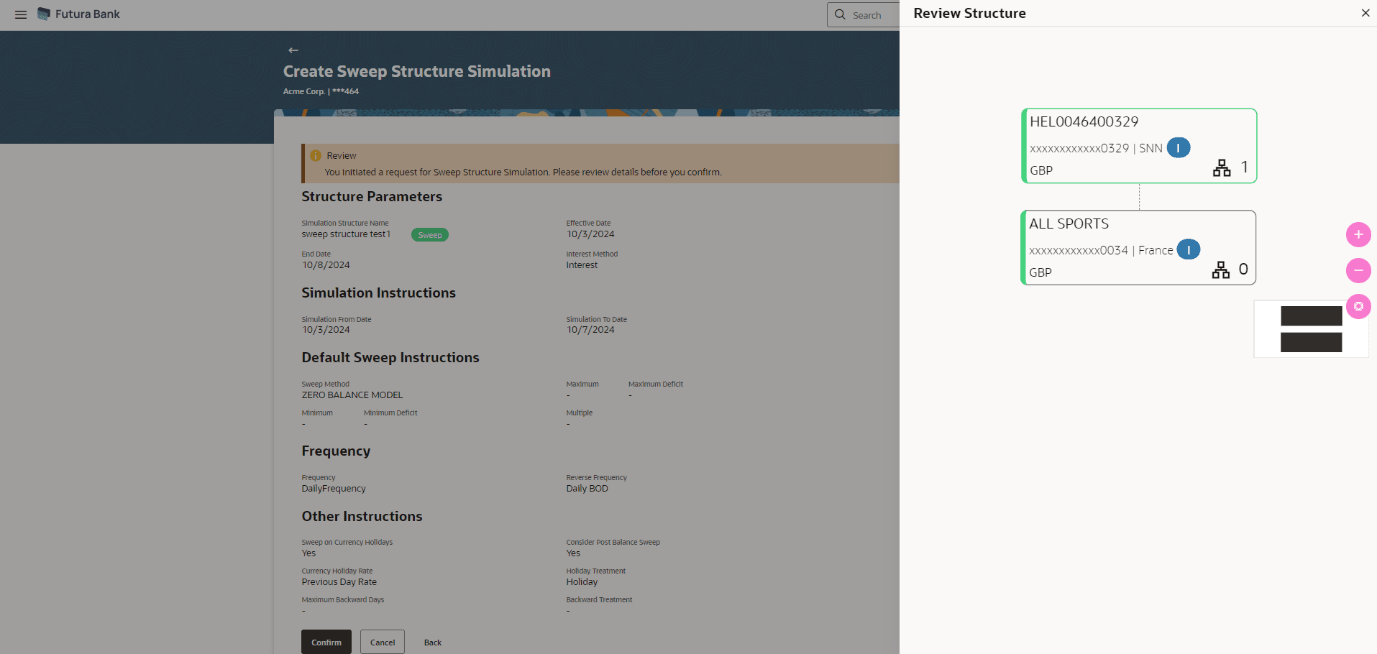
    The Create Sweep Structure Simulation – Review Structure overlay screen displays.

    Figure 4-15 Create Sweep Structure Simulation – Review Structure


    1. Click + to zoom in the structure.
    2. Click to zoom out the structure.
    3. Click Fit to fit the structure to screen.
    4. Click Close to close the review structure overlay screen.
  2. Perform any one of the following actions:
    The success message appears along with the status and simulation structure details.
    • Click Home to go to dashboard screen.
    • Click Go To Overview to go to the liquidity management Dashboard.
    • Click Create Simulation to create the simulation structures.